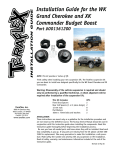
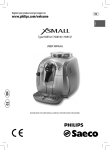
1
Autofill wall
mounted water
boiler
Please read and keep
these instructions
For Burco wall mounted boilers 76700 (SKU 444448534),
76702 (SKU 444448546), & 76704 (SKU444448548)
Getting the best from your water
boiler
• Remove any plastic film from the water boiler before use
• Any water in the water boiler is due to testing and is normal
• The water boiler must be used on a flat level surface
• Boil and discard the water twice before general use
Burco Commercial Catering Equipment
Glen Dimplex Professional Appliances
Stoney Lane, Prescot, Merseyside, L35 2XW
Tel 0844 815 3755 Fax 0844 815 3748
Email [email protected]
www.burco.co.uk
Important safety instructions
Safety considerations
The use of any electrical appliance requires following common sense safety rules.
Primarily there is danger of personal injury and secondly danger of damage to the
appliance and property. These are indicated in the instructions text by the following
two conventions:
Important: do not use a water jet to clean this appliance.
Important: do not use this appliance in an area a water jet can be used.
Important: this applaince is not intended for use by persons (including children)
with reduced physical, sensory or mental capabilities, or lack of experience and
knowledge, unless they have been given supervision or instruction concerning use of
the appliance by a person responsible for their safety. Children should be supervised
to ensure that they do not play witht the appliance.
Important: This appliance is only to be installed in locations where its use and
maintenance is restricted to trained personnel.
WARNING: Danger of personal injury.
IMPORTANT: Damage to the appliance.
In addition we offer the following essential safety advice.
General information
Scale build up can damage any appliance which boiling water passes through.
Failure to descale your Burco autofill water boiler will invalidate your guarantee.
Before general use it is recommended that the unit is boiled and emptied through
the tap twice discarding the water each time. For best taste and to protect your water
boiler from limescale Burco suggest you filter the water supply.
•
•
•
•
•
•
Location
•
•
•
IMPORTANT: This appliance must only be used for heating water.
Do not use your autofill water boiler outside.
All sides must be at least 100mm from any walls.
On a flat level surface.
Ambient Temperature
This appliance is designed to operate in an ambient temperature between 10ºC
and 40ºC.
•
•
•
The mains lead should reach from the wall socket the autofill water boiler without
straining the connections.
Do not let the cord hang over the edge of the table or the counter and keep it
away from any hot surfaces.
Do not let the lead run across an open space e.g. between a low socket and table.
Do not place the autofill water boiler where the mains lead could fall into a sink.
Your safety
•
•
•
•
Check that the voltage on the rating plate of your appliance corresponds with
your electricity supply which must be A.C. (Alternating Current).
For appliances fitted with a plug
WARNING: The plug removed from the mains lead, if severed, must be
destroyed as a plug with bared flexible cord is hazardous if engaged into a
live socket outlet.
WARNING: This appliance must be earthed.
Should the fuse in the 13A plug require changing, a 13A BS 1362 fuse
must be fitted.
IMPORTANT: Installation must be carried out by an appropriately qualified
service engineer. Any damage caused by installation by an un-qualified individual will
invalidate your warranty.
Fitting a plug
WARNING: Extreme caution must be used when moving the autofill
water boiler as it is very heavy.
•
Electrical requirements
If the socket outlets are not suitable for the plug supplied with this appliance, the
plug should be removed and the appropriate one fitted.
Mains lead
•
To protect against fire, electric shock and personal injury do not immerse cord,
plug or water boiler in water or any other liquid.
Do not tamper with the connector in any way.
If the mains lead is damaged, it should be discarded and replaced.
Turn off and unplug when not in use.
Maintenance other than cleaning and descaling should be carried out by the
manufacturer while this product is within guarantee. (Contact our service helpline
on 0871 222 2620).
Warranty is only valid in the UK.
Do not continue to use the water boiler if the warning lights are flashing, consult
advance diagnostics service light warning codes.
Do not use boiler if it has been damaged in any way.
Do not place the appliance on or near hot surfaces.
Do not use accessories or attachments which Burco have not recommended as
they can cause hazards.
Always switch off, empty and disconnect the autofill water boiler before moving
the unit.
WARNING: The only parts you should touch behind the front panel
are the two red isolation valves and the reset button.
WARNING: To avoid being scalded when the water boiler is in
operation or has just been switched off keep hands away from any steam.
Be particularly careful not to touch any hot surfaces especially when
running the descale programme or when the front/ top panel is removed.
2
The mains lead of this urn will already be fitted with a BS1363 13A plug. In the
event of replacing a fuse, a 13 amp fuse approved by ASTA or BSI must be used. If
the plug is not suitable for your socket then the plug must be cut off and disposed of
safely. An appropriate plug should be fitted as follows:
IMPORTANT: The wires in the mains lead are coloured in accordance with the
following code:
Green-and-Yellow - Earth
Blue - Neutral
Brown - Live
The wire, which is coloured green and yellow, must be connected to the terminal
in the plug which is marked with the letter E or the earth symbol or coloured green or
green and yellow. The wire, which is coloured blue, must be connected to the terminal
which is marked with the letter N or coloured black or blue. The wire, which is coloured
brown, must be connected to the terminal which is marked with the letter L or
coloured red or brown. Make sure that the connections are tight and that there are no
loose strands of wire and no insulation trapped under the terminals. Tighten the
3
clamp in the plug making sure that it grips the outer covering of the cord. In a 13A
(BS 1363) fused plug, fit a 13A fuse. Tighten the plug cover securely.
If you are in any doubt, consult a qualified electrician.
IMPORTANT: The supply cord on this appliance is of a special type. If replaced,
only a Burco supply cord must be used. The supply cord may become warm when the
appliance is in use.
Connecting to a water supply
Your water boiler has been supplied with a suitable hose 5 for connection to a
drinking water supply. The water supply must have a pressure not exceeding 1000
kilopascals (10 bar) and no lower than 25 kilopascals (0.25 bar). If your water pressure
exceeds this, a suitable pressure reduction value will need to be fitted.
Please ensure that you follow the bye-laws of the water council when installing
this product.
Burco cannot be held responsible for water boiler malfunction if the water supply
pressure does not confirm as above. If in any doubt consult your water supply
company.
The hose supplied with the water boiler is manufactured from materials which
have been approved for drinking water and is rated at 10 bar at ambient temperature.
It is therefore recommended that the water boiler is only connected to a cold water
supply. Your guarantee could be invalidated and water contamination may occur if a
hose not supplied by Burco is used. Please note that washing machine hoses are not
suitable for use on this water boiler.
Connection to mains water supply
Your autofill water boiler can be set up so that the mains water connection can
either enter your water boiler at the back or the bottom of the unit.
To set up connection from back of unit:
•
•
•
•
•
Features
1
2
3
4
5
To set up connection from bottom of unit:
Removable lid (Easy access for descaling)
Removable front cover
On/Off switch
Safety locking tap
Hose for connection to drinking water
Preparation
1
2
3
•
•
•
•
Using a screw driver remove blanking plate from back of unit A.
Attach supplied water connection hose to water inlet with the elbow joint
connection on the hose (screw fitting) C.
Tightly attach other end of water connection hose to mains water supply.
Replace blanking plate.
Overflow
Remove any plastic film from the water boiler and wipe over all surfaces with a
clean cloth.
Check that the voltage on the rating plate of your appliance corresponds with
your electricity supply which must be A.C. (Alternating Current).
Before using it is recommended that the water boiler is boiled twice, discarding
the water each time.
Check list
•
•
•
Using a screw driver remove blanking plate from back of unit A.
Attach supplied water connection fitting to water inlet (screw fitting) and when
secure attach the pipe B.
Tightly attach other end of water connection hose to mains water supply.
Ensure all pipes are suitably insulated to prevent water supply from freezing.
If rear overflow is required see instructions below on how to set this up at this
point.
Before starting installation check that you have the following parts:
Autofill water boiler
Drip tray
Food safe hose
4
Connecting rear overflow
An air gap of 200mm from the connection point must be provided. Failure to
provide this air gap will cause an air lock and stop the water discharging in event of
an overflow.
IMPORTANT: For rear overflow connection a 14mm internal diameter hose or a
15mm internal diameter hose with a pipe clip must be used. While every reasonable
precaution is taken to prevent an overflow, Burco cannot be held responsible for any
damage caused as a result of incorrect installation or blockage of the overflow.
• Attach a suitable 14mm internal diameter or 15mm internal diameter hose with
a pipe clip, to outlet connection. (Hose not supplied)
• Attach other end of outlet hose to mains drain.
If connection to the bottom of the water boiler is desired now replace the
blanking place at the back of the unit, using screw driver to tighten in place.
5
Wall mounting your autofill water boiler
•
•
Before wall mounting your water boiler ensure that the wall you intend to attach
it to is sturdy and that there are no electrical cables/pipes running behind it.
Drill holes in the wall to the following dimensions shown below.
Operating
Safety tap.
1
The tap is locked or unlocked by twisting it so that the closed or opened padlock
symbol is lined up with the white dot on the tap body.
2
There are two open positions, one self- holding so that the tap remains open, and
the other self-closing so that the tap closes as soon as the lever is released. To
change the tap position, turn the tap lever through 180º.
Open the tap by depressing the tap lever into the horizontal position.
Close the tap by returning the lever to a vertical position.
General operation.
3
4
After use
Switch off and isolate from supply. Water may be left in the water boiler when it
is not in use for short periods, for longer periods it should be emptied and cleaned out.
Protective cut-out
WARNING: The only parts you should touch behind the front pane are
the two red isolation valves. Touching any other part will put you in
danger of receiving an electric shock.
WARNING: The protective cutout is only to be reset by a qualified
service engineer.
The heating element is fitted with a manual resettable thermal cutout which
protects the water boiler from damage if it were to overheat D. If your appliance fails
to heat up and/or appears “dead” when switched on, try the following:
Check the water boiler is plugged in to the mains and switched on both at the
plug/spur and the front of the unit. If this does not resolve the problem switch off and
disconnect the appliance. Remove the front panel (see instructions below) and remove
internal cover below the water tank. Reach in carefully and on the underside of the
element, between the two terminals you will see a reset button.
Press this upwards and the thermostat will reset (click). We would always
recommend descling the water boiler after resetting the thermostat as scale build up
is the most common reason for the safetey thermostat operating.
If the safety thermostat activates repeatedly, even after descaling please contact
the customer helpline.
After resetting the cut-out replace the front panel and top plastic lid. Reconnect
to the mains and switch on at plug/spur and on the front of the unit. If the problem
pursists please contact Burco customer helpline.
Cleaning
WARNING: Disconnect from the electrical supply before cleaning and
allow the water boiler to cool.
IMPORTANT Do not immerse the water boiler in water or any other liquids and
take care to keep water away from the mains lead and connections. There are two
ways in which you will need to clean your autofill water boiler:
Externally; to do this follow the external cleaning guidelines (on page 8).
Internally; to do this follow the Easy Descale Procedure (on page 8).
IMPORTANT Do not use any abrasive cleaning fluids or materials.
Using
IMPORTANT: Always ensure unit is connected correctly to a water supply and the
supply is on before switching the appliance on.
6
7
External cleaning guidelines
In hard water areas where a large build up of scale has formed, you may need to
remove the tank lid and physically scrape the scale from the tank and level sensing
probes. If this is required, ensure care is taken not to damage the level sensing probes.
WARNING: Always disconnect the plug from the mains and allow to
cool before cleaning.
To clean, wipe the outside of your autofill water boiler with a damp cloth. It is
recommended that this is done daily. Stubborn stains may be removed using a
good stainless steel cleaner or non-abrasive cleaner.
Hard to reach areas should be cleaned using a small bristle brush and mild
cleaner.
IMPORTANT: Do not use abrasive cleaners on your water boiler as this could
scratch the finish of your water boiler.
To remove front panel of unit
•
•
•
•
•
Remove black plastic lid 1.
Using screw driver remove two retaining screws
Lift front panel slightly to disconnect front panel at top of the curved front panel
so that hole for the tap goes over the lower part of the top and lift vertically over
the rest of the tap F.
Pull front panel forward while lifting hole for tap over base tap fitting.
Lift front panel over top of tap fitting.
WARNING: When replacing the front of panel, ensure that wires do
not get trapped between tap and front panel.
Easy descale procedure
When to descale
Burco recommend that its appliances are descaled as part of the regular planned
preventative maintenance schedule at least every 3 months. This may be required
more periodically if the appliance is being operated in a hard water area. Failure to
descale the appliance periodically could cause the appliance to cut out to protect the
element in the event of excessive scale build up. If the appliance stops heating and all
lights on the front of the appliance go out, the first thing you should do is to complete
the following descale procedure.
Tap failure
•
•
Scale build up can cause your tap to drip when it is in a closed position. If your
tap should fail to operate follow the procedures below:
Remove front panel of unit. (See procedure on page 8).
WARNING: The only parts you should touch behind the front panel
are the two red isolation valves. Touching any other part will put you in
danger of receiving an electric shock.
•
•
•
•
Isolate tap by turning tap isolation valve clockwise
Unscrew the top of the tap from the body of the tap.
If scale is present (white/yellow chalky substance), wipe, scrape and break the
scale away from the rubber flexible seal and also from the sealing surface inside
the body of the tap.
Replace top of tap, screwing it firmly back into the base. Open the isolation valve
behind tap. If dripping has stopped replace front panel and follow descale
process (see page 8). If tap continues to drip call the Burco customer helpline.
IMPORTANT Failure to de-scale will invalidate your guarantee.
Trouble shooting
Indicator light warning codes
INDICATOR LIGHT
CAUSE/PROBLEM
Green indicator light.
Power on.
Amber ready light.
Flashes when heating up
On constantly when up to
temperature.
All lights out.
Unit may need de-scaling, be over
boiling or boiled dry
ACTION
Contact Helpline.
Descaling
1
2
Switch off the appliance on the front panel.
Remove lid and prepare for descale.
• Remove the black plastic lid by lifting up. You may need a screwdriver to lever the
lid off the stainless casing.
• Unscrew the large, square, black cap (twist anticlockwise).
3 Drain down tank.
• Take front panel off (see instructions above (page 7)
• Drain the tank through the normal operating tap, this will ensure there is still a
small volume of water in the tank.
4 Pour the descale liquid or powder into the tank.
5 Switch on the appliance and allow to fill and boil, activating the descle solution.
This process will take approx 40 minutes.
6 Switch off the appliance.
7 Drain down the tank completely using the tank drain down valve. Connect a hose
(supplied) to the drain valve and drain into a vessel or drain to dispense of the
water.
8 CLOSE THE DRAIN VALVE!
9 Fill the tank with fresh water through the plastic cap on top of the unit and drain
the tank again.
10 Reasemble your appliance, refitting the front cover, tank cap and lid. Your
appliance will now operate normally.
8
PROBLEM
Tap is dripping when closed
See ‘tap failure’ guidelines above.
Helpline 0871 222 2620
9
Replacement Parts
IMPORTANT: This product has no ‘user’ serviceable parts.
IMPORTANT: Installation must be carried out by an appropriately qualified
service engineer. Any damage caused by installation by an unqualified individual will
invalidate you warranty.
Genuine replacement Burco parts must only be fitted by a qualified service
engineer. If generic non-Burco parts are fitted you may stop your autofill water boiler
operating safely and in the most efficient manner and may invalidate your warranty.
Notes
_____________________________________________________________________________________________
_____________________________________________________________________________________________
_____________________________________________________________________________________________
Helpline 0871 222 2620
_____________________________________________________________________________________________
If you have any difficulty with your appliance, please check the items on the list
below:
• Does your autofill water boiler have power going into the unit?
• Have you tried descaling your autofill water boiler?
• Have you pressed reset button?
If you are still having trouble with your appliance please don’t hesitate to call us.
Please try to have your product to hand and have the following information ready to
enable us to deal with your query quickly:
• Name of the product.
• Model number as shown on rating plate, located on the side of the unit.
• Serial number as located on the rating plate, located on the side of the unit.
Guarantee
_____________________________________________________________________________________________
_____________________________________________________________________________________________
_____________________________________________________________________________________________
_____________________________________________________________________________________________
_____________________________________________________________________________________________
This water boiler is guaranteed for a period of 12 months from the date of
purchase against defective materials or faulty workmanship. This guarantee is given
subject to the water boiler being used in accordance with the instructions on the
supply voltage marked on it and to the usual fair wear and tear conditions. The
guarantee does not cover consequential damage arising out of any failure acceptable
under guarantee, nor does it cover damage resulting from misuse, accident or
unauthorised alterations to the water boiler.
This guarantee, in no way diminishes the buyer’s statutory rights.
_____________________________________________________________________________________________
_____________________________________________________________________________________________
_____________________________________________________________________________________________
_____________________________________________________________________________________________
_____________________________________________________________________________________________
_____________________________________________________________________________________________
_____________________________________________________________________________________________
_____________________________________________________________________________________________
_____________________________________________________________________________________________
_____________________________________________________________________________________________
_____________________________________________________________________________________________
_____________________________________________________________________________________________
_____________________________________________________________________________________________
10
11
Burco products are intended for commercial use as detailed in these instructions.
Burco has a policy of continuous improvement in product quality and design.
The Company, therefore, reserves the right to change the specification of its
models at any time.
For electrical products sold within
the European Community. At the
end of the electrical products useful
life it should not be disposed of with
household waste.
Please recycle where facilities exist.
Check with your Local Authority or
retailer for recycling advice in your
country.
CP76700 rev 2 08/08