1
Loomer Resound User Manual
End User Licence Agreement
Software Licence Agreement for Resound
4
4
Credits
Development Credits
6
6
Requirements
Mac OS X requirements
Windows requirements
Linux requirements
7
7
7
7
Resound Overview
What is Resound?
Plug-in vs Standalone
Resound formats
Supported channel configurations
8
8
8
9
9
Installation and Registration
Mac OS X installation
Windows installation
Linux installation
Product registration
10
10
10
10
11
Audio and MIDI Configuration
Setup Audio and MIDI
13
13
Preset Management
Parameters and Presets
Navigation Controls
Opening Presets
Preset Hot-Swap
Preset Meta Data
Searching for Presets
Categories
Saving Presets
XML / FXP / FXB support
Copying & Moving Presets
MIDI Program Change Lists
Create a new Preset
Compare a changed Preset to the original Preset
Restoring Deleted Factory Presets
User folder management
Undo / Redo
15
15
15
15
16
16
16
17
17
17
17
17
18
18
18
18
18
MIDI Controller Mapping
19
2
MIDI controllers
Display current MIDI controller mappings
Assign MIDI controllers to controls
Remove MIDI controller mappings from controls
19
19
19
20
Using Resound
Parameters
Control types
21
21
22
Status Display
CPU Usage monitor
MIDI input monitor
Tempo control
23
23
23
23
Contact Details
Loomer Online
Email
24
24
24
3
End User Licence Agreement
Software Licence Agreement for Resound
1. GRANT OF LICENCE: Subject to the terms below, Loomer hereby grants you a nonexclusive, non-transferable licence to install and to use Resound ('Software'). Under this
licence, you may: (i) install and use the Software for your personal, internal use (ii) copy
the Software for back-up or archival purposes; (iii) use an unregistered or evaluation
version of the Software for evaluation purposes only. (iv) You may not distribute the
software to others without first obtaining the required licences, where applicable. Whether
you are licensing the Software as an individual or on behalf of an entity, you may not: (i)
reverse engineer, decompile, or disassemble the Software or attempt to discover the
source code; (ii) modify, or create derivative works based upon, the Software in whole or in
part without the express written consent of Loomer; (iii) distribute copies of the Software;
(iv) remove any proprietary notices or labels on the Software; (v) resell, lease, rent,
transfer, sublicense, or otherwise transfer rights to the Software; By installing, copying, or
using the Software, you (either on behalf of yourself as an individual or on behalf of an
entity as its authorized representative) agree to all the terms of this End User Licence
Agreement ('Agreement') regarding your use of the software. If you do not agree with all
the terms of this Agreement, you may not use the Software.
2. RESOUND: You acknowledge that no title to the intellectual property in the Software is
transferred to you. Title, ownership, rights, and intellectual property rights in and to the
Software shall remain that of Loomer . The Software is protected by copyright laws and
international treaty provisions.
3. DISCLAIMER OF WARRANTY: You agree that Loomer has made no express
warranties, oral or written, to you regarding the product and that the products are being
provided to you 'as is' without warranty of any kind. Loomer disclaims any and all other
warranties, whether expressed, implied, or statutory. Loomer shall not be liable for indirect,
incident, special, cover, reliance, or consequential damages resulting from the user of this
product.
4. LIMITATION OF LIABILITY: You use this program solely at your own risk. In no event
shall Loomer be liable to you for any damage, including but not limited to any loss, or other
incidental, indirect or consequential damages of any kind arising out of the use of the
software, even if Loomer has been advised of the possibility of such damages. In no event
will Loomer be liable for any claim, whether in contract, tort, or any other theory of liability,
exceed the cost of the software. This limitation shall apply to claims of personal injury to
the extent permitted by law.
5. TERMINATION: This Agreement shall terminate automatically if you fail to comply with
the limitations described in this Agreement. No notice shall be required to effectuate such
termination. Upon termination, you must remove and destroy all copies of the Software.
4
6. MISCELLANEOUS: In the event of invalidity of any provision of this Agreement, the
parties agree that such invalidity shall not affect the validity of the remaining portions of
this Agreement. You agree that this is the entire agreement between you and Loomer,
which supersedes any prior agreement, whether written or oral, and all other
communications between Loomer and you relating to the subject matter of this Agreement.
Reservation of rights.
'VST' is a trademark of Steinberg Soft - und Hardware GmbH. All other trademarks are the
property of their respective owners.
All rights not expressly granted in this Agreement are reserved by Loomer.
5
Credits
Development Credits
Resound © 2009 - 2011 Loomer
Developed by
Interface by
Loomer
Kevin Barry - http://www.inquer.co.uk
Tested by
Clifton Cameron
kuniklo
Scott Simons (rexlapin)
taoyoyo
VST PlugIn Technology by Steinberg Media Technologies GmbH. This software is based in
part on libpng, zlib, and JUCE.
6
Requirements
Mac OS X requirements
• Requires Mac OS X v. 10.4 or later. 64-bit Audio Unit plug-ins require Mac OS X v. 10.5
or later. 64-bit VST plug-ins require Mac OS X v. 10.6 or later.
• x86 based processor 1.0Ghz, or above, with SSE
or
• PPC based processor 1.0Ghz, or above
• 512 MB RAM
Windows requirements
• Windows XP or above
• x86 based processor 1.0Ghz, or above, with SSE
• 512 MB RAM
Linux requirements
• x86 32-bit or or 64-bit based processor 1.0Ghz, or above, with SSE
• 512 MB RAM
The following shared object libraries are required:
• libfreetype
• libasound
• libXinerama
7
Resound Overview
What is Resound?
Resound is a software audio delay effect processor that emulates the sound and operation
of vintage magnetic-tape echo units. Whilst not a direct copy of any one particular model, it
takes features from several of the classic delay devices, and unites them into a convincing
and pleasingly retro sounding effect.
Resound not only subtly models the characteristic mechanical noise present in hardware
magnetic-tape units, but also allows the noise to be controlled; from gentle warmth and
distortion, to noisy, gritty, and unstable. The sound can be shaped further using the
moveable highpass filter. And with feedback set beyond a certain intensity, Resound is
even capable of self-oscillation.
Resound's echoes can either be synced to the host tempo (expressing delay times as
musical subdivisions of a beat, each echo will be exactly in time with the host) or in freetime mode (allowing any delay time, up to 2 seconds.) The reverse mode adds further
flexibility: by playing each delay backwards, Resound can produce unique effects beyond
what hardware magnetic-tape units are capable of.
True independent stereo processing means that left and right channel separation is
preserved. Resound is also capable or running in mono, or even mono to stereo.
With optimized audio algorithms that won't overload your processor, rock-solid stability,
and easy integration with any MIDI hardware controller, Resound is ideal for live work.
With a simple and intuitive interface, flexible Bank and Program management, and total
parameter automation, Resound fits right into your studio environment.
Plug-in vs Standalone
Depending upon your individual studio setup, Resound can either be used as a plug-in
component of a host application, or as a standalone application requiring no other
dependencies. Generally, by using the host application's routing flexibility, running as a
plug-in allows easier integration with existing plug-in effects and instruments. If this
integration is not required, the standalone version, without the extra layer of complexity
added by the host consuming resources, performs slightly better.
Presets and MIDI Mapping assignments are identical in both standalone and plug-in
versions. This means any sounds created in one format can be opened in the other.
8
Resound formats
For the Mac, the following formats are provided:
•
•
•
•
Standalone Application
Audio Unit (AU) Plug-In (32-bit and 64-bit)
VST Plug-in (32-bit and 64-bit)
RTAS Plug-In
These formats are available for Windows PC:
• Standalone Application
• VST Plug-in (32-bit and 64-bit)
• RTAS Plug-in
These formats are available natively for Linux:
• Standalone Application (32-bit and 64-bit)
• VST Plug-in (32-bit and 64-bit)
Supported channel configurations
For maximum flexibility, Resound can be used in several possible input and output channel
configurations. Resound is a true stereo effect: left and right channel separation is
preserved. The following configurations are possible:
• mono to mono (1 input, 1 output)
• mono to stereo (1 input, 2 outputs)
• stereo to stereo (2 inputs, 2 outputs)
Note that some host applications may not support one or more of these configurations;
consult your host's documentation for further details.
9
Installation and Registration
Mac OS X installation
1. Start the installation process by double-clicking the Resound installer application.
2. Read the introduction screen dialog text. Press Continue when you are ready to
proceed.
3. Read the Licence Agreement. Click Continue, then Agree to confirm you have read
and agree to the licence terms.
4. Select a destination volume into which to install Resound, and then click Continue.
5. From the list of installable components, uncheck any formats that you do not wish to
install. Click Continue to proceed.
6. To complete the installation, press Install.
The components are, by default, installed into the following directories:
•
•
•
•
•
VST plug-in into /Library/Audio/Plug-Ins/VST
Audio Unit plug-in into /Library/Audio/Plug-Ins/Components
RTAS plug-in into /Library/Application Support/Digidesign/Plug-Ins
Standalone application into /Applications
Documentation into /Library/Documentation/Loomer
Windows installation
1. Start the installation process by double-clicking the Resound installer application,
Setup.exe.
2. Read the welcome screen dialog text. Press Next when you are ready to continue.
3. Read the Licence Agreement. Click I Agree to confirm that you have read and agree to
it.
4. From the list of installable components, uncheck any formats that you do not wish to
install. Click Next to continue.
5. If you have chosen to include the VST plug-in format, select the directory into which it
will install. Click Next to continue.
6. Select a directory into which the common files will install. The user documentation and
the Standalone application (if selected in the the list of components), will be placed in
this location. To complete the installation, press Install.
Unless any other directories are selected during the installation, the components are
installed into the following directories:
• VST plug-in into the VST plug-ins folder, which is, unless configured otherwise,
C:\Program Files\Steinberg\VSTPlugins\
• RTAS plug-in into C:\Program Files\Common Files\Digidesign\DAE\Plug-Ins\
• Standalone application, documentation and default Bank into C:\Program Files\Loomer
\Resound. On a 64-bit Windows platform, the Standalone application will install into the
Program Files (x86) folder.
Linux installation
10
Resound for Linux is distributed as a standard Linux tarball. To install, extract the package
using any unarchiving utility; the following command-line invocation will suffice:
tar xzvf Resound.tar.gz
If you have a Linux VST host and have configured your VST Path, the VST plug-in can be
moved into the required directory with the following commands:
cd Resound
mv ResoundVST.so $VST_PATH
Without the VST Path configured, you will need to ensure that your host uses the Resound
directory when searching for VSTs; consult your host's documentation for information on
how to do this.
Resound requires the following shared object libraries to be installed:
• libfreetype
• libasound
• libXinerama
Without these libraries installed, the application will not launch. Install the libraries using
your distribution's particular package management system, such as apt-get; consult your
Linux distribution documentation for more information.
Product registration
Having installed Resound, it will run in evaluation mode with the following limitations:
• User created Presets can be saved, but not loaded.
• Audio output will stop after 30 minutes of continuous use. The only way to continue
using Resound is to restart the application.
• Output will be periodically interrupted, approximately every 30 seconds, by a short
moment of silence.
These limitations can be removed by purchasing a licence and registering your licence
information into the product. Note that registering Resound on a particular machine will
remove the evaluation limitations for all Resound plug-in formats installed on this machine;
you don't need to individually register all plug-in formats. Licence information will be in the
form of a user name and licence key.
11
To purchase a Resound licence:
1. Launch Resound. This can be either the standalone application, or as a plug-in.
2. From the Options menu, choose Purchase Resound Licence. This will launch the
shop website, from where a Resound Licence can be purchased by clicking Add To
Cart, followed by Checkout. Follow the on-screen prompts to enter your payment
details and confirm your purchase.
3. Once you have purchased Resound, you will receive your licence key information via
email. It is important to keep this information safe because you will require the licence
key if you ever need to reinstall and re-register Resound.
To register your copy of Resound:
1. Choose Enter Resound Licence from the Options menu.
2. Enter your name in the Name field. This must match exactly the name that was used to
purchase your Resound licence, including capitalization of letters.
3. Enter your licence key in the Licence Key field. This must match exactly the licence
that you received when you purchased Resound, including any hyphens. We
recommend using Copy and Paste to ensure that the Licence Key is entered exactly as
specified in your registration email.
4. Press OK to confirm that your name and corresponding licence key have been entered.
You will be informed that the application must be restarted in order for registration
changes to take effect. If you are currently running the standalone application, close
and relaunch it. If Resound is currently running as a plug-in, remove it from the host
and add a new instance of it.
5. Resound should now be registered. If the label on the bottom of the interface still reads
Unregistered Evaluation, you must have entered the licence information incorrectly. Go
back to step 1, paying careful attention that the name and licence key entered match
exactly the licence information in the registration email.
If you are having problems registering your installation of Resound, please consult the
detailed step-by-step instructions at http://www.loomer.co.uk/support.htm .
12
Audio and MIDI Configuration
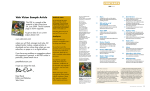
Setup Audio and MIDI
When running Resound as a Standalone application, you will need to setup your audio
and MIDI interfaces. Note that when running as a plug-in, audio and MIDI routing is
provided by the hosting application; consult the host's documentation for details. To open
the Audio & MIDI Configuration dialog, select Audio & MIDI Configuration under the
Options menu. The following dialog will be displayed:
Audio Device
Sample Rate
Audio Buffer Size
MIDI Inputs
From this dialog, the following details of your Audio and MIDI setup can be configured:
• Audio Device. Select the Audio Device you want to use from the list of available
devices. Certain devices tend to perform better than others, so if multiple devices are
available, you should favour: on Mac, using Core Audio; on Windows, using ASIO; on
Linux, using JACK.
• Sample Rate. The Sample Rate dictates the overall quality of the audio output. Using a
lower Sample Rate will reduce the presence of high-frequency components. Higher
Sample Rates should therefore be preferred. However, be aware that the CPU Usage is
directly proportional to the Sample Rate. A good compromise between quality and CPU
Usage is 44100Hz, which is the Sample Rate of CD audio. Select the Sample Rate you
require from the available list.
13
• Audio Buffer Size. The Audio Buffer Size governs latency; a smaller buffer means that
Resound will respond more quickly to MIDI messages and Parameter changes.
However, a smaller Audio Buffer Size will require more CPU Usage. Select the required
Audio Buffer Size from the available list. Using too small of an Audio Buffer can overload
your computer to the extent that audible clicks are heard. In this case, increase the Audio
Buffer Size until clicks are no longer present.
• MIDI Inputs. Check any MIDI Input devices that you want to use with Resound.
14
Preset Management
Parameters and Presets
You can modify the audio output that Resound produces by setting the value of
Parameters. Each Parameter, such as Delay Time, Feedback, or Highpass, will affect a
specific element of the sound. The state of all Parameters are collectively called a Preset.
Presets are given a suitable name, displayed in the Menu Bar, to describe the sound they
produce.
Navigation Controls
Preset Name
Previous Preset
Undo / Redo
Next Preset
If you wish to browse quickly through the Presets, you can do so using the the Previous
and Next controls. These controls are context sensitive, only displaying Presets that are
relevant to you. For example, if you search for “analogue, bass”, only Presets that match
this will be shown in the preset browser. The mouse-wheel can also be used to quickly
browse through presets.
Opening Presets
To select a preset from within your preset library, click on the Preset Name in the menu bar
to open the Preset Browser.
15
Presets can be divided into two groups; Factory, and User. Factory Presets are a
collection of example Presets built into Resound. Factory presets can’t be overwritten,
although you can, of course, edit and save your own presets derived from Factory Presets.
User Presets are stored as individual files on your computer’s hard drive. User Presets are
found in the following location:
Mac OS X: ~/Library/Application Support/Loomer/Resound/Presets/
Linux: ~/.Loomer/Resound/Presets/
Windows: My Documents/Loomer/Resound/Presets/ or Documents/Loomer/Resound/
Presets/
Only registered users can open User Presets. Unregistered versions of Resound are
limited to the Factory Presets. Unregistered versions of Resound can, however, still save
Presets. Any Presets created in the unregistered evaluation of Resound can be opened by
purchasing a licence for Resound.
Preset Hot-Swap
Selecting a Preset in the browser will automatically load the preset: this functionality is
called Preset Hot-Swap. Preset Hot-Swap allows you to preview Presets in the context of
the current project. If you decide to use the selected Preset, close the browser by pressing
return or by clicking OK. To return to your original Preset, close the browser by pressing
escape or by clicking Cancel.
Preset Meta Data
Presets can have meta data attached to them. Meta data doesn’t influence the sound of
the Preset, but is used in categorizing, searching, or annotating them. The following meta
data is available:
Author: The name of the Preset creator.
Notes: Any additional notes about the Preset, such as influences, playing tips, description,
etc.
Tags: Tags are short words that describe the Preset. Examples are: “bass”, “distorted”,
“monophonic”, “trance”, “quiet”, etc. Tags are used to help quickly search for a specific
sound.
Searching for Presets
Type keywords into the search field to locate all Presets that match this description. The
search will match the keywords in the Preset Name, Author, and Tags fields, and parent
folder name.
16
Categories
Categories allow you to quickly access a subset of your Presets. Categories are listed
under the Categories node in the Preset Browser. A Category is simply a shortcut to
searching for the Category name; a Category called “Bass” will list all Presets that match
the search criteria “Bass”. You are not limited to create Categories based on the type of
sound: you can, for example, create Categories for Preset Authors, or indeed for any other
search term. Provided you tag your own Presets, they will automatically be added to the
correct Category (or Categories: Presets can belong to multiple Categories; a Preset could
be both a “Bass” and “Lead” sound, for example.)
Saving Presets
Click Save to save the current Preset. Choose the location in which to save the Preset in
the Folders window. Press OK to actually save the Preset.
XML / FXP / FXB support
Presets in the User Presets folder need to be in either native .xml format, or VST .fxp
or .fxb format. Standalone, Audio Unit and RTAS versions can also open .fxp or .fxb files
within the browser. Please ensure any files in the User Presets folder have the correct file
extension.
Copying & Moving Presets
Presets can be moved or copied to another folder by dragging and dropping a Preset onto
the destination folder. By default, Presets will be moved. You can instead copy the Preset
by holding shift whilst dragging. Note that Presets inside Banks (either .xml or .fxb Banks),
can only be copied, not moved. Multiple Presets can be moved or copied at once by
selecting more than one Preset.
Default Preset
The Default Preset is automatically opened when a new instance of Resound is created.
To specify the Default Preset, right-click on a Preset and choose Set as Default.
MIDI Program Change Lists
You can change Presets by using MIDI Program Change commands. This requires a MIDI
keyboard or a control surface with the ability to send MIDI Program Change commands;
consult your controller’s documentation for details. If using Resound as a plug-in, this
functionality is dependent upon the host correctly forwarding MIDI messages to the plugin; check the documentation provided with your host for details.
To select which Presets are loaded in response to MIDI Program Change commands, you
will need to create a MIDI Program Change List. Select Edit MIDI Program Change List...
from under the MIDI menu to display the MIDI Program Change List editor.
17
To add Presets to the MIDI Program Change List, either double-click on a Preset, or select
a Preset and click the >> button. Use the View button to toggle between viewing the MIDI
Program Change List and information on the Selected Preset.
Any Presets in the MIDI Program Change Lists are automatically loaded and cached in
memory. This means that Preset changes can be instant. There may be a slight pause
after editing the MIDI Program Change List whilst the Presets within it are loaded. When a
Preset is saved, any entries in the MIDI Program Change List are saved alongside it. Note
that setting a Preset with a MIDI Program Change List as the Default Preset will cause all
Presets within the list to be loaded when a new instance of Resound is created.
Create a new Preset
Select New to create a new Preset. This Preset will be in the default initialized state.
Compare a changed Preset to the original Preset
Often you’ll want to compare a Preset that you have amended to see if it is is actually an
improvement on the original. Pressing the A | B button temporarily reverts a changed
Preset back to its original state. Pressing the A | B button a second time returns to the
changed Preset. This method allows you to easily contrast the Preset changes you have
made to the original Preset.
Restoring Deleted Factory Presets
To reinstate any deleted Factory Presets, right-click on the Factory branch and choose
Resore Factory Presets.
User folder management
Folder management is performed by right-clicking on a User folder, and selecting an option
from the pop-up menu. From here, you can create a New Folder, Rename Folder, or
Delete Folder. On Windows or Mac OS X, you can also quickly locate this folder in Finder
or Explorer by choosing Show In Finder / Explorer.
Undo / Redo
By pressing Undo, you can take back the most recent change made to a preset. Redo will
re-apply the last Undo changes. Note that only changes made via the Resound interface
can be undone; changes made externally (such as from a Host application, or from a MIDI
controller) are not eligible for Undo.
18
MIDI Controller Mapping
MIDI controllers
Instead of configuring a Program using a mouse, you can change any Parameter values
using a MIDI keyboard or a control surface. This is done by mapping each Parameter to a
MIDI Continuous Controller (CC). A Parameter can only be mapped to a single MIDI
controller; the same MIDI control can, however, be mapped to several different
Parameters.
MIDI Controller mappings are global; once defined, the same mapping assignments will be
used by all Resound Programs. This means that you only need define mappings once for
your particular controller.
Display current MIDI controller mappings
To view the current MIDI controller mappings:
1. Enter MIDI Learn Mode by choosing Start MIDI Learn under the Options menu. Each
Parameter's mapped MIDI controller will now be displayed beside it in yellow text.
Parameters without any mapping will be labelled -.
2. When you have finished viewing the MIDI controller mappings, choose Stop MIDI
Learn under the Options menu.
Mapped Control
Unmapped Control
Assign MIDI controllers to controls
To map a MIDI controller to a Parameter:
1. Enter MIDI Learn Mode by choosing Start MIDI Learn under the Options menu.
2. Click on the Parameter you wish to map to a MIDI controller.
3. Turn your MIDI controller. The Parameter should now be labelled with the MIDI CC
number of this controller.
4. You can now either:
• Map another Parameter by repeating these steps from Step 2.
• Finish mapping Parameters by choosing Stop MIDI Learn under the Options
menu.
19
Remove MIDI controller mappings from controls
To remove a mapped MIDI controller from a Parameter:
1. Enter MIDI Learn Mode by choosing Start MIDI Learn under the Options menu.
2. Click on the Parameter from which you wish to remove the mapping. This Parameter
will become unmapped, and the CC number label on the Parameter will disappear to
reflect this.
3. You can now either:
• Remove the mapping from another Parameter by repeating these steps from Step
2.
• Finish removing Parameter mappings by choosing Stop MIDI Learn under the
Options menu.
20
Using Resound
Resound can be used as either an insert or send effect. When used as an insert effect,
Resound is placed directly in a host's audio channel. As a send effect, Resound is placed
in a host's auxiliary or bus channel, and a portion of the original signal is fed into the effect.
Consult your host's documentation to find out how to add a plug-in as either an insert or as
a send effect.
Parameters
• The Noise Parameter introduces mechanical noise and hiss into the delay. These
additions imitate the imperfections present in tape-based delay units and so produce a
more convincing retro sound.
• The Flutter Parameter controls the amount of pitch variation as a result of tape dragging,
or other such mechanical instabilities.
• The Time Parameter controls the length of time between repeats. When Sync is turned
on, the delay time is based upon musical note divisions and will be in step with the host
tempo. With Sync off, the time delay is expressed in milliseconds. A characteristic effect,
often used in tape-based delay units, is the pitch shifted delay; this is achieved by
sweeping the Time Parameter value upwards or downwards.
• The Feedback Parameter controls the proportion of the signal to be fed back into the
delay line. As the value increases, the delayed signals volume will increase. At higher
values, it is possible to create a wall of sound using delays that don't decrease in volume
when they are fed back into the delay line. Beyond this, it is even possible to create
delays that increase in volume. Warning: High Feedback settings can produce
dangerously loud signals that can damage both your ears and audio equipment.
• Using the Highpass Parameter, the amount of low frequency content fed back into the
delay line can be changed. More low frequency content is removed as the Highpass
value increases.
21
• The Sync Parameter switches the Time Parameter between two modes of operation:
when Sync is off, the delay time is independent of the host tempo; when Sync is on, the
Time Parameter is controlled by the host tempo. See Time Parameter.
• Enabling Reverse will cause the delayed signal to be played backwards.
• The Mix controls the relative volumes of the original (dry) and delayed (wet) signal. At
0%, only the dry signal is present; at 100% only the wet signal will be heard. At 50%, the
dry and wet signals will be heard in equal amounts. A 100% wet signal is useful when
Resound is being used as send/return effect and you don't want any of the original signal
to be heard.
• The Volume Parameter governs the overall loudness of the effect. A meter provides a
visual cue to the current level: the louder the output, the higher the meter will register.
Too loud of an output will produce digital clipping, a usually undesirable form of
distortion. When this occurs, the meter will display a red warning indicator. Click the
meter to reset the warning display.
Control types
• Click on a rotary control and drag either upwards to increase the value, or downwards
to decrease it. Hold down shift and drag to make smaller and more precise changes.
Hold down ctrl and click to return the control to its default value. Rotary controls can also
be changed by hovering the mouse cursor over a control and scrolling the mouse-wheel
up or down.
• Click on a button control to toggle its value between On and Off. Hold down ctrl and
click to return the control to its default value.
Rotary Control
Button Control
22
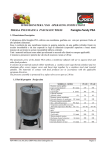
Status Display
Status Display information is displayed at the bottom right area of the Resound interface:
MIDI Input Monitor
Tempo Control
CPU Usage Monitor
CPU Usage monitor
The CPU Usage monitor displays the percentage of processor resources dedicated to
producing the audio output. The total processor resources on a computer are limited, so
when Resound increases its CPU usage, there will be less CPU resources remaining for
other plug-ins and applications. CPU Usage will differ depending on which Program is
currently loaded, how that particular Program is configured, and how many voices are
being played.
A value of 100% indicates that your computer is running at maximum capacity and will not
have enough processing power remaining for anything else. You might notice audio output
become temporarily glitchy, or that the user interface becomes sluggish. There are several
methods for resolving this:
• Choose a different Preset that has less CPU Usage.
• If running in Standalone mode, you can increase the latency or decrease the sample
rate. See section Setup Audio & MIDI.
• If your host offers Freeze of Offline processing, you might be able to render the audio
output in non-realtime.
MIDI input monitor
The MIDI monitor flickers to show that a MIDI Message has been received. You can use
this to confirm that your MIDI controller is configured correctly for Resound.
Tempo control
The Tempo control only appears when running Resound in Standalone mode; when
running as a plug-in, the host application will provide the tempo for Resound. The Tempo
control displays the current Tempo, in beats per minute (bpm). It can be changed by either:
• Double-clicking the tempo control, typing the required bpm and pressing return.
• Clicking on the tempo control and dragging either upwards to increase the tempo, or
downwards to decrease the tempo.
23
Contact Details
Loomer Online
Website:
http://www.loomer.co.uk
Support and FAQ: http://www.loomer.co.uk/support.htm
Email
Sales information: [email protected]
Technical support: [email protected]
24