1
#Byte Group
AlphaSphere iOS
Application
Final Report
Thomas Butterworth, Li Du, Andreas Georgiou, Andrew
Haslam, Robert Jones & Vlad Otrocol
2011-2012
Software Product Engineering
Table of Contents
1. Introduction.......................................................................................................... 3
1.1 Nu desine .................................................................................................................................... 3
1.2 The AlphaSphere ......................................................................................................................... 3
1.3 Why the App was needed ........................................................................................................... 3
2. Description ........................................................................................................... 5
2.1 Functionality ............................................................................................................................... 5
2.1.1 Standalone Use .................................................................................................................... 5
2.1.2 Use alongside the AlphaSphere ........................................................................................... 5
2.2 Proposed Marketing ................................................................................................................... 5
2.3 Requirements .............................................................................................................................. 6
2.4 Initial Design ............................................................................................................................... 7
3. Overview .............................................................................................................. 9
3.1 Planning ...................................................................................................................................... 9
3.2 Progress Monitoring ................................................................................................................. 11
4. Tasks ................................................................................................................... 13
5. Implementation and Testing............................................................................... 14
5.1 Implementation ........................................................................................................................ 14
5.1.1 Features ............................................................................................................................. 14
5.1.2 Coding Approach ................................................................................................................ 15
5.2 Code Example ........................................................................................................................... 16
5.2.1 OSC listener ........................................................................................................................ 16
5.3 Version Management................................................................................................................ 16
5.4 Testing and QA .......................................................................................................................... 17
5.4.1 Alpha Testing...................................................................................................................... 17
5.4.2 Beta Testing ....................................................................................................................... 19
5.4.3 Pre-Gamma Testing ............................................................................................................ 19
5.4.4 Gamma Testing .................................................................................................................. 21
5.4.5 Final Testing ....................................................................................................................... 22
5.4.6 User Feedback .................................................................................................................... 24
6. User Guide .......................................................................................................... 25
6.1 Installation ................................................................................................................................ 25
1|P age
Software Product Engineering
6.2 User Manual .............................................................................................................................. 25
6.2.1 The Home Screen ............................................................................................................... 25
6.2.2 Edit Mode........................................................................................................................... 25
6.2.3 Play Mode .......................................................................................................................... 26
6.2.4 Pad Settings........................................................................................................................ 26
6.2.5 Play State Selection Screen ................................................................................................ 27
6.2.6 Global Settings ................................................................................................................... 27
7. Conclusion .......................................................................................................... 28
7.1 Functionality ............................................................................................................................. 28
7.2 The Team .................................................................................................................................. 29
APPENDIX A ............................................................................................................ 30
2|P age
Software Product Engineering
1. Introduction
1.1 Nu desine
Nu desine is an award-winning technology company based in Bristol. Nu desine was founded in
September 2010 has rapidly expanded to a highly specialised team whose expertise ranges from
music technology, software development, electronic engineering and hardware design engineering.
It is this range of skills that has allowed them to produce the AlphaSphere.
1.2 The AlphaSphere
The AlphaSphere is a revolutionary electronic musical
instrument that utilises computer software and the
AlphaSphere hardware to allow the user to create and
perform digital music in a visually stimulating way. The
AlphaSphere is revolutionary in the way live music is
presented to an audience or crowd due to the aesthetics
of the instrument. A connection is established between
hardware and software via an Ethernet cable so that
instructions can be sent between them. The AlphaSphere
Figure 1: The AlphaSphere in use
itself is a haptic interface consists of 48 tactile pads that
showing multiple pads in use at one
stretch and flex as they alter the dynamic, timbre or
time.
another parameter of the sounds played. The
responsiveness and range of the interaction with the
pads means performers can tailor their every musical requirement to their exact specification,
producing a tangible sensation for performer and audience alike. The arrangement of the pads is
split into six rows of eight pads, meaning all pads are readily accessible in a convenient notational
arrangement. The computer-based software that is currently available (AlphaLive) allows the user to
create projects with sound mappings and playback settings for the AlphaSphere. The main
advantage of the AlphaSphere is the flexibility in programming, and this is clear in the AlphaLive
software. Users of this software have great freedom in which to be unique and creative with the way
they program and play the instrument. The desktop software has other features such as multiple
playback and edit modes, enabling music producers to not only play, but also compose music on the
AlphaSphere.
1.3 Why the App was needed
Nu desine felt that it is important to be able to produce and test AlphaSphere projects while on the
move. To this end they hired #Byte to create an iPhone app which acts in a similar way to the
AlphaSphere software. Nu desine generated some of the graphics that they wanted us to use in the
IOS application, as well as specifying some of the key features it must support. These features are as
follows;
Sound mapping to pads on the AlphaSphere
Editable play states
3|P age
Software Product Engineering
Wi-Fi enabled so that OSC messages can be received over the network
Load/ Save projects
Editable sound loops
Nu desine were vague on some functionality they wanted, and very specific in some of the more
important requirements. We were told we were going to be given graphics for the background and
buttons for our app but in term of screen navigation and user interface they left a lot to our
interpretation.
4|P age
Software Product Engineering
2. Description
2.1 Functionality
The AlphaSphere IOS app uses an edit function to take sounds and loops from the iPhone’s memory
and map them to one of the AlphaSphere’s 48 pads. These loops can also be edited to change the
play style, volume, pan and channel selection. The project can be saved into memory and loaded
again at another time to edit.
The AlphaSphere app is designed to work as either a standalone application or alongside the
AlphaSphere and while much of the functionality is the same there are some differences in the way
that app works when receiving signals from the AlphaSphere.
Nu desine also wanted the app to be capable of receiving an Open Sound Control message over the
network. It was specified that messages would be sent from the AlphaSphere to the IOS device and
the message format would be constant (and as follows);
/alpha (int) (int)
The app must be able to stream in and decode these messages, using the two integer values in real
time.
2.1.1 Standalone Use
As a standalone application the app uses a play function which is laid out similarly to the edit
functionality. The onscreen pads can then be used to emulate those of the AlphaSphere, allowing
the user to test their projects without needing access to the AlphaSphere hardware. This means that
musicians can test, practise and compose music from any of their AlphaSphere projects on their IOS
device.
2.1.2 Use alongside the AlphaSphere
When used in conjunction with the AlphaSphere the IOS app will constantly be waiting for a Wi-Fi
signal from the AlphaSphere hardware. The application will then use information sent from the
AlphaSphere to edit various settings of individual pads, multiple pads, or the entire project.
AlphaSphere projects may be saved and loaded from the application meaning a user of the
AlphaSphere can have all of their projects on his device. Once Nu desine receive and elaborate on
our application they will add some advanced functionality so that it is at the standard of their
current OSX desktop software. The limit to this functionality is expanded regularly so our group
ensured that our code could easily be read, interpreted and expanded on.
2.2 Proposed Marketing
The plan is to sell the Apple app store, but at present Nu desine does not have a licence to publish
apps to the app store it is not currently available. The team has not discussed pricing with Nu desine
5|P age
Software Product Engineering
but they expect that the app would be a free product used both as a tool to work alongside the
AlphaSphere as well as a way of raising awareness for the AlphaSphere. This application is a
marketing tool for the AlphaSphere and will be used to promote the features that the AlphaSphere,
the IOS app, and the OSX app will support.
While there are several apps which allow the user to map sounds, along with various effects to
onscreen buttons none of them are able to work alongside the AlphaSphere and it is this feature
that is the main reason for the app was created and as such this will be the emphasis when
marketing the app.
We plan to market the app at those people who either own an AlphaSphere who wish to continue to
work on projects while on the move or those who have access to an AlphaSphere for short periods
of time e.g. for a performance as this allows them to get a better understanding of how the music
will sound and feel when it is played on the AlphaSphere.
Once Nu desine receive our finished app they may add more advanced functionality such as audio
filters, midi mode, sequencing mode
2.3 Requirements
Requirement
Achieved
Intuitive User Interface
Yes
Works on iOS devices
Yes
Loads sounds from the device’s
memory
Yes
Receives signals from the
AlphaSphere and plays the
correct sounds.
Yes
Plays music through the play
screen.
Yes
Records sound through the iOS
device’s microphone
No
Saves projects to memory
Yes
Loads projects to memory
Yes
Play States can be altered per
pad.
Channels set for individual pads
Yes
Yes
Explanation
The UI is easy to use and feedback for tests told us
that first time users were able to create projects
and play them back easily.
The team have been able to get the app working on
both iPhone and iPad devices.
The app accesses the device’s memory to find the
sounds location; this is then loaded into the app so
that it can be played without a pause after the
button is pressed.
The app picks up OSC signals over Wi-Fi and then
can interpret them into pad number and pressure
which is used to play the sound associated with the
values.
Using the music loaded from the memory the app
plays the sound quickly, upon a button press.
This was of secondary concern to Nu desine and
because of constraints the team was unable to
implement this efficiently so did not make it into
the final product.
The app uses a custom project class which stores
the project name, so it can be found again as well
as the location of all of the sound files, volume, pan,
play state for each of the pads.
Via the pad setting screen the play state of the pad
can be changed and the project class is updated
Via the pad setting screen the channel of the pad
6|P age
Software Product Engineering
Volume can be changed for one
or all of the pads.
Yes
Pan can be changed for one or
all of the pads.
Yes
can be changed and the project class is updated
Via the global and pad setting screen the volume of
the pads can be changed and the project class is
updated
Via the global and pad setting screen the pan of the
sounds played by the pads can be changed and the
project class is updated
2.4 Initial Design
Figure 2: Architectural diagram for the project.
The Diagram in figure 2 shows the planned architecture for the project. It is split into 5 main
sections:
1. Interface Design – This includes the designing of the screen layout, including the graphics
used on the app and the navigation between the screens.
2. Interface Implementation – This is the implementation of the above interface such that the
screens navigation and appearance is correct, meaning that the app will end up with the
correct layout.
3. Functional Implementation – This includes the acquisition of resources as well as the coding
of the functionality of the app. This section gives the app its useful features such as storing
information as a project so that is can it can be loaded and saved.
4. Input and Output Implementation – this includes the Wi-Fi connectivity so that the app can
receive signals from the AlphaSphere and output audio though the microphone of the
device.
7|P age
Software Product Engineering
5. Reports – This includes any paperwork needed to be produced alongside the creation of the
app, namely design specification and the final report.
Main
Visual
Functional
Recording
Screen
Home
Panels
Selectors
Wi-Fi /
OSC Input
Settings
Player
Global
File
File
Handling
Pad
Audio
Project
Pad
Figure 3: System Overview, showing the dependencies of the classes within the app.
Figure 3 shows the system overview and the dependencies of the functions shown. The
functions are split into 2 sub-groups, visual and function where visual consists of graphics and
the user interface and function consists all of the back end programming.
8|P age
Software Product Engineering
3. Overview
3.1 Planning
Objective
Date Planned
Date Achieved
Screen Dependencies
Design
21 Nov 2011
21 Nov 2011
Resource Acquisition
30 Nov 2011
17 Dec 2011
Empty Screen
Navigation
Implementation
6 Dec 2011
20 Dec 2011
Alpha Phase Testing
12 Dec 2011
12 Dec 2011
Basic Screens’
Functionality
Implementation
25 Jan 2012
10 Feb 2012
The basic functionality was
delayed by the previous problems.
30 Jan 2012
Because basic functionality was
delayed although the screens
were properly connected for the
Beta release there was very little
functionality, testers were given
the most recent version of the app
and gave useful feedback so that
the team could improve the app.
Beta Phase Testing
30 Jan 2012
Explanation
The team was able to discuss the
basic screen dependencies with
Nu desine and decide on the final
layout quickly.
The software Licence for
Dragonfire SDK too expensive for
the team to use and Juce did not
have the functionality needed for
producing the app. In the end the
team used MacBooks with Xcode
4 to produce the app but it took
longer than expected to research
the alternatives and acquire the
MacBooks.
There were two reasons for this
set back, the first being the
extended time taken to acquire
the resources needed and the
second was disagreement within
Nu desine about how the app
should behave. The second meant
that the screen layout and
functionality had to redesigned,
explaining the extra time taken.
As these deadlines are unmovable
we explained the app functionality
to testers and showed them a
flash mock up of the new design
from Nu desine. We then used the
feedback to improve the
functionality of the app later.
9|P age
Software Product Engineering
Advanced Screen
Functionality
Implementation
14 Feb 2012
20 Feb 2012
Pre-Gamma Phase
Testing
16 Feb 2012
16 Feb 2012
20 Feb 2012
20 Feb 2012
Load Project
Implementation
25 Feb 2012
20 Feb 2012
Audio Filter
Implementation
25 Feb 2012
25 Feb 2012
Sound Recording
Implementation
25 Feb 2012
Not Complete
Final Graphics
Implementation
25 Feb 2012
1 Feb 2012
Wi-Fi Communication
Implementation
25 Feb 2012
28 April 2012
Gamma Phase Testing
12 Mar 2012
12 Mar 2012
Final Implementation
1 April 2012
1 May 2012
Save Project
Implementation
Again the functionality was not
complete on time, although the
time between completing basic
and advanced functionality was
less than expected.
Because advanced functionality
was delayed the screens had some
functionality for the pre-gamma
testing but it was not as advanced
as hoped, testers were given the
most recent version of the app
and gave useful feedback so that
the team could improve the app.
The function allowing projects to
be saved was done without
incident.
As the saving and loading of
projects use the same system the
ability to load projects was
implemented at the same time as
that to save them.
All of the audio filtering was done
without incident.
This was of secondary concern to
Nu desine and because of
constraints the team was unable
to implement this efficiently so
did not make it into the final
product.
We received the final graphics
from Nu desine earlier than
expected so were able to
implement them several weeks
ahead of schedule.
It took far longer than expected to
get the Wi-Fi connectivity working
properly due to a lack of support
for the most recent version of
Xcode.
Although the majority of the app
had been completed the gamma
release of the app did not include
any Wi-Fi connectivity. Testers
were given the most recent
version of the app and gave useful
feedback so that the team could
improve the app.
Due to the setbacks mentioned
above the final version of the app
was not completed until the
beginning of May.
10 | P a g e
Software Product Engineering
Final Testing
21 April 2012
1 May 2012
Although the majority of the app
had been thoroughly tested the
final testing on app could not be
done until all aspects of it were
believed to be complete.
3.2 Progress Monitoring
Figure 4: Original Gantt chart for the project.
The team based their work on the original Gantt chart, and this gave them good basic timing, as the
project continued the Gantt chart was updated to the time that each task actually took, this allowed
the team to continue working to deadlines while updating the more unrealistic ones. This meant
that the team could easily track progress that was being made, helping others when their deadlines
were approaching, or starting on the next task that could be.
Figure 5: The final updated Gantt chart for the project, showing the actual times taken.
11 | P a g e
Software Product Engineering
As well as the use of the Gantt chart the team met twice a week as planned, this gave them plenty
of opportunity to monitor the current progress of each of the team members and reallocate the
tasks as needed, working on tasks together when needed to complete tasks. An example of the
reallocation of work is the implementation of the Play state, the work was split between Andrew and
Vlad in order to create the more complex aspects of the programming so that pressure is emulated
by pinching towards the centre of the screen. The other aspect of this is that when work could be
done earlier than planned such as the early implementation of final graphics due to the speed with
which nu desine produced them.
The App project was split into multiple modules as part of a tree as shown in the System Overview
shown in figure 3, the two main areas of the project were the visual aspects and the function
aspects. Using the System Overview the team was able to mark off which areas of the app had been
completed, tracking what had been done and what the team had yet to do.
12 | P a g e
Software Product Engineering
4. Tasks
Team Member
All
Thomas
Butterworth
Li Du
Andreas Georgiou
Andrew Haslam
Task
Familiarising with Xcode and Objective-C
Wi-Fi communication with the AlphaSphere
125
Convert OSC signals into useful values
60
Collaboration with implementation of OpenAL
5
Development of the Play screen
50
Testing of the pre-release code at each stage
75
Compilation of user feedback at each release
20
Convert OSC signals into useful values
80
Assisting team management
20
AudioToolbox implementation
10
Wi-Fi development
60
Implementation of Alpha prototype
20
Implementation of pad class
5
Implementation of pad settings
20
Implementation of global settings
3
Implementation of project file handling
40
Implementation of OpenAL
40
Development of the Play screen
20
Implementation of play states
40
Screen Layout and Dependencies design
30
Assisting development of Alpha prototype
5
Advising on design of interfaces
40
Design of how the pad settings are stored, altered
Robert Jones
and accessed but the app as well as how the
Creation of graphics for the UI
Compilation and unifying of final report, so it is of a
single style
Vlad Otrocol
Time Spent (hours)
5
15
60
20
Resource acquisition
10
Implementation of skeleton code
60
Implementation of UI
80
Version control and the collation of code
30
Fixing bugs within master code
10
13 | P a g e
Software Product Engineering
5. Implementation and Testing
5.1 Implementation
5.1.1 Features
5.1.1.1 Screen Navigation
This was created through a combination of XCode’s ‘Interface Builder’ and a ‘View Controller’ class.
XCode natively supports gesture recognition, and this allowed for methods to be called when the
user swiped either left or right. Using class variables to maintain the state of the app (in the sense of
whether it was in play mode or edit mode) and determine what screen the user was viewing, the
screens were dynamically shown and hidden based upon the direction swiped, and the screen the
user was viewing at the time. XCode’s animation support allowed the transitions between apps to be
aesthetically pleasing and gradual, rather than instantaneous.
5.1.1.2 Pad Playing
Originally, the sounds mapped to pads were stored as strings within the Pad class, which contained
the file names that would then be passed to iOS’s standard audio playing methods when the
associated buttons were pressed. From early on, it was decided that data and visual classes should
be kept relatively separate, and thus, using the interface builder, each button was assigned a ‘title’
that would act as a means with which to access the associated data within the pad class.
Whilst it was beneficial having the sounds functioning from early on, later in development, the
decision was made to switch to a solution that offered lower latency, as the delay resulting from the
methods used at the time were inappropriate for a music app. After experimentation, the chosen
library was OpenAL as it is extensively supported on iPhone, and would also be fairly easy to port
across to Android, should nu desine desire it.
Once OpenAL was implemented, it was necessary to integrate functionality enabling the sliding of
buttons, which was created in a method that, like the original pad playing method, was called
alongside multiple methods, such as play-state related methods, called from the default buttondragging method. When the button was released, it needed to be reset to the original start position
(data stored in the pad class), which was implemented as a sub-method like the other two. The code
below is for the resetting functionality, and demonstrates how the title property of buttons was
used to access appropriate pad data.
-(void)padReset:(UIButton *)theButton{
NSString *indexString = [[theButton currentTitle]
substringFromIndex:1];
int index = [indexString intValue]-1;
[theButton setTransform:CGAffineTransformMakeScale(1.0, 1.0)];
theButton.center = CGPointMake(pads[index].initialX,
pads[index].initialY);
}
This code shows the way that a button can be passed as a parameter, and then its title used to access
an associated pad (and its data) from the pad array stored within the class. This code is used for
resetting a button’s position once it has been released. Although this method could be set as the
14 | P a g e
Software Product Engineering
default method for a button when released, there were other functions that needed to take place
when the button was released, and putting the code in a single method would result in monolithic
code. For this reason, it was called from another method that was assigned as the default that calls
multiple separate methods.
5.1.1.3 Pad and Global Settings
On the pad edit screens, the state of the pad (whether it was selected or not), was stored within the
pad class. The screen was designed so that when the settings screen was accessed, the attributes
within the selected pads were checked for consistency, and the UI elements were displayed
differently depending on whether the associated attributes had the same values or not. Once the
user changed the value of ‘inconsistent’ attributes, the UI elements switched to ‘consistent’ and
then the value would be set when the user pressed ‘Done’. The value of each attribute was defined
by the ‘value’ property of the UI elements.
A file browsing screen was designed to check through the file system and display for sound files for
selection on the pad settings page, which was then reused on the global settings page to browse for
project files. The global settings screen was implemented in a similar fashion to the pad settings
screen in terms of using the ‘value’ property of UI elements.
5.1.2 Coding Approach
From the early stages of development, the team felt it was important to approach the
implementation of features iteratively, initially establishing a simple skeleton offering basic
functionality, which was progressively added to in small steps. Keeping the steps as small as possible
ensured that the app was always kept in a working state and meant that very little time was spent
eliminating bugs.
Equally, prioritising developing the user interface meant that, after establishing a general idea of its
appropriateness through the prototyping of it in Flash, it could be tested on an actual iOS device, the
iPad. In many cases, this meant utilising methods that would later be abandoned, such as those from
AVAudioToolbox, but this was still considered to be the best approach as the interface of the app
was considered to be of paramount importance.
As an object-oriented language, the team worked extremely hard to ensure that the code’s design
was kept as modular as possible, considering best practices throughout development. A good
example of this was the explicit naming of methods, whereby every method created was given a
descriptive name stating exactly what the function of it was. This not only allowed for the
programmers to easily understand a method’s purpose, but also acted as a means for determining
whether a method was completely non-monolithic. In general, if a method was difficult to name
specifically once created, it was seen to contain too much functionality for one method, and thus the
method would be split into multiple sub-methods.
Equally, if code was seen to be similar in multiple places, the code was generally converted into a
method that could be used repeatedly throughout the app. A simple example of this would be the
‘closeSettingsView’, which took either the global or pan settings view as a parameter and ‘closed’ it.
15 | P a g e
Software Product Engineering
5.2 Code Example
5.2.1 OSC listener
The following code implements an OSC listener, which decodes OSC messages and bundles by calling
methods in the oscpkt library. The function opens a connection to a specified port and decodes OSC
packages (or bundles), splitting up the messages. This is done by the PacketReader. The messages
arguments are then pushed onto a stack in memory and can be popped off to show the necessary
values of the message. Messages support types int, string, float, true and false in their arguments so
not to cause errors if an invalid message is received. Ideally only ints and a fixed string will be sent
from the AlphaSphere but this code will now support unhandled messages.
5.3 Version Management
The team leader Vlad initially controlled version Management. Vlad kept a ‘master’ copy of the app
at each release and the rest of the team worked on their individual versions, sending it to Vlad when
functions or classes have been completed. In this way it was easy to discover where any errors or
bugs enter the system and remove them quickly, before they cause any major problems. Previous
versions of the code were always kept separate so that if any major problems do occur there is a
safe, working version to revert back to.
Later when the development of the application was progressed, it was decided that the use of a
Revision Control System (RCS) was necessary. Therefore a repository was set up to keep track of the
different versions. Each member of the team had his own branch from the main application code. At
the final stage of developing, different branches merged were manually merged step by step to
avoid any code overwriting. In this way the integrity of the core code was ensured
16 | P a g e
Software Product Engineering
5.4 Testing and QA
The testing of the AlphaSphere app was comprised of several parts. The first was done while the
code was written, as most of the team programmed in pairs they could quickly pick up on many
simple mistakes made when coding. Code was also compiled often so that the reason for any
compilation errors could be found quickly and resolved.
Li implemented modular testing, which was later removed in order to maximise the efficiency of the
app, to test all of the code the team created. This method allowed for continual error checking and
meant that when errors were found it was easy to find them quickly and effectively remove them
from the code.
The next stage was intensive testing by the team, lead by Li, this was done before each release. This
focused on looking for and bugs in the code which code have been missed by the modular testing
and reported any to Vlad for him to fix.
The final phase of testing was to hand the app to flatmates of the team and after explaining the
functions, asked them to use the app both to make sure the interface was intuitive and that there
were no problems that the team had missed during the initial phase of testing. The flatmates were a
good testing group as they are a similar age to the target audience (early to mid twenties) and are
from various backgrounds including technology and music.
Once the team had successfully built and compiled the first version of the app then it was saved in
the repository. That version then became the master project, which meant we always had a working
application to build on, but wouldn’t commit changes to the master version without ensuring they
did not prevent the program from executing successfully. To do this we used a revision control
system, which helped us maintain a working app through all stages of development.
5.4.1 Alpha Testing
There was no code for the team to test for the alpha stage, instead the testers were explained what
the app was supposed to do and asked them to perform specific tasks and asking them how easy it
was to complete them. The results can be seen below.
20
15
10
5
0
very easy
easy
ok
difficult
very
difficult
Chart 1: Swapping between Play and Edit states
Chart 1 shows that the switch at the top of the screen is a very intuitive way to transfer between the
two main states of the app.
17 | P a g e
Software Product Engineering
15
10
5
0
very
easy
easy
ok
difficult
very
difficult
Chart 2: Swapping different levels of the Play State
Chart 2 shows that the horizontal swipe across the screen is an intuitive way to transfer between the
levels of the AlphaSphere emulated in the app.
10
8
6
4
2
0
very
easy
easy
ok
difficult
very
difficult
Chart 3: Returning to Home Screen
Chart 3 shows that the button in the top left hand corner of the screen is quite intuitive but there
may be a better way of doing it.
8
6
4
2
0
very
easy
easy
ok
difficult
very
difficult
Chart 4: Selecting the whole of a level of pads to edit
Chart 4 shows that the button in the centre of the screen is not intuitive and may not be the best
way to get the user to select every pad on a single level.
18 | P a g e
Software Product Engineering
8
6
4
2
0
very
easy
easy
ok
difficult
very
difficult
Chart 5: Emulating pressure in the Play state
Chart 5 shows that holding the button and dragging it to the centre of the screen are intuitive and
were picked up quickly by the user despite being an unusual motion.
5.4.2 Beta Testing
The code of the beta release was checked thorough by Li, there were no major bugs but the button
to the global settings kept causing the app to slow down, this due to a slight error when copying
code into the master version of the app and it was quickly fixed by Vlad.
Due to the lack of change from the previous iteration, as far as the interface was concerned, the
testers were not asked to complete specific tasks. The Testers were still asked to try and crash the
app, which none of them managed, as well as being asked for feedback.
5.4.3 Pre-Gamma Testing
The code of the pre-gamma release was checked thorough by Li, there were a couple of small bugs
but they were quickly fixed without trouble.
As the app now contained the final graphics and the ability to load and play sound from the device’s
memory the testers were asked to test the app and the new functions of the app. The results can be
seen below.
19 | P a g e
Software Product Engineering
20
15
10
5
0
very
easy
easy
ok
difficult
very
difficult
Chart 6: Load music from the device’s memory
20
15
10
5
0
very easy
easy
ok
difficult
very
difficult
Chart 7: Play a sound for a specific pad
12
10
8
6
4
2
0
very easy
easy
ok
difficult
very
difficult
Chart 8: Navigation using the final graphics
The above charts show that the basic implementation worked well and the finalised graphics are
intuitive to use.
20 | P a g e
Software Product Engineering
5.4.4 Gamma Testing
The code of the gamma release was checked thorough by the team, there was a large bug found
within the global settings functions stopping the project code being saved correctly, stopping the
project from being loaded.
The app now contained all of the implementation except for Wi-Fi connectivity. The testers were
asked to test the app and the new functions of the app. The results can be seen below.
15
10
5
0
very
easy
easy
ok
difficult
very
difficult
ok
difficult
very
difficult
ok
difficult
very
difficult
Chart 9: Save a project
15
10
5
0
very
easy
easy
Chart 10: Load a project
20
15
10
5
0
very
easy
easy
Chart 11: Change the volume of a single pad
21 | P a g e
Software Product Engineering
10
8
6
4
2
0
very easy
easy
ok
difficult
very
difficult
Chart 12: Change the volume of all pads all once
The charts above show that most of the controls are intuitive, although the way in which the global
settings is reached could be made simpler, the feedback the team was given also suggested that the
way of reaching the Global Settings is not nearly as intuitive as the other controls and this needs to
be worked on.
5.4.5 Final Testing
The code of the final release was checked thorough by the team, there were no bugs or errors
found.
The app now contained all of the implementation including Wi-Fi connectivity. The testers were
asked to test the app and all of the functionality. The results can be seen below.
15
10
5
0
very easy
easy
ok
difficult
very
difficult
Chart 13: Navigation using final UI
Comparison between Chart 8 and Chart 13 shows that even with large amounts of time between
them the use of the app becomes more intuitive to use.
22 | P a g e
Software Product Engineering
20
15
10
5
0
very easy
easy
ok
difficult
very
difficult
Chart 14: Saving and Loading projects
This shows the new way to save and load projects, which was changed due to user feedback is far
better than the previous design.
20
15
10
5
0
very easy
easy
ok
difficult
very
difficult
Chart 15: Finding the correct sound
This shows that the way we find the music for the app works well for the user and is intuitive to use.
20
15
10
5
0
very easy
easy
ok
difficult
very
difficult
Chart 16: Finding the correct play state
23 | P a g e
Software Product Engineering
20
15
10
5
0
very easy
easy
ok
difficult
very
difficult
Chart 17: Choosing the correct play state
The two charts above show that the new play state screen, with the descriptions on them work
incredibly well for users to choose and use the play states in the way that they want.
5.4.6 User Feedback
At each stage of the testing by the team’s flatmates they were asked if there was any extra function
that should be added to app or anything that should be removed or changed to improved. The
following is some of the more useful feedback that the team received:
“I would like a way to change the volume of the different circles ”
“The play states need descriptions so that I know what each one does without testing”
“The Load and Save buttons could be part of the settings to stop the screens looking so
cluttered”
“The buttons in the settings need to be uniform, rather than being several styles ”
“We don’t need a home button because it just links to the play screens ”
“The last project I worked on should be there when I open the app, I don’t want to have to
find it in the settings”
24 | P a g e
Software Product Engineering
6. User Guide
6.1 Installation
The app cannot currently be installed from the app store; the final version of the app will be handed
over to nu desine to do with as they want. This means that the app may appear on the app store in
the future. Please contact nu desine for a copy of the final release code to install.
6.2 User Manual
This user Manual gives a brief overview of how to use the AlphaSphere App for iOS devices, the
screenshots shown are from an iPad but the functionary of the app is the same for both iPhone and
iPad devices. If the device is linked to an AlphaSphere then as long as the app is in play mode the app
will play any sound produced by the use of the AlphaSphere.
6.2.1 The Home Screen
1. The large central circle is a combination of six
buttons, one for each of the levels of pads,
where the top is linked to the first pad player
screen and moving down vertically through each
of the six levels.
6.2.2 Edit Mode
1. This button opens the global settings for the
whole of the project.
2. This is a switch that allows the user to quickly
swap between the edit mode and the play
mode.
3. Each of the eight buttons represents a pad on
the AlphaSphere, selecting one opens the
settings for that specific pad.
4. This button opens the pad settings for any
selected pads..
25 | P a g e
Software Product Engineering
5. This shows which of the six levels is currently
being edited, to change between levels swipe
horizontally across the screen.
6.2.3 Play Mode
1. This is a switch that allows the user to quickly
swap between the play mode and the edit
mode.
2. Each of the eight buttons represents a pad on
the AlphaSphere. To play a sound press the
button, to emulate pressure hold down the
button and drag it towards the centre of the
circle. Multiple buttons can be pressed at once.
3. This shows which of the six levels is currently
being played, to change between levels swipe
horizontally across the screen.
6.2.4 Pad Settings
1. Press the Browse button to open a list of
compatible sound file the desired sound can be
chosen by pressing on it. The file name will then
be shown in the box to the left of the Browse
button.
2. Press the Choose button to open the Play State
selection screen.
3. Use the slide to alter the volume of the current
pad.
4. Use the slide to alter the pan of the current pad.
5. The buttons can be used to select a channel for
the sound for the selected pad.
6. Press the Done button to make the chosen
changes.
26 | P a g e
Software Product Engineering
7. Press the Cancel button to discard the chosen
changes.
6.2.5 Play State Selection Screen
1. Give the Play Mode name and a description of
how the state is used.
2. The buttons are used to select a Play Mode for
the current pad.
3. Press the Done button to make the chosen
changes.
4. Press the Cancel button to discard the chosen
changes.
6.2.6 Global Settings
1. Pressing the load button brings up a list of
projects to load. Press on the desired project to
load it. The project name will then be shown in
the box to the left of the Load button.
2. Enter a project name into the white box and
then press the save button to save the current
project.
3. Use the slide to alter the volume of all pads
simultaneously.
4. Use the slide to alter the pan of all pads
simultaneously.
5. Each of the six buttons can be pressed to select
channel exclusivity for the pads, this will
overwrite any channel setting for individual
pads.
6. Press the Done button to make the chosen
changes.
7. Press the Cancel button to discard the chosen
changes.
27 | P a g e
Software Product Engineering
7. Conclusion
7.1 Functionality
The assignment was to implement a basic application that could be used to emulate, or in
conjunction with, nu desine’s AlphaSphere. It was evident from the second team meeting that the
team was well suited to the task we had applied for. We spent the first few meetings getting
acquainted and analysing the skills of each team member. This process helped us to split the team
and pick well-suited pairs to work on different parts of the project. The next task was then to
breakdown what needed to be done for the project and divide these tasks between the team. The
team then broke down the project and evaluated the key concepts, before distributing a task to each
team member. When coding began the project progress was initially slow due to the team having to
become familiar with Objective-C. Once members had overcome this barrier then progress picked up
and we could begin work on tasks relevant to our assignment.
To ensure that nu desine’s requirement demands were met we conducted a series of quality
assurance tests for each primary function both by the team and a small group of impartial testers
from outside of the team. This ensured that each requirement was met to nu desine’s standard by
implementing the necessary function within the app. Some functionality requirement was vague and
some very specific which meant we had a reasonable scope for interpretation of how we believe the
app should look and run. For example nu desine wanted an intuitive user interface so unfamiliar
users could operate the AlphaSphere through this iOS application. The team spent considerable time
designing and discussing the screen navigation so to create an app that was natural and instinctive
to navigate. Feedback showed us that we were successful in the design that had been chosen for
new users could easily access all of the screens and features. Another features that nu desine
specified they wanted was the ability to save and load projects for the AlphaSphere from an iOS
device. This functionality presented a challenge for the team due to the restrictions in iOS device
memory accesses. Rob, and other members of the team, was in close contact red wasp design (a
Bristol based design company) and nu desine in order to effectively implement this function into our
app. This contact ensured that we were correctly implementing this stage and meant we could
successfully implement this feature.
nu desine also asked that we implement the necessary steps to communicate with the AlphaSphere.
This is done by establishing a UDP connection between AlphaSphere and device and transferring
data. This data is in OSC format, which means that our app must have built in OSC support to listen
for, receive and decode these messages. The team managed to implement this function in a
separate application to that of our main project. The OSC listener app submitted can receive OSC
messages or bundles (teams of messages) and decode them to get the values of the arguments
passed with the message. This OSC application could not successfully be integrated into our project
due to the lack of compatibility o the supporting OSC library (oscpkt) and our then existing
Objective-C project.
28 | P a g e
Software Product Engineering
7.2 The Team
At first the team had some trouble working on a single project between six team members for it was
the first team-coding project some members had met. This was because tasks were divided between
members so each member of the team had an individual (coding) task that would then be integrated
into the rest of the project. As we learnt more about team software engineering projects, this
version control issue was quickly resolved for we implemented the use of a version control system.
This meant that all members could access the most recent project for it was stored in a repository
online. Now all members could access any code from anywhere they have an Internet connection
(which greatly helped development progress over the Easter break). The control system also meant
that each member could commit changes to the project on a private branch (specific to each
member), so the master branch was only edited when the team had confirmed the changes were
ready to be integrated. This method meant that our master project was always error free meaning
no backtracking was going to be necessary.
As we progressed through the early development stages we began to work much more efficiently as
a team. Once members better understood each other advantages and disadvantages then the team
could work more efficiently as a whole. If a member were struggling with a task, big or small, then
we would meet and reallocate the workload as to effectively counter this delay. This was evident in
various parts of the project for it was often difficult to estimate an accurate representation for the
complexity and timeframe of certain features that were to be integrated. An example of this is the
Wi-Fi communication. This task proved to be considerably difficult so the work was redistributed
among the team so more members could focus on the tasks troubling us as a whole. Towards the
end of the project our team could distribute tasks more effectively due to the dynamics of the team
and efficiency in teamwork.
The running of the team throughout the project was consistent and effective. There were regular
meetings where all members attended and contributed towards the design of the team’s app, which
inevitably resulted in a well-balanced end product due to the varying nature of the each member’s
experience. Vlad, as the project manager, was efficient in organising and distributing work where
necessary. Between the team it is evident that we can collaborate effectively and Vlad took sensible
measures to ensure that any issue relevant to the project was quickly resolved. The management of
the project helped the team quickly develop as a software engineering team as well as individuals.
By the end of the project the team all agreed that the team working efficiency is incomparable to
how we began. The project management also ensured that everybody in the team must contribute
his fair share. There was however no issues in this area for all team members worked to the required
standard (set by Project Manager Vlad).
29 | P a g e
Software Product Engineering
APPENDIX A
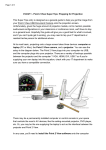
APPENDIX A: On the left the iOS Application developed during the project and on the right the
AlphaLive v.0.1, software developed by “nu design”.
30 | P a g e