1
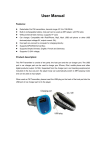
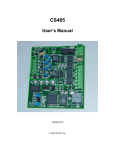
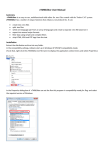
Air Pivothead - Quick Start Guide
Congratulations on your Air Pivothead purchase. This Quick Start Guide will help you get
your Air Pivothead up and running quickly. For complete instructions, please download
the User Manual at: pivothead.com/air-pivothead/
You can find our free applications on Apple Store and Android Market by searching with
the keyword Pivothead. A direct link is also available from our website.
1. Features:
J
A.
B.
C.
D.
E.
F.
G.
H.
I.
J.
SD Card Slot
USB Storage Connector
Power Switch
Mini USB Connector
Ethernet Connector
Charge Status LED
Storage Connection Status LED
Wireless Network LED
Power LED
Hole for reset
1. Connect Memory Storage to Air Pivothead
SD Card Insertion
Insert a SD card into the SD Card Slot (A) of the Air Pivothead until the card is firmly
seated (you will not hear or feel a “click” when the card is fully inserted). The card can
only be inserted in one way. Once the SD card is inserted and the Air Pivothead
switched ON, the Storage Connection Status LED (G) will light ON.
USB Storage Connection
Use the USB Storage Connector (B) from the Air Pivothead to connect your USB
Storage Device. Once connected and Air Pivothead switched ON, the Storage
Connection Status LED (G) will light ON.
Pivothead Recorder Connection
Switch the Pivothead Glasses ON and switch the Air Pivothead ON before the
connection. Use the Micro USB to USB cable (provided with your Pivothead Recorder
Glasses) to connect your Pivothead Glasses to Air Pivothead via the USB Storage
Connector (B). Once connected, the Storage Connection Status LED (G) on the Air
Pivothead will light ON.
Remarks:
- Do not disconnect the SD Card, USB Storage or Glasses during data transfer.
- Only one storage can be detected at a time, the default storage being the SD Card.
Air Pivothead - Quick Start Guide
2. USB Operations
SD Card Data Transfer:
You can connect the Air Pivothead into a computer’s USB port via the Mini USB
Connector (D), using the Mini USB to USB cable (included in the box). Once connected
to the computer (you must keep the Air Pivothead switched OFF) you can access the
SD Card Storage (but not the USB Storage). When the SD Card is inserted, the SD Card
will show up on your computer display as a USB flash drive. You can now drag & drop
files to the SD card. The Charge Status LED (F) may light ON, indicating that the Air
Pivothead is charging.
When you are ready to remove Air Pivothead from the computer, always eject or
unmount Air Pivothead from the computer to prevent data corruption on the SD card.
Battery Charge:
Air Pivothead will charge its internal battery when plugged into a computer, powered
USB hub, or stand-alone USB charger. In charging mode, the Charge Status LED (F)
will light ON. When the Air Pivothead is fully charged, the Charge Status LED (F) will
switch OFF. Please allow up to 3 hours to fully charge Air Pivothead.
3. Wireless Operations
Wireless On:
Slide the Power Switch (C) to the right. The Power LED (I) will light ON to Green or Red,
Red indicating that the battery level is low.
The wireless network will appears after 20 seconds to 40 seconds, indicated by the
Wireless Network LED blinking (H). The wireless LED (H) will continue to flash every
second to indicate that Air Pivothead wireless network is present. If the Power LED does
not light ON when you slide the Power Switch (C), charge the battery via the mini USB
Connector as described above.
Remark: once transmitting data, the Wireless LED (H) will blink faster.
Wireless Access
1. Open your wireless device’s WiFi settings and select the Air Pivothead Network SSID.
2. Open your Application (Android, iOS) or your device’s browser and type 10.10.1.1 in
the address bar to access Air Pivothead.
3. You can now access the content of your storage via the App or the Browser.
Remark: you can find the User Manual for our Free Application on the Pivothead website
at: pivothead.com/air-pivothead/
Air Pivothead - Quick Start Guide
Wireless Off:
To turnoff WiFi, slide the Power Switch (C) to the left. The power LED (I) will Switch OFF,
indicating that the device (and the wireless networked) are stopped.
4. Ethernet Operations
1. Connect the Ethernet Cable from your hotel or ADSL Box to the Ethernet Connector
(E) of the Air Pivothead.
2. Switch ON the Air Pivothead by sliding the Power Switch (C) to the Right
3. Open your wireless device’s WiFi settings and select the Air Pivothead Network SSID.
4. You can now connect to the internet wirelessly from your device.
Remarks:
- Connection to hotel or ADSL network may require further settings (username,
password) and/or cost. Please contact the user Manual and your provider for more
information. You can find the detail information on how to setup an ADSL connection into
the User Manual available on Pivothead website.
5. Reset
Reset (35ec) button (J) on the right side:
First, please make sure you had powered on the Wi-Reader and WiFi LED (Blue) is
keeping in working stage, then you can use a kit to press the Reset button (J). After
pressing 3 seconds, you will see WiFi LED (Blue) will turn off. Currently, you can release
the button for recovering it to Default Network setting.
6. Firmware Updates
Please go to pivothead.com/air-pivothead/ for the latest firmware update and process to
update the firmware.
DISCLAIMER
Pivothead Video Recording Eyewear does not promote, endorse or intend for its
products to be used in high risk, careless or dangerous activities, and is not responsible
for any injuries or property damage arising from any user activities. Cape Evolution, Ltd.
will not under any circumstances be responsible for injuries or property damages
resulting from any misuse, illegal use, or unintended use of its products. Cape Evolution
is not responsible for any illegal action taken while recording or editing video or still
images captured with our products. The Pivothead products are intended to be used to
capture images and recordings in strict compliance with all applicable federal, state and
local laws and regulations. It is the user’s responsibility to comply with such laws and
regulations.