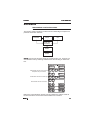
1
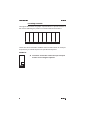
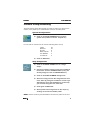
QUICK START GUIDE t h e CAPRICORN Capricorn Quick Start Guide Contents 1 Introduction 2 Capricorn Description 7 Console Setup/Recording 3 3 4 5 6 Three Sections The Graphic Display System System Screen System Connections Locating Controls 7 7 8 8 9 9 10 10 10 11 12 System Configuration Strip Assignment To place Tape Return Monitors on Bank 1 To place Inputs on Bank 2 To place Aux Masters on Bank 1 To place Main Outputs on Bank 1 Tape Machine Set-up Timecode Tape Machine Monitor Configure Input and Output Ports Making Paths Stereo 13 Routing 15 Configuring Processing 16 Auxiliaries and Cues 18 Using Capricorn like an in-line console 20 Machine Control 22 Configuration 13 13 13 13 14 14 14 14 14 15 16 17 17 20 20 20 21 22 22 22 To route tape returns to main output bus Routing Inputs to Tracks Routing Inputs to Groups Routing Inputs to the Mix (FX returns etc) Reverse Routing Selecting Mic or Line Input Changing an Inputs Phase Phantom Power Monitoring the desk outputs Modify AUX Sends AUX Masters HEADPHONES / CUE SEND control. Track Arming (Record Ready) Cycle and Locate Locating Cycle Issue 2.0 Naming paths & banks To store a configuration To recall a configuration Quick Start Guide 23 Automation 23 24 25 25 Automation session flowchart Quick Start Automation Controls Scope 26 Mix Basics 26 Mix Passes 28 Automation Modes 37 Mute/Switch Automation 39 Double Press Operation Of Mutes And Other Switches 40 Collect Touch 26 26 27 27 27 28 29 30 31 32 33 35 36 37 38 Going Back To Earlier Mix Passes Mix Pass Numbers Instant Undo Mix Tree Exiting Automation Touch Record Record Auto Glide Manual Glide Auto Takeover Trim Play Isolate Add Mode Write Mode 41 Other Useful Functions 41 Copying Control Parameters 41 Linking Controls 42 Fader To AUX Copy 43 Other Advanced Features 45 Index 41 43 43 43 43 44 Capricorn To make a Link Off Line Edits Mix Compare/Merge Record to End Stores Surround Sound Issue 2.0 Capricorn Quick Start Guide Introduction This Guide has been specifically created to provide users of traditional analogue desks (and occasional or inexperienced Capricorn users) with a basic ‘quick start’ operational guide to the ‘all digital’ Capricorn desk. To achieve this it uses straightforward everyday descriptions supported by actual examples (icons) from the system’s package and a range of schematics and graphic representations of relevant features and their location relative to the system’s work surface. The Quick Starte Guide will provide operators with everything they need to quickly and easily gain practical mixing skills with one of the world’s most powerful desks. Issue 2.0 1 Quick Start Guide Capricorn Capricorn Description Capricorn is a multitrack mixing console - specifically designed for the recording, broadcast and post-production industries - to be used in large scale multitrack recording, mixing and overdubbing applications. Its principle features include the following: l Total Digital Signal Path - using Applications Specific Circuits which offer more than just the advantages of digital sound but also the blend, warmth and musicality you would normally associate with the `Neve sound’. l Total Reset - all of Capricorn’s processing parameters can be recalled and reset with absolute accuracy. l Total Dynamic Automation - of all the consoles principle mixing functions. l Personalised Configuration - for each project and or operator. l Assignability - means that there is no need for a dedicated strip of controls for each input and output, every size of control surface is capable of operating the largest system size. l Instinctive Updating - allows operators wanting to update a control position to simply touch the control before making the adjustment. l Touch Sensitivity - all rotary and linear controls are touch sensitive allowing instant control of recording and enabling displays to indicate absolute values for controls in touch. 2 Issue 2.0 Capricorn Quick Start Guide Three Sections The desk is divided into three sections with each section completely self-contained - including their own power supplies. They are as follows: l The Channel Section l The AFU or Assignable Facilities Unit l The Monitor Section A high resolution colour monitor provides control of the consoles interactive graphic user interface along with a QWERTY keyboard and trackball. The Graphic Display System The system is used for off-line functions such as: l Setting/displaying signal path information l Naming paths and banks for console display l Strip assignment l Port routing l Disk and memory management l System configuration l Setting options l Tape machine configuration (All signal and processing elements are housed in a separate 42U high processing rack. This rack also contains the hard disk, a 3.5 Floppy disk drive and a 3.5 Magneto Optical disc drive - used for configuration and automation data storage). Issue 2.0 3 Quick Start Guide Capricorn System Screen The system screen is divided into three separate areas. 48 99% 1 00:00:00:00.0 I 12 HOLD 00:24:30:12.0 The Application Window Used for creating, editing and displaying information A pop-up dialogue box will overlay the application window with prompts, error messages, selection lists and option switches when the application needs to talk to the operator. 2 The Icon Menu System icons are displayed in this area in boxes which are highlighted when the cursor is moved onto them. 3 The System Status Area Gives a permanent display of system level data such as timecode and automation status. Trackball The trackball provides control of a cursor for both pointing and selection. It can also be used to modify data values on screen during editing and for configuring or moving audio processing components in the signal path. 4 Issue 2.0 Capricorn Quick Start Guide System Connections Capricorn 48 Console VDU Mic/Line Rack Mic/Line Rack Mic/Line Rack Analogue I/O Rack DSP Rack Digital I/O Rack Machine Control Rack DAT TB Monitor Facilities Rack Spare MADI Port Issue 2.0 Auto Locator 8 MADI Ports 5 Quick Start Guide Capricorn Locating Controls Throughout the manual are graphic representations of specific sections of the console indicating the position of controls within those sections. CHAN CHAN CHAN AFU MON CHAN CHAN CHAN Typical 48 fader control surface These have been included to facilitate ease of location when for example a specific key is named as part of an operational sequence. EXAMPLE: ä To find the `PLAY KEY’ within the tape transport section see the diagram adjacent. MON 6 Issue 2.0 Capricorn Quick Start Guide Console Setup/Recording This first section allows the operator to create a custom mix set-up from scratch, from power-up to a state where a session can take place. System Configuration ä Click on the PATH NUMBERS icon to select system size (number of auxes, outputs etc) For our trial-run session we will use the following basic set up: Inputs Monitors Groups Main Outputs Aux Masters Cue Sends 22 24 8 2 4 2 ä Click on EXECUTE. Strip Assignment ä Click on the BANK ASSIGN icon to “assign strips”. ä Choose a bank by clicking on the blue numbered boxes then click on ASSIGN STRIPS. (If any are already assigned, click on DE-ASSIGN ALL). ä Click on the STRIP NUMBER dialogue box. ä Select the strip you wish the assignment to start from, either by using the trackball or cursor keys. Alternatively press the ACCESS key on the strip you wish the assignment to start from. ä Click again to EXECUTE. ä Select paths to be assigned on to the strips by clicking on the list of available paths. HINT: Use the scroll key and trackball to choose from paths out of view. Issue 2.0 7 Quick Start Guide Capricorn To place Tape Return Monitors on Bank 1 ä Click on blue box for Bank 1. ä Click on ASSIGN STRIPS. ä Click on STRIP dialogue box. ä Select the cursor to SCROLL. ä Scroll down the list to MONITORS. ä Click on (turns yellow) Monitors 1 through 24. ä EXECUTE. To place Inputs on Bank 2 ä Click on blue box for Bank 2. ä Click on ASSIGN STRIPS. ä Click on STRIP dialogue box. ä Select the cursor to SCROLL. ä Scroll down the list to INPUTS. ä Click on (turns yellow) Inputs 1 through 22. ä EXECUTE. 8 Issue 2.0 Capricorn Quick Start Guide To place Aux Masters on Bank 1 ä Click on blue box for Bank 1. ä Click on ASSIGN STRIPS. ä Click on STRIP dialogue box. ä Select the cursor to SCROLL. ä Scroll down the list to AUXS. ä Click on (turns yellow) Auxes 1 through 4. ä EXECUTE. To place Main Outputs on Bank 1 ä Click on blue box for Bank 1. ä Click on ASSIGN STRIPS. ä Click on STRIP dialogue box. ä Select the cursor to SCROLL. ä Scroll down the list to OUTPUTS. ä Click on (turns yellow) Outputs 1 & 2. ä EXECUTE. Issue 2.0 9 Quick Start Guide Capricorn Tape Machine Set-up ä Click on the TAPE MACHINE icon to assign the tape machine. ä Click on the top box and choose a tape machine from the right hand list. ä Click on MADI LINKS. This opens the MADI link assignment sub-menu. ä Click on MULTITRACK and then on the I/O TAPE MACHINE icon to connect the MADI link to the tape machine. Is the clock rate OK? (either 44.1kHz or 48kHz sampling frequency). ä To change the sample rate click in the sample rate box (above left of the timecode display). ä Click on the SAMPLE FREQUENCY icon to adjust the sample rate. Timecode ä If a new rate needs selecting, click on the TIMECODE icon to change. Tape Machine Monitor ä Select the desk monitoring to RET on the monitor section of the console. ä Start the tape machine by pressing the PLAY transport key, and the input meters should indicate that a signal is present. MON 10 Issue 2.0 Capricorn Quick Start Guide Configure Input and Output Ports ä Click on the PATH CONFIG icon to “port route” main outputs, aux/cue outputs etc to analogue or digital destinations. The main output, aux or cue meters will not indicate until this is done. ä Press the ACCESS key on the output strip required. ä Click on PATH CONFIG icon ä Click on the output port to assign an output port. This brings up the output port sub-menu. ä Click on analogue or digital. ä Click on the port output required. ä Click on the PATH CONFIG icon again to check that inputs are port routed (mic/line signal is getting to the channel path). ä Click on source port to assign a port. This brings up the input port sub-menu. ä Click on analogue or digital. ä Click on the port input required. Issue 2.0 11 Quick Start Guide Capricorn Making Paths Stereo ä To make a path within Capricorn stereo (eg. main output, input, aux, cue etc), ACCESS the path you wish to be the left leg of a stereo pair. ä Click on the PATH CONFIG icon. ä Click on the STEREO dialogue box. ä Select which path you wish to be the right leg of the stereo pair if appropriate. ä EXECUTE. 12 Issue 2.0 Capricorn Quick Start Guide Routing To route tape returns to main output bus ä Press the ACCESS key on the required channel and select the output on the routing matrix on the meter bridge above the AFU. Routing Inputs to Tracks ä Press ACCESS on Input 1 (for example). ä Select track(s) required on routing matrix above the AFU. ä Continue routing as per the above steps. Routing Inputs to Groups ä Press ACCESS on Input 1 (for example). ä Select group(s) required on Group Routing Panel above AFU. ä Continue routing as per the above steps. Routing Inputs to the Mix (FX returns etc) ä Press ACCESS on Input 1 (for example). ä Select output(s) required on Output Routing Panel above AFU. ä Continue routing as per the above steps. Issue 2.0 13 Quick Start Guide Capricorn Reverse Routing ä Press ROUTE on the main routing panel. ä Select the destination on the main routing panel, eg. main output, group etc. ä Press the ACCESS keys on the sources you wish to route to the selected output. ä Press ROUTE again to execute. Selecting Mic or Line Input ä Press ACCESS on Input 1 (for example). ä Select either Mic A or B or Line A or B on AFU. Changing an Inputs Phase ä Press ACCESS on Input 1 (for example). ä Press Phase key on the AFU to Invert channels Phase. Phantom Power ä Press ACCESS on Input 1 (for example). ä Press the +48 key on the AFU to activate channels Phantom Power. Monitoring the desk outputs ä Press the console’s O/P key (next to the control room pot). MON ä Press the number of the output port (usually 1 & 2) that you wish to monitor on the 16-way selector (between the control room pot and the tape transport keys). ä Adjust the volume with the control room pot. 14 Issue 2.0 Capricorn Quick Start Guide Configuring Processing This is for configuring EQs, gates, etc. ä Click on the PATH CONFIG icon to assign processing to whatever channel is currently accessed. ä Select processing, gates, EQs etc by clicking on the processing element required and then moving the jack plug to the desired position. Click again to place it. Modify To KEY or INVERT a channel's GATEs or LINK Control Voltages of COMPRESSORS and LIMITERS: ä ACCESS the desired channel. ä Assign processing as required. ä Click on MODIFY (to change processors characteristics or keying). ä Click on desired processor, Gate, Compressor etc. Issue 2.0 15 Quick Start Guide Capricorn Auxiliaries and Cues AUX Sends There are several ways in which the engineer can set up AUX sends. Here are two very simple ways: ä Press the ACCESS key on a channel strip. ä Turn the AUX contribution control for the respective AUX bus on the AFU. ä To select an AUX bus to the channel strip FACs press the AUX select key at the end of the 2nd or 3rd row of FACs on the AFU. ä Press the number key on the required AUX bus. The respective bus will now be available desk-wide. ä If the Aux is STEREO, the third FAC acts as a PAN. HINT: For setting up headphone mixes on an Aux, try setting all channels to the same desired Aux then press the AUX on the AFU to use the FADERS to MIX the AUX’s. When you have finished, end this mode by again pressing AUX on the AFU. 16 Issue 2.0 Capricorn Quick Start Guide AUX Masters ä Assign AUX paths to a Bank in the same way as Channels, Monitors, etc. ä The AUX Master level can then be adjusted using the fader. ä Press the appropriate ACCESS key to use the processing and porting functions from the AFU and PATH CONFIGURATION, as for other paths. HEADPHONES / CUE SEND control. Headphones can be fed from several sources including the consoles mix output, the Aux sends etc. Headphone sends are called CUE’s. ä Assign CUE paths to a Bank in the same way as Channels, Monitors, etc. ä The CUE Master level can then be adjusted using the fader. ä Press the appropriate ACCESS key to use the processing and porting functions from the AFU and PATH CONFIGURATION, as for other paths. ä Use the CUE CONTROL panel to select type of source to feed to cues (eg Aux or Ext etc) followed by the number of the source on the 16 way matrix (eg. choose 12 for Aux 12 etc). Issue 2.0 17 Quick Start Guide Capricorn Using Capricorn like an in-line console NOTE: An In-Line console's channel contains two signal paths, Tape Return and Channel Input. Capricorn can be used to emulate this way of working by using two Banks out of the 12 available. As Capricorn has two rows of ACCESS keys but one row of faders the engineer can switch between the Tape Returns (on BANK 1) and Channel Inputs (on BANK 2) rather like “Fader Flipping” on an In-Line console. Switching between BANKS. ä To ACCESS the desired channel (which gives fuller control on the AFU) press its ACCESS key. This channel is now currently on the surface. NOTE: The top row of ACCESS keys for BANK 1 are known as the PRIMARY BANK, the lower row of ACCESS keys for BANK 2 are known as the SECONDARY BANK. To select which Banks are available on the surface: ä Both the Primary and Secondary Banks can be available at any one time on the surface. ä To select Bank 1 on to the top row, press BANK 1 on the small LED screen on the AFU. ä To select Bank 2 on to the lower row press “SEC BANK” then press BANK 2. Any processing, signals etc that are out of sight on Banks that are not shown continue to function, they are just hidden. 18 Issue 2.0 Capricorn Quick Start Guide To select the function for the top row of FACs (eg. I/P SEL, GAIN etc): ä Press the respective function select key on the adjacent FAC SELECTION panel on the AFU. ä The second and third row of FAC controls are usually used for AUX contribution - see page 16. ä The fourth row of FACs usually control PAN, WIDTH or BALANCE. To select EQ across all channel strip FACs: ä Press EQ in the FAC SELECTION panel. The top FAC now selects the EQ band, the second controls FREQUENCY, the third controls GAIN and the fourth controls Q. Issue 2.0 19 Quick Start Guide Capricorn Machine Control Track Arming (Record Ready) ä On MACHINE TRACK CONTROL panel select desired machine, A, B or C. ä On the 48 way track matrix select tracks that you wish to arm. MON Cycle and Locate ä Press NEW LABEL. ä Type in the name of the label point if desired. ä EXECUTE MON ä At end of the section press NEW LABEL. ä Type in the name of the label point if desired. ä EXECUTE NOTE: Whenever NEW LABEL is pressed the engineer is prompted for a name (which is optional) and that label is added to the LABEL LIST. Locating There are several ways to use Locate with Capricorn. Here is just one example: ä Press the LOCATE key on tape transport. ä Select desired label number from the numeric keypad, followed by STOP or PLAY on the tape transport keys. MON 20 Issue 2.0 Capricorn Quick Start Guide Cycle To cycle between two points: ä Click on LABEL LIST icon. ä Cursor to the first (FROM) label and click. ä Click on dots after Timecode numbers. ä Click on FROM marker. ä EXECUTE. ä Cursor to the end (TO) label and click. ä Click on dots after Time code numbers. ä Click on TO marker. ä EXECUTE ä On tape transport, press CYCLE, then LOCATE then PLAY to begin the cycle. ä STOP on transport controls halts the cycle. MON Issue 2.0 21 Quick Start Guide Capricorn Configuration Naming paths & banks ä Click on the PATH NAMES icon to name channel paths: ä Click on the list of channels and type in the new name followed by RETURN. ä Click on the BANK ASSIGN icon to name banks. ä Click on the required bank name and type in the new name followed by RETURN. To store a configuration ä Click on the USER SELECT icon. ä Click on SYSTEM MANAGER then ADD to enable you to add your name as a new user. ä Click on your user name to select yourself as the new user. ä Click on the STORAGE icon to add the name of the new configuration (this can now be your default configuration). To recall a configuration ä At a later stage, to recall your configuration, first click the USER SELECT icon to select your name. ä Click on the STORAGE icon then select the configuration required. 22 Issue 2.0 Capricorn Quick Start Guide Automation Automation session flowchart This section allows operators to take maximum advantage of Capricorn’s powerful automation features. CONTINUE WITH AN OLD MIX BRAND NEW MIX LOG ON SCOPE (decide what to automate) START MIXING LOG OUT NOTE: If someone has been using the console before you, log them out of automation first by selecting CLIENTS icon and clicking on LOG OUT box. AUTOMATION ON PLAY REC COL TOUCH GLIDE MUTE PLAY MUTE REC FDR PLAY FDR REC TRIM GLIDE Global Mode selection for all controls except Mute keys and Faders Global Mode selection for Mute keys PLAY SAFE SW MATCH RECORD TO END AUTOMATION SCOPE MUTE MATCH Global Mode selection for Faders ALL MATCH MIX - MIX + MASTER RECORD REHEARSE PASS - PASS + Before the mix automation system can be initiated, the system needs to be informed where to store and retrieve data for the session. Issue 2.0 23 Quick Start Guide Capricorn Close User Log-On • Current User • Default PASSWORD • Known Users • Default 23 Oct 95 11:24:50 System Manager 17 Dec 95 15:45:44 Dudley Saville 19 Sep 95 09:21:21 Peter East 27 Nov 95 13:03:31 Sheila Rexell 9 Jan 96 19:37:54 Select Add Rename Delete ä Select a CLIENT from the list by clicking on the appropriate client. eg. YOUR CLIENT. ä Select a PROJECT from the list by clicking on it or ADD a new project by clicking on the ADD box and entering a project name. eg. YOUR PROJECT. ä Select a TITLE or create a new TITLE by clicking in ADD box and typing the new titles name. eg. YOUR TITLE. Quick Start Capricorn has been designed to enable automation to be used without going through the preceding operation. Using this method the previous mix tree will be deleted automatically each time QUICK START is used. ä Press the AUTOMATION ON key on the AFU’s GLOBAL AUTOMATION CONTROLS panel. This will bring up the client menu. ä Click on all default cursor positions until a mix tree has been created. The AUTOMATION ON led will go on solid. 24 Issue 2.0 Capricorn Quick Start Guide Automation Controls Separate automation control keys are provided on a strip basis for faders and mutes. The remainder of rotary controls and switches that may be dynamically automated are controlled by a separate set of mode control keys situated at the top of each channel strip. For the accessed path these controls are mirrored by the automation keys on the AFU. Global mode control keys are provided in the monitor section for faders and mutes. A separate set of global mode keys are provided to control all other rotary and switch controls that may be dynamically automated except faders and mutes. Scope Scope provides the facility to select or reduce the number of controls that are recognised by automation. The engineer may only want to have say faders and mutes automated at the beginning of the mix session because if everything was automated (or in automation SCOPE) he would be recording experimental tweaks with the EQ etc. Once that the engineer decides to automate Aux’s for example he can just call up the SCOPE PAGE. ä Click the SCOPE icon. ä Click the AUTOMATION button in SCOPE MENU page. ä Click on “ALL PATHS”. ä Click on the facilities that you want to be automated (turns yellow) or ä On AFU, touch the controls that are required, red LEDs indicate that they are in. ä EXECUTE and then confirm scope settings. Issue 2.0 25 Quick Start Guide Capricorn Mix Basics Every mix pass is kept on the hard disk. Every mix pass is kept on your removable media which means that you can play any pass at a later date in a different location. Mix Passes Going Back To Earlier Mix Passes ä Press MIX - to go back a mix. ä Press MIX + to go forward a mix. ä Press PASS - to go back a pass. ä Press PASS + to go forward a pass. ä EXECUTE. Mix Pass Numbers Every time that you run the tape and make an adjustment, that pass is kept and given a number which increments up a number as you make adjustments with each pass. The first Mix Pass number would be Mix 1, Pass 1. The sixth pass will be called Mix 1, Pass 6 etc. At any time you can step back through each mix pass. If you step back from the current pass, say Mix 1, Pass 6 to any previous pass, the next Mix Pass number will be Mix 2, Pass 1. The next pass would be Mix 2, Pass 2 and so on. 26 Issue 2.0 Capricorn Quick Start Guide Instant Undo The PASS- key can be used to abort the current record pass before the transport is stopped. If an incorrect move is made: ä Press the PASS- key while the transport is still running. ä Stop the transport. The Pass will be discarded so that you can rewind and make the correct move without having to go back to the Mix Tree. Mix Tree Close Mix Tree 0.0 1.1 Home Delete 1.2 1.3 1.4 1.5 1.6 2.1 2.2 Display Compress Milestone Text 2.3 Cancel Execute ä Click on MIX TREE icon to view all of the MIX PASSES. Exiting Automation ä Click on “CLIENTS” icon. ä Click on “LOG OUT” box. Issue 2.0 27 Quick Start Guide Capricorn Automation Modes These modes apply to all controls wherever appropriate. Mutes for example do not need or have glide or VCA style Trim. FAC’s do not need VCA style Trim either. Touch Record Faders FAC PURPOSE Allows the operator to add an offset to an existing move. OPERATION ä Press the respective RECORD and PLAY keys simultaneously on the fader, strip, AFU, or globally on the monitor section. ä When you touch the control it goes into record and all moves that you make are recorded. ä On release of the control it drops out of record and the control resumes replay of the play pass. 28 Issue 2.0 Capricorn Quick Start Guide Record Faders FAC PURPOSE To record new absolute positions OPERATION ä Press the respective RECORD key on the fader, strip, AFU, or globally on the monitor section. ä When you touch the control, it goes into record, the led starts to flash and all moves that you make are recorded. ä On release of the control the control will continue in record as if being touched staying at the position where you released it. Issue 2.0 29 Quick Start Guide Capricorn Auto Glide Faders FAC PURPOSE Allows the operator to automatically remove offsets. OPERATION ä Press the respective RECORD and GLIDE keys simultaneously on the fader, strip, AFU, or globally on the monitor section. ä When you touch and move the control from the play pass position the moves you make will be recorded. ä On release of the control, the control will glide back to the play pass position at the glide rate set for “auto glide time”. 30 Issue 2.0 Capricorn Quick Start Guide Manual Glide Faders FAC PURPOSE This mode allows the operator to null out an offset at any time at the press of a key. OPERATION ä When you touch and move the control from the play pass position the moves you make will be recorded. ä At the time that you wish to match the controls either locally or globally, press the respective GLIDE key, and the controls will glide back to the play pass position at the glide rate set for manual glide. Issue 2.0 31 Quick Start Guide Capricorn Auto Takeover PURPOSE Allows the operator to manually null a fader or rotary control back to the play pass position without using the nulling LEDs. OPERATION Faders and rotary controls may be in either Record or Touch Record modes. ä When you touch and move the control from the play pass position the moves that you make will be recorded. ä At the time you wish to match the control manually to the play pass position, press the GLIDE key associated with the respective control WHILST YOU ARE STILL TOUCHING THE CONTROL. ä As you move the control past the play pass position, the control will automatically match and drop out of record at the play pass position. 32 Issue 2.0 Capricorn Quick Start Guide Trim Faders Trim is only available for faders. PURPOSE Used to add an offset to a previously recorded mix in a similar way to VCA type automation systems. OPERATION ä Press the TRIM key either locally on the channel strip, or globally on the monitor section. The faders selected will jump to the zero position as indicated by the left hand fader scale. ä Pressing TRIM and GLIDE together will select the AUTO TRIM mode. The faders show two scales. The right hand scale reads from infinity to +10 and is relevant to normal fader operations. The left hand scale indicates 0 in the middle of the scale and shows +20dB and –20dB. The left hand scale is used exclusively in TRIM mode. ä When TRIM mode is selected the fader jumps to the centre of the fader scale. When tape is started the fader will remain stationary at the zero position irrespective of the original position of the play pass or any dynamic moves that may have been written. Issue 2.0 33 Quick Start Guide Capricorn ä By moving the fader +/– you can increase the dynamic or static gain structure of previously written fader movements by +/–20dB without overwriting the dynamic moves during the period you are touching the fader. 34 Issue 2.0 Capricorn Quick Start Guide Play Faders FAC Mutes PURPOSE Used to monitor a mix pass. OPERATION ä Press the PLAY key either locally on the fader, strip, or AFU for the accessed path or globally on the monitor section. ä When you touch and move the control from the play pass position, the moves that you make will be heard but automation will not be updated and you will not create a new record pass. Issue 2.0 35 Quick Start Guide Capricorn Isolate Faders FAC Mutes PURPOSE Controls are isolated from the automation system and will not playback the automation data or record new data. Isolate is available to faders, rotary controls, mutes and switches. OPERATION ä Press PLAY twice for the respective function, either locally or globally. Moves may now be made without effecting automation and previous mix positions will not be replayed. 36 Issue 2.0 Capricorn Quick Start Guide Mute/Switch Automation All mute/switch functions in Capricorn that may be dynamically automated operate in the same way. Add Mode This is analogous to the fader TOUCH RECORD mode and is the default mode. FAC Mutes ä Press the MUTE RECORD and MUTE PLAY keys associated with the mute key. ä Pressing RECORD and PLAY keys at the top of the channel strip sets all the switches associated with the strip (except the mute key) to the ADD mode. ä Pressing RECORD and PLAY on the AFU sets all the switches for the accessed path to the ADD mode and mirrors the automation keys on top of the channel strip. Issue 2.0 37 Quick Start Guide Capricorn Write Mode This is analogous to the fader RECORD mode. FAC Mutes ä Press the MUTE RECORD key associated with the mute key. ä Pressing the RECORD key at the top of the channel strip sets all the switches associated with the strip (except the mute key) to the WRITE mode. ä Pressing RECORD on the AFU sets all the switches for the accessed path to the WRITE mode, and mirrors the automation keys on top of the channel strip. 38 Issue 2.0 Capricorn Quick Start Guide Double Press Operation Of Mutes And Other Switches The Mutes and other switches have a special “double press” feature allowing the engineer to quickly edit mutes or other automated switches without having to use the computer screen. As the name suggests, the switches have a double press feel. The first press is the same as say holding a finger on a fader, the current position is maintained. The second press is to INVERT the switches state, say turning a Mute to an UN-MUTE. When the key is pressed lightly the RED LED above lights up. You are now maintaining the state that the switch or mute is in. So if it is un-muted you will keep it un muted while holding it in this position over writing upcoming mutes. ä If in UPDATE mode, once you let go of the switch it will wait until the next change and then continue as before. ä If in RECORD (or WRITE) once you let go of the switch it will continue with the current state. Issue 2.0 39 Quick Start Guide Capricorn Collect Touch Collect Touch provides the operator with the facility to put any group of controls that may be automated into a state of RECORD either prior to the start of a new pass, or drop the controls into RECORD at a specific point in a pass. GLOBAL OPERATION ä Press the master COL TOUCH key. ä Touch the required controls on the strips or the AFU and set the new control positions as desired. MON 40 ä Either press the master RECORD key before starting the transport (to record from the beginning), or start the transport and press the master RECORD key "on the fly" to drop in the new values at the desired point. Issue 2.0 Capricorn Quick Start Guide Other Useful Functions Copying Control Parameters ä Press COPY. ä Select the parameters to be copied from the AFU. ä MON HINT: When COPY is pressed, the touch LEDs for all controls on the AFU will illuminate red. In this state, all of the control parameters will be copied. If this is not required then by touching any control on the AFU everything will be de-selected except for the control touched. Other controls can now be added to the set of controls to be copied. ä Press the ACCESS key for the source path, and then the ACCESS keys for the destination paths. ä Press COPY again to execute. Linking Controls Linking is used to link (or gang) any number of the same control together. Offsets are retained. To make a Link ä Press the LINK key. ä Select the control to be linked from the AFU (e.g. EQ, AUX1, etc.). ä Press the ACCESS keys for paths to be linked. MON Issue 2.0 ä Press LINK again to execute. 41 Quick Start Guide Capricorn Fader To AUX Copy This enables a stereo main mix of fader levels, pans and mutes to be duplicated onto a stereo AUX for an instant headphone mix, which can be adjusted. ä Press the FADER Û AUX key. ä Touch the AFU fader (the null LEDs will illuminate). This is the source. MON ä Touch the contribution control on the AFU for the required AUX. This is the destination. ä Press the ACCESS keys for the Channels (and/or other paths) to be copied. Usually all Channels are selected. ä Press the FADER 42 Û AUX key again to execute. Issue 2.0 Capricorn Quick Start Guide Other Advanced Features See the User Manual for detailed information on these features. Off Line Edits Off Line Edit functions include: Trim Fader levels can be trimmed off-line by any specific value. Mix Conform For Mixing with picture. Mix automation can be moved, deleted or new blank stock inserted for when picture scenes need to be moved, deleted or new scenes added. Timecode Slide A whole mix or just certain controls can be offset by a definable timecode value. Mix Compare/Merge 3 different mixes can be compared at different sections of a song, and then can be merged to form a new mix. Eg. A good backing vocal balance in verse from one mix, chorus balance from another mix and the bridge section from a third mix could be compared on line, edit points and cross fades adjusted and then merged into a new mix. Record to End This mode can be entered and then whenever the tape is stopped, the control in record will stay at its current level and erase everything downstream with its new level. Stores Stores can be automated against timecode which gives the engineers the ability to automate routing. Issue 2.0 43 Quick Start Guide Capricorn Surround Sound Mixing in surround formats can be easily achieved. Track sends (busses) can be nominated to be a film group and then channels can be sent to the busses and panned between them. This can be done on the AFU, the channel strip or by optional joysticks. A full monitoring and scoring panel is also available as an option. 44 Issue 2.0 Capricorn Quick Start Guide Index cycle, 21 A cycle and locate, 20 assign bank, 7 D strip, 8 double press, 39 strips, 7 automation, 23 controls, 25 exiting, 27 E EQ band, 19 global controls, 24 frequency, 19 quick start, 24 gain, 19 automation modes auto glide, 30 auto takeover, 32 isolate, 36 manual glide, 31 play, 35 Q, 19 EQ selection, 19 F FAC function selection, 19 record, 29 selection, 19 touch record, 28 trim, 33 fader to aux copy, 42 aux masters, 17 aux sends, 16 G auxes, 9 graphics display system, 3 B H balance, 19 headphone mix, 16 bank headphone/cue send, 17 assignment, 7 naming, 22 primary/secondary, 18 I inputs, 8 switching, 18 J C jack plug, 15 clients, 23 clock rate, 10 collect touch, 40 configuration, 22 configure I/O ports, 11 configuring processing, EQ etc, 15 console set-up, 7 L label list, 21 labels, 20 linking controls, 41 locate, 20 log out, 23 copy control parameters, 41 cue control, 17 M cue send, 17 machine control, 20 Issue 2.0 45 Quick Start Guide machine track control, 20 MADI links, 10 making paths stereo, 12 mic/line signal, 11 mix Capricorn S sample frequency, 10 scope, 25 sec bank, 18 selecting mic or line input, 14 basics, 26 instant undo, 27 passes, 26 tree, 27 mix compare/merge, 43 stereo, 12 storage, 22 stores, 43 storing configurations, 22 strip mix conform, 43 assignment, 7 mix set-up, 7 modify processing, 15 monitoring outputs, 14 number, 7 surround sound, 44 system configuration, 7 monitors, 8 multitrack, 10 mute/switch add mode, 37 T tape machine monitor, 10 write mode, 38 setup, 10 mute/switch automation, 37 tape return monitors, 8 timecode, 10, 21 O timecode slide, 43 off line edits, 43 outputs, 9 title, 24 track arming, 20 trackball, 4 P trim, 43 pan, 19 U path naming, 22 path config, 11, 15 path numbers, 7 useful functions, 41 user select, 22 using like an in-line console, 18 phantom power, 14 phase, 14 project, 24 W width, 19 R recalling a configuration, 22 record to end, 43 reverse routing, 14 routing, 13 inputs to FX returns, 13 inputs to groups, 13 inputs to the mix, 13 inputs to tracks, 13 tape returns to main O/P, 13 46 Issue 2.0