1
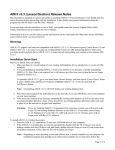
AIM I v3.3 (With Learning Objects) Release Notes
This document is intended as a quick start guide to installing AIM I v3.3. You should read this entire document
before proceeding with the installation. It also details some general information about the program that did not
make it into the User’s Manual.
If you need help with the installation or use of AIM, you should contact the System Support Office (SSO).
Contact information can be found in the User’s Manual.
Warnings
If you are running SQL Server, make sure you don’t update your SQL Server database if you plan on continuing
to use AIM I v3.2.1. Contact the AIM SSO for details on how to use both AIM I v3.2.1 and v3.3 on the same
computer when connected to SQL Server.
AIM I v3.3 output is not backward compatible with AIM I v3.2.1, i.e. you cannot export a Course from v3.3 and
import it into v3.2.1. As such, if you plan on creating/editing Courses in AIM and passing them to other users,
you either need to perform this in AIM I v3.2.1, or make sure all users getting your content is also running AIM I
v3.3.
Installation Quick-Start
Before you install AIM, you should:
1. Make sure there is a recent backup of your existing AIM database (if you already have a version of AIM
installed).
2. If you are planning on installing AIM I v3.3 into your AIM I v3.2.1 directory, consider uninstalling AIM
I v3.2.1 first. This is not required, but it will remove any files from your system that are no longer needed
by AIM I v3.3.
To uninstall AIM I v3.2.1, go to your Start Menu, choose Settings, and then choose Control Panel. When
it opens, double-click Add/Remove Programs. Highlight AIM I v3.2.1 in the list, and click the
Add/Remove button.
Note: Uninstalling AIM I v3.2.1 will NOT delete your existing database files.
3. Write down the location of the AIM directory on the network, if you run AIM from a server (not installed
on your local machine).
4. Write down the location of the directory containing the existing AIM database, as well as the name of the
associated Graphics directory, if any. If you do not have an existing database, determine where you want
to place it (on the network or on your local machine).
Warning:
If you are installing AIM I v3.3 separately from a previous version, you will need to make a
copy of your existing Database directory to use with v3.3. If you select your existing v3.2.1
database to be used with v3.3, AIM will convert it to v3.3 format, and it will no longer work
with the v3.2.1 software.
To install AIM I v3.3, follow these steps:
1. Insert the AIM I v3.3 installation CD into your CD-ROM drive of your computer.
2. If the AIM I v3.3 installer does not start up automatically, double-click the My Computer icon on the
desktop, double-click the CD drive icon, and finally double-click the Setup.exe icon (if your system does
not display extensions of files, then the file will be called just Setup).
Note: Depending on what operating system and software that is already installed on your computer, the
installation program may prompt you to reboot your computer one or more times before the
Page 1 of 13
AIM I v3.3 Installation Guide and Release Notes
installation program actually runs. This is normal, as it is installing certain key system files
required for it to run correctly.
3. Click the Next button to navigate past the Introduction screen.
4. The next screen displays the Read Me file for the installer. Make sure you read it through before
continuing.
5. The next screen displays the Customer Information screen. You can enter your Name and Company into
the appropriate fields. You will also see an option to install it for all users or just the current user. Choose
All Users if you want any user on that computer to be able to use the software.
6. The next screen will prompt you for the directory to install the AIM software. Click the Change button to
select another directory. If AIM will be run from a network server, select the directory where the AIM
software is located. Then click Next.
7. Finally you need to select which type of installation you want to perform. There are three options:
• Typical: Choose this option if you are updating AIM, installing AIM on your local drive, or
installing it on a server for others to use. This will install all the required elements for AIM to run.
• Minimal: Choose this option if you are planning on running AIM from a server. This will install
on your local machine just the software needed to run an existing copy of AIM I v3.3 already
installed on a network directory.
• Custom: Choose this option if you want to install some of the optional components, for example,
the NAVEDTRA 131A manuals in PDF format.
Note: If you are installing the software on a computer running Windows 2003 Server, you will need to
select the Custom, and deselect the box marked Data Access.
8. Once you’ve made a selection, click on Next. If you chose the Custom option, you will now be displayed
a list of AIM components to install. Make your selections, then click Next one last time.
9. Finally, you’ve reached the installation summary screen. This summarizes your selections from the
previous screens. If you want to change any selection, click Back. If all the settings seem correct, click on
Finish.
The installation will now commence. When it is finished, it may ask you to reboot your computer one last time.
Once installed, you can run AIM by double-clicking the icon on the desktop, or by going to the Start Menu and
choosing Programs->AIM I->AIM I.
Installation Comments:
• AIM has been tested under Windows 2000/XP. For best results and security, you should make sure you’re
running with the latest Service Packs and patches.
• AIM has not been tested for compatibility with Windows Vista. Currently, the only known issue is that
modules (like TCCD, LP, and the Administrative Utility) will open behind the current windows.
Known Issues:
• Due to the installation of several system files, administrative rights are required on the local machine in
order to install AIM I v3.3.
• Due to the way AIM now works, you cannot install multiple copies of AIM I v3.3 on one system.
However, you can make a copy of the AIM directory, delete the AIM.INI file, and choose another
database to use as your AIM database (this can be done so you have AIM icons for a local database and a
networked database).
• Even if you do keep two AIM directories on one system, when you launch an AIM module (like LP or
Admin), it will be launched from the directory in which AIM was originally installed. Therefore, if you
try to put product updates into the copied directory, the updated software will not be used. It will need to
be installed in the original directory.
Page 2 of 13
AIM I v3.3 Installation Guide and Release Notes
Running AIM for the First Time
The first time you run AIM I v3.3, AIM will perform the following actions:
1. If you used the Minimal option when you installed AIM, it will set up AIM to allow it to run from the
server.
2. If no AIM.INI file exists in the AIM directory, you will be prompted to specify the database, graphics and
media directories. If you already have an existing database, enter the path to that directory. If you do not
have an existing database, enter the path where you would want to create one (or leave the default settings
as is). If the directory you specify does not contain an AIM database, one will be created for you.
Note: The installer will never overwrite an existing database with a new one.
3. If you have a previous installation of AIM I, you will be prompted for the location of a new Media
directory. This directory is where AIM will store the files associated with the IMIs.
4. If the database needs to be converted to the latest version of AIM, you will be stepped through the process
of converting it to v3.3 format.
Note: You will need to have permissions to create and delete files to both the AIM and database
directories in order to convert the database. If you do not have these permissions, see your
Network Administrator.
Warning:
Once you’ve converted your database to v3.3 format, it can no longer be used with any
previous versions of AIM. If you still want to use a previous version of AIM, you will need
to make a copy of your AIM database directory and select that new directory when setting
up the database.
5. If you have Microsoft Word installed on your machine, you will be prompted to enable macros in Word.
AIM uses Word macros to allow you to add graphics to your Sheets from the AIM Graphics library.
a. If you have Word 97 and have Macro Virus Protection turned on in Word’s Options screen, you will
be prompted to turn this off. You do not have to disable this option. However, every time you open
part of the TG in Word, you will be prompted to enable macros in the document.
b. If you have Word 2000 or greater, you will be prompted to accept the digital certificate attached to
the macros. The macros used by AIM are signed to verify the author of the macros. If you accept the
certificate (by checking the “Always trust macros from this source” box), Word will not prompt you
about macros in AIM documents.
Once these are done, the AIM login screen will display.
AIM Comments:
• The AIM documentation is in Adobe Acrobat format. If you don’t already have it installed, the installer
for the free Adobe Acrobat Reader is included on the CD.
• The Help menu on the main AIM screen allows access to the On-line help as well as PDF versions of the
AIM User’s manual, a list of changes made to AIM I v3.3, and a set of Frequently Asked Questions.
• If at any time you want to connect to a different database, just exit AIM and delete your AIM.INI file.
The next time you run AIM, it will notice that the AIM.INI is missing and again step you through
selecting a database directory.
• AIM now supports use of SQL Server 7 or 2000 as the database engine. SQL Server offers better stability
and scalability than the Microsoft Access database engine used by AIM. If you want to upgrade your AIM
database to SQL Server, read the file AIM I v3.3 SQL Server Migration.pdf found on the installation CD.
Page 3 of 13
AIM I v3.3 Installation Guide and Release Notes
Known Issues:
• If you’re using Word for editing TG Sheets, and the AIM Graphic or IMI buttons (or associated menu
items under the Insert menu) within Word cause errors to appear, you may need to update Office with the
latest Service Packs. These can be found on the installation CD. If you do not have permission to install
the updates, changing your security setting to Medium or Low should also work. To change your security
settings, open Word and go to the Tools->Macros->Security menu.
• It is highly recommended that you run the latest Service Packs for your version of Microsoft Word.
Warning: Before updating Office 2000 with a Service Pack, you MUST have the Word/Office 2000
installation CDs used to install Office on your computer. The Service Packs require these CDs during the
installation. If you try to install the Service Packs without the CDs, your installation of Word/Office may
become unusable.
•
•
•
•
AIM does not support versions of Microsoft Word prior to Word 97.
The Graphics module cannot accept all types of GIF graphics, although some versions of the file format
do work. If you have a GIF graphic that AIM cannot read, try saving it in another format (JPG, for
example) and then import it into AIM.
If you add a graphic while on a line formatted with Bullets and Numbering option, the added graphic
entry will be formatted with the same style. To work around this, remove the style from the insertion
point before adding the graphic.
For spell checking in the HighEditor, the option “Check words in user file” in the Spell Check Options
dialog should be turned OFF. The text of this option is unclear. It does not tell the spell check to check the
user dictionary, which is handled simply by having the user dictionary, HSPELL.HUE, listed in the list at
the top of the dialog. This option pertains to using the Auto-Correction feature of the spell check. Turning
this option on can cause some text to disappear during a spell check operation, or, in the worst case, cause
the program to freeze.
Page 4 of 13
AIM I v3.3 Installation Guide and Release Notes
Using FTP to download AIM patches
FTP (File Transfer Protocol) has been around for a long time, much longer than HTTP (HyperText Transfer
Protocol) that is used widely on the internet. Its purpose is to allow you to login to a protected area of a server to
upload and download files. The main reason we're using it now is to distribute patches that are too large to be sent
via email. It also allows us to get around security measures that many mail servers have in place that do not allow
executable files to be emailed.
There are several ways to access our server via FTP. The most direct way is to use the Command Line (DOS).
The picture below shows what an FTP session would look like using the command line. The first and most
important thing to notice is that you MUST login under the aimftp account. Some FTP servers are setup to allow
what are known as anonymous logins. This is where you don't have an account on the machine. Customarily you
are asked to provide your email address as the password. Our server is not setup this way.
The FTP server address is aim.aimertech.com. It can also be referenced by its numeric IP address, which is
146.145.253.105. Both the login name and the password are aimftp. The examples below show the
“aim.aimertech.com” notation, however you can also use the “146.145.253.105” notation.
The following pages describe various methods of accessing the FTP site. Note that the examples use AIM v3.2.1.
The same steps will apply to AIM v3.3 as well.
Regardless of how the patch is downloaded, they will need to be installed.. You need to double click on the zip
file to extract the update. You will need to tell it where your AIM program files are located on your machine in
order to place the files in the correct location. By default, this is:
C:\Program File\AIM I\ for the AIM I program
C:\Program Files\AIM II\ for the AIM II program.
As always, if you have any questions or problems, please contact the AIM SSO at (407) 381-8620 or (DSN 9608620).
Page 5 of 13
AIM I v3.3 Installation Guide and Release Notes
Using Internet Explorer
This section details using Internet Explorer (or Netscape) to access the site. These web browsers have the
capability to connect to FTP servers. The biggest thing to remember here is that you MUST specify in the URL
that you are using FTP, not HTTP. Go to the Address Bar and type the following: ftp://aim.aimertech.com (or
ftp://146.145.253.105). When prompted, enter the user name and password for the site (as mentioned earlier, this
is aimftp and aimftp. If you don’t get the login prompt, you can use the Login As item under the File menu to log
into the server.
Once you are logged in, you will be presented with a "Windows Explorer-like" interface (see above). Click on the
link for FileTransfer. On the next screen, click the link for AIMUpdates. Then click on the appropriate link for
the file(s) you are looking for. When you find the file you want, click on the link.
Page 6 of 13
AIM I v3.3 Installation Guide and Release Notes
You will be presented with the following dialog box, asking if you want to open or save the file. It is best to
actually save the file to your hard drive and extract it from there. Click on the “Save” button to save the file to
your hard drive.
Page 7 of 13
AIM I v3.3 Installation Guide and Release Notes
Using FTP under NMCI
This section deals with how to download via FTP if you are running under the NMCI environment. You will use a
program called Reflection FTP Client. To start the program, click on the Start button, and navigate to Programs ->
Reflection -> FTP Client. You should see something like the following:
Page 8 of 13
AIM I v3.3 Installation Guide and Release Notes
Click on the “New” button. When it asks for the host name, type in aim.aimertech.com, then click “Next”.
On the next screen, when it asks what kind of login do you want, click “User” and then click “Next”
Page 9 of 13
AIM I v3.3 Installation Guide and Release Notes
The next screen will ask for your user name. Type in “aimftp”. If you want, you can check the box that asks to
save your password as encrypted text. If you do, type in “aimftp” in the password box. If you choose not to check
the box, you will have to type the password in every time you connect. When you’re done with this screen, click
“Next”
On the final screen, you are asked to provide a name for the site list (see the first picture in this section). By
default, it will be called the name of the server. I chose to call it “Updates to AIM”. You can call it whatever you
want. The next time you run the Reflection software, the “Updates to AIM” site will be listed in the site list, and
you will just have to highlight it and click “Connect”. For now, make sure the “Yes” box is checked, and hit
finish. This will log you into the FTP site.
Page 10 of 13
AIM I v3.3 Installation Guide and Release Notes
Once you connect, you are presented with a split screen. On the left will be the files on your computer, on the
right will be the files on the FTP server. Navigating the FTP site is as simple as clicking on the folder you wish to
go to.
To get to the AIM updates, double click on “FileTransfer”, then “AIMUpdates” on the right hand side of the
screen. Then select the subfolder you wish to got to. When you find the correct zip file to download, drag the zip
file from the right side of the screen to the left hand side. This will download the file to your local machine.
Page 11 of 13
AIM I v3.3 Installation Guide and Release Notes
Using the Command Prompt
In Windows, you need to open the Command Prompt. You can find the icon for this under the Accessories folder
in the Start Menu. Once the Command Prompt window appears, type the command ftp aim.aimertech.com and
hit return. When prompted, enter the user name and password (mentioned above).
In the above example, after logging in, I told it to "cd FileTransfer" which, for those of you who don't remember
DOS (or Unix), changes the working directory to "FileTransfer". Next, I told it to “cd AIMUpdates”, which is
where the AIM Updates are located. Next, I performed a directory listing (dir) to see what was available.. Next, I
changed my working directory to “AIM_I_v3.2.1_Updates” . Next, I performed a directory listing, to see what
file(s) were available. I then told it "type binary". This tells the FTP program that the content of the file you are
about to download is binary. This is important because by default FTP thinks you want to download text files. If
you download a binary file in text mode, you'll get gibberish (that is if it doesn't bomb completely). The next
command is "get <filename>", where <filename> is the name of the file you wish to download. NOTE: It may
take quite a while to download the patch, depending on how fast your connection is. Please be patient. When it's
done, use the command "quit". NOTE: The above example uses Version 3.2.1. The process will be the same for
Version 3.3, however the filenames will be different.
If you are downloading an entire Install Disc, rather than just a patch file, there is a shortcut to downloading
multiple files at once. In the above example, after changing into the appropriate directory, instead of typing “get
Page 12 of 13
AIM I v3.3 Installation Guide and Release Notes
<filename>”, you would type “mget *” in order to download multiple files (that is, mget followed by an
asterisk). Once you have downloaded all of the Install Disc files, you can burn them to a CD from which you can
install the AIM program.
Page 13 of 13