1
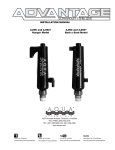
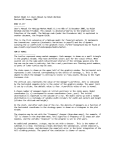
Restaurant Innovations’ FLATWARESAVER ® Deluxe II Utensil Retrieval System USER’S MANUAL ENGLISH Model JD-310 INTRODUCTION Congratulations! You have purchased the most effective restaurant utensil recovery system in the industry. Please read this operation manual before you start using your FlatwareSaver. It will help you understand its operation, maintenance, and cleaning, thus ensuring maximum savings and years of reliable use. TABLE OF CONTENTS INTRODUCTION ............................................................................................................................................... 2 TABLE OF CONTENTS ..................................................................................................................................... 2 PARTS DIAGRAM ............................................................................................................................................. 2 IMPORTANT SAFEGUARDS ........................................................................................................................... 3 HOW THE FLATWARESAVER® WORKS ..................................................................................................... 3 SETTING UP THE FLATWARESAVER® ....................................................................................................... 4 USING YOUR FLATWARESAVER® .............................................................................................................. 4 CARE AND MAINTENANCE ........................................................................................................................... 5 TIPS FOR BEST RESULTS ............................................................................................................................... 5 TROUBLESHOOTING ....................................................................................................................................... 6 CONTACT US..................................................................................................................................................... 6 SPECIFICATIONS .............................................................................................................................................. 6 QUESTIONS? ................................................................................................................................................ 6 PARTS DIAGRAM RED GREEN Tray RESET Button L.E.D. FUNCTION INDICATORS Handle GREEN LED: Comes on when unit is turned "ON". Flashes when battery is low. Battery Box RED LED: Stays "ON" when calibrating. Flashes when charging the battery. Goes "OFF" when charging is complete. Control Box AC Adapter Port Body On/Off Switch Tray and Control Box connectors AMBER LED: Flashes when metal is detected. Volume Control Figure 1 Figure 2 2 AMBER IMPORTANT SAFEGUARDS As with any electrical device, caution must be used when handling the AC Adapter which is used to charge the battery. The adapter should only be used at normal indoor room conditions. Never use an AC adapter other than that supplied for the FlatwareSaver Unplug the AC adapter from the power supply when not in use. Never use the AC adapter around water. In order to ensure proper functioning and long life, the FlatwareSaver control box must be protected from water and other liquids. A protective plastic splash cover (Fig. 3) is provided to aid in this. If your splash cover is unavailable, plastic wrap or another clear plastic product may be used for protection. (NOTE: The splash cover has a built-in “dimple” which allows the RESET button to be easily pressed). To complete the protection of your control box, always plug in the AC adapter port plug when the control box is not being charged. Clear plastic splash cover protects control box Plug in AC adapter port plug when not charging. Figure 3 HOW THE FLATWARESAVER® WORKS The FlatwareSaver has a custom-designed metal detector underneath the tray. When table scraps are dumped onto the tray, metallic items anywhere on or above the tray are detected. This causes the speaker to “beep” continuously and an amber LED light on the control panel to flash until the metallic item is removed. The metal detector is selfcalibrating, so there is no need for adjustments. This calibration occurs every time the unit is turned on, when the RESET button is pressed, or when a change in the ambient metal level is detected. This latter situation can occur when the FlatwareSaver is moved while “ON” or when a metal object is moved slowly toward the tray. Ramekins and other valuable items that are not metallic are detected with the help of the Ramekin Savers. Ramekin Savers, sold separately, are aluminum stickers which are usually attached to the outside bottom of the ramekin. They are specially designed and manufactured to maximize detection and to adhere through hundreds, if not thousands, of washes in high pressure dishwashing machines and in high heat. 3 SETTING UP THE FLATWARESAVER® (www.FlatwareSaver.com: SUPPORT > Instructional Videos) 1. Place the FlatwareSaver body on top of a 32 or 44 gallon round trash container. 2. Insert the control box into the cradle on the side of the Saver body by first sliding the right end under the right-side clip (Figure 4-A). Then gently pull back the left clip (Fig. 4-B) while lowering the left side of the control box (Fig. 4-C). Make sure the control box is securely fastened by both clips before continuing. 3. Place the tray in the FlatwareSaver's body, setting the 2 axles into the grooves in the sides of the Saver. The handle should fit into the slot in the side of the body and engage the latch. 4. Connect the tray to the control box by holding the black connectors on each cable and gently pressing together while rotating until a “click” is heard. (See Figure 5.) Figure 4 Left hand Right hand 5. Place the splash cover over the control box. 6. If Ramekin Savers are to be used to safeguard your ramekins or other nonmetallic items, be sure to clean the surface of the item before applying the Ramekin Saver. This will ensure good adhesion and long life of the Saver. Push Figure 5: Connecting USING YOUR FLATWARESAVER® (www.FlatwareSaver.com: PRODUCTS > FS Deluxe) 1. Charge the Battery – Unless your control box is wall mounted and permanently connected to an electricity source, we recommend you establish a charging location, such as the manager’s office, which is free from moisture, and charge the battery once a day. Plug the A/C adapter into the charging port (see Fig. 1 for location of AC Adapter Port) and then into a 110V electrical outlet. Turn the knob on the control box to the CHARGE position. The red LED light will come on and start flashing, indicating that the battery is charging. Once the battery is fully charged, the red LED light will stop flashing and go off. The green light will come on. Important: The battery for your unit may have been factory-installed. If not, remove the two silver screws from the battery box cover and install the battery as described in our website, www.FlatwareSaver.com, under SUPPORT > Instructional Videos. Replace the two screws. Then, prior to initial use, let the battery charge completely for 8 hours, or until the red light stops flashing and the green light stays on. 2. Select an appropriate location for the FlatwareSaver. The ideal location will be one which a) Is easily accessible b) Is not under or touching a metal counter c) Is at least 6 inches (15 cm) away from a metal wall d) Discourages movement of the trash can. (Moving the trash can while the FlatwareSaver is "ON" can cause a false alarm or automatic recalibration, which deactivates the detection mode temporarily.) 3. Activate the Unit – Lift the splash cover from the control box and turn on the FlatwareSaver by rotating the knob clockwise to the "ON" position. A single “beep” will be heard and the red LED will come on for about 8 seconds while the unit is calibrated for its specific location. When the red light goes out and a double “beep” is heard, your FlatwareSaver is calibrated and ready to use. Be sure the tray is free of metal items when calibrating. 4. Set the volume of the speaker by placing a metal object such as a fork on the tray to activate the alarm. Adjust the volume-control knob until the volume is at the desired level. Remove the metal object and replace the splash cover over the control box. 5. Begin using your FlatwareSaver - Dump all table waste directly onto the tray. If the alarm is activated, identify what metal object(s) is/are being detected. Remove any valuable items and then dispose of the waste by lifting up on the tray handle and rotating, or “flipping” the tray until the waste falls into the trash can. Although the FlatwareSaver was designed to detect metal objects through several inches of waste, it is recommended that the tray be “flipped” after every load or two of waste. This will prevent a large amount of waste from building up on the tray, thus making it easier to identify and remove valuable items. 4 CARE AND MAINTENANCE (www.FlatwareSaver.com: SUPPORT > Instructional Videos) Your FlatwareSaver is virtually maintenance free; simply clean it once a day to prevent the buildup of food residue. Although the control box was designed to resist indirect spills, it is not waterproof and must not be submerged in water, washed with a sprayer, put in the dishwashing machine, or subjected to direct spills. Whenever the control box is vulnerable to liquid contamination, such as when it is in use or simply in the kitchen area, 1. be sure the AC adapter port plug is properly inserted (see Figure 3), and 2. use the splash cover that was provided to protect the control box from accidental spills. If the cover is unavailable, use a substitute such as plastic wrap. Note that more covers can be purchased from our website, www.FlatwareSaver.com. To clean the FlatwareSaver, we recommend the following procedure: 1. Remove the control box splash cover. Left hand Right hand 2. Turn off the FlatwareSaver 3. Disconnect the Control Box from the Tray. To do this, grasp the black connector of the tray cable in the left hand and the silver textured rings of the Control Box cable connector in the right hand. Pull apart. (See Figure 6.) 4. Remove the control box by gently pulling back the left snap clip while lifting the box from the left. Take it to the office or other designated location to recharge the battery. Pull Figure 6: Disconnecting 5. Rinse and dry the splash cover. 6. The control box should have been protected during use, but if it does require cleaning, use a damp cloth to wipe it clean. Do not allow water to enter the control box. 7. Take the FlatwareSaver tray and body to the washing area. These can be sprayed down with hot water or cleaned with a sponge or brush using soap and water. Cleaning in a dish washing machine is not recommended. as the high heat can damage the FlatwareSaver electronics. After washing, blow excess water out of tray cable connector. Low Battery: When the battery is running low, the green LED light will start flashing. Charge the battery as soon as possible to ensure optimal performance. To charge, remove the splash cover, turn the control box off, and then disconnect the control box from the tray. Follow the directions in “Charge the Battery” under "USING YOUR FLATWARESAVER" on page 4. (NOTE: It is recommended that the battery be charged every night, even though the low battery indicator may not be flashing.) TIPS FOR BEST RESULTS Do not place your FlatwareSaver® directly under a metal counter; doing this may set off the metal detector even if there is nothing on the tray. Try to keep the FlatwareSaver® and its trash receptacle stationary. If it IS moved from its original location and the alarm beeps, just press the reset button and allow the unit to recalibrate for the new location. Avoid placing large quantities of ice or hot food on or under the FlatwareSaver®. The alarm can be activated by extreme heat or cold. Your FlatwareSaver® is designed to detect metal utensils. Some items, like butter chips, creamers and some beer bottles contain aluminum in the wrapping or label. These items work like the Ramekin Savers and will set off the alarm on your FlatwareSaver®. Due to the shallowness of the tray, they are easily identified and removed. Or you can use a separate trash receptacle for these items, especially the bottles, to avoid such “false alarms”. Alternatively, the staff can be instructed to lift the foil off of the tray and wait 1 second for the beeping to stop, indicating that there are no valuable utensils about to be lost. If the battery power is too low to operate the FlatwareSaver, or the metal detecting feature cannot be used for any other reason, simply use the FlatwareSaver without the control box. In this “Original mode”, your staff will not hear the alarm, but they can easily see and remove valuable items on the tray before losing them into the trash. You will continue to reap the benefits of the FlatwareSaver, although at a lower level than with the Deluxe model. 5 TROUBLESHOOTING RECALIBRATION: Recalibrating is a quick and easy solution to many problems. To recalibrate the FlatwareSaver, you can either turn the unit off, wait 2 seconds, and then turn it back on, or you can simply press the RESET button. To press the RESET button, it is not necessary to remove the splash cover from the control box. Simply press down and release the cover in the area over the RESET button. If the splash cover is not on the control box, a thin object such as a pen, fork, or toothpick can be used to press the button directly. Be careful not to puncture the plastic wrap that may be on the control box in place of the cover. Recalibration should take approximately 8 seconds. Problem: ● Cause: Solution: ● Cause: Solution: Problem: ● Cause: Solution: ● Cause: Solution: Problem: ● Cause: Solution: ● Cause: Solution: ● Cause: Solution: ● Cause: Solution: ● Cause: Solution: All three LED lights flash at the same time when first turned on. The tray cable connector is dirty. Use a brush or cotton swab and either rubbing alcohol or detergent and water to clean it, then blow out any excess water. Water may have contaminated the electronic components in the tray. This is covered under warranty. Call Restaurant Innovations for instructions. Calibration takes too long or doesn’t ever complete. Too much metal present when calibrating. Make sure there is no metal in, on, or under the tray. Recalibrate the FlatwareSaver using the procedure above. Water may have entered the control box. Remove the 2 screws from the battery cover and lift it off. Blow excess water out of the control box and let it dry. If the problem persists, call Restaurant Innovations for instructions. Alarm keeps beeping for no apparent reason. During operation, the FlatwareSaver was moved closer to a source of metal, like a counter, stainless steel wall, or even metal studs behind the wall. Recalibrate the FlatwareSaver using the procedure above. A metal utensil or object was dumped onto the tray while calibrating. Remove any metal items from the tray. Recalibrate the FlatwareSaver using the procedure above. A metal object, such as a can, aluminum foil, or a beer bottle with a metallic label, is in the trash can, underneath the tray. Either remove the metal object or empty the trash. A large metal source, like a steel counter or metal stud in the wall, is being detected when the tray is tilted to the vertical position. Rotate the body of the FlatwareSaver so that the handle is pointing in a direction that is parallel to the metal source, not pointing at the metal source or in the opposite direction. A source of heat, such as steaming rice, is in the trash can, or ice is on the tray. Extreme heat or cold can cause the alarm to activate. Flip the tray to the open position to allow the steam to escape or ice to fall into the trash. Wait for a few seconds until the beeping stops. CONTACT US If you have any needs or questions regarding product operation, troubleshooting, warranty, spare parts, or your account, please call us at 1-877-366-4655, or email us at [email protected]. SPECIFICATIONS Power Source Rechargeable Battery Battery Life Standby Current Detecting Current Charging Current Charging Time QUESTIONS? AC adapter (UL®): Input = AC 120V, 60Hz; Output = DC 9V, 500mA Ni-MH 7.2V, 1300mAH Approx. 500 - 600 charges 8mA 160mA Max 350mA 6 -8 Hrs, pulse current Please see our instructional videos at www.FlatwareSaver.com. ® © 2012 Restaurant Innovations. FlatwareSaver is a registered trademark of Restaurant Innovations. Manufactured in the USA and China for and exclusively distributed by Restaurant Innovations, Houston, TX, USA 6