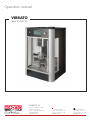
1
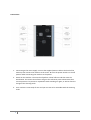
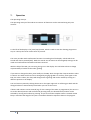
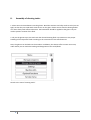
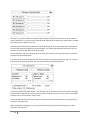
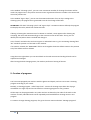
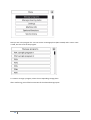
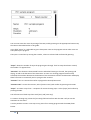
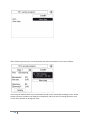
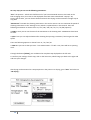
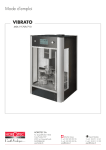
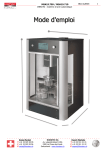
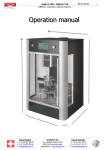
Operation manual VIBRATO MSA 19.709/710 HOROTEC SA Av. Léopold-Robert 105b Case Postale 837 2301 La Chaux-de-Fonds SWITZERLAND Marché Suisse T. +41 32 925 95 95 F. +41 32 925 95 96 Export Markets T. +41 32 911 21 21 F. +41 32 911 21 22 www.horotec.ch [email protected] [email protected] VIBRATO Machine without options and without baskets : MSA19.709 Machine without options and with baskets : MSA 19.710 (1x MSA19.569 / 3x MSA19570 / 1x MSA19.571 / 1x MSA19.572) The following additional functions are available : OPT1: extended cleaning movements : MSA19.710-A If this option is activated, the angle of rotation of all cleaning movements can be adjusted in the settings menu separately. OPT2 : Vibrasonic : MSA19.710-B When this option is enabled, the movement of "VB" in the cleaning programmes can select and customize the settings. During this movement, it is possible to constrain the rotation angle to 36 degrees. As well, an own, sharp acceleration ramp is stored for this movement produces an oscillating "vibration movement". OPT3 : SD card export : MSA19.710-C If this option is enabled, the machine logs all cleaning operations, with date, time, duration, used program and used movements, as well as the current state of the liquids used during cleaning. A serial number is generated for each cleaning that appears after cleaning in the display and a TXT file is written to the SD card, which contains all the information. OPT4 : Master/slave : MSA19.710-D If this option is activated, a relay is switched synchronous to the exhaust fan of the machine. It can be used to connect external exhaust systems and control them with the machine. 1. Index 2. Introduction 3. Declaration of conformity 4. Safety instructions 5. Technical fatcs 6. Initial start up 7. Operation 8. Equipping 9. Creating cleaning programs 10.Performing cleaning programs 11.Settings 12.Optional functions 13.Cleaning and maintenance 14.Disposal 2 2.Introduction Dear Sir or madam, many thanks for purchasing this product. With the purchase of the Vibrato MSA19.710, you have acquired a fully automatic washing machine, for cleaning watch movements and movement parts with completely free programmable cleaning processes. The machine offers the possibility to use 5 cleaning tanks and one ultrasonic tank, as well as a drying station in free programmable process. Please keep the operation manual. 3. Declaration of conformity. This device complies with European standards (CE) according to 2006/42/EC directives. A copy of the Declaration of Conformity can be provided on request. 3 4. Saftey instructions To avoid male functions, damages of the machine or injuries, please cearfully read and obey the following safety instructions and standards for proper use resp. the clearly defined application field of this machine. • • • • • • • • • • Make sure that your mains voltage corresponds to that indicated on the plate on the back of the machine. The equipment you have purchased may only be connected to a 230 volt/AC/50 Hz mains socket. Persons without proper instruction may not use the appliance, unless they are supervised separately by a legitimate service, and instructed sustainable. The device is not to be suitable for being operated by children or by not trained personnel. Exclude all possibilities for unsupervised use by untrained and unauthorized persons. Ensure that during cleaning of the unit the power switch is set to zero and the power cord is disconnected from the electricity network. Make absolutely sure that until the completion of any cleaning or maintenance work, the use of the device by other people is not possible. Make sure that the machine is only operated only in a well ventilated room or connected to an external exhaust. Take care when loading the machine not to damage any mechanical or electrical parts. When suspected damage of any kind, shut the machine down and please make sure that a further use by others is not possible. In case of damage of the machine or the cable further use is strictly prohibited. When using cleaning fluids take care to use them according to the safety instructions of their respective manufacturers. Do not use any cleaning solutions that are not approved by us. Please Inquire in case of doubt. Damage due to improper use of the substances are not subject to the liability of the manufacturer (L-‐trade) or the supplier of the cleaning fluids. Do not use explosive substances Do not mix cleaning fluids with each other. Do not try to make own repairs. Please contact a trained service technician or the manufacturer. Unauthorized repairs -‐ if not expressly approved by us in writing -‐ lead to void the warranty and liability warranty from the manufacturer. 4 5. Technical features: Device type Vibrato Reference number of the manufacturer L1-‐23 Voltage 230v / AC / 50hz Power max. 600 watt Power connected to inactive channel 35 watt Weight without packaging 71 kg Weight with transport packing 102 kg Dimensions 480mm x 480mm x 760mm Country of origin Germany Specific technical shipping information: Extracted air Internal 80mm Suction force 26 qm/h – free movement Guide language English Standard content of delivery Vibrato MSA19.710, ready for connection 1 Piece of power cord with EURO plug 5 Piece glass container 1 Piece ultrasonic tank 5 Piece breakwater for glass containers 1 Piece user manual 1 Piece door handle 5 6. Starting the device: Remove the transport packaging. Carefully remove the transport packaging. Open the screws of the wooden box with a suitable tool. Taking care to remove all screws on a cover of the transport box and remove step by step all sides of the box. The device is now available on the base plate of the transport packaging and can be withdrawn. Setting up: 1. If your device is delivered at very low temperature, there can be condensation, which can damage the electronics. Please leave the device 24 hours at its final place, so that it can assume the ambient temperature to avoid damage to the electronics through condensation. 2. Place the washing machine on a stable,plain surface. By turning the leveling feet, the machine can be aligned horizontally. Please ensure that the Foundation has sufficient stability. 3. Remove all packaging and transport securing materials from the working area. The machine is supplied with packing in the working area, supporting the tub lid. Remove it carefully from the working area. 4. Install the supplied handle bar by vertically pasting them on the glass with the attached doublesided tape. 6 Connections: 1. Connecting to the mains supply: connect the supplied paower cable to the back of the machine, then connect the machine to the mains. Be sure the power switch is in the off position when connecting the machine to the power. 2. Switch on the machine. The control will perform a brief self-‐test and then start the initialization. This means that all axes will go to the reference point to determine their current position. This process is repeated at each switching on again, as well as after the change of the cleaning tanks. 3. Your machine is now ready for use and you can start to be assembles with the cleaning tanks. 7 7. Operation The operating concept: The operating concept of the Vibrato is intuitive. All functions can be executed using only two controls. To the left of the display is the [start/stop] button, which is used to start the cleaning programs or stop it. It always has to be used to start any motion. The rotary encoder with confirmation function is located right of the display. A knob which can turned and also be pressed [ENC]. With this control can the menu can be navigated, settings can be made and confirmed and numbers and letters entered. With the help of the ENC, you can move the cursor in the display. This will allow values to change represented by a bracket to the value. [Value] If you want to change the value, press briefly on the ENC, which changes the clamp around the value > value <. The Value itself now can be changed by turning the ENC. To confirm, press again on the ENC, the value is taken, the clamp will change back to [value] and can be moved by turning to a different position in the display. You can leave any menu by clicking the Arrow on the upper right side. It will bring you back and the changed values are automatically saved when you exit via the arrow. If letters and numbers can be entered (E.g. for the naming of the tanks or programmes) the cursor is set to the desired position and confirmed by pressing. Now, the desired letter/number can be selected by turning and confirm by pressing. So you act until the complete name is entered. Please keep in mind that the length of any text is sometimes limited to represent them in the program. 8 8. Assembly of cleaning tanks: 1. Please insert the breakwaters into the glasses. Bend the stainless steel alloy mesh circular (not too tight) so that they are inside with some tension on the glass. Please ensure that the cleaning basket can rotate freely with sufficient distance. The breakwater should be applied to the glass. They are used to prevent rotation of the fluid. 2. Fill you the glasses up to the mark with the desired cleaning fluid. Pay attention to the proper handling of the respective fluids according to the instructions of the manufacturers. Now, the glasses can be load into the machine. In addition, the Vibrato offers an own menu item, under which you can make the loading and designation of the tanks/fluids. Switch to the menu "Cleaning tanks" 9 Here you can see the individual tanks B1 to B6 and right aside the associated name or the default name (substance A-‐F). These can be replaced while changing the tanks by your own names. Consider the contents of the bath here to use. The bath position identifies the position of the individual glass on the turntable and is starting with the ultrasonic bath B1 numbered counterclockwise. It is used for identification of the glass and its position on the turntable and cannot be changed. On the right side, you see a progress bar that shows the status of the respective tank if a maximum duration of use was deposited. Turn the ENC until the desired position is selected, where you want to place your glass jar. Confirm the selection by pressing the ENC. You now see overview of each tank position. If you press the button “Bath change”, the selected tank is turned to the front to allow an exchange. Please keep in mind that, for safety reasons the door must be closed. If it is not closed, the machine prompts you to close the door while turning. If the selected position has turned to the front, the buzzer sounds and the door may be opened to change or install the tank. After successfully changing the cursor jumps automatically to the [counter reset] button, which resets the two counters. 10 In the window "Cleaning cycles", you can enter a maximum number of cleaning the solution will be used. The progress bar in the parent overview screen is generated from this number. The counter will count the previous use. In the window "Age in days", you can set the maximum duration of use in days. Analog to the cleaning cycles, the progress bar is generated since the last change of the bath. ATTENTION: If for both "Cleaning cycles" and "Age in days" a maximum value is defined, the progress bar displays the value, which first reaches the limit. If during a cleaning the maximum use of a solution is reached, a note appears after cleaning. By accepting, the menu will automatically go to the overview screen of the tanks. There, you can identify the bad, whose limit is reached and change it. In the "Name" box below the tank can be given an individual name. E.g. the containing cleaning fluid. "B1" stands for position 1 of the bath in the machine. If no name is entered, the "BAD NAME" field is not changed it shows the default name or the position only if the default name is deleted. Using the arrow right above you can switch back to the tank overview and analog all tanks can be adjusted and changed. After leaving the bath changing menu, the machine performs a homing of the axis. 9. Creation of programs: You have now equipped your machine with the glasses and liquids, and can now create a cleaning program according to your needs. Basically, a cleaning program -‐ called "Step chain"-‐ consists of cleaning steps while also drying is considered as a single step and can be fitted into a cleaning program on every position. All the steps can be programmed in any order and are not bound by the order of the tanks in the machine. As well, individual tanks can be repeatedly used with different cleaning moves in one program. To create or change cleaning programs, first go to the main menu and select “Manage programs” 11 Now you are in the program list. You can see the 32 storage places (P01 to P032) and in case a name is used, also the name of the program. To create or change a program, select the corresponding storage place. After confirming, you will find an overview of the selected storage space. 12 You can now move the cursor by turning of the ENC, and by pressing on the appropriate location vary the value as described earlier in this guide. In the field "name:" it is advisable to give a descriptive name to the program so that other users can easily identify the program. The input is carried out by turning the encoder, a letter is selected and confirmed by pressing. "Steps": shows the number of steps the program goes through. If still no steps have been created, the number "0" appears here. "Duration": the duration is determined from the individual cleaning in the tank, the spinning and drying, as well as the duration of the movement. As soon as a cleaning program has been fully executed, the machine determines the duration of the movements and the total duration and display them from now on numerically and as a progress bar accurate. "Counter": here it is counted how often a program has already been used. "Counter reset": to reset the counter, select [counter reset] and confirm by pressing on the ENC. "Steps": To create a step chain -‐ a sequence of various cleaning steps -‐ select [steps] and confirm by pressing the ENC. You will now see a blank step chain with [start] and [new step]. To create a cleaning step, select the [new step] field and confirm with the ENC. Left you see the statement on the menu. It is also possible to insert a new step at any point of an existing program with the START/STOP button. 13 After confirming a new step is inserted (shown left), whose parameters can be set as follows: In this step the default values are pre-‐selected now and can be customized according to your wishes. Rotate the rotary encoder to the field left in the display, which you want to change and press once on the rotary encoder to change the value. 14 At every step you can set the following parameters: "Pos:" the position – which tank shall be used. If you have submitted names to the baths in the bath changing menu, the name is also displayed. Here bath 2 was named with "Isoprop.". By turning the encoder, you can choose the desired tank. Also drying can be inserted as a single step at any point "Movement": herewith the cleaning movement in the tank is meant. You can customize all speeds of cleaning movements in the "Settings" menu, which is explained later in this manual. There are following movements to choose from: LD / SD / LW / SW / LO / SO / LX / SX /VB (optional) « 03:00 »: Here you can set the time of the movement in the cleaning tank. 3:00 Minutes have been set here. « Spin»: here you can adjust whether after cleaning the spinning is executed , how long and at what speed. There are following options to choose from: ST / SL / SM / SS « 2:00 Here you can set the spin time :-‐ here 2:00 minutes. If "0:00" is set, there will be no spinning at all. Through the button [delete], you can delete the complete step displayed on the left side. To confirm your settings of each step, click on the lest arrow, which brings you back to the right side and save your changes. Also drying can be executed as a step anywhere in the process. For drying, go to "POS:" and select int "TR: drying" : 15 Here you can set the temperature: CA= cold air / WA = warm air / HA = hot air. These temperatures can be adjusted in the settings. Selecting ST (stop) the machine will only drain the basket without fan. Also, you can set the duration of the drying process. Please keep in mind that it takes some time until the heater has reached the set temperature. Also it will keep the temperature for a while when switched off by the inertia of the stainless steel air duct. After drying, the fan will run on to cool down the PTC heating element. Please make a test run without workpiece, if you have customized the temperatures in the settings. If you created all the steps of the cleaning program, the arrow will take you back to overview and save the program automatically. 10. Run a program: If you have created a cleaning program, it is now available in the list of programs and can be selected. Basically, the machine starts in the last executed or changed cleaning program. If you want to select a different program, turn the ENC until the Name of the program is highlighted (or black) and confirm the selection. It will bring you to the list of programs. 16 You will now see a list of the storage spaces. Now select a program and confirm again to load it. You are now back in the program. The cleaning program has always to be started with the start/stop button to avoid accidental starts while the operation through the ENC. 17 Interrupt the cleaning program: Is the start/stop button pressed during a current cleaning, the machine stops and a selection window will appear: There are now the following choices available: 18 [CONTINUE] The machine just continues the program. [SKIP STEP] The actually executed step is interrupted and skipped. This is done as follows: The machine automatically detects whether the cleaning basket already had contact with the liquid. This is the case it lifts the basket from the fluid and runs the spinning cycle (if programmed) before it is goes on to the next step. If the cleaning basket had no contact to the liquid, the spinning movement will be skipped and the cleaning basket immediately moves to the next step. [Quit] Aborts the entire program with all the steps. The basket is lifted out the fluid immediately and moved back into the Park/loading position. If the door is opened during operation, all movements are stopped and the spindle released. The same menu as above appears.. 19 11. Settings: The global parameters of the machine can be set in the menu "Settings". (Software V3.x.x). Here all settings can be made. For example the rotational speed of the cleaning movements, and in case the Option “extended movements” is active, also the rotation angle of the single movements can be adjusted. To test the speed immediately, please press the START/STOP button These speeds are global. If you choose 60 rpm for the movement of LO, the basket oscillates with 60 UPM every time you select LO as cleaning movement 20 Abbreviations and explanation of the cleaning movements : Abbreviation Movement Description ST Standstill No turning ST Slow turning t/2 left side, then right FT Fast turning t/2 left side, then right SA Slow alternating n turns left, then n turns right FA Fast alternating n turns left, then n turns right SO Slow oscillating n turns left, then 0,7n turns right FO Fast oscillating n turns left, then 0,7 n turns right SX Slow extra (osc+ up/down) n turns left, then 0,7 n turns right + Up and down FX Fast extra (osc+ up/down n turns left, then 0,7 n turns right + Up and down VB Vibrasonic (OPTIONAL) n turns left, then 0,7 n turns right (fast acceleration – vibrasonic movement) Now, you can globally set the rotation speed for every single movement. Optionally also the rotation angle Is adjustable. Otherwise, there are standard angles by factory. “Heating": The temperatures for "WA" warm air and “HA” hot air can be set. Please note that the heating due to the air tube made of stainless steel has a certain inertia. By pressing the [START/stop] button, you can also test the heating and directly read the temperature of the air at the sensor. Please take it first attempt without workpiece, to approach the ideal heating temperature and time and avoid overheating of the workpiece. "Beeper": Select whether the beeper also sounds while turning the ENC, or only while pressing it. 21 12. Additional functions Under the menu “Additional functions” you see the status of unlocking additional functions and unlock them after ordering. If you select the menu point, the machine shows the currently unlocked features. Furthermore, the other functions can be unlocked. To unlock an optional feature, you order it, and then contact us by phone, to get the code. The machine generates a new request code (REQ) at every single switching on. It is comprised of 4 pairs of numbers. From this request code, we generate password to unlock of the additional features. 22 The following additional functions are available: OPT1: extended cleaning movements If this option is activated, the angle of rotation of all cleaning movements can be adjusted in the settings menu separately. OPT2: Vibrasonic Dieso ption is enabled, the movement of "VB" in the cleaning programmes can select and customize the settings. During this movement, it is possible to constrain the rotation angle to 36 degrees. As well, an own, sharp acceleration ramp is stored for this movement produces an oscillating "vibration movement". OPT3: SD card export If this option is enabled, the machine logs all cleaning operations, with date, time, duration, used program and used movements, as well as the current state of the liquids used during cleaning. A serial number is generated for each cleaning that appears after cleaning in the display and a TXT file is written to the SD card, which contains all the information. OPT4: Master/slave If this option is activated, a relay is switched synchronous to the exhaust fan of the machine. It can be used to connect external exhaust systems and control them with the machine.. 23 13. Cleaning and maintenance Like any mechanical movement, the mechanics of this machine requires some maintenance. The guides of the B-‐axis (vertical movement) are maintenance-‐free, dry-‐running polymer bearings which require no maintenance over their lifetime. The spindle bearing arrangement consists of a maintenance-‐free, dry-‐running full ceramic bearings, as well as a dry-‐running Teflon shaft seal ring, which both also come out without lubrication. Every 8 weeks: • The trapezoidal screw which provides the vertical movement of the B-‐axis has to be controlled and if necessary applied some grease. To do this, we recommend you the spindle grease (best. L1-‐ ZBH003) applied with a bristle brush through the slots in the front panel. • Check air filter of the air inlet f the fan heater and control cabinet and, if necessary, clean or exchange it. The black powder-‐coated parts of the machine can be cleaned with a soft cloth and some washing-‐up liquid. DO NOT use solvent-‐based cleaner. Bare stainless steel parts can be cleaned with all commercially available cleaners and sovents if necessary. 14 Disposal If you want to throw your machine away, do not place it into the normal household garbage, but take local collection point. WEEE-‐Reg.-‐Nr.DE95245907 24