1
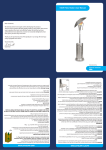
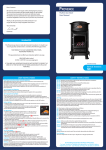
Scanning with Simplicity
SAVEO-SCAN-PKT-M22D-BT
www.saveoscan.com
Table of Contents
Product Information
3
Getting Started
5
Operating Elements
5
Connecting to iOS via Bluetooth
6
Connecting to Android via Bluetooth
8
Unpairing your device
11
Operating Modes
13
Reset to Defaults
15
LED Indicator
15
Power Saving Mode
16
Further Information
17
Product Information
Delivery contents
* SAVEO-SCAN-PKT-M22D-BT scanner x 1
* Strap x 1
* Mini USB cable x 1
* Quick instructions x 1
Limited Warranty
Saveo Scan provides a one year limited warranty.
This warranty does not cover any product which has been
subject to improper use, neglect or unauthorized repair or
installation.
This warranty does not cover consumable parts. (Cables &
batteries are consumables.)
Safety instructions
Read the operating instructions carefully and pay special
attention to the safety information. If you do not follow the
safety instructions and information on proper handling in this
manual, we assume no liability for any resulting personal injury
or damage to property.
* Don’t put scanner in places of excessively high
temperature, such as exposure to direct sunlight
* Don’t use scanner in extremely humid conditions or in
conditions of extreme temperature change
* The rechargeable battery is permanently built into the
product and cannot be replaced.
* Never damage the rechargeable battery. Damaging
the casing of the rechargeable battery might cause
explosion or fire!
3
Getting Started
Switch on and Charge your Scanner
Please switch on and charge your scanner for 3~4 hours
before first use.
Please note: LED indicator will remain red until scanner has
been paired with a device.
Operating Elements
Exit window
Pairing/Unpairing
button
(For iOS Devices ONLY)
Button to raise and lower
ON-Screen Keyboard
Power Saving
button:
Press the button for
2~3 seconds to
enter power saving
mode
Scan/Power
On Button
LED Indicator
Mini USB port
with protective cover
Charge the pocket scanner with mini USB cable.
5
Connecting to iOS via Bluetooth
Enable Bluetooth on your device
Go to your phone’s homescreen and find “Settings”, then
“Bluetooth” and turn Bluetooth on.
Pair your device to the scanner
Press and hold the left button (as
illustrated) for 3-4 seconds. You will
hear a notification sound and the
scanner will become visible to your
device.
Press and hold
for 3-4 seconds
to pair to your
device.
6
Search for devices
Your phone will automatically search for devices, Saveo Scan
will appear as an external keyboard with a unique identifier
number (R-xxxxxx).
Select R-xxxxxx to
connect
Select scanner from
“Available Devices” and
wait for pairing process
to complete.
Devices are now
paired.
Once “Connected” is
displayed, your device is
paired to the scanner.
Your scanner is now
ready to use.
Please note: devices only need to be paired once. When they are within
Bluetooth range they will automatically attempt to connect to each other. If
you wish to pair to another device it is recommended you first unpair this
device (see page 11, ‘Unpairing your device’).
You are now connected. Start scanning.
7
Connecting to Android via Bluetooth
Enable Bluetooth on your device
Go to your phone’s homescreen and click on the menu button
to find “Settings”, then “Bluetooth” and switch bluetooth on.
Pair your device to the scanner
Press and hold the left button (as
illustrated) for 3-4 seconds. You will
hear a notification sound and the
scanner will become visible to your
device.
Press and hold
for 3-4 seconds
to pair to your
device.
8
Search for devices
Click “Search for Devices” at the bottom of the screen and
Saveo Scan will appear as an external keyboard with a unique
identifier number (R-xxxxxx).
Select R-xxxxxx to
connect
Select scanner from
“Available Devices” and
wait for pairing process
to complete.
9
Devices are now
paired.
Once “Connected” is
displayed, your device is
paired to the scanner.
Your scan- ner is now
ready to use.
Please note: devices only need to be paired once. When they are within
Bluetooth range they will automatically attempt to connect to each other. If
you wish to pair to another device it is recommended you first unpair this
device (see page 11, ‘Unpairing your device’).
You are now connected. Start scanning.
10
Unpairing your device
Before connecting the scanner to another device it is recommended you first unpair from the current device.
This can be done on the scanner or through the system menu
on your smartphone/tablet.
Using the scanner to unpair
To unpair using the scanner, press
and hold the left button (as illustrated) for 3-4 seconds. You will hear a
notification sound and the LED will
turn red to indicate it is not paired to
any device.
Press and hold
for 3-4 seconds
to unpair from
device.
Unpairing using your phone
Go to the Bluetooth menu on your phone and select the
option menu for scanner from list of paired devices.
11
Choose “Forget this Device”/”Unpair”
12
Operating Modes
There are two operating modes on the scanner, Data transmission mode and Data Storage Mode.
Scan the appropriate barcodes when switching between these
two modes.
Please note: Switching between modes will wipe the
scanner’s internal memory.
Data Transmission Mode (Default)
Our Default setting is Data Transmission mode. In this mode
data will be sent to smartphone/tablet directly.
To enter Data Transmission Mode please scan the follwing
barcodes.
Demo
Enter Data Transmission
Mode
Green/Orange LED flashes followed by 3 beeps.
Demo
%E%R%A
%M%A%F
13
Data Storage Mode
In this mode, data will be saved directly to scanner’s memory.
Scan Transmit Memory Data to receive data stored on
scanner’s internal memory.
To enter Data Storage Mode please scan the follwing
barcodes.
Enter DataDemo
Storage Mode
Green/Orange LED flashes followed by 3 beeps.
Demo
%E%R%A
%M%A%N
Transmit Memory Data
Scan the following barcode to receive data stored
Demo in the
scanner’s internal memory..
Transmit Memory Data
Green/Orange LED flashes
followed by 3 beeps.
%R%E%C
After data is transmitted to your device it remains on the
scanner’s internal memory. Scan the following barcode to clear
Demoagain.
the memory if you do not wish to send this data
Clean Memory Data
Green/Orange LED flashes
followed by 3 beeps.
14
Reset to Defaults
Reset Configuration to Defaults (scan from A1to A2)
HID Profile
A1
Demo
A2
Demo
%D%F%T
LED Indicator
LED Indicator Information
Orange LED ON
Full charged
Orange LED (Flashing)
Charging / Low battery
Red LED ON
Offline / Out of Range
Green LED ON
Good read
Orange LED ON
Good read (Batch mode)
When the battery power is too low, the Orange LED will flash
and beep once. Scanner should be charged immediately. If
scanner shuts down it is recommended to charge it fully then
power it back on.
Under power-saving mode, there will not be an LED indication when charging.
15
Power Saving Mode
Power saving mode is enabled by default and will put the
scanner to sleep after 1 minute’s inactivity. To wake up the
scanner press the trigger.
Demo
Below are the barcodes to disable/enable power saving mode.
Disable
Scan to disable power saving
mode
%P%D%T00
Demo
Enable
Scan to enable power saving
mode
%P%D%T01
16
Further Information
Full User Manual and Spec sheet can be downloaded at:
www.saveoscan.com/downloads
For more information, contact us at:
Units 5-6
Ballywaltrin Business Park
Boghall Road
Bray
Co. Wicklow
Ireland
US PH: +1 847 448 0412
UK PH: +44 208 099 8071
IRE PH: +353 1 685 4600
Email: [email protected]
17