1
GSM Gateway User Manual
Copy Right
www.allo.com
Version 2.0
1
GSM Gateway User Manual
Copy Rights
Copyright © 2014 Allo.com. All rights reserved.
No part of this publication may be copied, distributed, transmitted, transcribed, stored in a
retrieval system, or translated into any human or computer language without the prior written
permission of Allo.com. This document has been prepared for use by professional and properly
trained personnel, and the customer assumes full responsibility when using it.
Proprietary Rights
The information in this document is Confidential to Allo.com and is legally privileged. The
information and this document are intended solely for the addressee. Use of this document by
anyone else for any other purpose is unauthorized. If you are not the intended recipient, any
disclosure, copying, or distribution of this information is prohibited and unlawful.
Disclaimer
Information in this document is subject to change without notice and should not be construed as
a commitment on the part of allo.com. And does not assume any responsibility or make any
warranty against errors. It may appear in this document and disclaims any implied warranty of
merchantability or fitness for a particular purpose.
www.allo.com
Version 2.0
2
GSM Gateway User Manual
About this manual
This manual describes the Allo product application and explains how to work and use it major
features. It serves as a means to describe the user interface and how to use it to accomplish
common tasks. This manual also describes the underlying assumptions and users make the
underlying data model.
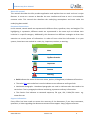
Document Conventions
In this manual, certain words are represented in different fonts, typefaces, sizes, and weights. This
highlighting is systematic; different words are represented in the same style to indicate their
inclusion in a specific category. Additionally, this document has different strategies to draw User
attention to certain pieces of information. In order of how critical the information is to your
system, these items are marked as a note, tip, important, caution, or warning.
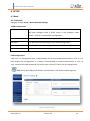
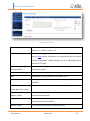
Icon
Purpose
Note
Tip/Best Practice
Important
Caution
Warning
• Bold indicates the name of the menu items, options, dialog boxes, windows and functions.
• The color blue with underline is used to indicate cross-references and hyperlinks.
• Numbered Paragraphs - Numbered paragraphs are used to indicate tasks that need to be
carried out. Text in paragraphs without numbering represents ordinary information.
• The Courier font indicates a command sequence, file type, URL, Folder/File name e.g.
www.allo.com
Support Information
Every effort has been made to ensure the accuracy of the document. If you have comments,
questions, or ideas regarding the document contact online support: http://support.allo.com
www.allo.com
Version 2.0
3
GSM Gateway User Manual
Table of Contents
Copy Right.......................................................................................................................................... 1
About this manual .......................................................................................................................... 3
Document Conventions .................................................................................................................. 3
1. Product Introduction...................................................................................................................... 7
1.1 Overview .................................................................................................................................. 7
1.2 Equipment Structure ................................................................................................................ 8
1.2.1 Rear View ........................................................................................................................... 8
1.2.2 Front View ......................................................................................................................... 8
1.3 Functions and Features ............................................................................................................ 9
1.4 General Hardware Specifications ............................................................................................. 9
1.4.1 GSM ................................................................................................................................... 9
1.4.2 SIP ...................................................................................................................................... 9
1.4.3 Network ............................................................................................................................. 9
1.5 Warranty ................................................................................................................................ 10
2. Getting Started with GSM gateway ............................................................................................. 11
2.1 Hardware Installation ............................................................................................................. 11
2.2 Accessing the Web GUI .......................................................................................................... 11
3. Setting up Features ...................................................................................................................... 13
3.1 Dash Board ............................................................................................................................. 13
4. SETUP ........................................................................................................................................... 14
4.1 Basic ........................................................................................................................................ 14
4.1.1 Network ........................................................................................................................... 14
4.1.2 Date/Time ........................................................................................................................ 15
4.1.3 GSM Settings.................................................................................................................... 15
4.1.4 SIP Trunks ........................................................................................................................ 19
www.allo.com
Version 2.0
4
GSM Gateway User Manual
4.1.5 GSM Lines ........................................................................................................................ 22
4.1.6 Routing Rules ................................................................................................................... 23
4.2 Advanced ................................................................................................................................ 25
4.2.1 Calling Groups .................................................................................................................. 25
4.2.2 Time-based Routing ......................................................................................................... 27
4.2.3 SIP Global Settings ........................................................................................................... 27
4.2.4 Feature Settings ............................................................................................................... 31
4.2.5 Asterisk API ...................................................................................................................... 32
5. SMS .............................................................................................................................................. 34
5.1 Inbox ....................................................................................................................................... 34
5.1.1 Create SMS ...................................................................................................................... 35
5.1.2 Custom SMS ..................................................................................................................... 35
5.2 Groups .................................................................................................................................... 36
5.3 Create/Compose .................................................................................................................... 37
5.4 Outbox .................................................................................................................................... 37
5.5 Gateway Control..................................................................................................................... 38
6. Features ....................................................................................................................................... 39
6.1 Caller List ................................................................................................................................ 39
6.2 Black List ................................................................................................................................. 40
6.3 Emergency List ....................................................................................................................... 41
6.4 Call Forwarding....................................................................................................................... 42
6.5 Email to SMS ........................................................................................................................... 43
7. TOOLS ........................................................................................................................................... 44
7.1 Diagnostics ............................................................................................................................. 44
7.2 Backup/Restore ...................................................................................................................... 45
7.3 Upgrade Firmware.................................................................................................................. 46
www.allo.com
Version 2.0
5
GSM Gateway User Manual
7.4 Factory Reset .......................................................................................................................... 46
7.5 Balance Inquiry ....................................................................................................................... 47
7.6 Recharge ................................................................................................................................. 49
7.7 Module Diagnostics ................................................................................................................ 49
8. Status ........................................................................................................................................... 50
8.1 Call Reports ............................................................................................................................ 50
8.2 SIP Trunk Status ...................................................................................................................... 51
8.3 GSM Span Status .................................................................................................................... 52
8.4 Current Calls ........................................................................................................................... 53
8.5 Network Status ....................................................................................................................... 53
9. Administrator ............................................................................................................................... 55
9.1 Reboot .................................................................................................................................... 55
9.2 Web Settings .......................................................................................................................... 55
9.3 Email settings ......................................................................................................................... 55
10. Appendix .................................................................................................................................... 57
10.1 SMS Sending and Receiving Options in Allo's GSM PCI cards for Asterisk........................... 57
www.allo.com
Version 2.0
6
GSM Gateway User Manual
1. Product Introduction
1.1 Overview
This 4 Port GSM Gateway is a standalone and fan less, easy to install and sturdy construction. This
4 module GSM gateway will bridge IP calls to GSM and vice versa. Use the web interface for easy
and quick configuration.
It is a new type of VoIP gateway that allows call terminations from a VoIP network to a GSM
network and vice versa. Call connections between IP networks and GSM networks are now
bridged seamlessly to extend the voice communication coverage significantly. As the traditional
PSTN lines are starting to disappear in developed countries and are not going to be built
extensively in under-developed countries, GSM phones are getting more and more popular all
over the world with lower service charges. The emergence of Allo bridges is gap between the
traditional telephone networks and VoIP networks. As a result, local and worldwide voice
communications are more convenience, lower cost, and broader coverage. Mainly includes the
following kind of model: aGG04 - A typical network diagram as below.
Figure 1: GSM Gateway Overview
www.allo.com
Version 2.0
7
GSM Gateway User Manual
1.2 Equipment Structure
1.2.1 Rear View
Figure 2: Rear View
1.2.2 Front View
Figure 3: Front View
www.allo.com
Version 2.0
8
GSM Gateway User Manual
1.3 Functions and Features
•
4 ports for communication over a SIP-to-cellular connection
•
SMS Sending and Receiving Support USSD service
•
Send Bulk SMS
•
SMS to E-mail
•
SIM Balance Alarm
•
Caller ID Black List
•
Call Duration Limitation for particular SIM
•
Call Back
•
Call Forwarding (unconditional, no reply, busy, not reachable)
•
Open API interface (AMI)
•
Gateway control via SMS.(Reboot, Reload, Fetching IP)
•
Recharge of SIM balance via GUI
•
Flexible call routing
•
Configuration and management using a Web browser
1.4 General Hardware Specifications
1.4.1 GSM
•
4 GSM Modules with single SIM card per GSM module.
•
Quad-Band GSM 850/900/1800/1900 MHz
•
External Antenna
•
Echo Cancellation support inbuilt in GSM Module
1.4.2 SIP
•
SIP (RFC3261) compliance
•
NAT support
•
Voice codecs: G729, G.711 A/U law
1.4.3 Network
•
Two 10/100 Mbps Ethernet interfaces
•
Protocols: DHCP, TCP/UDP, Telnet, HTTP, TFTP
www.allo.com
Version 2.0
9
GSM Gateway User Manual
1.5 Warranty
Hardware Warranty: 1 year
If the GSM Gateway was purchased from a Distributor/reseller, please contact the company
where the device was purchased for replacement, repair or refund. If the device was purchased
directly from Allo.com, contact our Technical Support Team for a RMA (Return Materials
Authorization) number before the product is returned. Allo.com reserves the right to remedy
warranty policy without prior notification.
Use the power adapter provided with the ALLO PRI Gateway. Do not use a different power
adapter as this may damage the device. This type of damage is not covered under warranty.
www.allo.com
Version 2.0
10
GSM Gateway User Manual
2. Getting Started with GSM gateway
2.1 Hardware Installation
1. Unpack the items from the box
2. Plug one end of the RJ45 Ethernet cable to your PC & other end into the Management Port
(LAN) of the GSM Gateway.
3. Plug one end of the RJ45 Ethernet cable into your Network Switch & other end into the WAN
port of the GSM Gateway.
Use Straight-through Ethernet cable to connect between the unit & Router/Switch/PC
4. Insert the GSM SIM in to the GSM Channels.
5. Plug the power cable to the GSM Gateway; wait until the Gateway boot up completely.
Configure your GSM Gateway according to the instructions below.
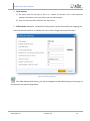
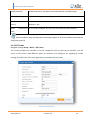
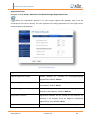
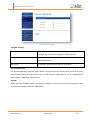
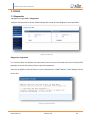
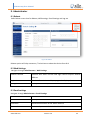
2.2 Accessing the Web GUI
GSM Gateway WEB GUI can be accessed either through WAN or Management Interface (LAN)
1) Make the setup as described in Hardware setup section, Lets access the WebGUI through
Management Interface (LAN)
3) Launch the web browser and enter the URL http://192.168.113.1 which is the default IP
address of the Management interface (LAN) of the GSM Gateway.
www.allo.com
Version 2.0
11
GSM Gateway User Manual
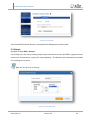
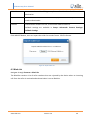
Figure 4: Login Page
4) Login using the default username & password (Default: Username: admin; Password: admin).
It takes you to change the password and login again with the new password. Observe the WAN IP
address on the dashboard, this will be used to access the GUI from the WAN interface.
5) If you know the SIM No, you can directly manage the GSM Gateway using below comment by
sending the SMS.
ALLOGSM “gateway password” INFO (Command to fetch the IP address of the gateway and
basic status of GSM spans)
For an Example: ALLOGSM admin INFO
6) If your network is not enabled with DHCP server, configure the WAN port IP address manually
in the SETTINGS > Network Settings section as per your requirement.
Recommended Web Browser to access GUI is Mozilla Firefox.
www.allo.com
Version 2.0
12
GSM Gateway User Manual
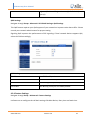
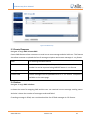
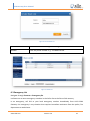
3. Setting up Features
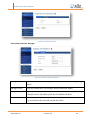
3.1 Dash Board
ALLO GSM Gateway Dash Board summarizes the gateway status with a graphical display.
Detailed status of an individual entity is available under the Status Tab or it can be directly
accessed by clicking on more.
Figure 5: Dashboard
www.allo.com
Version 2.0
13
GSM Gateway User Manual
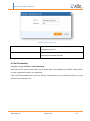
4. SETUP
4.1 Basic
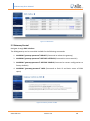
4.1.1 Network
Navigate through Setup > Basic>Network Settings
WAN Configuration:
DHCP
When enabled and a DHCP server is available, the GSM Gateway
will auto configure itself. If DHCP server is not available, select
“Static”, and fill in the Network Configuration.
IP Address
The static IP address corresponding to your WAN configuration.
Net mask
The Net mask corresponding to your WAN configuration.
Gateway
The IP address corresponding to your network Gateway (Router).
DNS
The IP address corresponding to a DNS server.
LAN Configuration:
LAN Port is a management port. GSM Gateway can be connected back-to-back to a PC or to a
LAN network for configuration. It is always recommended to connect back-to-back to a PC. In
case, connected to LAN network & if IP series clash is found, IP series can be changed here.
WAN port IP and LAN port IP address should not be in the same network segment.
Figure 6: Network Settings
www.allo.com
Version 2.0
14
GSM Gateway User Manual
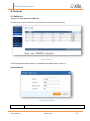
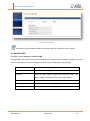
4.1.2 Date/Time
Navigate through Setup > Basic> Date/Time
Configuration Type
Date and Time of the GSM Gateway can be either set manually
(uses RTC) or automatically (through NTP). Default: NTP
NTP Configuration
Time Zone: Select the correct time zone for the location where the
GSM Gateway is installed using the Time Zone dropdown box.
Default: Asia/Kolkata
NTP Server: URI or IP address of the NTP (Network Time Protocol)
server, which will be used to synchronize the date and time. E.g.:
3.in.pool.ntp.org
Figure 7: Date/Time Configuration
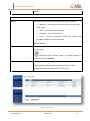
4.1.3 GSM Settings
Navigate through Setup > Basic> GSM Settings
This section provides the ability to modify the GSM settings depending on the carrier with respect
to the service provider
www.allo.com
Version 2.0
15
GSM Gateway User Manual
Figure 8: GSM Settings
Figure 9: Network Selection Mode
Network Selection Mode
GSM Name- User can select GSM span for which network mode is to be selected.
Network mode- User can select either automatic or manual network mode from the drop down
list.
For Manual mode, we have to fetch available networks and user can choose preferable
network.
Call Minute Settings
Call minutes can be limited for each span individually. Following are the limits.
www.allo.com
Version 2.0
16
GSM Gateway User Manual
1. Total minutes:
a) For every span we can give a limit, i.e. number of minutes. This is the maximum
number of minutes a user can make a call on selected span.
b) User can set alarm over email for the alarm limit.
2. Call Duration: Moreover, call duration limiting timer can be selected for the outgoing call.
If the call duration feature is enabled, user can’t make a single call beyond that limit.
Figure 10: Call Minute Settings
Click GSM Settings Edit button, you will be navigated to Edit GSM Settings screen page. In
this page you can edit the GSM name.
www.allo.com
Version 2.0
17
GSM Gateway User Manual
Figure 11: Edit GSM Settings
GSM name
GSM name is the name for your in identification
Port State
Enable/ Disable option allow user to change the state as per requirement
SIM PIN
SIM PIN will be given by the provider
SMS Center
A short message service center (SMSC) is a network element in the
mobile telephone network
Forward SMS to E- Configure email address where the SMS need to be forwarded
mail
Band Selection
Band selection can be done in Auto, Mono Band mode (850,900E, 1800,
1900 MHz) and Dual band mode (900E/1800 and 900E/1900).
Default is AUTO
Echo Cancellation
Enable /Disable option allows user to configure according to the
requirement
www.allo.com
Version 2.0
18
GSM Gateway User Manual
DTMF Detection
DTMF detection in the device controlled be DSP and GSM engine
DTMF Out dialing
DTMF out dialing can be configured in INBAND or USING AT commands
DTMF Duration
The duration in millisecond of DTMF transmission.
(msec)
Default is : 80
Allow
Anonymous IF this option enabled ,the calls with out caller ID will be allowed
Calls
Please configure these settings after contacting support as incorrect updates may lead the
system being faulty.
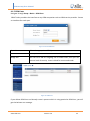
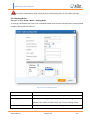
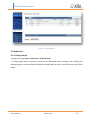
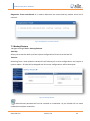
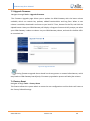
4.1.4 SIP Trunks
Navigate through Setup > Basic > SIP Trunks
SIP Trunks provides the interface to any SIP companion such as VoIP service provider, any SIP
server or SIP clients. Add different types of interfaces, and configure the signaling & media
settings for each trunk. SIP trunk registration is limited to 10 SIP trunks.
Figure 12: Create SIP Trunk
www.allo.com
Version 2.0
19
GSM Gateway User Manual
Account Name
Descriptive name for the SIP Trunk for user's reference.
Username
Username of endpoint (e.g.: IPPBX) will use to authenticate with
the gateway.
Registration Mode
Whether the endpoint will register to this gateway or this
gateway will register to the endpoint.
a. None: No Registration, IP Address peering of the
Gateway & Endpoint
b. To Gateway: Endpoint (IPPBX or VoIP Service Provider)
register with the Gateway
c. c) From Gateway: Gateway register to the End point
(IPPBX or the VoIP Service Provider)
Authentication
Enable, if Authentication is required by the End point (VOIP
Service Provider or IPPBX)
Auth. Username
A username to use only for registration.
Password
Password to authenticate inbound or outbound registrations or
calls.
Proxy Address
IP address or hostname with port of the endpoint (VOIP Service
Provider or IPPBX) where the calls will be diverted. Default port
no.: 5060
Outbound Proxy Address
IP address or hostname with port of the outbound proxy server.
This ensures that all the SIP packets are sent via specified proxy.
Specifying the port is not mandatory. Default port no.: 5060
e.g.: 192.168.0.222:5062 OR 192.168.0.222
Register
Enable, if Registration to the End point (VOIP Service Provider or
IPPBX) is required.
Registrar Address
IP address or hostname with port of the Registrar server where
gateway must register to. Specifying the port is not mandatory.
Default port no.: 5060
e.g.: 192.168.0.222:5062 OR 192.168.0.222
Bridge PIN
You can set a PIN for outgoing calls on SIP trunk, thus you will
set one more level of security. Leave it blank for unsecured
www.allo.com
Version 2.0
20
GSM Gateway User Manual
mode.
Advanced Options
DTMF
Set default DTMF mode for sending DTMF digits. Options:
INBAND – sent along with audio (requires 64 kbit codec -
alaw, ulaw)
INFO – sent as SIP INFO messages
RFC2833 – sent as RTP packets
AUTO – System automatic selects the mode. Uses
RFC2833 if offered, inband otherwise.
Default: AUTO
NAT
Enable it, to address NAT-related issue for SIP & media sessions
for this trunk.
Configuring NAT settings under SIP Global Settings is
required) Default: disabled
Codec Configuration
Choose the available Codecs and set GSMority in the order in
which gateway should prefer to send and receive audio.
Supported codecs are alaw, ulaw, G.729, G.722
Figure 13: SIP Trunks
www.allo.com
Version 2.0
21
GSM Gateway User Manual
4.1.5 GSM Lines
Navigate through Setup > Basic > GSM Lines
GSM Trunks provides the interface to any GSM companion such as GSM service provider. Create
an interface for each span.
Figure 14: Create GSM Line
Span Name
Select the appropriate GSM Spans.
Trunk Name
Descriptive name for the GSM Trunk for user’s reference.
Bridge PIN
You can set a PIN for outgoing call on GSM trunks, thus you can
set one level of security. Leave it blank for unsecured mode.
Figure 15: GSM Lines
If you delete GSM lines and already route is present which is using particular GSM lines, you will
get the below error message.
www.allo.com
Version 2.0
22
GSM Gateway User Manual
Line name is dependency with Calling Groups, Call Routing Rules, & Time Route Groups.
4.1.6 Routing Rules
Navigate through Setup > Basic > Routing Rules
A routing rule determines how a call is handled based upon certain characteristics such as dialed
number, inbound trunk, DID, etc.
Figure 16: Create Call Routing Rule
Name
Descriptive name for the Call routing rule for user's reference.
Description
Provide the description for the Call routing rule. (Optional)
Incoming Type
Specify how the gateway should match incoming calls. The
gateway can match on GSM Trunk, SIP Trunk or Calling Group.
Incoming From
www.allo.com
Specify the available trunk or calling group for the selected
Version 2.0
23
GSM Gateway User Manual
Incoming Type.
Pattern
Specify the pattern to match the dialed string of the incoming
call.
Pattern:
X: Any Digit from 0-9.
Z: Any Digit from 1-9.
[12345-9]: Any digit from 1 to 9.
N: Any Digit from 2-9.
".": Wildcard. Match one or more characters.
"!": Wildcard. Match zero or more characters immediately.
e.g.: X. – match at least one digit
988XXXX – match 988 followed by 4 digits
Trim Digits
Allows you to specify the number of digits that will be stripped
from the beginning of the dialed string before the call is placed
via the selected trunk.
e.g.: If you configure the pattern as 9X. and you want to strip 9
then you should mention Trim Digits field as 1
Prepend Digits
Specify the digits to be prepended before the call is placed via the
selected trunk. Those digits will be prepended after the dialing
number is stripped.
e.g.: If dialed number is 8789763010 and if you want to prepend
44 as a country code then mention in Prepend digits field as 44
DISA
Available for GSM Incoming routing rule which allow us to receive
Dialout number in GSM Gateway. The received number is dialed
afterwards.
Outbound Call Routes
Select the preferred trunks or time route groups where calls are
to be routed for this Routing rule. Ordering of the trunks in the
“Selected” column indicates the order in which call flows on
failure.
www.allo.com
Version 2.0
24
GSM Gateway User Manual
Figure 17: Call Routing Rules
4.2 Advanced
4.2.1 Calling Groups
Navigate through Setup > Advanced > Calling Groups
A calling group allows a group of trunks to be addressed when creating a call routing rule.
Multiple groups can be created with different combination of trunks, but of the same type (SIP or
GSM).
www.allo.com
Version 2.0
25
GSM Gateway User Manual
Figure 18: Create Calling Group
Group Name
Descriptive name for the Calling Groups for user's reference.
Group Type
You can select group type as SIP or GSM Trunk. For e.g.: If you select
Group Type as SIP, SIP trunks will be listed in available Table.
Trunks
Depending upon the Group Type you have selected, available trunks can
be moved to “Selected” column, to be listed under this Calling Group.
Figure 19: Calling groups
www.allo.com
Version 2.0
26
GSM Gateway User Manual
4.2.2 Time-based Routing
Navigate through Setup > Advanced > Time-based Routing
Time routing routes calls to different locations based on the time of day and day of week, when a
call is made.
Group Name
Descriptive name for the Time Route Group for user's reference.
Description
Provide the proper description for the Time based routing rule.
(Optional)
Route To Trunk
Select the destination trunk where the call is routed to on matching
the time. The destination can be any trunks – GSM Trunks/SIP
Trunks.
Duration
Specify the time range for which this routing rule will apply. Format:
hh:mm
Days
Select the day/days during which this routing rule will apply.
Make sure that the current date and time are configured currently under System>
Date/Time Configuration.
4.2.3 SIP Global Settings
Navigate through Setup>Advanced > SIP Global Settings
SIP Global settings apply to all VoIP traffic.
Port Settings
www.allo.com
Version 2.0
27
GSM Gateway User Manual
Figure 20: Port Settings
Port Settings
SIP Bind Port
Choose a port on which to listen for SIP UDP traffic. Default:
5060
RTP Port Range
Range of port numbers to be used for RTP traffic.
Default: 16001- 17000
Make sure you configure this dynamic range of ports on your
NAT Router. When the GSM Gateway is behind a NAT and the
NAT is configured to do port forwarding with above
mentioned port range for UDP ports.
NAT Settings
Navigate through Setup> Advanced> SIP Global Settings
In this NAT Settings, user can select Stun Server IP or External IP function. These functions can
help your VoIP device working properly behind NAT.
www.allo.com
Version 2.0
28
GSM Gateway User Manual
Figure 21: NAT Settings
NAT Settings
NAT
NAT option is checked, when the GSM Gateway is behind the
Router/Firewall. Select either Stun Server IP or External IP.
Default: disabled
Stun Server IP
If the GSM Gateway is behind a non-symmetric NAT router, it
may be necessary to use STUN to allow GSM Gateway to reliably
communicate via IP through the router. Enter a STUN server IP
address or domain name in the STUN Server field. For a list of
public STUN servers, please Refer to: http://www.voipinfo.org/wiki/view/STUN
External IP
Enter the NAT Traversal IP address i.e. Public IP Address of your
internet, to communicate with Public
Network when GSM
Gateway is behind the NAT. This IP address will substitute in all
outgoing SIP messages instead of Local IP address.
Local Net mask
Entering the Net mask of the local network of the GSM gateway
allows it to identify the hosts falling within the same network.
E.g.: 192.168.2.0/255.255.255.0
www.allo.com
Version 2.0
29
GSM Gateway User Manual
Registration Timer
Navigate through Setup> Advanced> SIP Global Settings> Registration Timer
When the registration timeout is 0, user cannot register the gateway and it will be
connected to the server directly. You can reference the setting parameters of the single server
mode to register the gateway.
Figure 22: SIP Global Settings
Registration Timer
Default Registration Expiry
Default duration (in seconds) of incoming/outgoing
registrations. Default: 120 sec
Minimum Registration Expiry
Minimum duration (in seconds) of registrations allowed by
the Gateway. Default: 60 sec
Maximum Registration Expiry
Maximum duration (in seconds) of incoming registrations
allowed by the Gateway. Default: 3600 sec
Registration Timeout
Registration attempt will be retried till this duration (in
seconds), if no response from the Registrar. (Outbound
Registrations only). Default: 20 sec
Registration Attempts
www.allo.com
Number of registration attempts before giving up with
Version 2.0
30
GSM Gateway User Manual
registrar (Outbound Registrations only). Default: 0 (never
give up)
QOS Settings
Navigate through Setup> Advanced> SIP Global Settings> QoS Settings
This QoS feature requires your QoS support of your network to improve voice data traffics. Please
consult your network administrator for proper setting.
Signaling QoS improves the performance of SIP signaling. If local network device supports QoS,
select this field accordingly.
QOS Settings
ToS SIP
Sets TOS for SIP packets
ToS Audio
Sets TOS for RTP audio packets.
CoS SIP
Sets 802.1p priority for SIP packets.
CoS Audio
Sets 802.1p priority for RTP audio packets.
4.2.4 Feature Settings
Navigate through Setup > Advanced> Feature Settings
It allows user to configure the call back settings like Max Retries, Retry time and wait time.
www.allo.com
Version 2.0
31
GSM Gateway User Manual
Figure 23: Feature Settings
Call back settings
Max Retries
Number of retries before failing (not including the initial
attempt, e.g.0=total of 1 attempt to make the call).
Retry time
It specifies the seconds between retries, don’t hammer an
unavailable phone.
Wait time
It specifies the seconds to wait for an answer.
4.2.5 Asterisk API
The Asterisk Manager Interface (AMI) allows a client program to connect to an Asterisk instance
and issue commands or read events over a TCP/IP stream. GSM Gateway can be configured for
AMI in Setup > Advanced > Asterisk API.
General
When you click “Enabled” option, this page is available. It allows users to access the gateway API.
And the port number is default: 5038 (fixed).
www.allo.com
Version 2.0
32
GSM Gateway User Manual
Asterisk API Interface- Manager
Figure 24: Asterisk API Interface
Figure 25: Asterisk API Interface-Manager
Manager Name
Enter the name of the manager for Asterisk API Interface manager. E.g.:
Admin
Manager Secret
Enter the password for the manager. Default Password: Admin
Deny
If you want to deny many hosts or networks, use char & as separator. E.g.:
0.0.0.0/0.0.0.0 or 192.168.1.0/255.255.255.0&10.0.0.0/255.0.
Permit
The user wants to permit many hosts or network, use char & as separator.
E.g.: 0.0.0.0/0.0.0.0 or 192.168.1.0/255.255.255.0
www.allo.com
Version 2.0
33
GSM Gateway User Manual
5. SMS
5.1 Inbox
Navigate through SMS > Inbox
SMS inbox feature allows you to check the inbox of each SIM cards inbox messages
SMS inbox will provide message details such us date and time, message from field information,
message body and span information.” Options” tab in the SMS inbox help you to delete / View.
Figure 26: SMS Inbox
Date & Time
Date and time of the INBOX message
From
The source of the INBOX Message
Message
It shows the body of message
Span ID
On which span the message received
Options
Two options are given (View and Delete )
Export
This will allow to export the message in .csv format
Click Edit button, you will be navigated to SMS inbox. In this page you can edit the
Message.
www.allo.com
Version 2.0
34
GSM Gateway User Manual
5.1.1 Create SMS
Navigate through SMS > Create/Compose.
Users can create and send the SMS in this page. And you can import numbers from a .CSV file
here.
Figure 27: Create SMS
Click Download Template button, to download the GSM gateway Custom SMS.
5.1.2 Custom SMS
Navigate through SMS > Create/Compose.
This Custom SMS feature allows you to assign custom text on a group basis. User can choose the
SMS group name and .CSV file for sending SMS. E.g.: GSM_Gateway_Custom SMS (file name).
www.allo.com
Version 2.0
35
GSM Gateway User Manual
Figure 28: Custom SMS
Click Download Template button, to download the GSM gateway Custom SMS.
5.2 Groups
Navigate through SMS > Groups.
For sending sms, User has to make group of spans from which we can send SMS. A group can have
minimum 1 and maximum 4 spans (for 4 port gateway). This Gateway will automatically schedule
sms sending on free spans.
SMS can only be sent on Groups.
Figure 29: Create SMS Group
www.allo.com
Version 2.0
36
GSM Gateway User Manual
Figure 30: SMS Groups
5.3 Create/Compose
Navigate through SMS >Create SMS
Create SMS features allow customers to send one to one message and also bulk sms. This feature
also allow customer to upload the lists of message recipients and custom message in .csv format
GSM
For selecting the GSM channel
To
Destination number separated by semicolons or custom destination
number list can be imported using IMPORT button in .csv format
Message
Enter the body of your message.
Custom SMS
Custom messages can be uploaded which is in .csv format. Template is
available on the same page.
5.4 Outbox
Navigate through SMS >Outbox
It shows the status for outgoing SMS and the user can received current message sending status.
And also it shows the number of messages sends and failed.
If sending message is failed, user can download the list of filled messages in CSV format.
www.allo.com
Version 2.0
37
GSM Gateway User Manual
Figure 31: SMS Outbox
5.5 Gateway Control
Navigate through SMS >Outbox
The GSM gateway can be controlled via SMS for the following commands.
1. ALLOGSM “gateway-password” REBOOT (Command to reboot the gateway)
2. ALLOGSM “gateway-password” RESTART ASTERISK (Command to restart asterisk)
3. ALLOGSM “gateway-password” RESTORE CONFIG (Command to restore configuration to
factory defaults)
4. ALLOGSM “gateway-password” INFO (Command to fetch IP and basic status of GSM
spans)
Figure 32: Gateway Control via SMS
www.allo.com
Version 2.0
38
GSM Gateway User Manual
6. Features
6.1 Caller List
Navigate through Features >Caller list
It allows user to store numbers in the Caller list to the Direct Dial memory.
Figure 33: Caller List
Click Download Template button, to download the GSM gateway caller list.
Create Caller list
Figure 34: Create Caller list
Name
www.allo.com
User can enter the name for creating caller list.: E.g. John
Version 2.0
39
GSM Gateway User Manual
Caller Id
User can make a call to GSM gateway from caller id and a call will be made to
destination.
Destination
If the destination does not answer the call, (if call back enabled) a call will be
made to Destination.
Callback
If destination answers the call, a call will be made to caller id.
Callback settings are available in Setup> Advanced> Feature Settings>
Callback Settings
Click IMPORT Button, user can import the caller list entries from a .CSV file format.
Figure 35: Import Caller List
6.2 Black List
Navigate through Features > Black list
The Blacklist contains a list of caller numbers that are rejected by the device when an incoming
call from the caller is received and authentication is set to Blacklist.
www.allo.com
Version 2.0
40
GSM Gateway User Manual
Figure 36: Create Black List
Name
Enter the name for creating Blacklist. E.g. John
Number
Enter the phone number. E.g.: +91 8056721319
Figure 37: Black List
6.3 Emergency List
Navigate through Features > Emergency list
It allows user to store emergency numbers in the Caller list to the Direct Dial memory.
In an emergency, call 911 or your local emergency number immediately from ALLO GSM
Gateway. An emergency is any situation that requires immediate assistance from the police, fire
department or ambulance.
www.allo.com
Version 2.0
41
GSM Gateway User Manual
Figure 38: Create Emergency List
Name
Enter the name for creating Emergency list. E.g.:
Emergency Services
Number
Enter the phone number. E.g.: 911 (must be in
international number format)
6.4 Call Forwarding
Navigate through Features > Call Forwarding
With this service, you can have calls to your mobile phone forwarded to your office, home phone,
or other registered number you registered.
Calls can be forwarded even if you turn off your mobile phone or are already on the line, so you
will never miss another call.
www.allo.com
Version 2.0
42
GSM Gateway User Manual
Figure 39: Call Forwarding
Users have to fetch enable /disable call forwarding and choose the list of options.
6.5 Email to SMS
Navigate through Features > Email to SMS
GSM gateway can receive Email and send content (as mentioned in template) as SMS. To receive
Email on gateway, user has to configure an email client. Following are the settings.
Enable
Enabled option.
Mail Server
It specifies Incoming mail Server for POP3 services.
Email ID
Enter the login name of your email account. Note: This
option might be different from your email address.
Password
Enter your Password to login your Email.
Username (Optional)
Enter your user name.
Security type
User can choose the security type from the interface.
www.allo.com
Version 2.0
43
GSM Gateway User Manual
7. TOOLS
7.1 Diagnostics
Navigate through Tools > Diagnostics
Analyze the functionality of the GSM Gateway with some of these diagnostic tools provided.
Figure 40: Diagnostics
Diagnostics Ping Result
It is used to check the packet loss and latency time from your SIP end client like IP Phone/ FXS
gateways to check the quality of your network connections.
Enter the IP address of the IP Phone in your LAN and enter “PING” Button, it wills displays similar
to like this:
Figure 41: Diagnostics Result
www.allo.com
Version 2.0
44
GSM Gateway User Manual
Diagnostics Trace route Result- It is used to determine the route taken by packets across an IP
network.
Figure 42: Diagnostics Trace Route Result
7.2 Backup/Restore
Navigate through Tools > Backup/Restore
Back Up:
Allow you to take the back up of the System configurations & save it to the local PC.
Restore:
Restoring from a new upload or backup file will destroy all current configurations and require a
system reboot. All calls will be dropped and all current configurations will be destroyed.
Figure 43: Backup/Restore
Administrator password will not be restored on restoration. So you should still use same
credentials as before restoration
www.allo.com
Version 2.0
45
GSM Gateway User Manual
7.3 Upgrade Firmware
Navigate through Tools > Upgrade Firmware
The Firmware Upgrade page allows you to update the GSM Gateway with the latest release
available, which can contain key updates, added functionalities and bug fixes. When a new
release is available, download it and save to your local PC. Then, browse for the file, and click the
Upload button. Now your GSM Gateway will display a Progress Screen and will prompt you when
your GSM Gateway is about to reboot. Let your GSM Gateway reboot, and wait for the Blue LED’s
to come back on.
Figure 44: Upgrade Firmware
During firmware upgrade there should not be any power or network disturbances, which
may leads to GSM Gateway board faulty. Firmware up-gradation process will take few minutes.
7.4 Factory Reset
Navigate through Tools > Factory Reset
This feature allows the system admin to erase the user configuration and the device will reset to
the Factory Default Settings.
www.allo.com
Version 2.0
46
GSM Gateway User Manual
Figure 45: Factory Reset
Hardware Factory Reset will erase the call reports and software Factory Reset shall retain
the previous CDR reports.
By clicking on Factory Reset, the device will reset to the Factory Default Settings.
7.5 Balance Inquiry
Navigate through Tools > Balance Inquiry
This feature allow system admin to get UPTO DATE information regarding the account balance in
each SIM ,this information can also send to admin email address. Administrator can monitor the
balance history using the Tab “Balance History”
The balance information can be forwarded to a mobile no by selecting (Checking) the option “”
Send SMS for every Balance Inquiry “”
www.allo.com
Version 2.0
47
GSM Gateway User Manual
Figure 46: Balance Enquiry
Balance Inquiry Number
This is the number provided by GSM service provider to check
balance ex : *123# or *141# …etc
Unstructured Supplementary Service Data (USSD) is a protocol
USSD Reply
used by GSM cellular telephones to communicate with the service
provider's computers. USSD messages are up to 182 alphanumeric
characters in length.
Balance
Inquiry
on Customer can configure the schedule for checking balance by
Scheduled Basis
selecting this option
Frequency
schedule for checking balance –Daily ,weekly, monthly
Day
schedule for checking balance in day (Mon- SUN )
Time
schedule for checking balance in time settings Hours: Minutes
(HH:MM)
Balance Inquiry on every This option will check balance inquiry on every power ON
Power ON of the system
Send
SMS
for
every This option will send balance information to selected mobile no
Balance Inquiry
after each balance check
Enter Mobile Number
The mobile no to be configured to receive for forwarded balance
information form the Gateway
Balance history
www.allo.com
This will provide the history of balance check
Version 2.0
48
GSM Gateway User Manual
7.6 Recharge
Navigate through Tools > Recharge
This option allow system admin to recharge the pre paid SIM card using the wed GUI
Figure 47: Recharge
7.7 Module Diagnostics
Navigate through Tools > Module Diagnostics
We have manual module resets here in case of failure.
Figure 48: Module Diagnostics
www.allo.com
Version 2.0
49
GSM Gateway User Manual
8. Status
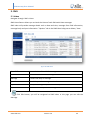
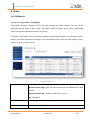
8.1 Call Reports
Navigate through Status > Call Reports
Call Reports displays a detailed list of calls pass through the GSM Gateway. The list can be
generated on the bases of date range, CDR count, latest 50 entries or all entries. Generated
report can also be exported to local PC as CSV file.
To create a new report select the Extension Range or Date range and click the “Generate” Report
button. A list with call details will display in the Call Reports section. You can either export to your
local PC or Print the Call reports.
Figure 49: Call Reports
Generate Type
Default (last 50 entries)-Show the last 50 calls
Based on date range- filter the calls according to the FROM and TO date
entries
Based on CDR count – Based on CDR entry serial no
All – Display all
Show entries
How many entries in the single page
NO
Serial no of the CDR entry
www.allo.com
Version 2.0
50
GSM Gateway User Manual
Start Time
Stating time of the call
Caller
Who originates a call
Callee
The person who is called by the caller
Duration
The duration of the call
Status
NO ANSWER –If the call landing on the Gateway not answered
Answer –If the call landing on the gateway answered
Busy – If the call landing on the gateway rejected by the user
Owner
Caller ID of the caller
Link ID
Unique no generated by the Gateway
Generate
This button used when you sort CRD with generate type
Export
To export CDR in .csv format
Print
To Print CDR
8.2 SIP Trunk Status
Navigate through Status > SIP Trunks
SIP Trunk Status page displays detailed status of each SIP trunks available on the GSM Gateway.
Figure 50: SIP Trunk Status
www.allo.com
Version 2.0
51
GSM Gateway User Manual
Status
Reg. State
Description
OK
Registered
Configured, Registered &
-
reachable
OK
-
Configured & Reachable, but
-
no Registration
OK
OK
UNREACHABLE
Request
Configured, but Host not
Check Registrar
Sent
responding or unreachable
Address
Rejected
Configured & reachable, but
Check
Registration failure
Authentication
Configured, Registered, but
Check Proxy Address
Registered
not reachable
UNREACHABLE
-
Configured, but not reachable
Check Proxy Address
UNKNOWN
-
Not Registered
Client not registered
Dynamic: Host IP is obtained dynamically on registration.
8.3 GSM Span Status
Navigate through Status > GSM Span
GSM Span Status page displays detailed status of each span name, Signal Strength, Service
Provider info and channel status available on the GSM Gateway.
Figure 51: GSM Span Status
www.allo.com
Version 2.0
52
GSM Gateway User Manual
Channel Status
Description
Channel is Busy
Channel is Idle and ready to receive or make
calls
Channel is not active(SIM not found )
8.4 Current Calls
Navigate through Status > Current Calls
Current Calls page displays detailed status of the real time calls available on GSM Gateway.
Figure 52: Current Calls
8.5 Network Status
Navigate through Status > Network
Network Status page displays detailed status of the network configuration on GSM Gateway.
www.allo.com
Version 2.0
53
GSM Gateway User Manual
Figure 53: Network Status
www.allo.com
Version 2.0
54
GSM Gateway User Manual
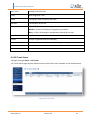
9. Administrator
9.1 Reboot
Refer Below screen shot for Reboot, WEB settings, Email Settings and Log out
Figure 54: Reboot
Reboot option will help customers / Technicians to reboot the device from GUI
9.2 Web Settings
Navigate through Administrator > Web Settings
Session Timeout
Duration after which current web login session expires. Default:
3600 sec
Pagination
Number of entries in a table per page to be displayed.
Change Password
Modify Administrator password here.
9.3 Email settings
Navigate through Administrator > Email Settings
Mail Server
The IP Address or domain name of the SMTP server
Email-ID
Specify the Administrator Email ID.
Username
Authorized username of the Admin Email ID
Password
Authorized password of the Admin Email ID
www.allo.com
Version 2.0
55
GSM Gateway User Manual
TLS Support
TLS setting to require mail to be transmitted via a secure
connection when users correspond with specific domains and
email addresses.
www.allo.com
Version 2.0
56
GSM Gateway User Manual
10. Appendix
10.1 SMS Sending and Receiving Options in Allo's GSM PCI cards for Asterisk
1. Sending SMS
There are two modes for sending SMS such as PDU mode and text mode. PDU mode supports a
few languages’ characters for sending. Text mode currently supports only English characters.
To send SMS, chan_allogsm provides three methods:
i.
Sending SMS on the Asterisk console (only supports English characters).
Usage: allogsm send sms <span> <destination number> <sms contents>
E.g. allogsm send sms 1 135xxxxxxxx “Hello World!”
ii. Sending SMS over Linux Shell.
Usage: asterisk - rx “allogsm send sms <span> <destination number> <sms contents>”
E.g. asterisk – rx “allogsm send sms 1 135xxxxxxxx \”Hello World!
\””
iii. Send SMS over dialplan.
Usage: SendSMS (<span>, destination number, sms content)
E.g. SendSMS (1,135xxxxxxxx, “Hello World!”)
2. Receiving SMS
The sms will be saved in /var/log/asterisk/sms/receive_message when system receives. At this
moment, it will trigger corresponding contexts and sms priorities over dialplan.
E.g. exten =>sms, 1, xxxxxxxxxxx (must use sms so that trigger sms receiving). It
might be different for each span
3. Additional Variable settings in Dialplan.
Sending Side
i.
Set (CHAR_CODING=encoding); set up encoding mode of sending sms. Currently
supported GSM for text mode and HEX for PDU.
www.allo.com
Version 2.0
57
GSM Gateway User Manual
E.g. Set (CHAR_CODING=GSM)
ii. Set (SMSC=sms centre number); set up centre number of sms.
E.g. Set (SMSC=861380755500)
Receiving Side
i.
${SMSSRC}; sms sender number.
ii. ${SMSTXT}; sms contents.
iii. ${SMSPDU}; PDU codes of sms.
www.allo.com
Version 2.0
58
GSM Gateway User Manual
www.allo.com
Version 2.0
59