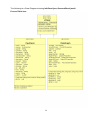
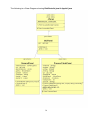
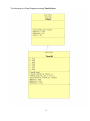
1
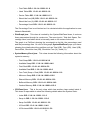
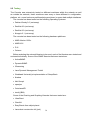
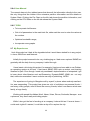
Network Management Console
Virat Gohil
Bachelor’s Of Computer Applications,
Maharaja Sayajirao University,
Vadodara
15/05/2003
Summary
This project is focussed on Network Management Systems, Java, and
GNU/Linux, i.e how a network is managed by the use of the latest technology such as Java Management Extensions (JMX) and SNMP (Simple Network
Management Protocol).
The aim of the project was to review the products available in the market, that are
frequently used my Network Administrators around the world. And then develop
something similar to those to fit the requirement of DeepRoot Linux Pvt. Ltd..
The new system should give a strong base for further developments.
Contents
1
Research on OpenNMS
1.1 About DeepRoot Linux Pvt. Ltd. . . . . . . . . . . . . . . . . . . . . . . . .
1.2 Description . . . . . . . . . . . . . . . . . . . . . . . . . . . . . . . . . . . . .
1.3 Downloading and Installing . . . . . . . . . . . . . . . . . . . . . . . . . . .
1.3.1 Dependencies . . . . . . . . . . . . . . . . . . . . . . . . . . . . . . .
1.4 Configuring . . . . . . . . . . . . . . . . . . . . . . . . . . . . . . . . . . . . .
1.4.1 discovery.xml . . . . . . . . . . . . . . . . . . . . . . . . . . . . . . .
1.4.2 poller-configuration.xml . . . . . . . . . . . . . . . . . . . . . . . . .
1.4.3 snmp-config.xml . . . . . . . . . . . . . . . . . . . . . . . . . . . . .
1.5 More on .xml files . . . . . . . . . . . . . . . . . . . . . . . . . . . . . . . . .
1.5.1 actiond-configuration.xml . . . . . . . . . . . . . . . . . . . . . . . .
1.5.2 AvailabilityReports.xsl SVGAvailReport.xsl PDFAvailReport.xsl .
1.5.3 viewsdisplay.xml . . . . . . . . . . . . . . . . . . . . . . . . . . . . .
1.5.4 views.xml . . . . . . . . . . . . . . . . . . . . . . . . . . . . . . . . . .
1.5.5 capsd-configuration.xml . . . . . . . . . . . . . . . . . . . . . . . . .
1.5.6 controller-configuration.xml . . . . . . . . . . . . . . . . . . . . . .
1.5.7 service-configuration.xml . . . . . . . . . . . . . . . . . . . . . . . .
1.5.8 create.sql database-schema.xml . . . . . . . . . . . . . . . . . . . .
1.5.9 datacollection-config.xml . . . . . . . . . . . . . . . . . . . . . . . .
1.5.10 notifications.xml . . . . . . . . . . . . . . . . . . . . . . . . . . . . . .
1.5.11 destinationPaths.xml . . . . . . . . . . . . . . . . . . . . . . . . . . .
1.5.12 notificationCommands.xml . . . . . . . . . . . . . . . . . . . . . . .
1.5.13 discovery-configuration.xml . . . . . . . . . . . . . . . . . . . . . .
1.5.14 eventconf.xml . . . . . . . . . . . . . . . . . . . . . . . . . . . . . . .
1.5.15 eventd-configuration.xml . . . . . . . . . . . . . . . . . . . . . . . .
1.5.16 users.xml / groups.xml . . . . . . . . . . . . . . . . . . . . . . . . . .
1.5.17 log4j.properties . . . . . . . . . . . . . . . . . . . . . . . . . . . . . .
1.5.18 magic-users.properties . . . . . . . . . . . . . . . . . . . . . . . . .
1.5.19 opennms-database.xml . . . . . . . . . . . . . . . . . . . . . . . . .
1.5.20 opennms-mapping.xml . . . . . . . . . . . . . . . . . . . . . . . . . .
1.5.21 opennms-jms.xml . . . . . . . . . . . . . . . . . . . . . . . . . . . . .
1.5.22 outage-configuration.xml . . . . . . . . . . . . . . . . . . . . . . . .
1.5.23 poller-configuration.xml . . . . . . . . . . . . . . . . . . . . . . . . .
1.5.24 rrdtool-graph.properties . . . . . . . . . . . . . . . . . . . . . . . . .
1.5.25 rtc-configuration.xml . . . . . . . . . . . . . . . . . . . . . . . . . . .
1.5.26 snmp-config.xml . . . . . . . . . . . . . . . . . . . . . . . . . . . . .
1.5.27 trapd-configuration.xml . . . . . . . . . . . . . . . . . . . . . . . . .
1.6 Starting & Stopping . . . . . . . . . . . . . . . . . . . . . . . . . . . . . . . .
2
5
5
5
7
7
11
11
11
11
12
12
12
13
13
13
13
13
13
13
14
14
14
14
15
15
15
15
15
15
15
15
16
16
16
16
16
16
17
1.6.1 Starting PostgreSQL . . . . . . . . . . . . . . . . .
1.6.2 Starting Tomcat . . . . . . . . . . . . . . . . . . . .
1.6.3 Starting OpenNMS . . . . . . . . . . . . . . . . . .
1.6.4 Stopping OpenNMS . . . . . . . . . . . . . . . . . .
1.6.5 Stopping Tomcat . . . . . . . . . . . . . . . . . . .
1.6.6 Stopping PostgreSQL . . . . . . . . . . . . . . . .
1.7 Exploring . . . . . . . . . . . . . . . . . . . . . . . . . . . .
1.7.1 The Home Page . . . . . . . . . . . . . . . . . . . .
1.7.2 Outage table . . . . . . . . . . . . . . . . . . . . . .
1.7.3 Availability . . . . . . . . . . . . . . . . . . . . . . .
1.7.4 Performance and Notification . . . . . . . . . . . .
1.7.5 Events . . . . . . . . . . . . . . . . . . . . . . . . . .
1.7.6 Viewing Events . . . . . . . . . . . . . . . . . . . .
1.7.7 Managing Events . . . . . . . . . . . . . . . . . . .
1.7.8 Outages . . . . . . . . . . . . . . . . . . . . . . . . .
1.7.9 Search . . . . . . . . . . . . . . . . . . . . . . . . . .
1.7.10 Searching for Nodes . . . . . . . . . . . . . . . . .
1.7.11 Searching Asset Information . . . . . . . . . . . .
1.7.12 Reporting . . . . . . . . . . . . . . . . . . . . . . . .
1.7.13 Performance Reports . . . . . . . . . . . . . . . . .
1.7.14 Custom Performance Reports . . . . . . . . . . .
1.7.15 Availability Reports . . . . . . . . . . . . . . . . . .
1.7.16 Notifications . . . . . . . . . . . . . . . . . . . . . .
1.7.17 Turning Notifications on . . . . . . . . . . . . . . .
1.7.18 Check and Acknowledge Notifications . . . . . .
1.7.19 Managing Notifications . . . . . . . . . . . . . . . .
1.7.20 Assets . . . . . . . . . . . . . . . . . . . . . . . . . .
1.7.21 Adding Asset information . . . . . . . . . . . . . .
1.7.22 Search Nodes based on Asset Information . . .
1.7.23 Exporting Asset Information . . . . . . . . . . . .
1.7.24 Importing Asset Information . . . . . . . . . . . .
1.8 Advanced Configuration . . . . . . . . . . . . . . . . . . .
1.8.1 Sending a notification on occurance of an event
1.8.2 Sending an SMS . . . . . . . . . . . . . . . . . . . .
1.8.3 Managing and Unmanaging Nodes and Services
1.8.4 Configuring Pollers . . . . . . . . . . . . . . . . . .
1.9 Troubleshooting . . . . . . . . . . . . . . . . . . . . . . . .
1.10 Tips . . . . . . . . . . . . . . . . . . . . . . . . . . . . . . . .
.
.
.
.
.
.
.
.
.
.
.
.
.
.
.
.
.
.
.
.
.
.
.
.
.
.
.
.
.
.
.
.
.
.
.
.
.
.
.
.
.
.
.
.
.
.
.
.
.
.
.
.
.
.
.
.
.
.
.
.
.
.
.
.
.
.
.
.
.
.
.
.
.
.
.
.
.
.
.
.
.
.
.
.
.
.
.
.
.
.
.
.
.
.
.
.
.
.
.
.
.
.
.
.
.
.
.
.
.
.
.
.
.
.
.
.
.
.
.
.
.
.
.
.
.
.
.
.
.
.
.
.
.
.
.
.
.
.
.
.
.
.
.
.
.
.
.
.
.
.
.
.
.
.
.
.
.
.
.
.
.
.
.
.
.
.
.
.
.
.
.
.
.
.
.
.
.
.
.
.
.
.
.
.
.
.
.
.
.
.
.
.
.
.
.
.
.
.
.
.
.
.
.
.
.
.
.
.
.
.
.
.
.
.
.
.
.
.
.
.
.
.
.
.
.
.
.
.
.
.
.
.
.
.
.
.
.
.
.
.
.
.
.
.
.
.
.
.
.
.
.
.
.
.
.
.
.
.
.
.
.
.
.
.
.
.
.
.
.
.
.
.
.
.
.
.
.
.
.
.
.
.
.
.
.
.
.
.
.
.
.
.
.
.
.
.
.
.
.
.
.
.
.
.
.
.
.
.
.
.
.
.
.
.
.
.
.
.
.
.
.
.
.
.
.
.
.
.
.
.
.
.
.
.
.
.
.
.
.
.
.
.
.
.
.
.
.
.
.
.
.
.
.
.
.
.
.
.
.
.
.
.
.
.
.
.
.
.
.
.
.
.
.
.
.
.
.
.
.
.
17
17
17
18
18
18
19
19
19
20
20
20
20
20
21
21
21
21
21
22
22
22
22
22
23
23
23
23
23
23
23
24
24
24
25
25
25
26
2 Development of a Management Console
27
2.1 User Requirements . . . . . . . . . . . . . . . . . . . . . . . . . . . . . . . . 27
2.2 Functional Specification . . . . . . . . . . . . . . . . . . . . . . . . . . . . . 27
3
2.3
2.4
2.5
2.6
2.7
System Implementation . . . . . .
2.3.1 Tools Used . . . . . . . . . .
2.3.2 Source Code Organization
Completion Status . . . . . . . . . .
Testing . . . . . . . . . . . . . . . . .
2.5.1 Conclusion . . . . . . . . . .
User Manual . . . . . . . . . . . . . .
2.6.1 Installation . . . . . . . . . .
2.6.2 Maintenance . . . . . . . . .
2.6.3 Troubleshooting . . . . . . .
2.6.4 User Manual . . . . . . . . .
2.6.5 TODO . . . . . . . . . . . . .
My Experiences . . . . . . . . . . .
.
.
.
.
.
.
.
.
.
.
.
.
.
.
.
.
.
.
.
.
.
.
.
.
.
.
.
.
.
.
.
.
.
.
.
.
.
.
.
.
.
.
.
.
.
.
.
.
.
.
.
.
.
.
.
.
.
.
.
.
.
.
.
.
.
.
.
.
.
.
.
.
.
.
.
.
.
.
.
.
.
.
.
.
.
.
.
.
.
.
.
.
.
.
.
.
.
.
.
.
.
.
.
.
.
.
.
.
.
.
.
.
.
.
.
.
.
.
.
.
.
.
.
.
.
.
.
.
.
.
.
.
.
.
.
.
.
.
.
.
.
.
.
.
.
.
.
.
.
.
.
.
.
.
.
.
.
.
.
.
.
.
.
.
.
.
.
.
.
.
.
.
.
.
.
.
.
.
.
.
.
.
.
.
.
.
.
.
.
.
.
.
.
.
.
.
.
.
.
.
.
.
.
.
.
.
.
.
.
.
.
.
.
.
.
.
.
.
.
.
.
.
.
.
.
.
.
.
.
.
.
.
.
.
.
.
.
.
.
.
.
.
.
.
.
.
.
.
.
.
.
.
.
.
.
.
.
.
.
.
.
.
.
.
.
.
.
.
.
.
.
.
.
.
.
.
.
.
.
.
.
.
.
.
.
.
.
.
.
.
.
.
.
.
.
.
.
.
.
34
34
34
37
38
39
39
39
39
39
40
40
40
3
Bibliography
42
4
Acknoledgements
44
4
1
Research on OpenNMS
1.1 About DeepRoot Linux Pvt. Ltd.
DeepRoot Linux is an upcoming GNU/Linux company, which was setup August 2000,
housed in the northern outskirts of Bangalore, in Southern India.
DeepRoot Linux was started with a simple objective:
• to design products based on GNU/Linux and
• to offer value-added and high-quality services on GNU/Linux.
Its committment to the GNU/Linux community remains one of the strongest reasons for
its work. It is aiming towards contributing on a larger scale - and if possible more than
what it has taken from the community.
It stresses upon two things.
• Spreading GNU/Linux adoption across boundaries.
• Making it easy for users to deploy GNU/Linux.
Contact Information:
Postal Address
DeepRoot Linux Pvt. Ltd.
#377, SFS-407,
Opp. Mother Dairy,
IVth Phase, Yelahanka New Town,
Bangalore - 560064,
INDIA.
Phone Number:
(Head Office and Development Center)
+91 (80) 856 5624
Fax Number +91 (80) 856 2896
1.2 Description
5
A few years back, a group of people with a lot of network management experience were
getting frustrated with the current state of network management software. They are expensive, difficult to configure, not reliable, and run on expensive hardware. They came
up with OpenNMS, an open source platform.
OpenNMS was designed from the ground up to be a one-for-one replacement for
HP’s OpenView, IBM’s Tivoli, CA’s Unicenter, and the like. With that in mind, the OpenNMS team designed it as a network management tool, complete with SNMP hooks and
a system-monitoring tool that can measure the availability of critical network services.
It also has a configurable, event-driven messaging subsystem that allows us to plug-in
event streams from other sources, such as vulnerability information from Nessus, tailed
log files, and /proc-based monitors. And in good open source fashion (OpenNMS is released under the terms of the GPL), the product was designed to leverage preexisting
tools where it made sense. Therefore, the SNMP performance data storage and graphing
system uses RRDTool (Round Robin Database), the Web server/JSP container/servlet
engine is Apache’s Jakarta Tomcat, and the underlying RDBMS is PostgreSQL.
Built from the ground up in Java, the project has covered a lot of territory in a short
period of time. Version 0.4 was the first public release at the end of 2000, with 1.0.2-2
currently available and 2.0 slated for end of 2003. But enough about releases and as
there will be many more.
6
1.3 Downloading and Installing
As the platform used was a Debian clone (Debian Woody 3.0, to be more presise), .deb
packages are used as installation files, they are similar to .rpm under RedHat clones. The
technique for installing is also a lot similar, download the .deb file and run dpkg -i [debfilename] and the software is ready to run.
The other tool for downloading and installing is apt-get. apt-get is an installation tool
which downloads the packages as well as any of its dependencies that are not installed
in the current system. It then installs the dependencies first later the main package. This
makes it a lot easier to install applications like OpenNMS where a software depend on a
lot of other packages.
The first method of searching and downloading the .deb packages one by one was
chosen. Most of the packegs could be found with the debian distribution, but some like
J2SDK, Tomcat 4.0 and ofcourse OpenNMS have to be downloaded.
After downloading all the necessary dependencies start installing the packages one by
one. As Sun’s new policy does not allow others to distribute Java VM or J2SDK, The .bin
file from sun.java.com. was downloaded and then converted into .deb, so the OpenNMS
can identify with it, and then install J2SDK 1.4. Finally the OpenNMS .deb package was
installed.
1.3.1 Dependencies
The following is Dependency tree for OpenNMS, upto three levels:
• OpenNMS
– librrd0 >= 1.0.10-1
∗ libc6 >= 2.2.4-4
· libdb1-compat
∗ libgd-gif1
· libc6 (>= 2.2.5-13)
· zlib1g (>= 1:1.1.4)
∗ libpng2 >=1.0.12
· libc6 (>= 2.2.5-13)
· zlib1g (>= 1:1.1.4)
– Perl
∗ perl-base = 5.6.1-7
7
· libc6 (>= 2.2.4-4)
∗ perl-modules >= 5.6.1-7
· perl (>= 5.6.1-1)
∗ libc6 >=2.2.4-4
· libdb1-compat
∗ libdb2 >=2:2.7.7-4
· libc6 (>= 2.2.5-13)
∗ libgdbm1
· libc6 (>= 2.2.4-4)
– J2sdk1.4 or java2-runtime
∗ libc6 >= 2.3.1-1
· libdb1-compat
∗ xlibs >4.1.0
· xfree86-common (>4.2)
· libc6 (>= 2.3.1-1)
· libfreetype6 (>= 2.1.3-1)
∗ java-common
– Mailx
∗ libc6 (>= 2.2.5-13)
· libdb1-compat
∗ liblockfile1 (>= 1.0)
∗ mail-transport-agent (Exim was used as the mail transport agent)
∗ base-files (>= 2.2.0)
· awk, base-passwd (>= 2.0.3.4)
– Metamail
∗ libc6 (>= 2.2.4-4)
· libdb1-compat
∗ libncurses5 (>= 5.2.20020112a-1)
· libc6 (>= 2.2.4-4)
– RRDTool
∗ libc6 (>= 2.2.4-4)
· libdb1-compat
∗ libgd-gif1
∗ libpng2 (>= 1.0.12)
· libc6 (>= 2.2.5-13)
8
· zlib1g (>= 1:1.1.4)
∗ librrd0 (>= 1.0.10-1)
· libc6 (>= 2.2.4-4)
· libgd-gif1
· libpng2 (>= 1.0.12)
– Tomcat4
∗ java2-runtime — j2sdk1.3 — java-virtual-machine-dummy (J2SDK 1.4.003.0 was used)
· libc6 >= 2.3.1-1
· xlibs >4.1.0
· java-common
∗ libtomcat4-java
· java-common
· libxerces2-java
· libservlet2.3-java
· libregexp-java
∗ logrotate
· libc6 (>= 2.2.5-13)
· libpopt0 (>= 1.6.4)
· cron (>= 3.0pl1-53) or anacron
· base-passwd (>= 2.0.3.4)
∗ adduser (>= 3.34)
· perl-base (>= 5.6.0)
· passwd (>= 961025)
· debconf
– PostgreSQL 7.1 or above
∗ libc6 (>= 2.2.4-4)
· libdb1-compat
∗ libpam0g (>= 0.72-1)
· libc6 (>= 2.2.5-13)
· libpam-runtime
∗ libreadline4 (>= 4.2a-4)
· libc6 (>= 2.2.4-4)
· libncurses5 (>= 5.2.20020112a-1)
∗ libssl0.9.6
· libc6 (>= 2.2.4-4)
9
∗ python2.1
· python (>= 2.1.3)
· libc6 (>= 2.2.4-4)
· libdb3 (>= 3.2.9-16)
· libncurses5 (>= 5.2.20020112a-1)
· libreadline4 (>= 4.3-1)
· libssl0.9.6, zlib1g (>= 1:1.1.4)
∗ zlib1g (>= 1:1.1.4)
· libc6 (>= 2.2.4-4)
∗ procps (>= 1:2.0)
· libc6 (>= 2.2.4-4)
· libncurses5 (>= 5.2.20020112a-1)
∗ debianutils (>= 1.13.1)
· libc6 (>= 2.2.4-4)
∗ postgresql-client
· libc6 (>= 2.2.4-4)
· libpam0g (>= 0.72-1)
· libreadline4 (>= 4.2a-4)
· libssl0.9.6
· zlib1g (>= 1:1.1.4)
· libpgsql2 (>= 7.2-3)
∗ adduser (>= 3.34)
· perl-base (>= 5.6.0)
· passwd (>= 961025)
· debconf
∗ libpgsql2 (>= 7.2)
· libc6 (>= 2.2.4-4)
· libssl0.9.6
· libstdc++2.10-glibc2.2 (>= 1:2.95.4-0.010810)
OpenNMS also depends on DBI and DBD-Pg perl modules that are used to communicate
with postgreSQL. These can be found at www.cpan.org
10
1.4 Configuring
The configuration files of OpenNMS are stored in /etc/opennms directory. The files
are in .xml format so they are easy to understand and configure. The discovery.xml,
snmp-config.xml and poller-configuration.xml files are more important as they have to
be modified manually, the rest of the files are taken care of by the OpenNMS web console.
1.4.1 discovery.xml
The range of IP addresses are defined in discovery.xml
<include-range retries=”2” timeout=”3000”>
<begin >192.168.0.1 </begin>
<end >192.168.0.254</end>
</include-range>
The begin and the end tag define the start and the end of the range of IP Addresses
that the opennms will scan.
<specific >192.168.50.3 </specific >
The above line is used when one wants to include a specific IP Address only e.g a
printer or a webserver outside a particular range that is already defined.
1.4.2 poller-configuration.xml
<include-range begin=”192.168.0.1” end=”192.1680.254”>
Changes in the include-range tag are made to make sure that the pollers are aware of
the range of IP Address.
1.4.3 snmp-config.xml
The parameters used to connect with SNMP agents are defined in the snmp-config.xml
file. Here is an example:
<snmp-config retry=”3” timeout=”800” read-community=”public” write-community=”private”>
<definition version=”v2c”>
<specific>192.168.50.5</specific>
</definition>
<definition retry=”4” timeout=”2000”>
<range begin=”192.168.50.1” end=”192.168.1.254”/>
11
<range begin=”192.168.60.1” end=”192.168.60.254”/>
</definition>
<definition read-community=bubba” write-community=”zeke”>
<range begin=”192.168.70.1” end=”192.168.70.254”/>
</definition>
<definition port=”1161”>
<specific>192.168.80.50</specific>
</definition>
</snmp-config>
The attributes for the snmp-config tag are as follows:
• retry: The number of attempts that will be made to connect to the SNMP agent.
• timeout: The amount of time, in milliseconds, that OpenNMS will wait for a response
from the agent.
• read-community: The default ”read” community string for SNMP queries.
• write-community: The default ”write” community string for SNMP queries. Note
that this is for future development - OpenNMS does not perform SNMP ”sets” at the
moment.
All of the global parameters can be overridden with definition tags. These new SNMP
definitions can apply to ranges or specific IP addresses. In addition, there are two other
attributes available:
• port: This overrides the default port of 161.
• version: Here we can force either SNMP version 1 ”v1” or version 2c ”v2c”.
1.5 More on .xml files
1.5.1 actiond-configuration.xml
Actions are external programs called based on events. This file controls the number of
concurrent actions allowed as well as a time out for waiting on a return.
1.5.2 AvailabilityReports.xsl SVGAvailReport.xsl PDFAvailReport.xsl
These 3 files contain information for converting availability reports to PDF format.
12
1.5.3 viewsdisplay.xml
This file defines layout of categories for display in the web UI. The actual categories are
defined in the views.xml file.
1.5.4 views.xml
This file defines view categories, and services, to include per category as well as thresholds. These values are used by various components of OpenNMS such as RTC, the
availability report generator and the web UI.
1.5.5 capsd-configuration.xml
This file defines capabilities (services) to be checked for on nodes discovered either
by the discovery daemon or via SNMP. It aslo specifies which addresses, and address
ranges, that if discovered, should be managed or unmanaged. It also provides for a default state or ”management-policy” that covers addresses not specifically referenced.
<capsd-configuration rescan-frequency=”86400000” management-policy=”unmanaged”
>
Finally we can set the ”rescan-frequency” which controls how often devices are rescaned or rechecked for which services they provide. This number, specified in milliseconds, is used to determine how often items should get rescanned. The default value is
86400000 or 24hrs.
1.5.6 controller-configuration.xml
This file defines listeners for broadcast control JMS messages.
1.5.7 service-configuration.xml
This file defines opennms services to start. This is VM specific and controls which services are started in which VMs.
1.5.8 create.sql database-schema.xml
The file create.sql is the template for creating OpenNMS database. It is typically used by
the install.pl script during the install process. The database-schema.xml defines the same
database, in xml format, and is used by the filtering system to format database queries.
1.5.9 datacollection-config.xml
This file contains data collection information for RRDTool.
13
1.5.10 notifications.xml
This file defines which events or UEIs warrant notification and a destination path for said
notification.
<notification name=”nodeAdded”>
<uei><![CDATA[http://uei.opennms.org/products/bluebird/nodes/nodeAdded]]></uei>
<rule><![CDATA[IPADDR IPLIKE *.*.*.*]]></rule>
<destinationPath>Email-Network/Systems </destinationPath>
<text-message>OpenNMS has discovered a new node named <subject></notification>
1.5.11 destinationPaths.xml
This file contains definitions for destination paths ie. whom to notify and by what method
either pager, email or email-pager.
1.5.12 notificationCommands.xml
This file defines how to accomplish various contact methods defined in destinationPaths.xml. This would include the location of executable and aliases for each type of
contact along with any other information needed to send information of the specific type.
<command type=”email”> <name>/bin/mail</name>
<lookup>email</lookup>
<lookup>mail</lookup>
<comment>for sending email notifications</comment>
<argument streamed=”false”>
<substitution>-s</substitution>
<switch>-subject</switch>
</argument>
<argument streamed=”false”>
<switch>-email</switch>
</argument>
<argument streamed=”true”>
<switch>-tm</switch>
</argument>
</command>
1.5.13 discovery-configuration.xml
This file defines the ranges of addresses to discover, (ping sweep) as well as time outs,
number of retries, and number of threads to dedicate to discovery. This file also provides
14
initial-sleep-time and restart-sleep-time. These values are in miliseconds and control how
long after OpenNMS is started, that discovery should begin it’s initial pass through the
addresses, and how long to wait between each additional pass.
1.5.14 eventconf.xml
This file defines the Universal Event Identifiers or UEIs as well as their event masks,
descriptions, log messages, and severity levels.
1.5.15 eventd-configuration.xml
This file defines operating parameters for eventd such as time outs and number of listener
threads.
1.5.16 users.xml / groups.xml
These files hold information about users, and their contact information, as well as groups
and membership. Information in these files is used for authentication on the web UI as
well as for contact methods needed by notifications.
1.5.17 log4j.properties
This file defines properties for log4j. It controls log size, rotation as well as logging levels
for individual category.
1.5.18 magic-users.properties
This file includes special users, and takes precedence over users.xml for the users that it
has information about. This is used internally to control permissions for certain functions
that interact with the web UI.
1.5.19 opennms-database.xml
This file defines database type, name, authentication and mapping template to use for
OpenNMS.
1.5.20 opennms-mapping.xml
This file is empty but required by DTD for opennms-database.xml
1.5.21 opennms-jms.xml
This file defines properties for OpenJMS.
15
1.5.22 outage-configuration.xml
This file simply defines number of writer threads allowed by the outage manager.
1.5.23 poller-configuration.xml
This file is used to define packages as well as set up the various pollers. A package
includes several items such as address ranges, services, outage calendars, and down
time models.
1.5.24 rrdtool-graph.properties
This file is used to define RRD configurations for generating reports.
1.5.25 rtc-configuration.xml
This file defines properties for RTC (Real Time Console) such as the rolling window used
to calculate percentages of down time, web UI refresh interval and how often RTC sends
updates to the web interface.
1.5.26 snmp-config.xml
This file is used to define community strings for addresses or address ranges, one snmpconfig entry per community
1.5.27 trapd-configuration.xml
This file defines the SNMP trap port.
16
1.6 Starting & Stopping
Define JAVA HOME environment variable:
#JAVA HOME=/usr/j2sdk1.4
The following sequence is to be followed while starting OpenNMS:
1. postgreSQL
2. Tomcat
3. OpenNMS
The following sequence is to be followed while Stopping OpenNMS:
1. OpenNMS
2. Tomcat
3. postgreSQL
1.6.1 Starting PostgreSQL
#/etc/init.d/postgresql start
1.6.2 Starting Tomcat
#/etc/init.d/tomcat4 start
OR
#/usr/share/tomcat4/bin/startup.sh
1.6.3 Starting OpenNMS
#/usr/share/opennms/bin/opennms.sh start
OR
#/sbin/service opennms start
Now OpenNMS is up and running, give it some time to initialize all its services and pollers,
then open a web browser and type the following URL for Debian clones:
http://localhost:8180/opennms
for others:
17
http://localhost:8080/opennms
This is because the Apache Tomcat 4 server on Debian runs at port 8180.
A dialog box pops up asking for Username and Password, ’admin’ is the username as
well as the password.
1.6.4 Stopping OpenNMS
#/usr/share/opennms/bin/opennms.sh stop
OR
#/sbin/service opennms stop
1.6.5 Stopping Tomcat
#/etc/init.d/tomcat4 stop
OR
#/usr/share/tomcat4/bin/shutdown.sh
1.6.6 Stopping PostgreSQL
#/etc/init.d/postgresql stop
If some other service or application is using Tomcat4 or PostgreSQL then it is
recommended that they should be kept running.
18
1.7 Exploring
Now lets explore the OpenNMS Web console.
1.7.1 The Home Page
From this centralized view, a quick overview of the current health of the network can be
found. Notice in the upper right hand corner is information about the time and date on
the management station, as well as the currently logged in user, and whether or not
notices are currently turned on.
1.7.2 Outage table
To the left of the screen is the outage table, labeled ”Nodes with Outages.” This is a list
of nodes that currently have service outages. Clicking on a node in this list will present
more specific information about the node, it’s services, and current, as well as historic,
outages. From this page, information can be found regarding times that any outages
occurred as well as when service was restored.
19
1.7.3 Availability
In the center of the display are categories of services. For each category, there is listed
the number of current outages as well as availability for the last 24 hours.
The outage, and availability sections of this table are colored green, yellow, or red based
on threshold values set by the administrator when the system was installed.
1.7.4 Performance and Notification
On the right side of the display there are links to notifications and a portal to
performance graphs. This section is used to create graphs from data collected via SNMP.
1.7.5 Events
When an event occurs on the management station, it is stored in the database. These
entries can be viewed on the events page which is accessed by clicking ”Events” on the
menu bar near the top of the main page.
1.7.6 Viewing Events
From this page, start by choosing the type of events to view. Options are ”outstanding
events” (events that have not yet been acknowledged) and ”acknowledged events.” After
selecting the type of events, an unfiltered list of events is presented in a table format.
Each event has been assigned a severity and is colored appropriately. The legend can
be viewed by pressing the button labeled ”Severity Legend”.
More information about any event can be reached by clicking on the link in the ID column.
1.7.7 Managing Events
From the main Events page there is a link to acknowledge or unacknowledge all events.
In addition, filters can be applied to the event list by clicking on the ”+” or ”-” next to the
item.
Clicking the ”-” will exclude any item where the specific field that matches that value.
Clicking the ”+” will exclude any item that does not match that value for the specific field.
20
1.7.8 Outages
Access the outage page by clicking on the ”Outages” link in the main menu. On this
page there is a table that contains information about all current outages for all managed
devices. On this page, there is information regarding the type of outages, affected nodes
and interfaces as well as the times of the outages. Clicking links in this table will provide
additional information such as availability, events, and historical outages.
1.7.9 Search
Clicking on the ”Search” link in the main menu takes us to the search page. From here
we can search for nodes using various criteria. Once a search is initiated we recieve a
list of nodes and their interfaces that match the search criteria. Each of these will be a
link to the main node, or interface pages. These pages contain a very complete set of
information about each device. Below is more detail on some of the different types of
searches that can be done.
1.7.10 Searching for Nodes
Generate lists of nodes that match any of a number of criteria including ip addresses,
services, and machine names. Ranges of addresses can be entered for example, to
provide a list of nodes that have ip addresses in that range. There are examples on this
page, as well as some syntax rules to help refine searches. If all else fails there is also a
link to ”list all nodes”.
1.7.11 Searching Asset Information
If asset information has been entered for devices on the network, a search can can be
created based on that information. Searches can be initiated based on category,
information in any given field, or again there is a link to all nodes containing asset
information.
If no asset information has been entered for the devices, these searches will not return
any matches.
1.7.12 Reporting
Access the main reporting page by clicking ”reporting” in the main menu. From this
point there are 3 options, performance reports, custom performance reports and
availability reports. In this section we will look at each type of report, and how to
generate and interpret the graphs and information provided.
21
1.7.13 Performance Reports
Clicking on ”Performance Reports” will display a list of options for generating the
standard performance reports.
In the leftmost select box, choose an interface to generate a report on. Select any one
SNMP capable interface. Next, choose what information to report on. Select any number
of options in the second column. Select at least one option in each of the first 2 columns.
Lastly, choose the timeframe to report on.
After selecting the options, press the ”Submit” button to be taken to a bookmarkable
page containing the resulting reports.
1.7.14 Custom Performance Reports
After selecting ”Reports” from the main menu select ”Custom Performance Report”. At
this point, we will be guided through a series of questions about the report we would like
to create. First choose the interface on which we would like to report. Next we need to
select between 1 and 4 data sources to report on. For each data source we can choose
a title, color, line style and the type of value. Finally choose a title for our graph as well as
a time period to report on. From this point, selecting next should display a bookmarkable
graph. The complete address of this graph can be sent to another user via email, or
instant message.
1.7.15 Availability Reports
After selecting ”Reports” from the main menu select ”Availability Report”. From this point
simply select the type of report we would like to create, and the category we would like to
report on. Pressing the ”Get Report” button will open the requested report in a new
browser window.
1.7.16 Notifications
Notifications Notify us of events.
1.7.17 Turning Notifications on
From the admin page, select Notification Status ON, then simply click ”Update Status”.
This will turn notifications on/off for the entire system en masse.
22
1.7.18 Check and Acknowledge Notifications
From the notifications page select the catagory that best describes the type of
notifications in which we are interested. From here we will get a list of notifications that
we can browse through and acknowledge, if needed. Unacknowledged notifications will
continue to escalate as perscribed, until acknowledged.
1.7.19 Managing Notifications
From the admin page and click ”Turn On/Off Notices by Service”. Follow instructions on
this page to control notifications on a per service basis.
1.7.20 Assets
Asset information helps us keep track of information about our managed devices. It can
be used as search criteria, and is very handy in troubleshooting when we need a phone
number for a vendor, or wish to document peculiar behavior for the next person that may
access this information.
1.7.21 Adding Asset information
Use the search page to find the node we would like to add asset information to, and click
it. Then click ”Asset Info”. Fill out whatever fields we think we need. Click submit. When
entering asset information, be very careful not to use any commas in any fields if we plan
to export or import our data. THERE IS CURRENTLY NO WAY TO ESCAPE COMMAS
IN THE CURRENT VERSION.
1.7.22 Search Nodes based on Asset Information
Go to the search page or asset page and enter the criterium, and search.
1.7.23 Exporting Asset Information
Exporting our asset information will give us a list of comma separated values. The first
line of which will be the field names, and each subsequent line a device.
1.7.24 Importing Asset Information
This feature, by itself, is basically useless in it’s current state. The node id must match
for each device, and because of that, this information can not be passed from one
management station to another, nor could it even be used across installations, unless we
remapped the node ids. Information could be exported from a management station,
imported into a spread sheet, then modified, exported back to a comma separated list,
and then re-imported back into the same management station from which it was initially
23
exported. Or alternately the exported list could be modified by an external script and
then re-imported if for instance we would need to duplicate information such as
addresses for a large number of devices.
Note that when re-importing information, the field names (the first line) should be left out.
That is, if we export and save the resultant .csv file, pasting this file in the import field
would cause an error in the first line. The field names are only there for the sake of
another spreadsheet/database program that could read them as field names.
1.8 Advanced Configuration
1.8.1 Sending a notification on occurance of an event
For this purpose the email address in the destination path of the user has to be defined
from the admin- >configure notifications- >configure destination paths page.
Then, the event notifications are configured through admin->configure notifications>configure event notifications page.
Here the destination path for the events can be specified individually, so it makes it
easy, to send particular events to different people or group of people according to ones
needs.
Remember to configure the MTA (Mail Transport Agent) first.
1.8.2 Sending an SMS
The following things are required to send an SMS:
• A GSM Instrument
• A Data cable to connect the GSM instrument to the RS-232 port.
• Alamin Gateway, a server and client for sending and recieving SMS.
Then modify our notificationCommands.xml file to read:
<command>
<name>mobilePhoneSMS</name >
<execute >/usr/bin/gsgc </execute >
<comment>for sending GSM messages (SMS)</comment >
<argument streamed=”false”>
<substitution>–send</substitution>
</argument>
24
<argument streamed=”false”>
<switch>-np</switch>
</argument>
<argument streamed=”false”>
<switch>-tm</switch>
</argument>
</command>
1.8.3 Managing and Unmanaging Nodes and Services
It often happens that in a large network one requires to look for only a few services and
nodes, and wants to ignore the rest, or ignore a few services and look after others, in
such cases OpenNMS can be customized to monitor only those services and nodes that
are required to be monitored.
This can be done through the Admin->Manage and Unmanage Interfaces and services
1.8.4 Configuring Pollers
Pollers can be configured to look for services that are important, one can even add ones
own customised poller, these pollers look for services for the interfaces through their ports,
they first try to telnet to that port and check if the port responds or not, if it does respond
then the service is available on that interface.
1.9 Troubleshooting
• While Installing opennms it says something like DBI or DBD::Pg not found?
The solution to this problem is to install the DBI and DBD-Pg perl modules. These
modules are available at www.cpan.org.
• Installating the perl modules:
Download the DBI-1.32.tar.gz and DBD-Pg-1.21.tar.gz, extract them into a directory,
change into that directory, and run the following commands:
#perl Makefile.PL
#make
#make test
#make install
25
• mail process hangs, or goes into sleeping mode, and there are too many mail process in sleep mode.
Downgrade from J2SDK 1.4.1 03 to 1.4.1 02 or 1.4.1 01, this bug in not in the mail
transport agent but java mail APIs of J2SDK 1.4.1 03
1.10 Tips
• If you used apt-get tool for installing opennms, then remember to take a backup of
.deb packages in /var/cache/apt/archieves.
• Also backup the Debianized form of the j2sdk bin file.
• Save these files in case you need to reinstall opennms or port it to other machine.
• The best way to learn OpenNMS is to subscribe the discuss list at http://www.opennms.org/users
26
2
Development of a Management Console
The complicated configuration system and the System requirement of OpenNMS lead to
the decision to develop a Management Console, that would fit the requirement of easily
configurable and low on system resources on the server side.
2.1 User Requirements
The following is a a list of Object IDs whose tables were Required:
• Memory Table OID: .1.3.6.1.4.1.2021.4
• CPU Table OID: .1.3.6.1.4.1.2021.11
• Process Table OID: .1.3.6.1.4.1.2021.2.1
• Load Average OID: .1.3.6.1.4.1.2021.10.1
• Interface Table OID: .1.3.6.1.2.1.2.2.1
• LmSensors Table OID: .1.3.6.1.2.1.2021.14
The following individual Object IDs were Required to be displayed:
• System Description OID: .1.3.6.1.2.1.1.1.0
• System Location OID: .1.3.6.1.2.1.1.6.0
• System Up Time OID: .1.3.6.1.2.1.1.3.0
• Contact Information OID: .1.3.6.1.2.1.1.4.0
• Hostname OID: .1.3.6.1.2.1.1.5.0
• System Services OID: .1.3.6.1.2.1.1.7.0
2.2 Functional Specification
The application is build to display the current status of the Server, i.e a brief information of
things like the free space on mounted partitions, load average, the interface information,
etc.
27
The following is a Class Diagram showing CPUPanel.java & DiskGraph.java.
28
The following is a Class Diagram showing InfoPanel.java, GeeneralPanel.java &
ProcessTable.java
29
The following is a Class Diagram showing DiskDeetails.java & Applet1.java
30
The following is a Class Diagram showing InterfacePanel.java, SensorPanel.java and
LoadPanel.java
31
The following is a Class Diagram showing SystemCPUPanel.java,
SystemDiskPanel.java ,SystemMemoryPanel.java
32
The following is a Class Diagram showing TimeUtil.java
33
2.3 System Implementation
2.3.1 Tools Used
• Oracle’s JDeveloper was used as the Integrated Development Environment.
• Westhawk University’s implementation of SnmpStack was used as the SNMP
APIs for Java.
• Chart2D, a Chart and Graph library from chart2d.sourceforge.net was used for
displaying graphs.
• Java Swing was used as main GUI.
• Debian Woody 3.0 was used as the base Operating System.
• net-snmp tools were used as command line interface to SNMP.
• J2SDK 1.4.1 01 was used as the default Java Runtime Environment.
• Latex was used for Documentation.
2.3.2 Source Code Organization
All the classes are in the default package, The Applet1.class file initializes the GeneralPanel.class, InterfacePanel.java, SensorPanel.class & ProcessTablePanel.class.
Java’s Naming conventions are followed everywhere, i.e Class name, Method name,
etc. except the variable names, wherever possible the variable names are all in small
letters.
The following is the list of Source files that are either developed from scratch or extending third party libraries:
• Applet1.java: This is the first file that is initiated as soon as the console is called.
• GeneralPanel.java: This class is responsible for showing the following details:
– Hostname OID: .1.3.6.1.2.1.1.5.0
– System Description OID: .1.3.6.1.2.1.1.1.0
– System Location OID: .1.3.6.2.1.1.6.0
– System Up Time OID: .1.3.6.1.2.1.1.3.0
– Contact Information OID: .1.3.6.1.2.1.1.4.0
– System Services OID: .1.3.6.1.2.1.1.7.0
• InterfacePanel.java: This class shows the information about any interfaces configured into the system. It shows the following information about each interface.
– Index Table OID: .1.3.6.1.2.1.2.2.1.1
34
– Description Table OID: .1.3.6.1.2.1.2.2.1.2
– Type Table OID: .1.3.6.1.2.1.2.2.1.3
– Maximum Transfer Unit Table OID: .1.3.6.1.2.1.2.2.1.4
– Speed Table OID: .1.3.6.1.2.1.2.2.1.5
– Hardware Address TableOID: .1.3.6.1.2.1.2.2.1.6
– Admin Status Table OID: .1.3.6.1.2.1.2.2.1.7
– Oprational Status Table OID: .1.3.6.1.2.1.2.2.1.8
– InOctets Table OID: .1.3.6.1.2.1.2.2.1.10
– InPackets Table OID: .1.3.6.1.2.1.2.2.1.11
– InErrors TableOID: .1.3.6.1.2.1.2.2.1.14
– OutOctets Table OID: .1.3.6.1.2.1.2.2.1.16
– OutPackets Table OID: .1.3.6.1.2.1.2.2.1.17
– Out Discards Table OID: .1.3.6.1.2.1.2.2.1.19
– OutErrors Table OID: .1.3.6.1.2.1.2.2.1.20
– OutQueueLength OID: .1.3.6.1.2.1.2.2.1.21
• ProcessTablePanel.java: This class shows the information regarding the processes that are currently being monitored through snmpd.conf. It shows the following information about the process:
– prIndex Table OID: .1.3.6.1.4.1.2021.2.1.1
– prName Table OID: .1.3.6.1.4.1.2021.2.1.2
– prMin Table OID: .1.3.6.1.4.1.2021.2.1.3
– prMax Table OID: .1.3.6.1.4.1.2021.2.1.4
– prCount Table OID: .1.3.6.1.4.1.2021.2.1.5
– errFlag Table OID: .1.3.6.1.4.1.2021.2.1.100
– errMsg OID: .1.3.6.1.4.1.2021.2.1.101
– prErrFixed OID: .1.3.6.1.4.1.2021.2.1.102
– prErrFixCmd OID: .1.3.6.1.4.1.2021.2.1.103
• SensorPanel.java: This class integrates the information about the disk, memory
and cpu load.
• SystemDiskPanel.java: This class fetches the following information ans passes it
to DiskGraph.java
– Path Table OID: .1.3.6.1.4.1.2021.9.1.2
35
– Total Table OID: 1.3.6.1.4.1.2021.9.1.6
– Used Table OID: 1.3.6.1.4.1.2021.9.1.8
– Device Table OID: 1.3.6.1.4.1.2021.9.1.3
– Should be free (KB) OID: 1.3.6.1.4.1.2021.9.1.4
– Should be free (%) OID: 1.3.6.1.4.1.2021.9.1.5
– Percentage Used OID: 1.3.6.1.4.1.2021.9.1.9
The Percentage Free is not fetched as it is calculated within the application to save
Network Bandwidth.
• DiskGraph.java: This class is invoked by the SystemDiskPanel class, it recieves
three parameters through its constructor, The mount point, Total disk Space, Percentage Used, and index which is internally used on its mouse click event.
The graph is a PieChart showing the mountpoint as its title, the percentage used
and the percentage free. On click of this graph, SystemDiskPanel pops up a frame
showing the details about the partition such as Total (GB), Free (GB), Used (GB),
DevicePath, Should be free (GB), Should be Free (%), Used (%).
• SystemMemoryPanel.java: This class shows the following information about the
system’s memory:
– Total Swap OID: 1.3.6.1.4.1.2021.4.3.0
– Available Swap OID: 1.3.6.1.4.1.2021.4.4.0
– Total Real OID: 1.3.6.1.4.1.2021.4.5.0
– Available Real OID: 1.3.6.1.4.1.2021.4.6.0
– Free Total (Swap + Real) OID: 1.3.6.1.4.1.2021.4.11.0
– Minimum Swap OID: 1.3.6.1.4.1.2021.4.12.0
– Shared Memory OID: 1.3.6.1.4.1.2021.4.13.0
– Buffered Memory OID: 1.3.6.1.4.1.2021.4.14.0
– Cached Memory OID: 1.3.6.1.4.1.2021.4.15.0
• CPUPanel.java: This is the only class which has another class nested inside it.
This class is responsible to show the following details about the System Stats:
– Index OID: 1.3.6.1.4.1.2021.11.1.0
– Swap In OID: 1.3.6.1.4.1.2021.11.2.0
– Swap Out OID: 1.3.6.1.4.1.2021.11.3.0
– IO Sent OID: 1.3.6.1.4.1.2021.11.4.0
– IO Recieved OID: 1.3.6.1.4.1.2021.11.5.0
36
– System Interrupts OID: 1.3.6.1.4.1.2021.11.6.0
– System Context OID: 1.3.6.1.4.1.2021.11.7.0
– CPU User OID: 1.3.6.1.4.1.2021.11.8.0
– CPU System OID: 1.3.6.1.4.1.2021.11.9.0
– CPU Idle OID: 1.3.6.1.4.1.2021.11.10.0
– CPU Raw User OID: 1.3.6.1.4.1.2021.11.11.0
– CPU Raw Nice OID: 1.3.6.1.4.1.2021.11.50.0
– CPU Raw System OID: 1.3.6.1.4.1.2021.11.51.0
– CPU Raw Idle OID: 1.3.6.1.4.1.2021.11.52.0
– Error Name OID: 1.3.6.1.4.1.2021.11.53.0
• get next.java: This class was modified from the original class so that it fits the
requirement of returning the whole table instead of just one ID.
• InfoPanel.java: GeneralPanel: and ProcessTable extend this class to share data
members.
• TimeUtil.java: This Class is used to translate the Time from timeticks to Human
Readable form.
• MyApplet.html: This file calles the main Applet, and passes the following three
parameter to the Applet:
– Hostname
– Port
– Community String
2.4 Completion Status
Most of the project is finished, the only part remaining in this project is to integrate the
LmSensors table which shows the CPU Temperature, CPU Fan speed, etc.
This project is just the tip of iceburg, there lies a lot of potential in the project to be
extended, this project has given a tough base to build a strong building upon it. A lot
of research has gone behind making it as generic as possible, doing away with all the
dependencies that could be done away, though at the cost of a bit efficiency, and ease of
development and making it portable across platforms.
37
2.5 Testing
The Console was extensively tested on different machines within the network as well
as outside the network, these machines were many a times different in configuration,
platform, etc. some had more partitions being monitored, or some had multiple interfaces.
The console has been tested on the following Operating Systems:
• Debian Woody 3.0 (net-snmp)
• RedHat 8.0 (ucd-snmp)
• RedHat 9.0 (ucd-snmp)
• Knoppix 3.1 (net-snmp)
The console has been tested on the following hardware platforms:
• AMD Athelon 1800+
• AMD K6-II
• P-III
• Celeron
Before selecting the external libraries to be used, each of the libraries were tested and
reviewed individually. Some of the SNMP libraries that were tested are:
• ActiveSNMP
• DynamicSNMP
• iReasoning
• Java Dynamic Management Toolkit
• Westhawk University’s implementation of SnmpStack
• Koshna
• Net-SnmpJ
• openjmx
• CmisJavaAPI
• tmx4j (IBM)
Some of the Charting and Graphing Libraries that were tested are:
• JfreeChart
• Chart2d
• EasyCharts from object planet
• Java chart construction kit (jcck)
38
2.5.1 Conclusion
The console sometimes takes time to load on a slower client, but it does not impact the
server’s performance. The network bandwidth could be optimized further.
2.6 User Manual
2.6.1 Installation
Installation process of the console is pretty straight forward.
• copy ’console’ directory to /var/www/html and change its permission to 777.
(read,write,execute everyone)
• copy .java.policy file to the home directory on the client side, only if the snmp port is
below 1024.
• edit MyApplet.html and change the following three parameters to suite the requirements.
<PARAM NAME=”HOSTNAME” VALUE=”192.168.50.2” >
<PARAM NAME=”PORT” VALUE=”161” >
<PARAM NAME=”COMMUNITY” VALUE=”deeprw” >
Now open any java enabled browser and type in the following URL:
http://hostname/console/MyApplet.html
The installation process assumes that the host machine has either net-snmp or ucdsnmp configured and running.
2.6.2 Maintenance
The console is maintanence free, it does not save any data on to the file, or nither does it
access any database.
2.6.3 Troubleshooting
• If the applet does not show anything, make sure that .java.policy file in the users
home directory grants access to port 161 to everybody.
• If it still does not show anything, then check the parameters passed to the Applet in
MyApplet.html.
• Make sure that the browser is Java Enabled browser.
• For further troubleshooting enable the java console from the web browser.
• If the console shows in Process tab that there are no processes configured for monitoring, check the snmpd.conf
39
2.6.4 User Manual
The console has only four tabbed panes that show all the information directly to the user,
the only things that are hidden is the extensive partition information and the details on
System Stats. Clicking the Pie Chart on the 4th tab shows the partition information, and
clicking on the CPU Stats on the 4th tab shows the System Stats.
2.6.5 TODO
• To incorporate LmSensors.
• Get rid of parameters in the main html file, rather ask the user to enter the values at
the runtime.
• Optimize bandwidth usage,
• Incorporate more graphs.
2.7 My Experiences
I took this project as it had all the ingredients that I would have wished for in any project,
i.e Java, GNU/Linux and Network.
Initially the project seemed to be very challenging as I had never explored SNMP, but
gradually with the help from my company I sailed through.
I have learnt a lot during this project, for example I had never been able to use Debian,
an operating system at its best. I also learnt SNMP, RRD upto an extent, and charting
libraries for java. Even though I used only westhawk’s implementation of snmpstack I got
to learn about other libraries such as iReasoning, DynamicSNMP, JDMK, etc. not only
that, while documentation I learnt a whole new way of publishing, LATEX.
The experience of going to Bangalore all by myself, a place where nobody was familier, was exagerating. This project has given me a lot of confidence on personal fronts. I
met many, many people, most of them are now my friends, infact I now have a whole new
family, a huge family.
Working with people like Abhas, Nimit, Naren, Kiran, Rizvan, Sushmita, Narayan.. was
a pleasure, they were really motivating people.
While I also got the feel of working at a company, it almost felt as if I was at home. I
could work nights if I wanted, I could take a day off to explore the city.
40
I also had a chance to view the AirShow 2003, and SunTech Days 2003. The first
event was for fun, while the second one gave me an insight on upcomming technologies
like J2ME and J2EE and tools such as Sun One Studio, JDeveloper etc. and meeting
people like Scott McNelly, Rima Patel, Matt Thompson.
I got to enjoy teaching socket programming to the students of Computer Engineering.
While the last week of the project was full of action, I never felt tired of working on this
project, as I just wanted to finish it up, unfortunately I could not finish the LmSensors part
but I will try and finish it when I have some time for it.
While trying to enable LmSensors I got a chance to learn the insights of recompiling
the GNU/Linux Kernel, of different versions, which is a big feast in itself.
41
3
Bibliography
• Essential SNMP by Douglas Mauro & Kevin Schmidt.
• Java 2 Complete Reference by Patrick Naughton
• OpenNMS Discussion Group http://www.opennms.org/users/discuss/
• Javadoc API’s
• Javadoc generated from the snmpstack and chart2d libraries.
• http://www.debian.org/
• http://www.objectplanet.com/easycharts
• http://jcck.sourceforge.net/
• http://www.sourceforge.net/
• http://chart2d.sourceforge.net/
• http://www.tac.dk/
• http://www.visualmining.com/
• http://www.iReasoning.com/
• http://net-snmp.sourceforge.net/
• http://netsnmpj.sourceforge.net/
• http://www.adventnet.com/
• http://ei.cs.vt.edu/
• http://www.noao.edu/noaoprop/help/sample.html
• http://www.opennms.org/users/discuss/
• http://www.net-snmp.org/
• http://www.monfox.com/
• http://java.sun.com/
• http://www.ibm.com/developerWorks/
• Developer IQ Magazine
• Linux For You Magazine
42
• http://www.cpan.org/
• http://www.oracle.com/
• http://www.google.com/
• http://www.koshna.com/
• http://www.net-policy.com/
• http://www.zdnet.com/
43
4
Acknoledgements
Firstly I would like to thank my family, for encouraging me to go to Bangalore in order to
persue this project.
I would like to thank people from DeepRoot Linux Pvt. Ltd. Abhas Abhinav, Kiran A.
N., Rizvan Khan, Nimit Gupta, Naren, Saurav, Sushmita, Prakash, Narayan.
I would also like to thank, Nilesh Vaghela to inspire me to learn GNU/Linux, Manish
Lakhani for helping me with my networking fundamentals, Ujval Trivedi for teaching me
Java. All the faculty members from BCA, specially Mr. Rana Mukhopadhyay.
Special thanks to Jai Thakkar, Amit, Kiran, Sudeep, Manoj, Anil, Pradeep, Satish,
Raghu, Mr. S. Ananth Venkatesh and members of his family.
44