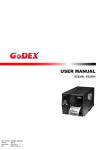
1
User Manual
BZB-2U
Rev. A, 06.2011
1. ABOUT THE BZB PRINTER ....................................................... 2
1-1. Introduction ........................................................................................... 2
1-2. About the BZB labeling Software .......................................................... 2
1-3. About the BZB Windows drivers ............................................................ 2
1-4. Contents of the BZB Package ............................................................... 3
1-5. BZB Printer Parts .................................................................................. 3
2. SETTING UP THE BZB-2U PRINTER ........................................ 5
2-1. Connecting the Printer to a Power Outlet. ............................................. 5
2-2. Connecting the Printer to a PC.............................................................. 5
2-3. Loading the BZB Printer with Labels ..................................................... 5
2-4. Testing the BZB printer ......................................................................... 6
3. MAINTENANCE AND ADJUSTMENTS ...................................... 7
3-1. How to remove the BZB top cover ........................................................ 7
3-2. How to clean the BZB printer head ....................................................... 7
3-3. How to clear a label jam in the BZB Printer ........................................... 7
3-4. Label gap sensor adjustment for the BZB printer .................................. 8
APPENDIX A. TROUBLESHOOTING ............................................ 9
APPENDIX B. BZB-2U TECHNICAL SPECIFICATION ................ 11
APPENDIX C. USB PORT SPECIFICATION ................................ 13
1
1. About the BZB Printer
1-1. Introduction
The BZB-2U label printer r will enable you to automate a lot of tasks currently handwritten saving
time and giving a more professional image. It is the easiest way to produce high quality labels for
a wide variety of applications, the printer works with direct thermal labels eliminating the need for
costly ink, toner and ribbons.
With the power full BZB software provided with every printer you can easily produce the
following:
Address Labels
File Labels
Barcode Labels
Shelf Labels
Diskette Labels
Shipping Labels
….. and many more.
1-2. About the BZB labeling Software
Every BZB label printer is supplied with fully featured labeling software for Windows XP, Vista,
Windows 7, Server 2003, 2008. Features include the following:
Windows software
Easy to use no programming experience required
True WYSIWYG (What you see is what you get)
Sequential Numbering
Bar codes supported: EAN 8 (add on 2 of 5), EAN13 (add on 2 of 5),
Code 39, Code93, Codabar, Code 128, EAN 128, UPC A, UPC E
Interleaved 2 of 5.
2 Dimensional Bar Codes supported: PDF 417, Maxicode.
Variable data, Prompt at print time
Import information from a Database using ODBC link
Adjust print darkness from the software.
1-3. About the BZB Windows drivers
A complete set of windows drivers for Windows XP, Vista, Windows 7, Server 2003, 2008.
The BZB drives will help you to print from your existing Windows applications.
2
1-4. Contents of the BZB Package
Fig. 1.4.1
Please check the contents of the packet as attached.
1-5. BZB Printer Parts
Using the following diagram to familiarize yourself with the features and components of the
BZB-2U printer (see figure 1.5.1).
Fig. 1.5.1
Item
Parts
Description
1.
Front cover
2.
Label tear line
3.
Power light
Indicate whether the power is on or off.
4
Feed button
Manually feed labels or adjust label position.
5
Rear cover
Protect the roller and labels.
6
Lock switch
Lock the rear cover.
7
Printer mechanism
Protect the printer head of the unit.
Sharp edge is used to tear off printed label
The engine of the printer.
3
Item
Parts
8
Label guide
9
Label spindle hole
10
Label guide
To locate the label roller in position
Stands for big roll of label The big label roll holder stands
11
USB port
12
Power jack
13
Power switch
14
Description
The printer port connector
Connect the power cord to the unit
Turn printer power on/off
Print head release level To release label or adjust the label position.
4
2. Setting up the BZB-2U Printer
2-1. Connecting the Printer to a Power Outlet.
1.
2.
3.
4.
5.
Plug the power cord into a power outlet.
Plug the AC adapter cable into the power jack at the rear of the BZB printer
Turn the BZB printer on by pressing the power switch.
The LED on the printer will turn red.
Proceed to 2-2 Loading your BZB printer with Labels.
2-2. Connecting the Printer to a PC
1.
2.
3.
4.
Be sure the printer is powered off.
Plug the power adapter into the printer power jack.
Connect the printer to the parallel interface on the PC (with the cable provided)
Power on. The LED light will be red (no label) or green.
2-3. Loading the BZB Printer with Labels
Loading small-size label roll
1.
Press the two lock switches (part 6) and lift up a little to open the rear cover. Then insert a
small-size label roll onto the core shaft (see figure 2.3.1).
Fig. 2.3.1
2.
3.
4.
Place the roll into the groove.
Insert the edge of labels into the label guide, until the edge is blocked by the printhead.
Press feed button to drive the label (under the printhead) into the printer.
5
Loading large-size label roll
1.
2.
3.
4.
5.
6.
Power on.
Press the two lock switches (part 6) and lift up a little to open the rear cover. (See figure
2.3.1)
Remove the label roll stands. Vertically place the two stands along the left and right sides
of the rear cover.
Place the large-size label roll on the stands (see figure 2.3.3).
Insert the edge of labels into the label guide, until0l the edge is blocked by the printhead.
Press feed button to drive the label (under the printhead) into the printer.
Fig. 2.3.3
2-4. Testing the BZB printer
The self-test function helps you check if the printer works normally.
To start the self-test function, please follow these steps.
1.
Load the label. (As described in 2-3)
2.
Power the printer OFF and wait for 2 seconds).
3.
Hold down the feed key and power the printer ON.
4.
Release the feed key and wait for few seconds. The printer will print a self-test page.
Note:
To disable the self-test, please power OFF the printer at least 2 seconds,
then power ON again.
6
3. Maintenance and Adjustments
3-1. How to remove the BZB top cover
1.
Face the front side of the printer. Place
your thumbs on the top cover and the
other fingers on the left and right sides
of the printer.
2.
Gently press down the top cover with
your thumbs, and pull it toward you to
remove the top cover. (See figure 3.1.1
& 3.1.2)
Fig. 3.1.1
Fig. 3.1.2
3-2. How to clean the BZB printer head
1.
Remove the top cover.
2.
Press your pointing finger on “A”, move out the
two plastic fasteners from the retainer, and you
can take out the retainer and the print head
unit. (see figure 3.2.1)
3.
Use soft cloth soaked in isopropyl alcohol, to
rub off caught labels and cleans the surface.
Fig. 3.2.1
Reinstall the fasteners and retainer.
3-3. How to clear a label jam in the BZB Printer
1.
Power off the printer.
2.
Remove the top cover and back cover.
3.
Remove label roll.
4.
Close the two label guides the way as figure 3.3.1(1).
5.
Make apart the two retaining clips from the assembly, by gently pressing the clips the
direction as figure 3.3.1(2), and afterward by lifting them a little.
6.
Lift the guide board the direction as figure 3.3.1(3).
7.
Clean, with alcoholic cloth, the label jam on the bottom of the assembly.
8.
Reassemble the printer
7
Fig. 3.3.1
3-4. Label gap sensor adjustment for the BZB printer
Due to different quality labels available it may be necessary to make an adjustment to the label
gap sensor for detecting the label gap
Any adjustment must be made in well light room.
1.
Remove top cover.
2.
The top view shows the circuit board as indicated on figure 3.4.1.The Variable Resistor (VR)
can be adjusted the ways either counter-clockwise for lower transmit power (less sensitivity)
or clockwise for higher transmit power (higher sensitivity).
Each slight adjustment of the
VR has to be verified by pressing the feed button at least 7 times.
less
sensitivity
higher
sensitivity
Fig. 3.4.1
Thermal Labels
1.
Remove the label from the backing paper. Load the backing paper under the sensor.
2.
Slowly adjust the Variable resistor and press the label feed switch successively (at least 7
times), until the LED light turns red.
3.
Put the label with backing paper under the sensor, and then press feed button a few times.
If the LED light turns green, you have finished the adjustment. If the LED light is red, repeat
step 2 and 3 until the LED light turns green.
8
Appendix A. Troubleshooting
Problems
Power switch already turned on but the
Recommended Solution
Check Power connector.
Probably software setting or programming
LED does not light.
Printing stops and LED goes red.
problem.
Printer is working but nothing is printed
Check to use the correct paper
Probably label jam, remove the stuck label
Check the label is facing up and the paper you
on label.
use is thermal paper.
Check to choose the correct printer driver.
Make sure to choose the correct model of
printer on platen.
Label is stuck
Remove the stuck label and use soft cloth
soaked with alcohol to clean the adhesive glue.
Only part of the label got printed
Label is stuck on print head.
Probably software problem
Margins are not set properly
Printer head is not fixed in proper position,
re-positing printer head screws or clipper
Difficult to load label roll
Check if the label stuck on printer.
Remove the stuck label.
Make sure the width and thickness of label is
within the specification.
When printing out, some dots missing
Clean printer head with alcohol. (If the label
glue is attached to printer head, please apply
alcohol to printer head; wipe with soft cloth
softly.)
Printing is not in the correct position
Replace printer head for possible damage.
Check the Label Transmit Sensor, it may be
covered with dust.
Check with your label supplier; make sure they
have used the recommended backing material.
Adjust the label transmit sensor if you are an
experienced printer user.
Check the label guide, it may not be in the
proper position.
9
Label printing jumps to next label
Check if the label height setting is the same as
actual label height.
Check the Label Transmit sensor, it may be
covered with dust.
Printing is not very clear
Check the printer darkness setting.
If any problems occur that are not described here, please contact your dealer.
10
Appendix B. BZB-2U Technical Specification
Printer Specifications:
Model
Print Method
BZB-2U
Direct Thermal
Resolution
203 dpi (8 dots/mm)
Print Speed
Max. 2 ips (50.8 mm/s)
Print Width
2.12” (54 mm)
Controller
8-bit MCU, 64KB Flash, 32KB SRAM
Sensor Type
Fixed center alignment GAP label sensor
Width: 1” (25.4 mm) Min. – 2.36” (60 mm) Max.
Media
Thickness: 0.003” (0.06 mm) Min. -0.008” (0.2 mm) Max.
Label roll outer diameter: Max. 4” (101.6 mm) / 10" (254 mm)
Core diameter: 1” (25.4mm)
1-D barcodes supported:
EAN8 (add on 2 of 5), EAN13 (add on 2 of 5), Code 39, Code 93,
Barcodes
Codbar, Code 128, EAN128, UPCA, UPC E interleaved 2 of 5, Postnet
code & Royal Mail code supported
2-D barcodes supports:
PDF417, Maxicode
Print Language
Software
Driver
Interface
Control Panel
EZPL-1, GODEX Line mode command
BZB Application Software, compatible to Microsoft® 32-bit Windows XP,
Vista, Windows 7, Server 2003, 2008
Compatible to Microsoft® 32-bit Windows XP, Vista, Windows 7, Server
2003, 2008
USB Device 2.0 Full Speed B-Type outlet
One dual Color LED: Green light indicates the printer is working fine; Red
light indicates the printer is in Error status
Control key: FEED
Depth: 5" (127 mm)
Dimension
Height: 8.46” (215 mm)
Width: 5.67” (144 mm)
Weight
Power Supply
Certifications
< 2.61 lbs (1.2 Kg)
60W switching power adaptor, I/P: AC100~240V 50/60Hz, O/P:
DC19V/3.15A peak 5A
CE (EMC), RoHS
11
Storage temperature : -4 to 122℉ (-20 to 50℃)
Environment
Operation temperature : 40 to 104℉ (5 to 40℃)
Storage humidity : 10 to 90% non-condensing Operation humidity : 30 to
85% non-condensing
* Specifications are subject to change without notice
12
Appendix C. USB Port Specification
Connector type
: Type B
Pin No.
1
2
3
4
Function
VBUS
D-
D+
GND
13