1
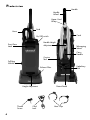
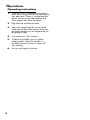
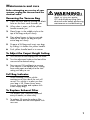
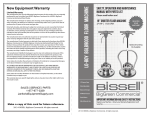
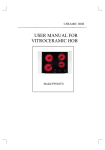
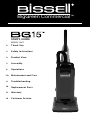
BigGreen Commercial™
USER'S GUIDE
MODEL 15K7
2
Thank You
3
Safety Instructions
4
Product View
5
Assembly
6
Operations
7-8
9
Maintenance and Care
Troubleshooting
10
Replacement Parts
11
Warranty
12
Customer Service
BISSELL Commercial Upright Vacuum BG15
Thanks for buying a BISSELL Commercial Upright Vacuum BG15.
We’re glad you purchased a BISSELL Commercial Upright
Vacuum BG15. Everything we know about floor care went into
the design and construction of this complete, high-tech
commercial cleaning system.
Your BISSELL Commercial Upright Vacuum BG15 is well made,
and we back it with a limited one year warranty. We also stand
behind it with a knowledgeable, dedicated Customer Service
department, so, should you ever have a problem, you’ll receive
fast, considerate assistance.
My great-grandfather invented the floor sweeper in 1876.
Today, BISSELL is a global leader in the design, manufacture,
and service of high quality commercial products like your
Commercial Upright Vacuum BG15.
Thanks again, from all of us at BISSELL.
Mark J. Bissell
Chairman, President & CEO
2
IMPORTANT SAFETY INSTRUCTIONS
When using an electrical appliance, basic precautions should be
observed, including the following:
■ Do not pick up anything that is burning or smoking, such as
Read all instRuctions befoRe using youR
commeRcial uPRigHt Vacuum bg 15.
■
■
■
■
Always connect to a polarized outlet (left slot is wider than right).
Unplug from outlet when not in use and before conducting
maintenance.
WARNING:
To reduce the risk of fire,
electric shock, or injury:
■ Do not modify the polarized plug to fit a non-polarized outlet
■
■
■
■
■
■
■
■
■
■
■
■
■
■
■
■
■
■
■
■
or extension cord.
Do not leave vacuum cleaner unattended when it is plugged in.
Unplug from outlet when not in use and
before servicing.
Do not use outdoors or on wet surfaces.
Do not allow children to operate vacuum
cleaner or use as a toy.
Close attention is necessary when used by or near children.
Do not use for any purpose other than described in this
User’s Guide.
Use only manufacturer’s recommended attachments.
Do not use with damaged cord or plug.
If appliance is not working as it should, has been dropped,
damaged, left outdoors, or dropped into water, have it repaired
at an authorized service center.
Do not pull or carry by cord, use cord as a handle, close a door
on cord, or pull cord around sharp edges or corners. Do not run
appliance over cord. Keep cord away from heated surfaces.
Do not unplug by pulling on cord. To unplug, grasp the plug,
not the cord.
Do not handle vacuum cleaner or plug with wet hands.
Do not put any object into openings. Do not use with any
opening blocked; keep openings free of dust, lint, hair, and
anything that may reduce air flow.
Keep hair, loose clothing, fingers, and all parts of body away
from openings and moving parts.
Turn off all controls before plugging or unplugging vacuum
cleaner.
Use extra care when cleaning stairs.
Do not pick up flammable materials (lighter fluid,
gasoline, kerosene, etc.) or use in the presence of explosive
liquids or vapors.
Do not pick up toxic material (chlorine bleach, ammonia, drain
cleaner, etc.).
Do not use vacuum cleaner in an enclosed space filled with
vapors given off by oil base paint, paint thinner, some moth
proofing substances, flammable dust, or other explosive or
toxic vapors.
Do not pick up hard or sharp objects such as glass, nails,
screws, coins, etc.
cigarettes, matches, or hot ashes.
Do not use without filters in place.
Use only on dry, indoor surfaces.
Keep appliance on a level surface.
Do not carry the vacuum cleaner while it is running.
SAVE THESE
INSTRUCTIONS.
tHis model is foR commeRcial use.
GROUNDING
INSTRUCTIONS
this appliance must be connected to
a grounded wiring system. if it should
malfunction or break down, grounding
provides a safe path of least resistance
for electrical current, reducing the risk of
electrical shock. the cord for this appliance has an equipment-grounding conductor and a grounding plug. it must only
be plugged into an outlet that is properly
installed and grounded in accordance
with all local codes and ordinances.
Grounded
Outlets
Grounding Pin
WARNING:
improper connection of the equipmentgrounding conductor can result in a risk
of electrical shock. check with a qualified
electrician or service person if you aren’t
sure if the outlet is properly grounded.
do not modify tHe Plug. if it will
not fit the outlet, have a proper outlet
installed by a qualified electrician. this
appliance is designed for use on a nominal 120-volt circuit, and has a grounding
attachment plug that looks like the plug in
the drawing above. make certain that the
appliance is connected to an outlet having the same configuration as the plug.
no plug adapter should be used with this
appliance.
3
Product view
Handle
Handle
Wheel
Upper Cord
Wrap
Cord
Hose
Cord
On/Off switch
Handle Height
Adjustment
Front Door
Latch
Telescoping
Wand
Carry
Handle
Crevice
Tool
Full Bag
Whistle
Upholstery
Tool
Exhaust Filter
Height Adjustment
Thumb
Screw
4
Cord
Lock
Detent Pedal
Hose Clips
Assembly
1. attach the upper body of the vacuum to
the base (foot) of the vacuum by inserting
it vertically until you hear it “click.”
2. slide handle into the slot on top of main
body of vacuum.
3
locate the cord lock and place over
screw hole as shown. secure with thumbscrew provided.
4. adjust the height of the handle by
pulling up or down on the yellow handle
near base of handle. Push all the way
down to lock the handle at a certain
height.
ATTENTION:
some berber carpets have a
tendency to fuzz with wear.
Repeated strokes in the same
area with an ordinary vacuum
or deep cleaner may aggravate this condition.
3.
4.
5. install the hose by pushing one end into
the top of the housing. secure by placing clip around the base.
6. Push opposite end into the wand and
secure with second clip.
5.
6.
7. Place the open end of wand over the
opening of the power brush housing and
push the wand into the sleeve in the back
of the bag housing until you hear it click.
8. open the cable cover door next to on/
off switch at top of unit. insert the plug.
9.
9. attach a small section of the upper cord
into the cord lock
10. store attachments on the back of the unit
in the yellow clasps.
5
Operations
Operating instructions
1. make sure unit is un-plugged and check to
see if there is bag in the unit, by opening the
front door latch. if there is no bag attached
please secure one (see maintenance and
care section), then close front door.
2. Plug cord into an electrical outlet.
3. adjust the carpet height by turning round
knob near the foot of the vacuum to the carpet height that best suits the carpet area you
are going to clean
4. turn machine to “on” position.
5. to detent the handle, push on yellow
release pedal. When the handle is in
the detent position the brush motor will
start rotating.
6. you can now begin to vacuum.
6
Maintenance and care
Before attempting any service of your
vacuum, unplug the vacuum from the
electrical outlet.
Removing the Vacuum Bag
1. open the front door by pulling the black
lever on the front cover towards you
WARNING:
to reduce the risk of fire, electric
shock, or injury,turn power
off and disconnect plug from
electrical outlet before performing
maintenance or troubleshooting.
2. When door is open, pull the yellow
handle towards you
3. Place finger in the middle circle at the
top of the bag and pull slowly.
4. then place fingers in the two outside
holes at the top of the bag and pull
entire bag out slowly
5. dispose of full bag and insert new bag
by sliding it in below the yellow handle.
6. Push yellow handle back in to secure.
To Adjust the Carpet Height Setting
1. turn Vacuum off and unplug from the outlet
2. turn the adjustment knob on the foot of the
vacuum to the desired setting
3. turn vacuum on and begin to vacuum.
if the vacuum is too hard to push, unplug
from outlet again and adjust to the next
setting until easy to use.
Full Bag Indicator
When the bag is full the whistle
mechanism on the side of the unit will
sound. this whistle is to alert you that
your bag is full. Please throw away
current vacuum bag and replace with
a new empty bag.
To Replace Exhaust Filter
the exhaust filter should be replaced
every 6 months, or when dirty.
1. to replace: lift up on the exhaust filter
cover. Remove old filter and replace with
new one.
7
Maintenance and care
Red Sensor Light
The red sensor light on the foot of the
vacuum will turn red if:
a.
dust bag is full
b.
there is a blockage in the hose or
power head
c.
brush roll is working improperly
*if you ignore the red light eventually the machine
will shut off. if the red light changes to green
the vacuum is working properly
Replacing Paper Filter (located behind bag)
While you are vacuuming you should
see a green light on the foot of the
vacuum. If this changes to red it is time
to change the paper filter.
1.
Remove the yellow bar (filter sensor)
located vertically across the filter
2.
Place new filter in by sliding it in where
the old one was located.
3.
secure the filter by reattaching the yellow
bar (filter sensor)
To Change the Brush Roll
8
1.
unplug the vacuum from the
electrical outlet
2.
turn the vacuum over so you have access
to the bottom of the vacuum foot
3.
loosen the two large screws until
they click
4.
starting on the right as you face the
vacuum click the tabs open in a counterclockwise motion
5.
Pull plate off of bottom of foot
6.
grab brush and pull
7.
Replace with new brush
8.
Reverse steps 4 and 5 and tighten
the screws
Troubleshooting
WARNING:
to reduce the risk of fire, electric
shock, or injury,turn power
off and disconnect plug from
electrical outlet before performing
maintenance or troubleshooting.
Red Sensor Light is On
Possible causes
Remedies
1.
Vacuum Bag is full
1. Replace Vacuum Bag with a new one
2.
Possible obstruction in hose or power head
2. Check hose and brush roll for obstruction and clear the area
Machine shuts off and red light stays on
Possible causes
1.
Brush is blocked
Remedies
1. Turn off unit and clear the brush area of any large debri
Low Suction
Possible causes
Remedies
1.
Dust Bag is Full
1. Replace Dust Bag
2.
Wand is not installed properly
2 Secure the wand properly to ensure no air leaks
Poor Pick Up
Possible causes
Remedies
1.
Brush not adjusted to the proper height
1. Adjust the height adjustment to confirm you're at the right
carpet height
2.
Brush is worn out
2 Replace the brush
Vacuum motor is not working
Possible causes
Remedies
1.
Electrical outlet not working
1 Check to make sure vacuum is plugged in properly
2.
Air path obstructed
2. Check electrical source
3. Check to make sure the vacuum button is ON
4. Check for any air flow obstructions
Brush Motor is not working
Possible causes
1.
Brush Motor is not working
5 Switches might need to be replaced
Remedies
1. Check to make sure vacuum is plugged in properly
Other maintenance or service not included in the manual should be
performed by an authorized service representative.
Thank you for selecting a BISSELL product.
Please do not return this product to the store.
For any questions or concerns,
Contact Us at 1-877-977-3339.
9
Replacement parts Item
1.
2.
3.
4.
5.
6
Part No.
203-7815
203-7812
203-7814
203-7816
203-7817
203-7813
Part Name
brush Roller assembly
Paper bag
belt
upholstery tool
crevice tool
exhaust filter
For a complete list of replacement parts for your
BISSELL Commercial upright vacuum please contact
Us 1.877.977.3339
Warranty - BISSELL Commercial Upright Vacuum BG15
this warranty gives you specific legal rights, and you may also have other rights which may
vary from state to state. if you need additional instruction regarding this warranty or have
questions regarding what it may cover, please contact bissell customer service by e-mail, telephone, or regular mail as described below.
Limited one Year Warranty
subject to the *eXcePtions and eXclusions identified below, upon receipt of the product
bissell business Ventures, llc. will repair or replace (with new or remanufactured components
or products), at bissell’s option, free of charge from the date of purchase by the original
purchaser, for one year any defective or malfunctioning part.
see information below on "if your bissell product should require service".
this warranty does not apply to fans or routine maintenance components such as filters, belts, or
brushes. damage or malfunction caused by negligence, abuse, neglect, unauthorized repair, or any
other use not in accordance with the user's guide is not covered.
If your BISSELL product should require service: Call Us: 1.877.977.3339
bissell business VentuRes, llc. is not liable foR incidental oR conseQuential
damages of any natuRe associated WitH tHe use of tHis PRoduct. bissell’s liability
Will not eXceed tHe PuRcHase PRice of tHe PRoduct.
Some states do not allow the exclusion or limitation of incidental or consequential
damages, so the above limitation or exclusion may not apply to you.
*EXCEPTIONS AND EXCLUSIONS FROM THE TERMS OF THE LIMITED WARRANTY
tHis WaRRanty is eXclusiVe and in lieu of any otHeR WaRRanties eitHeR oRal oR
WRitten. any imPlied WaRRanties WHicH may aRise by oPeRation of laW, including
tHe imPlied WaRRanties of meRcHantability and fitness foR a PaRticulaR PuRPose,
aRe limited to tHe one yeaR duRation fRom tHe date of PuRcHase as descRibed
aboVe.
some states do not allow limitations on how long an implied warranty last so the above limitation
may not apply to you.
11