1
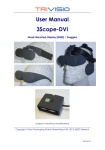
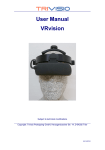
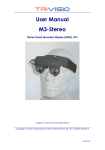
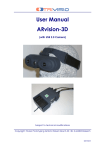
User Manual
ARvision-3D-DVI
(with USB 2.0 or IEEE1394 FireWire Cameras)
Subject to technical modifications
Copyright: Trivisio Prototyping GmbH, Karcherstrasse 10, D-67655 Kaiserslautern
2010/10/16
WARNING
Before using the ARvision-3D HMD please read carefully
these safety instructions.
Read this handbook and use the ARvision-3D device in
strict accordance in order to prevent any damage to your
eye, other injury, loss of visual functions, property damage
or death.
Children under the age of fifteen may not use this product.
We strongly advise you to get familiar with the ARvision-3D
device and its capabilities before you use it for the first
time.
ARvision-3D User Manual
2
Table of Contents
Table of Contents........................................................................... 3
1 Safety Instructions .................................................................... 4
1.1
1.2
1.3
Health Concerns..................................................................4
General Safety Hints ...........................................................5
Warning for Electrical Products.........................................5
2 Description ................................................................................ 6
2.1
2.2
Head Mounted Display HMD ............................................6
DVI Dongle............................................................................7
3 General Operating Instructions .............................................. 8
3.1
3.2
3.3
3.4
3.5
3.6
3.7
3.8
3.9
3.10
3.11
Installing Software................................................................8
Connecting External Video Sources................................8
Attachment and Mechanical Adjustment ....................9
Adjusting the Interpupil Distance ...................................10
Adjusting the Image (by Software)................................11
USB-Camera / Software ...................................................12
AR Setup..............................................................................12
Using Different Stereo Modes ..........................................14
Using Audio .........................................................................14
Adjusting Cameras............................................................15
Firmware update ...............................................................16
4 Maintenance and Cleaning Instructions............................. 17
5 Troubleshooting ...................................................................... 18
6 Returning used electronic devices in EU countries ............ 19
7 Technical Data ....................................................................... 20
ARvision-3D User Manual
3
1
Safety Instructions
1.1 Health Concerns
WARNING: Eye Disease, Eye Injury, and Glaucoma
If you have been diagnosed with or are susceptive to eye
disease, eye injury, or glaucoma consult your doctor before
use and do not use without your doctor’s approval.
CAUTION: Heart Disease, High Blood Pressure
If you have a history of heart disease or high blood pressure
consult your doctor before use and do not use without his
approval.
CAUTION: Seizures
If you have a history of temporary spasm, unconsciousness, or
epileptic seizures from light stimulation, consult your doctor
before use and do not use without his approval.
If any of the following symptoms occur, if using ARvision-3D,
stop using immediately and rest:
eye fatigue or irritation,
headaches or dizziness,
aches and pain in the neck or shoulders,
double vision,
nausea or motion sickness,
inability to focus on the displays.
Misuse or overuse of this product may result in eye damage, or
loss of visual functions.
ARvision-3D User Manual
4
1.2 General Safety Hints
Avoid getting the cable entangled around your neck,
body or arms. Use the belt pouch for the power unit and
wear the cable close to your body.
To ensure that the device does not fall off during use,
always use the headband, and have it tightened with an
adequate tension.
1.3 Warning for Electrical Products
To avoid any risk of electrocution, do not bring any part of
the ARvision-3D in contact with water when the device is
connected to an AC outlet (e.g. when plugged to PC).
Avoid using and storing the ARvision-3D at wet, humid,
dusty and smoky surroundings and extreme temperatures.
Do not use ARvision-3D at temperatures below 0°C and
above +40°C. Avoid dropping or mechanical shock, as
frame and displays may be deformed.
Always switch off and unplug the ARvision-3D when it will
not be used.
In case of damage contact your retailer. There are no user
serviceable parts. Only qualified service personnel should
perform any service required on this product.
ARvision-3D User Manual
5
2
Description
2.1 Head Mounted Display HMD
The HMD contains two microdisplays (2) to show the images.
The cable (1) is permanently attached to the HMD and to the
dongle element. The built-in color cameras (3) provides the
video signal to the power unit for output to a PC. Without a PC
or external video source connected to the device there is no
image visible inside the HMD ! Into the 3.5mm socket (4)
earphones can be connected. There is a built-in microphone
(5) on the bottom side of the case.
2
3
4
1
ARvision-3D User Manual
5
6
2.2 DVI Dongle
The DVI dongle contains the following elements:
(1)
(2)
(3)
(4)
(5)
(6)
HMD cable permanently attached
DVI connector, Main=Left channel
(connect to graphics card)
DVI socket, Aux=Right channel
(connect by cable from 2nd DVI graphics card output)
USB cable for power supply, audio and settings
USB cable left camera
USB cable right camera
1
3
2
4
5
ARvision-3D User Manual
6
7
3
General Operating Instructions
3.1 Installing Software
Please install the camera drivers and HMD adjusting software
before you connect the device the first to time to your PC.
3.2 Connecting External Video Sources
To prevent damage to the electronic, first connect the video
cables with your PC before you power on the device by
connecting the USB cable. You can connect the device by
plugging the DVI dongle directly into your graphics card (in
case of HDMI output you can use converter plug) or by using
DVI extender cable. This gives you Input1 (IN1) what is the main
channel. You can also connect a second DVI signal to the Aux
channel (IN2) from second DVI output of the same graphics
card or form another graphics card, see also stereoscopic
options "3.8 Using Different Stereo Modes" page 14). The device
will automatically recognize the correct signal.
A static image can burn into the microdisplays after an
extended period of time !
IN1
IN2
ARvision-3D User Manual
8
3.3 Attachment and Mechanical Adjustment
Putting on the HMD
Put on the ARvision HMD. Place the headband around the
back of your head and pull it just tight enough to make it
fit safely and comfortably.
On the displays inside the HMD, you can now see the
pictures of your video sources.
Wearing the HMD you will see your surroundings only
constricted. For this reason, please, move only carefully or
not at all.
Flip up
Adjust
distance
ARvision-3D User Manual
Easy adjust to
your head
9
3.4 Adjusting the Interpupil Distance
To optimize the position of the two displays, so that both
images are seen as a single visual field, carefully move the
oculars into the right position.
Slide oculars to fit
IPD (inter pupilary distance)
ARvision-3D User Manual
10
3.5 Adjusting the Image (by Software)
To adjust the image start the software "hmd_connection.exe"
which can be downloaded from www.trivisio.com. Please
install first the software according instructions before you
connect the HMD with the PC using the DVI and USB-cable.
After installation process plug in the DVI and USB cable to the
PC to turn on the device. Windows will detect the hardware
and install automatically. To adjust the image start the software
"hmd_connection.exe" either from icon or start menu. Then
select the HMD (also serial number is shown here). Then you
can go to menu "Picture" and adjust the brightness, contrast
and gamma of the image. You can also change the look-up
table (LUT) or flip the image.
ARvision-3D User Manual
11
3.6 USB-Camera / Software
Please install first the camera driver software downloaded from
www.trivisio.com according instructions before you connect
the power unit with the PC using the USB-cables. Then power
on the device and Microsoft Windows® will recognize new
hardware automatic. To check both USB cameras you can run
the CameraViewer software twice. To avoid damage (and to
prevent aging) please unplug the USB-cables between HMD
and PC during lightning storm and when unused for long
periods of time.
3.7 AR Setup
To use the device with AR function (augmented reality) the
camera signal must be sent to a computer. Then the overlayed
stereoscopic video signal from the PC can be directed into the
power unit using one or two DVI cables (2). The PC-resolution
must be set to 800x600@60Hz.
ARvision-3D User Manual
12
ARvision-3D User Manual
13
3.8
Using Different Stereo Modes
The electronics of your ARvision-3D device allows two different
stereo modes. The electronic is automatically detecting when
actice stereo signal is supplied by the graphics card.
3.9 Using Audio
After connecting the USB cable to your PC, Windows will
detect the built-in microphone and also the earphones as
audio devices.
ARvision-3D User Manual
14
3.10 Adjusting Cameras
For adjusting the convergence use the wheel (1). The focus can
be manually adjusted by turning the camera lenses (2).
1
2
ARvision-3D User Manual
15
3.11 Firmware update
In the need of a firmware update connect the device be an
USB cable to the PC and turn on the device. Then run HMDsoftware "hmd_connection.exe" and chose the menu of new
firmware. Select the fimrware file by clicking on "Browse". The
firmware
is
provided
as
"RIGHT_0x000?.hex"
and
"LEFT_VGA_DVI_0x000?.hex" files. Then click "Program". You
should program these files one by one in above mentioned
order. After programming the last file the device will turn off
automatically. During the update process never unplug the
device and do not shut down the computer and do not turn
off the power ! If the device fails to turn on, try to reprogram
"LEFT_VGA_DVI_0x000?.hex" file, holding power-button pushed
during programming process.
ARvision-3D User Manual
16
4
Maintenance and Cleaning Instructions
To clean the HMD and control unit, use a damp cloth. A light
rinsing agent may be added to the water. Do not use any
detergents.
To clean the oculars of the HMD use a dry, clean cloth.
In case of damage contact your retailer. There are no user
serviceable parts. Only qualified service personnel should
perform any service required on this product.
ARvision-3D User Manual
17
5
Troubleshooting
Problem
Only dark,
or only white
image
No image
Cause
Remedy
Incorrect brightness. See HMD software
and adjust correct
No DVI signal
applied
No image
Wrong resolution or
frequency from
grapics card
No image
Appliance switched
off, no power
connected
Unsharp image Focus of camera
lens is not adjusted
Connect a video
source (SVGA)
Set 800x600@60Hz
Plug USB cable to
PC
Adjust the focus by
turning the
camera lens
All other problems should be performed by a trained and
authorised service provider !
ARvision-3D User Manual
18
6
Returning used electronic devices in EU countries
This HMD and accessories shall not be
treated as household waste. The separate
collection is a condition for reuse,
recycling and utilisation of used electronic
devices, which ensures the protection of
resources. To comply with german
ElektroG (Rucknahme und Entsorgung von
Elektro- und Elektronikaltgeraten) and
european WEEE (Waste Electrical and
Electronic Equipment) electronic used
devices from private households can be
returned free of charge. For details please
contact your local distributor or directly
Trivisio Prototyping GmbH
(www.trivisio.com).
ARvision-3D User Manual
19
7
Technical Data
Cameras 2x
Sensor
Gain
Shutter Speed
Synchronization
Convergence
Focus
Iris
Lens
Microdisplays 2x
Display Color
Frame Rate
Overlap
Field of View
Distortion
Eye distance (IPD)
Eye Relief
Eye Motion Box
Video Interface
Stereoscopic Modes
Audio (via USB)
Cable Length
Power Consumption
Operating Temperature
Weight
Dimensions (W/H/D):
752x480 (max 61fps), USB 2.0 (optional IEEE1394)
1/3” CMOS, progressive scan, global shutter
auto/manual, 0 dB to 12 dB
auto/manual, 0.12 ms to 512 ms
external trigger, software trigger, or free-running
manually adjustable
manually adjustable
fixed
6mm (0.9x vision), changeable by user, lens mount
M12
SVGA AMLCD 800x600 color (equals 1,440,000 pixels)
24 bit
60fps
100%
41.8° diagonal (4:3, 33.7° (horiz), 25.2° (vert))
3.1% (horiz), 1.9% (vert),4.0% corner
55-72mm adjustable
27mm
7mm (horiz) x 6mm (vert)
DVI-D
Mono, passive stereo, active stereo
Microphone integrated, 3.5mm socket for headset
2.2m (optional 5m)
Display 2.5W, Camera <1W each (5V, taken from
USB port)
0°C to +40°C
290 g (without headband)
150mm x 42mm x 84mm
Subject to technical modifications
ARvision-3D User Manual
20