1
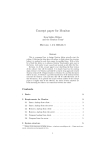
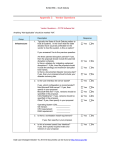
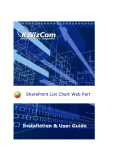
SharePoint Backup Guide for Microsoft Windows Backing up and restoring SharePoint sites and content databases using Attix5 Pro. Copyright notice and proprietary information This User Manual is published by Attix5 or its local affiliated company, without any warranty. Improvements to this User Manual necessitated by typographical errors, inaccuracies of current information, or improvements to features may be made by Attix5 or its local affiliated company at any time and without notice. Such changes will, however, be incorporated into new editions of this User Manual. This User Manual is available to distributors, resellers, and customers and may be given to potential end-users at resellers' discretion. BY ACCEPTING THIS DOCUMENT, YOU, THE RECIPIENT, AGREE TO BE BOUND BY THE AFOREMENTIONED STATEMENT. All rights reserved. © Attix5, 2013 Trademarks ® - Microsoft, Windows, and Microsoft Windows are registered trademarks of Microsoft Corporation. Copyright © Attix5. All rights reserved. 1 Contents Background ............................................................................................ 3 Overview ................................................................................................ 3 Deleted item recovery ............................................................................ 4 Recycle Bin ................................................................................................................ 4 Unattached Content Database restore .................................................. 5 Backing up and restoring SharePoint sites and content DBs ................ 9 Background ............................................................................................................... 9 Backing up and restoring with Active Directory .............................................................. 9 Backing up and restoring without Active Directory ....................................................... 10 Important note on SharePoint versions............................................................ 10 SharePoint 2007 ....................................................................................................... 11 Backup......................................................................................................... 11 Restore ........................................................................................................ 11 SharePoint 2010 ....................................................................................................... 17 Backup......................................................................................................... 17 Restore ........................................................................................................ 17 Appendix: Scripting IIS settings - backup and restore .......................23 2 Copyright © Attix5. All rights reserved. Background Microsoft SharePoint is a complex application which can be difficult to back up effectively. There are many sources of conflicting information for SharePoint backup, and the recommended method of backup from Microsoft differs depending on the SharePoint database sizes and configuration. This guide contains the recommend practice and configuration steps for backing up and restoring using Attix5 Pro. It is split into different settings for the different backup and restore methods, but you are advised read through the entire guide. Overview Things to keep in mind: Synchronise your SharePoint environment with a separate Active Directory domain controller and back this up separately. Non-Active Directory environments are supported, but client permissions will likely need to be reset after restoring. SharePoint content databases should be selected for backup using the MS SQL plug-in. SharePoint installations that use Windows Internal Database are not supported. VSS backups of content databases are not supported. The SharePoint Recycle Bin should still be the first method to try for document restore. Unattached Content Database Restores are supported in SharePoint 2010 using the backed up content databases. Site and document centre level restores are supported in SharePoint 2007 and 2010 using the backed up content databases. IIS backups may be useful, and are supported using the script plug-in. Copyright © Attix5. All rights reserved. 3 Deleted item recovery Recycle Bin If you want to recover a deleted file, you should first check the SharePoint Recycle Bin. Navigate to the SharePoint Recycle Bin (located in the left hand navigation panel by default), select the appropriate document and the click Restore Selection. SharePoint 2007 SharePoint 2010 4 Copyright © Attix5. All rights reserved. If you are running SharePoint 2010 and cannot recover your file from the SharePoint Recycle Bin, you can attempt to recover from an Unattached Content Database. Unattached Content Database restore Note: See below for details on backing up SharePoint content databases. To perform an Unattached Content Database Restore you should first restore the SharePoint content database to the SQL server, making sure to use a different name to the production content database. 1. Go to SharePoint Central Administration, and from there to Backup and Restore. Click Recover data from an unattached content database. Copyright © Attix5. All rights reserved. 5 2. Enter the database name and appropriate SQL authentication details. Select Browse content to inspect the contents of the database. 3. You should now select the site collection within the database, Export site or list, and then click Next. 6 Copyright © Attix5. All rights reserved. 4. Specify the location where the site or list will be exported to in the Specify the destination for the export package. box. SharePoint and the SQL Instance need to be able to write to this location, so the SQL dump location can be useful for this purpose. Click Start Export. 5. When the export completes, launch the SharePoint 2010 Management Shell, which can be found in the Start menu. Copyright © Attix5. All rights reserved. 7 6. You can now use the Import-SPWeb cmdlet to import the exported library using the following syntax: Import-SPWeb <URL> -Path <path to exported library> E.g: Import-SPWeb http://win-myq2bhdk3sk –Path E:\SQLDump\export.cmp Note: When importing, please consider the following: It is not possible to import only a single document; a site/list library must be imported. Libraries cannot be restored to different names, so if they were exported as “Shared Documents” they will be imported as “Shared Documents”. If a site exists under the same name at the specified URL, the contents will be merged and will create new document versions where possible. It is possible to specify an alternate site to restore the library to. 7. After restoring, browse to the imported library to access the restored document. 8. The temporary database, exported library and any temporary sites can now be deleted. 8 Copyright © Attix5. All rights reserved. Backing up and restoring SharePoint sites and content DBs Background This section demonstrates how to back up SharePoint content databases, which contain site data, and how these can be restored into a fresh SharePoint installation. It does not demonstrate how to restore the configuration database or any site settings. The SharePoint configuration database is often not restorable into a usable state. The configuration and settings required by SharePoint includes security IDs and settings that are unique to the installation. Whilst some of these details are restored in a Windows Server Backup System State restore, the machine onto which they are restored may not be able to run an existing, or install a fresh installation of SharePoint without an extensive clean-up of SharePoint and SQL components. It is therefore simpler not to restore the System State on a machine that uses standalone authentication (i.e. is not part of Active Directory), but rather to complete a fresh SharePoint installation and add the restored SharePoint content databases to the new installation. A replacement Active Directory server can be joined into the domain, so should not require a system state restore. SharePoint can then be installed as normal, with content databases restored to it. Backing up and restoring with Active Directory If the SharePoint server is an Active Directory member, it is recommended to configure a separate machine as Domain Controller, with an Active Directory user as Site Collection Administrator, and to configure Active Directory Synchronisation within SharePoint. The required steps for this are beyond the scope of this guide. The Active Directory Domain Controller system state must also be backed up to ensure the domain is available in the event of disaster. When using Active Directory, the restored users permissions within the restored content database will correspond to the security IDs of Active Directory, so will be available for the SharePoint server to authenticate, and will allow users to access the sites and documents. Attix5 recommends that you use Active Directory users within SharePoint. Copyright © Attix5. All rights reserved. 9 Backing up and restoring without Active Directory If standalone users are assigned site and document permissions within SharePoint, the restored user permissions and security IDs will not correspond to the user security IDs present on the machine. User permissions must be rebuilt after the site restore in order to allow the users to access the sites and documents. Important note on SharePoint versions SharePoint will not allow databases backed up with one version of software to be restored with another version of software. E.g. a database backed up with SharePoint version 12.0.0.6661 cannot be restored to SharePoint version 12.0.0.6219. It is strongly recommended that you document the running version of SharePoint. In SharePoint 2007, the version can be found in Central Administration > Operations > Servers In Farm under Version. In SharePoint 2010, the version can be found in Central Administration > System Settings > Servers in Farm under Configuration database version. 10 Copyright © Attix5. All rights reserved. SharePoint can be automatically upgraded by Windows Update without notifying the user. Attix5 recommends setting Windows Update to only download updates automatically, and install only when manually triggered by an administrator. Without knowing the correct SharePoint version, you will find have difficulty completing a restore. SharePoint 2007 Backup 1. Using the MS SQL plug-in, select the content databases you wish to back up. Maintenance should be set to “NONE”. 2. When the backup runs, the MS SQL plug-in will write the database out to disk, allowing it to be patched in the normal way. Notes: The VSS plug-in is not currently supported. If SharePoint uses the Windows Internal Database, also known as SQL Server Embedded Edition (SSEE), this is not currently supported. Restore In a non-DR scenario, e.g. where a content database has been corrupted, a SQL-level restore of the content database can be performed. In a full DR scenario where the machine itself has been lost, follow these steps: 1. Install Windows onto a new machine. 2. Install SharePoint, making sure that the version matches that of your backed up database. 3. Install the Attix5 Pro Backup Client and reconnect to the Backup Account. 4. Restore the SharePoint content database to disk. 5. Using SQL Management Studio, restore the content database to the SQL Server used by SharePoint. You may need to rename the database and change the filenames you are restoring to in order to avoid filename conflicts with existing databases. Copyright © Attix5. All rights reserved. 11 6. In SharePoint Central Administration, navigate to Application Management > Create or extend Web application. On the next page click Create a new Web application. 7. You should now create a new web application using a temporary database that will be removed and replaced with the database restored to the SQL server. Select the following options: Select Create a new IIS web site Change the port and path as appropriate Select Use existing application pool The database server will be configured by default. Set the database name to a temporary name such as “WSS_Content_TEST” Note the web application URL for later use Click OK to create the web application Note: Existing web applications that would conflict with the restored web application should be reconfigured or deleted before adding the new web application. Example: If the web application was using port 80 when backed up, and you wish to continue using port 80 on the restored machine but there is already an application using port 80, first delete or reconfigure the existing application. 12 Copyright © Attix5. All rights reserved. Copyright © Attix5. All rights reserved. 13 8. Navigate to Central Administration > Application Management and click Content databases. On the Manage Content Databases page, change the web application to the newly created web application. Click the database name. 9. Select the Remove content database checkbox and click OK. 10. The restored database now needs to be attached to the new web application. Open the Command Prompt and navigate to C:\Program Files\Common Files\Microsoft Shared\Web Server Extensions\12\Bin\. Run the following command: stsadm –o addcontentdb –url <web application’s URL> databaseserver <Server>\<Database Instance> -databasename <Restored database name> -assignnewdatabaseid 14 Copyright © Attix5. All rights reserved. Example: stsadm –o addcontentdb –url http://sp2007test2:42983 -databaseserver SP2007TEST2\OFFICESERVERS -databasename WSS_Content2 – assignnewdatabaseid 11. Check that the site collections have been restored to the new server. Navigate to Central Administration > Application Management and click Content Databases. Select the correct web application as noted previously. Note the current number of sites. This should correspond to the sites backed up from the original machine. 12. In Central Administration > Account Management click Policy for Web Application and grant your administrative account full control of the account. Copyright © Attix5. All rights reserved. 15 13. If your Site Collection Administrator is not an Active Directory user, in Central Administration > Account Management click on Site Collection Administrators. Even if the user has not changed, click OK to reconfirm the Site Collection Administrator user. Windows uses unique security IDs for user accounts and these will differ from the machine where the content database was backed up. 14. You should now confirm that the site bindings are correct within IIS Manager and that Windows Firewall allows access to the SharePoint site on the specified port. 15. Using a web browser connect to the URL of the content database, e.g. http://sp2007test2:42983, enter the credentials for your administrative account and you should be able to access the backed up sites. 16. You should now configure the correct access permissions for your SharePoint site(s), and change any other critical settings such as ports and bindings in order to bring the SharePoint server back into active service. You may need to reconfigure: Forms Based Authentication Alternate Address Mappings Web.config modifications Web application extensions SSL certificates Kerberos settings Other customisation settings Note: Custom SharePoint solutions should be redeployed before restoring content databases. 16 Copyright © Attix5. All rights reserved. SharePoint 2010 Backup 1. Using the MS SQL plug-in, select the content databases you wish to back up. Maintenance should be set to “NONE”. 2. When the backup runs, the MS SQL plug-in will write the database out to disk, allowing it to be patched in the normal way. Notes: The VSS plug-in is not currently supported. If SharePoint uses the Windows Internal Database, also known as SQL Server Embedded Edition (SSEE), this is not currently supported. Restore In a non-DR scenario, e.g. where a content database has been corrupted, a SQL level restore of the content database can be performed. In a full DR scenario where the machine itself has been lost, follow these steps: 1. Install Windows onto a new machine. 2. Install SharePoint, making sure that the version matches that of your backed up database. 3. Install the Attix5 Pro Backup Client and reconnect to the Backup Account. 4. Restore the SharePoint content database to disk. 5. Using SQL Management Studio, restore the content database to the SQL Server used by SharePoint. You may need to rename the database and change the filenames you are restoring to in order to avoid filename conflicts with existing databases. Copyright © Attix5. All rights reserved. 17 6. In SharePoint Central Administration, navigate to Application Management > Manage web applications. 7. On the next page click New. 8. You should now create a new web application using a temporary database that will be removed and replaced with the database restored to the SQL server. Select the following options: Select Create a new IIS web site Change the port and path as appropriate Select Use existing application pool The database server will be configured by default 18 Copyright © Attix5. All rights reserved. Set the database name to a temporary name such as “WSS_Content_TEST” Note the web application URL for use later Click OK to create the web application Note: Existing web applications that would conflict with the restored web application should be reconfigured or deleted before adding the new web application. Example: If the web application was using port 80 when backed up, and you wish to continue using port 80 on the restored machine but there is already an application using port 80, first delete or reconfigure the existing application. 9. Navigate to Central Administration > Manage web applications > Manage content databases. Select the temporary database you created. Copyright © Attix5. All rights reserved. 19 10. Select the Remove content database checkbox and click OK. 11. The restored database now needs to be attached to the new web application. Open the Command Prompt and navigate to C:\Program Files\Common Files\Microsoft Shared\Web Server Extensions\14\Bin\. Run the following command: stsadm –o addcontentdb –url <web application’s URL> databaseserver <Server>\<Database Instance> -databasename <Restored database name> -assignnewdatabaseid Example: stsadm –o addcontentdb –url http://shrpnt2:38000 databaseserver SHRPNT2\SHAREPOINT -databasename WSS_Content2 –assignnewdatabaseid 20 Copyright © Attix5. All rights reserved. 12. You now need to check that the site collections have been restored to the new server. Navigate to Central Administration > Application Management and click Manage Content Databases. For the new web application, note the current number of site collections. This should correspond to the sites backed up from the original machine. 13. In Central Administration > Application Management click Change site collection administrators. Even if the user has not changed, click OK to reconfirm the Site Collection Administrator user. Windows uses unique security IDs for user accounts and these will differ from the machine where the content database was backed up. 14. You should now confirm that the site bindings are correct within IIS Manager, and that Windows Firewall allows access to the SharePoint site on the specified port. 15. Using a web browser, connect to the URL of the content database, e.g. http://shrpnt2:38000 and enter the credentials for your administrative account. You should be able to access the backed up sites. 17. You should now configure the correct access permissions for your SharePoint site(s), and change any other critical settings such as ports and bindings in order to bring the SharePoint server back into active service. You may need to reconfigure: Forms Based Authentication Copyright © Attix5. All rights reserved. 21 Alternate Address Mappings Web.config modifications Web application extensions SSL certificates Kerberos settings Other customisation settings Note: Custom SharePoint solutions should be redeployed before restoring content databases. 22 Copyright © Attix5. All rights reserved. Appendix: Scripting IIS settings - backup and restore IIS7 can be scripted to back up using the command-line application appcmd.exe. Appcmd is located in the %windir%\system32\inetsrv\ directory and should be run as follows: %windir%\system32\inetsrv\appcmd.exe add backup <backupname> Example: C:\Windows\system32\inetsrv\appcmd.exe add backup “a5iis7backup” To restore the IIS configuration, run the following: %windir%\system32\inetsrv\appcmd.exe restore backup <backupname> Example: C:\Windows\system32\inetsrv\appcmd.exe restore backup “a5iis7backup” Attix5 Pro can be set to automate the appcmd backup using the following steps: 1. Create a script file called “iis7backup.bat” containing the following lines: REM delete old copy rmdir /s /q %windir%\System32\inetsrv\backup\a5iis7backup\ REM back up using appcmd %windir%\System32\inetsrv\appcmd.exe add backup "a5iis7backup" 2. In the Attix5 Pro script plug-in, create an IIS7 Backup Script. 3. Set the script to run at Backup Start and execute the batch file script you have created. Set the Execute in folder to be the same path where the script is located. No parameters are needed. Select the Wait for process to complete checkbox. Example: Copyright © Attix5. All rights reserved. 23 In the backup selection tree, make sure that the %windir%\System32\inetsrv\backup\ path is selected: 24 Copyright © Attix5. All rights reserved.