1
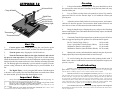
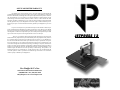
ONE YEAR LIMITED WARRANTY
Geo Knight & Co warrants that the press is free from defects in both material and
workmanship from the date of invoice to the buyer. If any parts or workmanship are found to be
defective in manufacture, Geo Knight & Co will repair or replace the defective parts or workmanship. This limited one (1) year warranty covers all parts and labor to repair the defects, except
when damage results from accident, alteration, misuse or abuse, or when machine has been
improperly installed, or modified in any way. If the press becomes defective during the limited
warranty period of one year, Geo Knight & Co reserves the right to recall the defective press to
the factory for repairs. A return authorization must be granted by Geo Knight & Co prior to its
return.
If a press covered by the one year limited warranty must be returned to the factory for
repairs, Geo Knight & Co shall make every effort to repair buyer’s press. However, Geo Knight
& Co reserves the exclusive right to determine whether to repair or replace a defective press. If
Geo Knight & Co authorizes a replacement press, the warranty of the replacement press shall
expire on the anniversary date of the original machine’s invoice to the buyer.
There are no warranties which extend beyond the description on the face hereof.
Seller disclaims any implied warranty of merchantability and/or any implied warranty of fitness
for a particular purpose, and buyer agrees that the goods are sold “as is”. Geo Knight & Co
does not warrant that the functions of the press will meet the buyers requirements or expectations. The entire risk as to use, quality and performance of the press lies with the buyer. In no
event will Geo Knight & Co be liable for any damages, including loss of profits, destruction of
goods or any other special, incidental, consequential or indirect damages arising from the use
of the press or accompanying materials. This limitation will apply even if Geo Knight & Co or its
authorized agent has been advised of the possibility of such damage. This product is not
intended for business or professional use, and all warranties above are considered null and
void if this product is used in a production or manufacturing environment or in a continuous
volume capacity as defined by Geo Knight & Co.
Geo Knight & Co Inc
52 Perkins St, Brockton MA 02302 USA
(508)588-0186 - Fax (508) 587-5108
[email protected] - www.heatpress.com
JETPRESS 12
JETPRESS 12
Pressing
Pressure Knob
Clamp & Handle
Digital Timer
Power Socket
On/Off Switch
& Heating Light
1.
Lift up on the handle to open the press. The press should always be in
the open position when the press is heating. Swing the heat platen out away
from the rubber pad.
2.
Lay out T-Shirt (or other item to be printed) as desired. Lay transfer
paper onto shirt. Be sure the Transfer Paper is well within the silicone pad
pressing area.
3.
Adjust the pressure knob clockwise to increase pressure, and counterclockwise to decrease pressure. Do not turn the knob counter-clockwise too
far or the swivel arm will disconnect from the machine frame.
4.
Bring the handle down, clamping the press, and press the Start/Stop
button on the Digital Timer. The handle should lock firmly in place, and should
point straight-forward.
Thermometer
Thermostat Knob
5.
Consult the Transfer Paper instructions on whether to peel cold ot hot.
Here are suggested pressing time guidlines for different transfer papers:
Start Up
1.
Connect power cord to the press. Plug the cord into the power
socket in the back of the control console, and then into the wall receptacle.
2.
Turn the power on by flipping the On/Off Switch on.
3.
Turn the Thermostat Knob to the right (clockwise) and wait for
the press to come up to heat. The Heating Light will be lit while heating.
When the thermometer indicates the desired temperature, turn the temperature
knob back to the left (counter-clockwise) slowly until the red heating light turns
off. The Heating light will continually cycle on and off to regulate your temperature setting afterwards, and the machine may be pressed whether lit or
not.
4.
The Digital Timer is set by using the M/S buttons. Hold them down
to increase values rapidly. Press the Start/Stop button to start the timer. When
the alarm sounds, press the Start/Stop button again to reset.
Important Notes
1.
Always leave Heat Platen in Up/Unclamped position when not pressing. Prolonged contact with the silicone pad will decrease the life of the pad.
2.
Do not leave press Heating Unattended, or for extremely long periods of time.
3.
Do not let power cord come in contact with heat platen.
4.
Silicone pad may be slightly larger than heat platen, or may expand due to heat.
This is normal.
5.
Heat platen may pivot slightly back and forth rotationally. This is due to movement allowance within the clamp assembly, and is normal.
Ink-Jet Transfer Paper (fabrics)
Laser Copier/Printer Transfer Paper (fabrics)
Sublimation Transfers (onto Fabrics)
Sublimation Transfers (onto FR-Plastic/Woods)
14-18 seconds
18-25 seconds
25-30 seconds
60-70 seconds
6.
Mousepads, coasters, and other thicker matierals may also be pressed.
Simply adjust the pressure adjustment knob as stated in step 2.
7.
To avoid re-heating the first transfer when printing double sided TShirts, insert a sheet of cardboard in between the shirt, adjust the height to less
pressure, & press.
Troubleshooting
1.
Transfer is pressed print-side-up and transfer image is burned onto the heat
platen surface. Unplug press, swing heat platen out to allow room to clean. Use strong detergent
and non-abrasive scrubbing sponge to remove transfer material from heat platen.
2.
Heat Platen becomes severely misaligned with silicone pad. There is a stop adjustment at the back of the swivel post. This is adjustable with an allen key. Loosen the stop bracket at
the back of the press, swing the press in the desired stop-postion, and tighten the allen key. Make sure
the stop bracket is pushed hard against the stop-post while tightening. ALSO - Loosen top nut
connecting heat platen to clamp shaft. Lower heat platen, but do not clamp. Rotate heat platen until
square with silicone pad, and let go to be sure heat platen is relaxed and in proper alignment. Clamp
the heat platen down fully. Tighten top nut very tightly to lock heat platen position.
3.
Press continuously heats up far beyond normal operating temperature and red light does
not turn off. The thermostat has failed. Call factory to obtain new thermostat and follow instructions for replacement.