Transcript
Under Overdriver — Multi Harmonic Booster/Overdriver
Owner’s Manual
Thanks for choosing Under Overdriver. Please read this document to get the best use and joy of the one and only
Multi Harmonic Booster/Overdriver in your neighbourhood.
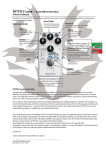
External controls:
& Out:
Over:
High:
3-way switch for the high frequencies
(mid & treble). Start in the mid
position (neutral). Left=+4 dB Treble
boost/Right=+4 dB Mid boost.
Mid control +/- 7 dB/900 Hz. Start around 12 o’
clock (neutral) and adjust at your taste. Clockwise
will give a mid boost (hump). Counter clockwise
will give a mid cut (scoop).
Volume control, -20 to +15
dB. Start at 11 o clock and
from there turn clockwise to
boost your amp or the pedals
which are connected after
Under Overdriver. NB: On high
settings some distortion may
occur—in this pedal or in
what’s connected next in line.
Low:
2-way switch for the low frequencies
(bass). Start in the Right position (neutral).
Left position gives a bass cut.
Gain:
Gain control, -20 to +15 dB. Start at 11 o
clock and from there turn clockwise to get
a more dirty sound. On higher settings, in
combination with the rest of the controls, the
sound(s) may get quite wild.
Under:
5-18V DC
Bass control, +/- 7 dB at 100
Hz. Start around 12 o’ clock
(neutral) and adjust at your
taste. Clockwise will give a bass
boost. Counter clockwise will
give a bass cut.
External DC adapter. Standard 2,1 mm
barrel jack, 5-18 volt regulated DC with
center-pin negative (BOSS standard).
The Himmelstrutz pedals are designed to be
used with straight power cable plugs. Right
angle plugs may not make a secure connection
and are not recommended.
OUT:
Connect your
amplifier here.
IN:
Connect your
instrument here.
GIMME:
ON/OFF push switch*. True mechanical
(not electronic) bypass. ON is indicated
with a magical, blue LED.
* The push switch in Under Overdriver is not
as stiff/evil as the ones you might be used
to. If you’re a girl who prefer to play without
clothes and shoes this must be good news.
Under Overdriver tips & tricks:
It might take some time to get a grip about all possibilities in this pedal. We encourage you to try several different
combinations of the outboard control settings as each will impart its own unique character on your tone. Also, try
to adjust the volume control of your guitar and you will see how flexible and responsive Under Overdriver is. Why
not also try a distortion box (Fetto!) before or after Under Overdriver! Our wish is that you’ll like the Under Overdriver
experience!
Every pedal is 100% handmade, tested and carefully adjusted by the original designer in Sweden. If you happen to
remove the bottom plate and find a “Treble” trimmer inside, remember this parts is not meant to be adjusted by the
user—because of functional/warranty reasons (as noted inside). The “Treble” trimmer is a Set & Forget thing.
More information about Under Overdriver, and collaborating products, is available at www.himmelstrutz.com.
t
t
t
t
Even though the power consumption is low (2-3 mA) the battery needs to be replaced when the LED gets weak
or if the tone changes. To change the battery, unscrew the four screws on the bottom plate, bring out the old 9
volt battery (6LR61) and replace it with a new. Then attach the bottom plate with the four screws. Never use Under
Overdriver without the bottom plate!
If you play loud, always use ear protection. It’s easy to forget, but in the long run not a good idea!
Unplug the input cord when not using the pedal—if powered by a battery—to save the battery (and environment).
Do your best to have fun, with ear protection if needed.
Good luck!
Joakim Hedeby, Himmelstrutz Elektro Art, Sweden
www.himmelstrutz.com
Doc: 6403017_om_001-. (#001–)