1
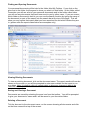
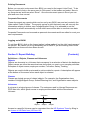
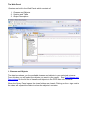
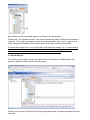
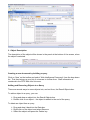
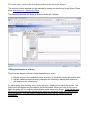
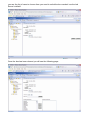
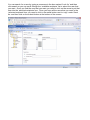
User Manual for the Business Objects Web Intelligence XI System (BOXI) CONTENTS Section 1: Getting Started with BOXI In this section you will learn how to log in to BOXI, find, open and view existing documents and refresh reports contained in the documents. Section 2: Report Building This section introduces the terminology used in BOXI and you will learn how to build and run simple queries to retrieve data through a universe. Section 3: Restricting Data In this section you will learn how to set up query conditions. By using query conditions, you can limit the data returned from the underlying database. Section 4: Sharing Data with Colleagues In this section you will learn how to distribute your reports to other BOXI users. Section 1: Getting Started with BOXI [Contents] Logging On BOXI is accessed through a channel in MyEd so you must first be registered with EASE to gain access to BOXI. Once logged into MyEd you will see a channel on the Admin Tab called Business Objects Reporting. To open BOXI click on the box that says ‘Launch BOXI’ This will open up a new window and take you to the BOXI home page Finding and Opening Documents Your personal documents will be held in the folder titled My Folders. If you click on the plus next to the folder it will expand to show you what is in that folder. In the folder called Favourites you will see a list of your personal documents and in the folder called Inbox you will see any documents that have been sent to you by other users. If you are unsure which folder a document is held in you can use the search function by typing the name of the document (or part of the name) into the search bar at the top of the page. This will show you any reports that match what you have searched for and which folders they are in. (please note the reports listed below are examples only) Viewing Existing Documents To view an existing document, click on the document name. The report results will now be shown on the screen or you will be prompted to enter some details for the report to run e.g. dates. Note: It is best to click on ‘refresh data’ to allow any changes in data to be reflected in the report. Saving and Closing a Document Documents are saved by selecting the save icon from the toolbar. You will be prompted to give your document a name and it will be saved to your favourites folder. Deleting a Document Tick the box next to the document name, on the screen showing all documents and click on the blue cross at the top of the screen. Printing Documents Before you can print a document from BOXI you need to first export it into Excel. To do this you need to click on the arrow next to ‘Document’ in the toolbar and select ‘Save to my computer as’ and then select ‘Excel’. Once the document opens in Excel you can print and save it as normal. Corporate Documents These documents are reports which can be run by any BOXI user and are located in the folder called ‘Public Folders’. The security set-up is such that each user will see only the information relating to his/her own College/Support Group. It is advisable to set the document to refresh automatically so that other users will be able to see their own data. Corporate Documents can be saved as personal documents and then edited to meet your own requirements. Logging out of BOXI To exit from BOXI, click on the Logout option (yellow padlock) on the right hand corner of the screen. Be careful not to log completely out of EASE if you are running other EASE applications or these will close down as well. Section 2: Report Building [Contents] Definitions – Objects, Classes and Universes Objects Objects are elements in a Universe that correspond to a selection of data in the database. Object names are often the same business terms that you use in your everyday activities. Examples of object names, employee number, Full name, Salary, Funding Objects are used to build queries and to retrieve data for reports. A description will appear at the bottom of the screen when each object is selected. Classes Classes are logical groups of related objects. For example, the Organisation class contains College/Support Group, School/Planning Unit, and Organisation name objects. Universes A universe is a logical group of classes. The universes used by Human Resources are PPIP Man Info, which gives access to employee information and the Recruitment Universe Universe Class Object Class Object Class Object Access to a specific Universe can be requested from the HR Systems Team by filling in an Access to HR Data form (HR form 85). The Web Panel Queries are built in the Web Panel which consists of: 1. Classes and Objects 2. Section and Table 3. Object Description 1. Classes and Objects The data box shows you the available classes and objects in your selected universe. From this box you will select the objects you want in your report. See Field Names and Descriptions for the full list of classes and objects in the PPIP Man Info Universe. When the Query Panel opens, the class folders are closed. Clicking on the + sign next to the class will expand the folder to show the objects it contains. Each Class can be contracted again by clicking on the minus sign. Please note: The classes shown on the screen should be used if historical information is required. If you wish to produce a report using current data, click on the + sign next to ‘Daily Assignment Funding’ which will produce all the daily classes and objects. Care should be taken not to mix up the daily and historical classes (i.e. if current data is required, ensure all objects selected are within the ‘daily’ classes) otherwise the information returned will not be accurate or the report may not run. 2. Result Objects The section on the right is where the objects from the Classes and Objects box are placed to define the data retrieved by the query. Clicking on run query at the top of the page will pull the data you have requested from the universe. 3. Object Description The description of the object will be shown in the panel at the bottom of the screen, when the object is selected. Creating a new document by building a query Click on ‘New’ on the toolbar and select ‘Web Intelligence Document’ from the drop down list. This then brings up your list of universes to choose from. Staff information is contained in the PPIP Man Info Universe. Adding and Removing Objects to a Query There are several ways to move objects into, and out from, the Result Objects box. To add an object to a query, you can: Drag and drop an object into the Result Objects box Double click on an object – the object is added to the end of the query To delete an object from a query: Drag and drop it back into the Data box Right click on the object and select Remove Select the object and press the Delete key To run the query, click on the Run Query button at the top of the screen. The amount of data returned can be reduced by setting up restrictions in the Query Filters area. See Section 3 – Restricting Data The following selection will show all Schools within all Colleges. Editing the Results of a Query There are two ways to edit the results displayed by a query: Edit the query in the conditions panel and rerun it which will change the output data Edit the table block which simply changes the information display and retains all the data from the initial query To edit a query after running, click on the edit query option at the top of the screen. The Web Panel will appear and the objects can be amended. When you click on run query again the query will run with the amendments which have been made. Note that the new objects will not automatically appear in the report but will show in the ‘data’ panel at the left of the screen. You will need to drag and drop them into the report to add the information. Section 3: Restricting Data [Contents] Applying Conditions to a Query Object Sometimes, you will want to restrict a query so that it returns data related to a subset of values for an object rather than all the values e.g. you may wish to see data for a certain School rather than the whole College. A condition has 3 elements: School/Planning Unit Equal to School of Law Object Operator Operand There are several different types of conditions that you can use in BOXI: 1. Single and multi-value conditions 2. Prompted condition 3. Multiple conditions 1. Single and multi-value conditions. In a single value condition you limit the data returned to one single value for that object. E.g. School equal to School of Law Multi-value conditions allow you to select multiple values by using a different operator such as In List. To select multiple values select ‘Value(s) from list’. If ‘Value(s) from list’ is selected, a list of options is displayed. Several operands can be selected by double clicking each one or pressing the arrow to move them into the ‘Value(s) selected’ box. See example below – The Schools of Chemistry and Divinity are selected. 2. Prompted condition. Choose ‘Prompt’ instead of ‘Value(s) from list’. When the query is run, the user must select from the list of values (see below) 3. Multiple Conditions. Conditions can also be combined to increase control over the data a document contains. To combine conditions, add them to your query. BOXI automatically combines them with an 'and' (as shown below). Once combined, you can determine how the conditions work together by changing the logical operator from 'and' to 'or' which broadens the scope of the query, as the data retrieved can meet either the first or the second condition to be valid. When using 'and', the data must meet with both conditions. If there are three or more conditions in the query, they can be bracketed together. To bracket conditions click on one of the conditions and drag it on top of the other condition and let it go. This will bracket the two conditions together separate from any other conditions that you have in the query. To change the operator from and to or (and vice versa), double click on the one which is displayed. You can use as many brackets on the page as the conditions allow. The above query will show all staff in the School of Biomedical Sciences with a grade of UE08 or a Job Segment 2 of Academic Section 4: Sharing Data with Colleagues [Contents] Sending Documents A document can be sent to any other BOXI user. If a document is sent through this system, it will be found in the section marked Inbox Documents. To send a document, click the ‘Send’ command on the tool bar and choose ‘to Business Objects Inbox’ from the drop down list. This will call up the following screen and before you see the list of users to choose from you need to untick the box marked ‘use the Job Server’s default’ Once the box has been cleared you will see the following page You can search for a user by typing a username in the box marked ‘Look for’ and then click search or you can scroll through the ‘available recipients’ list to select the user that you want. Once you find the user that you want you need to click on the arrow to put that user into the ‘selected recipients’ box. Once you have all the users that you want in the ‘selected recipients’ box you need to click in the radial button next to ‘copy’ under Send As: and then click on the submit button at the bottom of the screen.