1
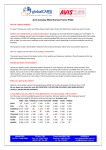
Standard Operating Procedure Title:_SOP-002 Drill Press PI: Art Erdman Lab Location: Mayo G217 Issue Date: 7/2/13 Revision Date: NA Prepared by: Marlina Komarek Approved by: Hazard Identification: Physical Danger Exposure Assessment: Motions Rotating Motion In drill press operation, the drill bit is a source of rotating motion. Rotating elements could grip loose clothing, gloves, hair, or appendages which could result in severe injury. Rotating elements can also propel poorly secured items across a room. In-Running Nip Points The belt assembly above the cutting area is a source of in-running nip points. Clothing, hair, or appendages could get caught and pinched in these points resulting in severe injury. Actions Cutting The cutting action of the drill press is performed by the drill bit when it rotates. The drill bit is sharp. The cutting action produces material chips that could be sharp. These chips may be propelled into the air by the rotating motion of the drill press and cause injury. Control Plan: Read and become familiar with machine’s operating procedures before operating Always know where the power off switch is located in case of emergency Always turn switch to off position when not operating drill press Always disconnect the machine from the power source before servicing, repairing, making any adjustments, or changing accessories, such as blades, bits, cutters, etc. Wear safety glasses at all times while operating drill press to protect eyes from any dust or debris Wear a dust or face mask to prevent the inhalation of dust from operating the machine Do not wear gloves, necktie, jewelry, or loose clothing, as they could get caught in the rotating elements of the machine Tie up long hair or wear protective hair covering to prevent hair from getting caught in the rotating elements of the machine Always clamp workpiece or brace against column to prevent rotation. Never drill loose work. Never secure the workpiece with hands. Always use drill chuck guards in appropriate position when operating drill press Always use recommended speed and specifications for drill bits, accessories, and workpiece material. If visibility is low, turn light switch on Experimental Procedures: Put on all safety equipment and tie back loose hair or clothing before operating machine Check to make sure all parts of machine are working and functioning properly Double check all measurements (drill bit size) for operating machine on work piece Put the correct drill bit in the drill press o If the wrong size drill bit is in the machine, Unplug the machine Take chuck key, on left side of drill table Put the key into the hole on the front side of the chuck Turn the key counterclockwise to loosen the chuck Once loosened, take out the drill bit and put in the correct-sized drill bit Once the drill bit is at the desired depth (make sure most of drill bit is visible), turn the chuck key clockwise to tighten the chuck Place chuck key back on drill table Once correct drill bit is in drill press, check for recommended drill speed o See chart below for recommended drill speeds. This chart can also be found in the Drill Press User Manual (p. 18). Once recommended drill speed is found, align the belt pulleys to the desired speed o See chart below for pulley alignment designated for desired speed. This chart can also be found in the Drill Press User Manual (p. 15) o Unplug the machine o Open the head cover of the machine, check pulley alignment o If pulley alignment is not correct for desired speed, Release belt pressure by loosening belt tension lock knobs and unlock belt tension handle Loosen motor mounts, lift and lower motor until pulleys are in line Tighten the motor mounts using a wrench Retighten the belts by turning the belt tension handle clockwise until tight Lock the belt tension lock knobs Once belt alignment is correct, place work piece in desired position and clamp to table Make sure all safety equipment is on correctly and put safety guards into position Start machine by pushing switch inwards and then moving switch to on position Use machine to drill work piece as desired When finished, turn off drill press right away Wait until drill bit has completely stopped before unclamping work piece Clean machine after use and dispose of debris (see Waste Management Procedures) For other inquiries, see Drill Press User Manual. Waste Management Procedures: When finished with the drill press, always clean the area. There should be no chips or filings on the work table or floor. Dustpan, handbroom, regular broom, paper towels and cleaning solution can be found in G217-09. Place all drill bits, wrenches, clamps, raw materials, and vice grips back in the appropriate place. Spill and Accident Procedures: If an accident occurs, report immediately to the lab supervisor (G217-05) or other appropriate staff member. If no one is around, dial 911 on the landline phone near the door of G217-09 to reach the campus police. The lab first aid kit is located on the wall near the sink. A first aid pamphlet from DEHS is located in all of the MDC’s first aid kits.