1
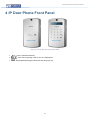
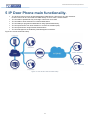
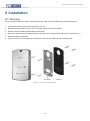
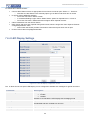
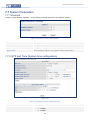
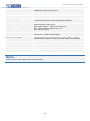
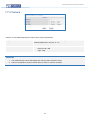
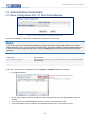
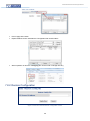
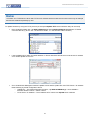
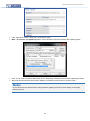
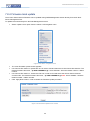
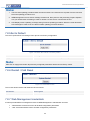
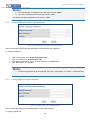
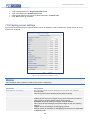
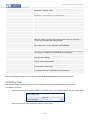
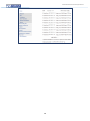
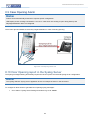
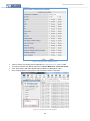
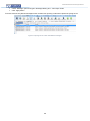
NISTA DEVICES GmbH 2013 © All Rights Reserved Door Access Control with the VoIP interface IP 39-4X Release 2.06 1 NISTA DEVICES GmbH 2013 © All Rights Reserved IP Door Phones IP 39-4X Installation and Programming Manual Document Release: 2.06 Release Date: 8-Sep-15 2 NISTA DEVICES GmbH 2013 © All Rights Reserved NOTICE This document refers to the Nista Devices GmbH Door Access Control devices with VoIP protocol capabilities. Additional copies of this manual may be obtained from Nista Devices GmbH. Reproduction of this manual or parts thereof without written permission from Nista Devices GmbH is strictly prohibited. Nista Devices GmbH reserves the right to modify the hardware and software described herein without prior notice. However, changes made to the hardware or software described do not necessarily render this publication invalid. 3 NISTA DEVICES GmbH 2013 © All Rights Reserved Table of Contents 1 Introduction ................................................................................................................................................................ 6 1.1 List of Available Models .................................................................................................................................... 6 2 Product Overview ....................................................................................................................................................... 6 3 IP Door Phone package content ................................................................................................................................ 7 4 IP Door Phone Front Panel ........................................................................................................................................ 8 5 IP Door Phone main functionality. ............................................................................................................................. 9 6 Installation ................................................................................................................................................................ 10 7 6.1 Mounting .......................................................................................................................................................... 10 6.2 Connections .................................................................................................................................................... 11 6.3 Reset device to Factory Default Configuration ............................................................................................... 14 Programming ........................................................................................................................................................... 15 7.1 Access to Web Management interface ........................................................................................................... 15 7.2 Home screen ................................................................................................................................................... 16 7.3 Network Parameters ....................................................................................................................................... 18 7.3.1 Network Configuration parameters ............................................................................................................. 18 7.3.1 Network -> HTTPS activation ...................................................................................................................... 19 7.3.2 Network / NAT Traversal ............................................................................................................................. 20 7.3.3 Auto Provision ............................................................................................................................................. 21 7.4 SIP Parameters ............................................................................................................................................... 22 7.4.1 SIP Account screen ..................................................................................................................................... 22 7.4.2 SIP / Port Settings ....................................................................................................................................... 22 7.4.3 SIP Audio Codecs ....................................................................................................................................... 23 7.4.4 SIP Video Codecs ....................................................................................................................................... 23 7.4.5 SIP advanced settings................................................................................................................................. 24 7.5 Telephony........................................................................................................................................................ 25 7.5.1 Telephony Parameters ................................................................................................................................ 25 7.5.2 Day and Night settings ................................................................................................................................ 26 7.5.3 Speed Dial and System subscribers table .................................................................................................. 28 7.6 Door Functions ................................................................................................................................................ 29 7.6.1 Door Functions / Parameters ...................................................................................................................... 29 7.6.2 Door Access Codes..................................................................................................................................... 30 7.6.3 Sensor ......................................................................................................................................................... 31 7.6.3.1 7.6.4 7.7 Sensor Door Status Control ................................................................................................................ 31 LED Display Settings................................................................................................................................... 33 System Parameters ......................................................................................................................................... 35 7.7.1 Volumes ...................................................................................................................................................... 35 7.7.2 NTP and Time (System time configuration) ................................................................................................ 35 7.7.3 Camera ........................................................................................................................................................ 37 7.8 Administration Parameters .............................................................................................................................. 38 7.8.1 Save Configuration File / IP Door Phone Backup ....................................................................................... 38 7.8.2 Restore Configuration ................................................................................................................................. 39 4 NISTA DEVICES GmbH 2013 © All Rights Reserved 8 7.8.3 Firmware Update ......................................................................................................................................... 40 7.8.4 Firmware local update ................................................................................................................................. 43 7.8.5 Set to Default ............................................................................................................................................... 44 7.8.6 Restart / Cold Reset .................................................................................................................................... 44 7.8.7 Web-Management credentials .................................................................................................................... 44 7.8.7.1 Change WEB Administrator login credentials ..................................................................................... 45 7.8.7.2 Change WEB User login credentials ................................................................................................... 45 7.8.8 Syslog server settings ................................................................................................................................. 46 7.8.9 Ping Test ..................................................................................................................................................... 47 User Operations ....................................................................................................................................................... 49 8.1 Access by using the ‘Door Access Code’ ....................................................................................................... 49 8.2 Door opening by using the External Switch button ......................................................................................... 49 8.3 The Door Status Sensor. Serial Doors opening .............................................................................................. 49 8.3.1 8.4 8.4.1 9 Serial Door Opening .................................................................................................................................... 50 Call to the Day / Night Operator ...................................................................................................................... 50 Peer-to-Peer Calls ....................................................................................................................................... 51 8.5 Direct Call to destination number .................................................................................................................... 51 8.6 Dialing by using Speed Dial Destinations ....................................................................................................... 51 8.6.1 Speed dialing by using the SPD code ......................................................................................................... 52 8.6.1 Speed dialing by using the LED Display search ......................................................................................... 52 8.7 Door opening from IP Extension by using the Extension’s Door Opening Code ............................................ 52 8.8 Setting the maximum conversation time ......................................................................................................... 53 8.9 Case Opening Alarm ....................................................................................................................................... 54 8.10 Door Opening report in the Syslog Server ...................................................................................................... 54 Technical specification ............................................................................................................................................. 57 5 NISTA DEVICES GmbH 2013 © All Rights Reserved 1 Introduction The Nista Device's IP Door Phones are standalone SIP phones, which maximize functionality of the VoIP network. Integrated into SIP Proxy as extension IP Door Phone allows voice and video communication and doors control within an enterprise multiple branches, which is operated under single IP network. An integrated IP video camera allows users to manage a high quality SIP video call. 1.1 List of Available Models Model IP39-40PC IP39-40P IP39-41PC IP39-41P IP39-40AC IP39-40A IP39-41AC IP39-41A Description IP Door Phone, Piezo Keypad, Integrated Internal Video Camera IP Door Phone, Piezo Keypad IP Door Phone, Piezo Single Button, Integrated Internal Video Camera IP Door Phone, Piezo Single Button IP Door Phone, Touch Keypad, Integrated Internal Video Camera IP Door Phone, Touch Keypad IP Door Phone, Touch Single Button, Integrated Internal Video Camera IP Door Phone, Touch Single Button 2 Product Overview Nista Devices IP Door phones IP394X family are smart, surface mounted access control devices connected to the Nista Devices IP platform allowing door entry control. They are designed for both indoor and outdoor use and are constructed in an aluminum case with piezo and touch keypads. The Nista Devices IP Keypad and Single Button versions support the following features: Feature Multiple door access codes Door opening from any extension Programmable day and night destinations Integration with local LAN and VoIP networks Network Configuration: DHCP or Static Authorized registration with existing VoIP switching system (SIP Proxy) Automatic busy & disconnect detection 99 Speed Dialing Memories Up to 99 System accounts Destination No answer call forwarding Day and Night weekly time profiles Separate Day & Night destinations Informative Display Speed dial memory scrolling External buttons Two separate doors control POE-Power over Ethernet High quality speakerphone with WEB volume control High quality Video over IP Web Management interface Web GUI password protection Software upgrade capabilities Integral Card reader ( * Optional) Door Status Detectors ( * Optional) Backlit keypad with stylish design ( * Indoor Touch keypad) Weather resistant and anti-vandal PIEZO keypad Case Opening Alarm 6 Keypad Single Button V V V V V V V V V V V V V V V V V V V V V V V V V V V X V V V V V V X X V V V V X V V V V V V V V V V V V V NISTA DEVICES GmbH 2013 © All Rights Reserved 3 IP Door Phone package content IP Door phone unit Metal rear cover Rear rubber mat Set of connectors Hex key wrench for security screw Note: 1. If POE equipment is not available it is possible to use External Power Supply (not supplied). External Power Supply shall be: Input: 100 – 240 V AC Output: 5VDC; 2A 2. 5VDC Power Supply shall be connected to IP Door Phone in accordance with the required polarity 3. The External Power Supply does not included in standard IP394X package 7 NISTA DEVICES GmbH 2013 © All Rights Reserved 4 IP Door Phone Front Panel Figure 4-1 The IP Door Phone Unit Front Panel ▲▼ – scroll a speed dial directory. – enter the programing mode or use as a “Backspace” – dial predefined day/night extensions and hang up a call. 8 NISTA DEVICES GmbH 2013 © All Rights Reserved 5 IP Door Phone main functionality. The IP Door Phone unit can be integrated with IP PBX (Server / SIP-Proxy) as a SIP extension. IP Door Phone can be connected to IP PBX directly or via IP router, HUB or Switch. The unit dials to predefined ‘Day’ and ‘Night’ extensions via IP PBX. The unit dials to local extensions or external destinations. The unit dials pre-programmed destinations using Speed Dial directory. The unit opens doors from local extension or remote conversation party. The unit opens doors using External Switch buttons. The unit management is handled by Web Management interface. Figure 5-1 the unit schematic setup. Remote IP Extensions Remote IP Extensions Figure 5-1 The IP Door Unit schematic setup 9 NISTA DEVICES GmbH 2013 © All Rights Reserved 6 Installation 6.1 Mounting The Door phone shall be mounted on the wall using rear metal cover and rubber mat provided with the unit. 1. Unscrew the secret screw on the bottom part of the unit. 2. Measure and mark location of the holes on the wall, where they are to be drilled. 3. Drill the holes and insert the wall dowels into the holes. 4. Place the rubber mat on the wall and then the rear metal cover using provided wall screws. (See Figure 6-1) 5. Make all required connections. 6. Put Door Phone unit on the base latch mechanism, close the case and lock with provided screw. Figure 6-1 Door Phone wall installation 10 NISTA DEVICES GmbH 2013 © All Rights Reserved 6.2 Connections For the safety reason and to avoid electrical damage to the unit any Power source like an external power supply or POE shall be disconnected during installation process. The External Power Supply does not included in standard IP394X package 1. Connect and screw door lock(s), push button(s) or sensor(s) wires to the provided two-wire terminal connectors. 7. Insert wired terminal connectors into the matting sockets on PCB (Figure 6-2). 8. Connect POE/LAN cable to RJ-45 socket. 9. Connect door lock to ‘REL 1’ (Relay 1) and/or ‘REL 2’ (Relay 2). 10. If an external switch button is used (See also Chapter 7.6: Web GUI Door Functions -> Sensor), connect the external switch button wires to ‘SEN 1’ (Sensor 1) and/or ‘SEN 2’ (Sensor 2 ) Attention: NO/NC jumper position. Closed Central Pin (2) + ’NO’- (1) pin means the ‘Normally open’ relays status in powered mode. Closed Central Pin (2) + ’NC’ - (3) pin means the ‘Normally Close’ relays status in powered mode Relay 2 works in Normally Open mode only 11 NISTA DEVICES GmbH 2013 © All Rights Reserved Figure 6-2The IP Door Phone PCB module Attention: The internal relay’s maximum supported current is 2A Important: To set device in operational mode, switch 1 on PCB shall be switched to position “Normal”. PCB elements 1 ( SW2) Description Factory Default Settings switch: ‘Normal’ – Door Phone normal working position ‘Default’ – Set to default procedure mode 2 3 ( NO/NC Jumper) Hardware Reset ( Cold Reset Switch) Relay 1 and Relay 2 Normally Open and Normally Close status jumper. Closed Central Pin (2) + ’NO’- (1) pin means the ‘Normally open’ mode. Closed Central Pin (2) + ’NC’ - (3) pin means the ‘Normally Close’ mode Note: Relay 2 works in Normally Open (NO) mode only 4 Microphone Connector 5 Speaker Connector 6- Ethernet POE/LAN connection 12 NISTA DEVICES GmbH 2013 © All Rights Reserved PCB elements 5VD (5V DC) Description External power supply 5VDC 2A input (if no POE applied). Draw attention on connection polarity: +5V and GND marked on PCB (Figure 6-2) The External Power Supply does not included in standard IP394X package SEN 1/2 (Sensor 1/2*) Door status detector. Also can be used as external Switch button connection (Chapter 8.3). Note: The short circuit closer type External Switch button can be used for manual door opening REL 1/2 (Relay 1/2) Support 30VDC 2A Internal relays Normally Open and Normally Close status depends on JP1 jumper position. Audio Out* Reserved for future release *feature support depends on firmware version Figure 6-3 shows the IP Door Phone connections with External Switch button, which is connected to SEN 1 (‘Sensor 1’) socket. Figure 6-3 IP394X Connections diagram with External switch button Note: The door electrical Lock requires the separate own powering 13 NISTA DEVICES GmbH 2013 © All Rights Reserved 6.3 Reset device to Factory Default Configuration IP Door phone can be reset to its Factory default configuration: 1. Via WEB-Management interface ( See Chapter 0) 2. By using the hardware ‘Factory Default Settings’ switch ( See Figure 6-2 ) To set IP Door Phone to Factory Default Setting by using hardware ‘Factory Default Settings’ switch: Power off the device. Put the switch to “DEFAULT” position. Power On will restore device the factory default. o LED Display can show the message “ Destination not set “ if Day or Night destinations not specified and case is open o LED Display Shows ’Set to default’ message if a case is closed o Power off the device. Put the switch back to “NORMAL” position Power on the device Figure 6-4 Factory Default Settings switch SW2 14 NISTA DEVICES GmbH 2013 © All Rights Reserved 7 Programming 7.1 Access to Web Management interface The programming application can be launched from a web browser. To run the application type in address bar the IP Door phone IP address. The Web Management Application Login screen appears: Figure 7-1 The WEB Programming Interface Login screen IP 394X provides different management levels for WEB-Management: Administrator and User ‘Administrator’ level has access to all IP394X configuration parameters ‘User’ level has limited access to IP394X configuration parameters. Fill Administrator or User login name and Password fields. ( See Also Chapter 7.8.7 ) Note: 1. The default IP Door Phone IP address is 10.10.10.6 and it is configured as ‘Static’ IP Address. 2. The default web-programming Administrator credentials are: User name: ‘admin’ – For Administrator management level and ‘user’ – for User management level Default Password: 1234 for both management levels 3. It is strongly recommended to change the default administrator password to a stronger one. Allowed Password characters: Up to 19 Digits: 0-9, Aa-Zz, no space allowed 4. Also IP Door phone IP address could be seen on the unit’s LED display (keypad models only). Dial: P/ + 1 + Web Access Administrator password + # 15 NISTA DEVICES GmbH 2013 © All Rights Reserved 7.2 Home screen Figure 7-2 The IP Door phone web-management application main screen The left side navigation menu contains the following items: Parameter Network SIP Telephony Door Functions System Parameters Admin ( Administration) Save & Reboot Description LAN Configuration parameters HTTPS Configuration SIP Account settings SIP Advanced settings Audio – SIP audio codecs configuration Video – Video codecs configuration Global telephony calling parameters Day/Night extensions number settings Speed Dial extensions numbers settings and System accounts configuration Door(s) handling parameters configuration Door Access Codes and Extension door opening code(s) settings LED Display messaging configuration Speaker and Microphone volume separate adjustment NTP and Time: Clock settings Save system configuration file Restore system configuration file System Firmware update Set device to factory default configuration Restart: restart the unit Change the Administrator Web-Login credentials Syslog Server Settings Ping test to the unit Save updated configuration and restart the unit The Home page parameters table includes following information: Parameter Description Model Name Model Number IP Door Phone Product name IP Door Phone Product ID – the manufacturer identification code 16 NISTA DEVICES GmbH 2013 © All Rights Reserved Software Version No. Software Version Date MAC Address IP Address Telephone Number Status Installed firmware release identification code Firmware’s release date IP Door Phone MAC Address IP Door Phone IP address Associated SIP extension number Shows the associated SIP extension registration status in IP PBX 17 NISTA DEVICES GmbH 2013 © All Rights Reserved 7.3 Network Parameters 7.3.1 Network Configuration parameters Figure 7-3 Network -> LAN screen Note: 1. At least the ‘DNS Server-1’ parameter shall be specified in ‘Static’ IP address configuration mode. Parameter Description IP Address Acquire Available options: Static DHCP Static mode allows to specify Network parameters manually. DHCP - Network parameters will be received automatically from DHCP server. IP Address: Identifies the IP Door Phone on the TCP/IP network. IPv4 format shall be used: XXX.XXX.XXX.XXX Example: 192.168. 1.10 Subnet Mask: Determines network subnet. IPv4 format shall be used: XXX.XXX.XXX.XXX Example: 255.255.255.0 Default Gateway: An identifier for the default network gateway on a TCP/IP network. IPv4 format shall be used: XXX.XXX.XXX.XXX DNS Server (Primary, Secondary): The local DNS servers IP address. IPv4 format shall be used: XXX.XXX.XXX.XXX Note: Strongly recommended to specify at least one DNS Server in Static Network configuration mode. Static DNS 18 NISTA DEVICES GmbH 2013 © All Rights Reserved 7.3.1 Network -> HTTPS activation The HTTPS Activation parameter will requires to use the HTTPS secure protocol for the web management communication. HTTPS provides authentication of the web-management server that one is communicating with, which protects against man-in-the-middle attacks. Additionally, it provides bidirectional encryption of communications between administrator’s PC and IP Door Phone. Figure 7-4 The HTTPS activation screen Parameter Description Activation Available options: Disable (default) Enable . Applies updated configuration. ‘Apply Now’ button Note: 1. The unit LAN configuration shall be completed and saved before the HTTPS activation is set. 2. WEB access URL to Door phone management page can require ‘https://’ prefix when HTTPS function activated 19 NISTA DEVICES GmbH 2013 © All Rights Reserved 7.3.2 Network / NAT Traversal These settings are relevant only if IP Door phone is a part of LAN and has internal (not public) IP address. NAT Traversal function allows traffic to get to the specified destination when a device does not have a public IP address. Figure 7-5 NAT Traversal screen Parameter Description NAT Traversal Activation Available options: Off (default selection) On The STUN server allows IP clients to find out their public address required for IP connection. TEXT Field allows to type the used STUN Server URL or IP address STUN Server STUN Port Specifies the STUN server connection listening port number 20 NISTA DEVICES GmbH 2013 © All Rights Reserved 7.3.3 Auto Provision Auto provision screen allows to configure APS (Auto Provisioning Server) server IP address / DNS name and IP Door Phone configuration file name. Figure 7-6 Auto-provisioning screen Parameter Description Server Type Available options: HTTP HTTPS Specified the connection type with APS server APS Server DNS name or IP address Directory path in APS server where configuration file stored. ‘Download now’ button initiates the Configuration file downloading procedure from the APS server This section specifies the time period for automatic connection with APS server. Available options: - Disable – The Auto-Provisioning functionality disabled - Restart – Initiates Auto-Provisioning each time when unit restarted - Periodic - Initiates Auto-Provisioning in specific days interval. Available for configuration by using the ‘Periodic Time’ parameter. The default ‘Periodic Time’ parameter settings is 1 day. ‘Update Now’ button – initiates the Auto-provisioning procedure immediately Server Name File Path Config File Update File Note: 1. Allowed to use only original file provided by IP Door Phone manufacturer 2. Auto-provisioning procedure supports only files with specific File Name. Contact with Support Center in order to specify the IP394X File Names Convention. 21 NISTA DEVICES GmbH 2013 © All Rights Reserved 7.4 SIP Parameters 7.4.1 SIP Account screen Figure 7-7 SIP account configuration screen Parameter Description Username The SIP account user name which shall be to be used for SIP extension identification The SIP account user name which shall be to be used for SIP extension registration in SIP proxy The SIP extension authorization password for registration in SIP proxy. In most cases the parameter it is the same as the Proxy server IP address. In special cases, it is required to enter the local Domain IP address or DNS address. An identifier for the SIP Proxy server on a TCP/IP network. Legal entry: 09 digits only in Ipv4 format XXX.XXX.XXX.XXX. Alternatively allowed to specify Proxy Server by its DNS name. Auth User ID Password Domain Server Proxy Server 7.4.2 SIP / Port Settings Figure 7-8 SIP Port settings screen Parameter Description SIP Local port RTP Port Start / RTP Port End Port to be used by IP Door phone for SIP signaling. Set the initial port for the range of ports to be used for audio and video transfers. The default value is 4000 for RTP Port Start and 20000 for RTP Port End. 22 NISTA DEVICES GmbH 2013 © All Rights Reserved 7.4.3 SIP Audio Codecs Figure 7-9 SIP Audio Codecs screen This screen specifies Audio codecs which used in SIP protocol codec’s priority. Available following codecs: PCMU – G.711µ-low PCMA – G.711 a-low Speex 32 / 16 / 8 KHz GSM G.722 G.729 7.4.4 SIP Video Codecs Figure 7-10 SIP Video Codecs screen This screen specifies Video codecs used in SIP protocol for video stream transfer. Allowed to specify priority for each selected video codec Available are following codecs: H263-1998 ( H.263+) H264 23 NISTA DEVICES GmbH 2013 © All Rights Reserved 7.4.5 SIP advanced settings Figure 7-11 SIP Advanced settings Parameter Description SIP Reg Expires Set the minimum time for IP Door Phone SIP extension registration attempts. This option defines how DTMF signaling can be presented or recognized in SIP traffic. Note: Requires the opponent side configuration as well Available Options: RFC 2833 SIP INFO ( Default) Enables / Disables the SIP traffic media encryption by using SRTP protocol capabilities. Note: Parameter not activated in default settings Session Timer used follow by RFC 4028 in which either INVITE (outgoing call) or 200 OK (incoming call) header will have Session-Expires notification. The purpose is for checking if a call is still active or not. Available Options: Disable Enable DTMF Mode Media Encryption Session Timer 24 NISTA DEVICES GmbH 2013 © All Rights Reserved 7.5 Telephony 7.5.1 Telephony Parameters Figure 7-12 Telephony parameters screen Parameter Description Auto Answer Available options: Disable Enable This parameter Enables / Disables the IP door phone auto pick up incoming calls Digit # as End of dialing Inter-digit Timeout Max. Conversation time out No Answer Timeout No Answer Forward Destination ‘Apply’ button Specifies ‘#’ sign typed on the IP Door phone keypad as end of dialing direct destination number Specifies the maximum delay time in seconds between two digits when entering a code or destination telephone number using IP Door keypad Specifies the maximum allowed conversation time. Specifies the time interval for incoming call when IP Door phone not answered. The call will be forward to another destination when parameter expires. Specifies the ‘No Answer’ case call forward destination Screen requires using ‘Apply’ button for to update parameters in the unit 25 NISTA DEVICES GmbH 2013 © All Rights Reserved 7.5.2 Day and Night settings Note: The Single button Door Phone allows Day and Night destination dialing. Speed Dial Destination dialing is relevant for Keypad Housing edition only. Figure 7-13 Telephony Day & Night settings screen Parameter Description Switch Mode Available options: Auto Manual This parameter will switch the unit to Day or Night operational modes automatically or manually. Manual Type Weekly Time profile table Day Time destination Night Time destination Specifies the operational mode Day or Night for the ‘Manual’ Switch Mode selection Table specifies the daily time interval for each day of the week. Specified time interval specifies the ‘Day’ time interval Specifies the ‘Ring’ button destination number for the ‘Day’ operational mode. For Peer-to-Peer calls enter the destination in format: sip:XXX.XXX.XXX.XXX:5060 (where ‘5060’ the actual SIP signaling port number ) Specifies the ‘Ring’ button destination number for the ‘Night’ operational mode For Peer-to-Peer calls enter the destination in format: sip:XXX.XXX.XXX.XXX:5060 26 NISTA DEVICES GmbH 2013 © All Rights Reserved 27 NISTA DEVICES GmbH 2013 © All Rights Reserved 7.5.3 Speed Dial and System subscribers table Note: Speed Dial Destination dialing is relevant for Keypad Housing edition only. Single button Door Phone allows Day and Night destination dialing The IP Door phone provides an option to create up to 99 System subscribers. Each system subscriber can be identified by its SPD number (Speed Dialing Code) and includes a set of destination telephony numbers where subscriber can be reached when appropriate SPD code dialed from the IP Door phone keypad. Alternatively the System subscribers can be reached by using ▲▼ arrows buttons from the IP Door Phone keypad. Speed dial table purposed to configure the IP Door phone Speed dialing destinations / System Subscribers Figure 7-14 Speed dial and System subscribers table Parameter Description Speed Dial No. Parameter shows with 2 digits the Speed dial table number. Each table includes 10 records. Switching to required table is available by typing the table number in the text field and followed ‘Select’ button or by using the ▲▼ arrows buttons SPD The Speed dial destination code. This code can be dial from the IP Door Phone front panel keypad or selected by using the LED Display and arrows keys. Dialed SPD code and follows ‘Ring’ button initiates dialing to SPD destination number The destination telephony number which associated with the SPD code and will be dialed in ‘Day’ operational mode For Peer-to-Peer calls enter the destination in format: sip:XXX.XXX.XXX.XXX: NNNN, where, XXX.XXX.XXX.XXX – destination peer IP address in IPv4 format NNNN – SIP Signaling port number, ‘5060’ in default settings The destination telephony number which associated with the SPD code and will be dialed in ‘Night’ operational mode Day Time Destination Night Time Destination 28 NISTA DEVICES GmbH 2013 © All Rights Reserved No Answer Forward Destination Description Specifies telephony number where IP Door phone outgoing call will be forwarded in case if ‘Day’ or ‘Night’ destinations no answered on incoming call Short up to 30 characters SPD destination’s description which will be indicated on the front panel LED Display by usage ▲▼ arrows buttons 7.6 Door Functions 7.6.1 Door Functions / Parameters Figure 7-15 Door Functions / Parameters screen Parameter Description Door Opening time Specifies the time interval in seconds during which the door lock remains open. Available selection options from 1 to 9 seconds. Door Opened Timeout Specifies allowed door open status time interval in seconds. This parameter is actual if the door status detectors in use in order to alarm the door open status. IP Door phone calls to Day / Night destination in case if specified time expired and door did not returns to its IDLE/Stand By mode 29 NISTA DEVICES GmbH 2013 © All Rights Reserved 7.6.2 Door Access Codes Figure 7-16 Door Access Codes screen IP Door phone support up to 9 Door access codes. The different Door access code can be specified separately for Door 1(Relay 1) and Door 2 (Relay 2) Parameter Description Access Code 1~9 Specifies the Door opening code, which opens a door when typed on the IP Door phone keypad in ‘Stand by’ mode. Up to 9 digits. Legal entry: 0-9 digits only, no space allowed. Code can be specified separately for Door 1 and Door 2. Access Code from Extension Specifies the Door opening code, which opens a door remotely when dialed from destination number during conversation with the IP Door Phone. Up to 4 digits code allowed for assignment. Legal entry: 0-9 digits only, no space allowed. The code can be specified separately for each relay: Door 1 and Door 2. Door Opening Code Prefix ( Masking Door Opening code on LED monirtor) Used in order to mask actual dialed Door opening code and show ‘****’ ‘stars’ characters instead of. LED display will show ‘STAR’ characters follows after dialed assigned Door Opening Code Prefix To activate Code Masking: * or # or ‘None’ – to disable’ - Select ‘Door Opening Code Prefix’: - Click ‘Apply’ button - Save & Reboot unit - Dial Door opening prefix and follow the door opening code: for example: 30 NISTA DEVICES GmbH 2013 © All Rights Reserved If a Code prefix selected as ‘*’ and door opening code is ‘4321’, so need to dial *4321 in order to open a door. LED Display with masked Door Opening code 7.6.3 Sensor Figure 7-17 Door Sensors and External Switch button configuration screen Parameter Description Serial Doors Opening (See Chapter 8.3.1) Configures the ‘Serial Door opening’* application support. Default configuration – ‘Disabled’ *Note: - Future Software Release. Sensor 1 & 2 type Specifies type of equipment connected to PINs ‘Sensor1’ and ‘Sensor2’ see Figure 6-2 Available options: Status Sensor External Switch Buttons The Door ‘Status Sensor’ provides an option to control the doors open/close status and activates alarm calls when door does not return to its IDLE mode during specific time interval The ‘External Switch Button’ provides an option to open a door manually. See Figure 6-2 7.6.3.1 Sensor Door Status Control Door Sensors control the door opening status and send alarm call to preconfigured Day / Night destination if the door opening time (‘Door Opened Timeout’ see Figure 7-15) expires and door does not return to its IDLE mode. Note: IP Door phone supports following Sensor types: Loop Control - Dry Contacts: Open / Close type 31 NISTA DEVICES GmbH 2013 © All Rights Reserved The used sensor shall provide the ‘Normally Open’ status in IP394X IDLE mode and ‘Normally Close’ status in Door Opened mode. The ‘Normally Open’ sensor type means that sensor provides the loop disconnection status via its pins in default mode. Figure 7-18 Normally Open Sensor The ‘Normally Close’ sensor type means that sensor provides the short-connection status via its pins in default mode. Figure 7-19 Normally Close Sensor Figure 7-20 Door Sensors connection The ‘Door Opened Timeout’ parameter controls the maximum allowed time when door can be opens. Parameter can be configured by using the WEB interface: Door Functions / Parameters screen (See Figure 7-15). Door Phone initiates alarm call to pre-configured Day or Night destination number if a ‘Door Opened Timeout’ parameter time interval expired but door did no returns to its IDLE mode. 32 NISTA DEVICES GmbH 2013 © All Rights Reserved To activate Door Status Sensors: Connect Door Status sensors to appropriate IP Door Phone connector pins ‘Sensor 1’ / ‘ Sensor 2’ o Note: Be sure that Sensors are ‘Normally Open’ type in IDLE mode when door is closed. In IP Door phone WEB GUI interface: o Go to Door Functions / Sensor screen o In ‘Individual Settings’ region select ‘Status Sensor’ option for required Door 1 or Door 2 o Go to Door Functions / Parameters and configure ‘Door Opened Timeout’ Call to Destination from the IP Door Phone Open a door and leave door opened during time interval, which is longer than ‘Door Opened Timeout’ configured parameter value. o Note: Check the Sensor provides ‘Connection’ status via its pins when door is open. IP Door Phone calls to Day/Night destination 7.6.4 LED Display Settings Figure 7-21 The LED Display configuration screen The IP Door Phone front panel LED Display can be configured to indicate text messages for guests and users. Parameter Description Show Message Available options: Enable Disable Activate or de-activate the LED Display text messaging mode Scrolling Time Specifies a time interval in seconds with in the LED Display message will be indicated and then scrolled to a next one. Language Specifies the specific Language support Message Line X ( from 1 to 8) The LED Display message text. 33 NISTA DEVICES GmbH 2013 © All Rights Reserved LED Display divides messages by pairs and shows & scrolls simultaneously 2 lines. Note: 1. Feature required Save & Reboot action for activation 34 NISTA DEVICES GmbH 2013 © All Rights Reserved 7.7 System Parameters 7.7.1 Volumes Volumes screen allows to adjust the IP Door Phone’s internal microphone and speaker volumes Figure 7-22 System Volume’s settings screen Parameter Description Microphone Volume This parameter purposed to adjust the microphone volume Speaker Volume This parameter purposed to adjust the speaker volume ‘Apply’ button Screen settings require to be applied in order to take effect. 7.7.2 NTP and Time (System time configuration) Figure 7-23 Figure 7-24 System Real Time configuration screen Parameter Description NTP Active Available options Disable Enable 35 NISTA DEVICES GmbH 2013 © All Rights Reserved This parameter enables / disables the internal real-time clock auto updating by using the NTP protocol Primary / Secondary NTP server The NTP server DNS name or IP address Time Zone The local time zone Daylight Saving Time Activates the ‘Daylight Saving Time’ (DST) support. Automatically corrects the system clock when enabled and configured Daylight Saving Time Start / End Specifies days to correct the Door Phone system clock in accordance with the local DST rules, where: MM – Month number, 1-January, 2-February etc WW – Week number in month: from 1 to 5 DD – Day of the week Update interval The connectivity session with NTP server time interval. Actual only for ‘NTP Active’ – ‘Enable’ selected status Date and Time Settings Set of parameters which are actual only for ‘NTP Active’ – ‘Disable’ selected status. Allows to set the Door Phone system clock manually. Date Actual Date settings fields: Year / Month / Day Time Actual Time settings fields: Hours / Minutes / Seconds ‘Set Date and Time’ button This button applies ‘Date and Time Settings’ table updates to the unit ‘Apply’ button Screen settings require to be applied in order to take effect. Note: Feature requires Save & Reboot action to be accepted 36 NISTA DEVICES GmbH 2013 © All Rights Reserved 7.7.3 Camera ‘Camera’ screen allows adjusting the internal video camera parameters: Brightness Allows to adjust the internal video camera ‘Brightness’. Allows to set selected parameter in interval: -2 / +2 *. Resolution Allows to select the internal video camera resolution mode: Normal: 640 x 480 High: 720p Note: 1. The destination SIP client shall support the selected video resolution mode 2. Feature configuration requires ‘Save & Reboot’ action in order be accepted. 37 NISTA DEVICES GmbH 2013 © All Rights Reserved 7.8 Administration Parameters 7.8.1 Save Configuration File / IP Door Phone Backup Figure 7-25 Save IP Door Phone Configuration File screen This screen allows back up the IP Door configuration by using the TFTP protocol. Note: 1.The TFTP server can be installed and activated by using the Third Part Company tftp software. For example: Tftpd32 application, which can be found on the following URL: http://www.snapfiles.com/download/dlTftpd32.html ) 2. The IP Door Phone configuration file name is fixed to ‘Config.cfg’ and must be used for back up and restore operations Parameter Description TFTP Server IP address Specifies the TFTP server on a TCP/IP network, where configuration files will be stored. ‘Apply Now’ button This button shall be used in order to initialize the functional operation. To save the IP Door Phone configuration by using ‘tftpd32’ or ‘‘tftpd64’ software (as example): Run tftpd32 software. Screen Opens where shown the Configuration file storage directory and your (Administrator’s) PC’s IP Address Go to IP Door Phone Web Management screen / Admin / Save Config File screen Type Administrator’s PC’s IP Address where tftpd32 software runs to ‘TFTP Server IP’ field 38 NISTA DEVICES GmbH 2013 © All Rights Reserved Press ‘Apply Now’ button tftpd32 software screen indicates the Configuration file transfer status When operation is done the ‘config.cfg’ file can be found in storage directory 7.8.2 Restore Configuration Figure 7-26 IP Door Phone Restore Configuration screen 39 NISTA DEVICES GmbH 2013 © All Rights Reserved Parameter Description TFTP Server IP address Specifies the TFTP server on a TCP/IP network, where configuration files was previously stored. ‘Apply Now’ button This button shall be used in order to initialize the functional operation. To restore configuration file requires exactly the same procedures as in previous chapter. 7.8.3 Firmware Update Figure 7-27 Update Firmware screen Note: The firmware updating procedure is available by using TFTP and FTP protocols. Only original IP Door phone’s firmware can be used for the Firmware update procedure. Please contact with authorized local distributor in order to get the original firmware file. Parameter Update File Description The IP394X Software file name including the file’s extension suffix. For example: ip-394X-wNNN.tar.gz TFTP Server IP Address The IP Address of PC where runs TFTP server software FTP Server Login Name Specifies the FTP server account login name. Password Specifies the FTP server account password name. IP Address Specifies the FTP server IP address Update file The firmware file name. ‘Apply Now’ button This button shall be used in order to initialize the functional operation. 40 NISTA DEVICES GmbH 2013 © All Rights Reserved Note: ‘TFTPD32’ and ‘TFTPD64’ are three-side TFTP server software which mentioned in this document only as example and must be obtained separately by user To update firmware by using the TFTP protocol (As example ‘tftpd64’ TFTP server software utility can be used) Place IP394X firmware files: ip-394X-wXXabN.tar.gz and ip-394X-wXXabN.tar.gz.sum into TFTPD64 executive directory ( where: XX – the firmware version ; N – the firmware edition number ) Launch tftpd64 server utility and draw attention on ‘Server Interface’ field where must be shown IP address of PC where tftpd64 server runs Go to IP394X Web Management Admin/ Update screen and fill ‘Update File’ and TFTP Server / IP Address fields following by actual configuration where: o Update File – The IP394X Firmware file name; ‘ ip-394X-wXXXNN.tar.gz ‘ where XXXNN – firmware release number + edition number. o TFTP Server / IP Address – The IP address of PC where runs tftpd64 server software 41 NISTA DEVICES GmbH 2013 © All Rights Reserved Click ‘Apply Now’ button in Web-Gui / TFTP Server region Wait ~ 20 seconds until tftpd64 application screen will start to show the firmware files updating status Note: The IP 394X front panel LED Display shows ‘Rebooting’ message during firmware updating procedure Wait until IP 394X will finish the firmware updating; restart the unit and returns to its IDLE mode Note: Do not disconnect the IP394X power during firmware updating procedure. Power failing on this stage destroys the unit. 42 NISTA DEVICES GmbH 2013 © All Rights Reserved 7.8.4 Firmware local update The IP Door Phone internal Firmware can be updated during WEB-Management session directly from the IP Door Phone management GUI. To update Firmware directly from the Web-Management screen: Select ‘Update Local’ option from the ‘Admin’- left navigation menu Figure 7-28 ‘Admin’ navigation menu The Local Firmware Update screen appears Use ‘Choose File’ button in ‘Update File’ line in order to find and select the IP Door Phone firmware file. The IP394X Firmware file name; ‘ ip-394X-wXXXNN.tar.gz ‘ where XXXNN – firmware release number + edition number. Use ‘Choose File’ button in ‘ Checksum File’ line in order to find and select the IP Door Phone firmware checksum file. The IP394X Firmware file name; ‘ ip-394X-wXXXNN.tar.gz.sum ‘ where XXXNN – firmware release number + edition number. Click ‘Apply Now’ button in order to initiate the Firmware update procedure Figure 7-29 Firmware ‘Update Local’ screen 43 NISTA DEVICES GmbH 2013 © All Rights Reserved Note: 1. The Firmware updating procedure takes at least 2 minutes. Do not disconnect a power from the unit when Firmware updating procedure runs 2. WEB-Management screen shows message ‘Please wait, Door-phone is still processing Prepare Update !’. Use your web-browser refreshing in order to refresh a screen and re-connect with the unit 3. LED Display shows ‘Updating’ message during Firmware updating procedure. Wait the normal functional LED messages in order to be sure that Firmware updating procedure finished 7.8.5 Set to Default This menu option allows converting IP Door phone to its factory configuration Figure 7-30 Set IP Door Phone to its factory default Parameter Description ‘Apply Now’ button This button initializes the Reset to Factory default operation. Note: After click on ‘Apply Now’ button all previously configured parameters will be reset to factory values. 7.8.6 Restart / Cold Reset Figure 7-31 Cold Reset screen This screen allows remote cold restart the IP Door Phone Parameter Description ‘Restart’ button This button initializes the IP Door Phone Cold Reset. 7.8.7 Web-Management credentials IP 394X provides different management levels for WEB-Management: Administrator and User ‘Administrator’ level has access to all IP394X configuration parameters ‘User’ level has limited access to IP394X configuration parameters. 44 NISTA DEVICES GmbH 2013 © All Rights Reserved Note: 1. The ‘Administrator’ management level web-login name is ‘admin’ 2. The ‘User’ management level web-login name is ‘user’ The default web-login password for both levels is ‘1234’ 7.8.7.1 Change WEB Administrator login credentials Figure 7-32 Change Web Administrator password screen This screen allows changing the Web-Management Administrator login password. To change a password: Type existing password in ‘Original Password’ field Type new password in ‘New Password’ field Confirm New Password by typing the New Password in ‘Confirm’ field Click ‘Save’ button to complete Note: 1. The Web login password can be assigned with up to 15 characters: 0-9, Aa-Zz, no space allowed 7.8.7.2 Change WEB User login credentials Figure 7-33 Change Web User password screen This screen allows changing the Web-Management User login password. To change a password: 45 NISTA DEVICES GmbH 2013 © All Rights Reserved Type existing password in ‘Original Password’ field Type new password in ‘New Password’ field Confirm New Password by typing the New Password in ‘Confirm’ field Click ‘Save’ button to complete 7.8.8 Syslog server settings This screen allows specifying the external ‘Syslog’ server IP address in order to stream the ‘syslog’ directly to server, where it can be stored. Figure 7-34 Syslog Server Settings screen Note: Save & Reboot action required in order to save screen configuration Parameter Description Syslog Server IP Address The external Syslog server IP address in IPv4 format. For example: 85.10.212.220 Note: Empty field means disabling Syslog data streaming Log Level Filter the Syslog level of the messages to be sent to server ERROR: shows all error messages, it may cause if Door Phone doesn’t work properly or specific feature doesn’t work properly. WARNING: shows all warning messages, it needs attention. INFO: shows all info messages, like pressed digits on the unit, Opening Door etc. DEBUG: shows all messages for debugging purpose. TRACE: shows all messages for debugging purpose and more detail than in ‘DEBUG’ mode 46 NISTA DEVICES GmbH 2013 © All Rights Reserved Log Details DETAIL TRACE: shows all messages for debugging purpose and more detail than in ‘TRACE’ mode Specifies and enables the data which printed in Syslog event messages Day Name – Print the Day of the Week Name Year – Print the event Year Month – Print the event Month Day – Print the event Date Time – Print the event time Micro Second – Detailed the event microsecond Sender – print the sender details New Line – Print message in the new line Carriage return - Returns to beginning of the line. Usually enabling the ‘New Line’ option is enough, but if syslog server does not change to a new line, it must enable this setting as well. Space when no Mark (Debug) - For debugging purposes, add a space when ‘Mark’ when ‘Thread Switched’ option disabled. Reserved (Debug) – Not in use Level Text - It shows ERROR, WARN, INFO, DEBUG, TRACE, DETRC in the message, according to selected level of the message. Thread ID (Debug) - For debugging purposes, it shows thread id that generates the message. Mark when Thread Switched (Debug) - For debugging purpose, add a mark (!) when thread switched. Indentation (Debug) - For debugging purposes, add indentation (.) to show the deep of the sender. Console (Debug) - For debugging purpose, it also displays the message to a terminal (must be connected to IP-3940 RS-232). See User’s Operation Chapter 8.10 in order to get the Door Opening report to external syslog server. 7.8.9 Ping Test Ping test allows checking IP connection from the IP Door phone with other IP destinations in the network. To initiate the Ping test: Type the remote IP Door phone IP address or its DNS name in ‘IP or Domain Name’ and press ‘Ping’ button After some seconds, Ping results will be shown on the screen. 47 NISTA DEVICES GmbH 2013 © All Rights Reserved 48 NISTA DEVICES GmbH 2013 © All Rights Reserved 8 User Operations Note: 1. The IP Visitor door phone provides limited functionality. The limitations depend on the unit programming. 2. Pressing the ‘Ring’ button a second time performs the “Call Cancellation” function. 8.1 Access by using the ‘Door Access Code’ To open the door: Dial the known ‘Door Access Code’ on the keypad (See Chapter 7.6.2) Door shall be open and accompanied by ‘Confirmation’ tone Note: 1. The default door access code is ‘4321’. Read Chapter 7.6.2 in order to configure the ‘Door Access Code’ 2. Door phone supports up to 9 digit Door Access Code 3. This specific operation is available in Keypad units only Door will be opened during the ‘Door Opening Time’ interval. (See Chapter 7.6.1) Note: 1. The ‘Door Opening Time’ interval can be configured via appropriate WEB-GUI Screen (See also Chapter 7.67.6.1) 2. The default Door opening time is 3 seconds 8.2 Door opening by using the External Switch button The Door phone supports an external switch button installation. The separate external button can be used for each door lock. This allows the door opening with a hardwired switch button. An external button should be connected to the Sensor-1 and Sensor-2 terminals. (See Figure 6-2) External Button functionality shall be enabled in the Web-GUI ‘Sensors’ screen (See Chapter 7.6.3) The door will be open, regardless of the Door Phone telephony connection status. 8.3 The Door Status Sensor. Serial Doors opening The IP Door phone supports integration with the Normally Open (NO) or Normally Closed (NC) types external sensors, which can indicate the Door status: Closed or Open. Sensors shall be connected to ‘Sensor1’ or ‘Sensor2’ 49 NISTA DEVICES GmbH 2013 © All Rights Reserved pins of the wires connector (See Figure 6-2 and Chapter 7.6.3Sensor). Changing the default sensor status will indicate to the IP Door phone that the Door status is changing. 8.3.1 Serial Door Opening The Serial door opening application allows the unit to open Door 2 after Door 1 with specific condition that Door 1 is already closed. The following diagram shows the serial door opening functional:- Figure 8-1 Serial Door opening feature Visitors press the ‘Bell ’ button on the IP Door Phone in order to dial to operator. Operator opens the door by using the Door Opening code from their extension. Visitor enters into the building and waits till Door 1 will be closed. Sensor 1 follows and indicates to IP Door Phone the door 1 status. Door 2 will open automatically when Door 1 is closed. Sensor 2 shall indicate to IP Door Phone when Door 2 is closed and the IP Door phone returns to its Standby mode. 8.4 Call to the Day / Night Operator The IP Door phone can operate in ‘Day’ and ‘Night’ scheduling modes. The Operator destination number can be specified for each mode separately via WEB Management interface (See Chapter 7.5.2). The number will be dialed when pressing button. To dial the Operator: Press on the button Door phone dials to a preconfigured destination number, depending on the Operational mode: Day or Night Note: 1. Day and Night operational modes can be switched manually via Web-Management interface or automatically (See Chapter 7.5.2) 2. The default Operator destination numbers are empty and must be configured by using the WebManagement interface 50 NISTA DEVICES GmbH 2013 © All Rights Reserved 8.4.1 Peer-to-Peer Calls Peer-to-Peer mode calls means calling directly to destination IP address. IP Door Phone allows Peer-to-Peer calls when it’s associated SIP extension Registered or Not Registered in SIP Proxy server (IP PBX) To make a Peer-to-Peer call: Go to Telephony / Day and Night Settings or Telephony / Speed dial table Enter destination IP address in format sip:XXX.XXX.XXX.XXX:NNNN in Day/Night Time Destination fields as shown in following image, where: Parameter Description XXX.XXX.XXX.XXX The destination IP address NNNN SIP protocol signaling port, 5060 in default Figure 8-2 Peer-to-Peer Call Configuration 8.5 Direct Call to destination number To dial directly to a destination number: Dial required destination number by using the keypad buttons. Use ‘Backspace’ button incorrect typed digit. Press button when finished or wait until the ‘Inter Digits Timeout’ interval Door phone dials destination number to delete Note: 1. The maximum destination number length is 20 digits 2. Operation available for Keypad units only 8.6 Dialing by using Speed Dial Destinations The IP Door Phone supports up to 99 Speed Dialing System subscribers destinations (See Chapter 7.5.3), where each system subscriber includes following telephony destinations: ‘Day Time destination’ – the number which will be dialed in the Day operational mode ‘Night Time destination’ – the number which will be dialed in the Night operational mode ‘No Answer Forward Destination’ - the number which will be dialed in case if a Day or Night mode did not answer during specific time interval ‘Description’ – short up to 30 characters System subscriber destination’s description, which will be indicated on the front panel LED Display. 51 NISTA DEVICES GmbH 2013 © All Rights Reserved 8.6.1 Speed dialing by using the SPD code For speed dial System subscriber’s destination number by using the Speed dialing SPD code: Type known SPD code on the IP Door phone keypad Press ’Ring’ button Door phone dials to pre-configured destination number Figure 8-3 IP Door phone Keypad 8.6.1 Speed dialing by using the LED Display search For speed dial System subscriber’s destination number by using the destination LED Display search: Find required System subscriber by using ▲▼ arrows buttons Press ‘Ring’ button to initiate a call Door phone dials to pre-configured destination number 8.7 Door opening from IP Extension by using the Extension’s Door Opening Code Called Destination can open the door for guests remotely by dialing the ‘Extension’s Door Opening Code’ in conversation mode. (See Chapter 7.6.2 and Figure 7-16) To open a door from an Extension: Call to destination as described in Chapters: 8.28.4, 8.5, 8.6 Wait till destination answers. Destination extension can dial the ‘Extension Door Opening code’ during conversation in order to open a door. The call will be disconnected after door opening procedure is complete. 52 NISTA DEVICES GmbH 2013 © All Rights Reserved Door Release Mechanism SIP Extension Figure 8-4 Door opening from remote Extension during conversation Note: 1. The default Extension’s Door opening code 1 for Relay number 1 is ‘5’, the rest of codes shall be configured via Web-GUI / Door Access Codes screen (See Chapter 7.6.2) 8.8 Setting the maximum conversation time The IP Door phone controls the conversation time duration. When preconfigured conversation time has expired, the Door phone will disconnect the call. (See Chapter 7.5.1) Note: 1. The default Maximum conversation duration time is 1 minute 2. The Maximum conversation time interval can be configured via the Web-management interface ‘Telephony Parameters ‘ screen (See Chapter 7.5.1) 53 NISTA DEVICES GmbH 2013 © All Rights Reserved 8.9 Case Opening Alarm Note: Feature works automatically and doesn’t requires specific configuration LED Display shows message ‘Destination is not set’ in case when unit housing is open during start up and Day/Night destination does not configured. The IP Door phone initializes a call to Day / Night destination in case of housing opening. Figure 8-5 Case Opening Alarm Call 8.10 Door Opening report in the Syslog Server The Syslog messages filtering functionality requires the IP Door phone and external Syslog server configuration. Note: The ‘Syslog Watcher’ Syslog server application shown as example in further in this document To configure IP Door Phone to generate Door Opening syslog messages: Go to Admin / Syslog Server Settings and select Log Level ‘3=Info’ 54 NISTA DEVICES GmbH 2013 © All Rights Reserved Figure 8-6 Syslog Server Settings screen Type PC where runs Syslog server application in ‘Syslog Server IP Address’ field The rest of selection are default and shown on Error! Reference source not found. Click ‘Save’ button and follow Save& Reboot option from Navigation menu Go to ‘Syslog watcher’ syslog server and Click ‘Filter’ button in top Menu Figure 8-7 Syslog server Filter window 55 NISTA DEVICES GmbH 2013 © All Rights Reserved Check ‘Message’ option and type in Message filtering box: “ Door Open Code” Click ‘Apply button From this moment only filtered messages which includes door opening codes will be printed in Syslog server Figure 8-8 Syslog server screen with filtered messages 56 NISTA DEVICES GmbH 2013 © All Rights Reserved 9 Technical specification Power supply 5V DC; 1.5A or Power Over Ethernet IEEE 802.3af compliant Communication interface Ethernet for voice; and for programming DC Leakage <10 µA Imbalance ratio 300-3400Hz > 46dB Return loss 300-3400Hz > 18dB Relay’s switching current 30VDC - 2A Max VoIP protocol supported SIP; RTP; RTCP Supported Audio codecs G.711 PCM (µ/A-Law) at 64 kbps; Speex 32/16/8 KHz; GSM; G722 Supported Video codecs H.264; H.263-1998 Media Encryption SRTP Echo canceller G.168-2002 Compliant with programmable echo tail of up to 128 msec. Full duplex, acoustic EC Quality Enhancement Comfort Noise generation (CHG) Packet Loss Concealment (PLC) Adaptive Jitter Buffer(up to 300 msec) Echo canceller length Up to 64 msec IP media features Automatic Gain Control Dimensions Weight Operating Temperature Indoor Unit: ………………182 L x 94 W x 36 H (mm) (with rubber pad) Indoor Unit Mini Housing: 130 L x 65.5 W x 33 H (mm) (with rubber pad) Outdoor Unit: …………….182 L x 94 W x 36 H (mm) Indoor Unit : ............. ……550g (net) Indoor Unit Mini Housing: 282.4g (net) Outdoor Unit:……………..700g (net) Outdoor: -20ºC to +50ºC/4ºF to 122ºF Indoor: 0ºC to +35ºC/32ºF to 95ºF 57