1
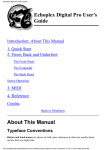
TECH 21, THE COMPANY
Tech 21 was formed by a guitarist possessing the unusual combination of a trained
ear and electronics expertise. In 1989, B. Andrew Barta incorporated Tech 21 and
made his invention commercially available to players and studios around the world.
His highly-acclaimed SansAmp™ pioneered Tube Amplifier Emulation in professional applications for recording direct and performing live, and created an entirely
new category of signal processing. While there have since been many entries into
this niche, SansAmp continues to maintain its reputation as the industry standard.
After developing a full line of SansAmp models, Tech 21 expanded its offerings to
include effect pedals; a compact, battery operable MIDI footcontroller, the MIDI
Mouse; as well as “traditional” style amplifiers for guitar and bass. Each product
is thoughtfully and respectfully designed by B. Andrew Barta himself with the
player in mind.
Our goal is to provide you with flexible, versatile tools to cultivate, control, refine
and redefine your own individual sound. Tech 21 takes great pride in delivering
consistent professional quality sound, studio to studio, club to club, arena to
arena.
POWER ENGINE SERIES, AN OVERVIEW
The Power Engine Series concept began as a simple, all-purpose 1x12 open-back
powered cabinet. The goal, initially, was to provide pure, transparent sound to
amplify our own line of SansAmp Tube Amplifier Emulators after having to address
the most often asked question, “Which amplifier should I use with my SansAmp?”
During the engineering process, the Power Engine evolved into a stand-alone “preamp amplifier” that could be used with any direct recording device or preamp from
any manufacturer. The Power Engine was also designed to complement our
Trademark Series of traditional amplifiers for players whose volume requirements
vary from gig to gig.
The next most often asked question was for those with SansAmp rackmount models: “Which power amp should I use?” It became apparent we should build our
own instrument power amplifiers for large-venue capacity.
Both formats, 300-watt/4-Ohm mono or 400-watt/8-Ohm stereo, fit into a 2U rack
space. The oversized power supply with a toroidal transformer delivers pneumatic
punch with a natural transient response for tone that is uncolored and unaltered.
These costlier transformers are lighter in weight and reduce stray magnetic fields
that cause interference and hum.
Each model is touring tough and super-reliable. Top-quality Toshiba power transistors and a heat-sensor equipped cooling fan furnish non-stop, full RMS-watt power,
rather than pulse or peak power.
1
IMPORTANT SAFETY INSTRUCTIONS.
READ AND SAVE THESE INSTRUCTIONS.
HEED ALL WARNINGS.
This symbol, wherever it appears, alerts the user to the presence of uninsulated dangerous
voltage within the product’s enclosure that may be of sufficient magnitude to constitute a
risk of electric shock to persons.
This symbol, wherever it appears, alerts the user to important operating and maintenance
instructions in the accompanying literature. Read the manual.
This unit is powered by potentially hazardous voltage. Therefore, observe
the following safety precautions:
1. Read and follow all instructions before using product.
2. Do not use product near water (such as near a bathtub, washbowl, kitchen sink,
swimming pool, in a wet basement, etc.).
3. Unit should be located so that its location or position does not impede the flow of
air through the ventilation openings.
4. Product should be located away from heat sources such as radiators, heat registers,
or other products, including amplifiers, that produce heat.
5. Product should be connected to a power supply only of the type described in the
operating instructions or as marked on the product.
6. Protect the power cord from being walked on
or pinched particularly at plugs, convenience
receptacles, and the point where they exit from
the unit.
7. Do not allow objects or liquids to penetrate
the enclosure through openings.
8. During heavy use, chassis may get hot to the
touch. Handle with care.
9. Protect unit from strong impact.
10. Unplug product before cleaning. Never
spray liquid cleaners into the amp: wipe with a
clean, lint-free cloth to remove dirt and film.
11. Only use attachments/accessories specified by the manufacturer.
12. This product should be used only with a
cart or stand that is recommended by the manufacturer. When a cart is used, use caution when moving the cart/product combination to avoid injury from tipping over.
13. Amplifiers may be capable of producing high volume levels that could cause permanent hearing loss or damage, if the exposure to such levels is prolonged. Such damage is progressive and irreversible! If you experience any hearing loss or ringing in the
ears, consult an audiologist.
14. Unplug unit during lightning storms or when unused for long periods of time.
2
15. This unit must be earth grounded. To reduce the risk of electric shock,
NEVER remove or otherwise attempt to defeat the ground pin of the power
cord. If the provided plug does not fit into your outlet, consult an electrician
for replacement of the obsolete outlet.
WARNING: To avoid the risk of fire, electric shock or injury, do not expose this unit to
rain or moisture. Do not remove the chassis from its cabinet, or remove metal covering
from chassis parts. Removing the chassis from its cabinet exposes extremely dangerous
high voltages. There are no user-serviceable parts inside. Hazardous voltages are present inside the chassis. Refer all servicing to qualified personnel.
CAUTION: Never modify the power cord. If original power cord becomes damaged,
frayed, or has exposed wires, replace immediately with same rating and gauge, or higher. Replacements are commercially available or you can contact Tech 21 directly.
WARNING: Attempting to repair this unit is not recommended and may void its
warranty. NOTE: In the U.S. and Canada, servicing is performed at factory only. In other
countries, please refer repairs to the local Tech 21 authorized distributor.
FUSE
Fuse holder is located inside A/C cord receptacle. You must unplug and
4. Considering its weight, we recommend mounting unit on bottom of rack case.
5. If there isn’t enough clearance at the bottom of the rack case, detach the rubber
feet simply by removing the screws.
6. If there’s too much clearance (with or without rubber feet) and you have a gap, provide additional support to the rear of the unit (such as larger feet, wooden shims, etc.)
7. DO NOT BLOCK AIR VENTS. Allow a minimum of 4” of airspace at the rear.
STARTING UP
MAIN POWER
• Connect the AC power cord to the Power Engine and to main power
source. NOTE: The 3rd prong of the plug (ground) is an important safety feature. DO NOT attempt to defeat the ground by using an adapter or removal.
• You will need input wiring cables and output wiring cables (not included) to connect
to your preamp and speaker cabinet(s).
• Be sure all levels in the signal chain, including the Power Engine, are at minimum.
• Turn on the Power switch on the front of the unit, which will glow red.
• Turn up the level of your audio source approx. 3/4.
• Gradually turn up the Level control(s) on the Power Engine to approx. 3/4.
• Adjust the level of our audio source accordingly to normal amount.
FRONT PANEL
remove power cord to change fuse. Replace with similar type and same
value:
Power Engine 300:
Power Engine 400:
100V, 117V units: use F 6A L
100V, 117V units: use F 8A L
230V, 240V units: use F 3.15A L 230V, 240V units: use F 4A L
PRECAUTIONS
1. Improper wiring may result in serious operating difficulties.
2. Do not short the ground lead of a speaker output cable to the input signal ground.
This may form a ground loop and cause oscillations.
3. NEVER connect the output to a power supply, battery or power main or
electric shock may occur.
LEVEL(s)
Adjusts the overall volume. We recommend starting with Level(s) approx. 3/4 up and
then adjusting to desired amount.
SIGNAL LED
4. Tampering with or performing unauthorized circuitry changes may be hazardous and
void warranty.
5. Do not operate if the Clip LED is constantly flashing.
6. Never operate the amplifier with less than the minimum load impedance or premature clipping and speaker damage may result.
INSTALLATION & MOUNTING
1. During installation, be sure the unit is not connected to a power source, the power
switch is in the “off” position, and Level control(s) is/are at minimum (7 o’clock).
2. If rackmounting, you will need a standard 19” rack case (not included).
3. Rackmounting holes are ISO standard spacing. Four 10-32x.5” philip machine
screws are typically used to secure the amplifier.
3
Green status indicator for presence of an input signal. It will flash when the signal
passes to your speakers.
CLIP LED
Red status indicator for presence of input clipping distortion. It will flash when at maximum output. Lower bass frequencies may cause occasional flashing, for which there is
no need for concern. Higher frequencies causing consistent flashing, indicates there is
excessive distortion, which could result in damage to high frequency drivers, but not
the amp itself. NOTE: If the Clip light(s) remain on when there is no signal, it may
indicate there’s a problem. Contact Tech 21 for technical assistance to determine how
to proceed.
4
POWER SWITCH with built-in status indicator
Turns on the Power Engine when right side is pushed in and will glow red when
engaged. Be sure power amp connections are secure and check the AC power source
prior to engaging the Power Switch.
BACK PANEL
POWER ENGINE SPECIFICATIONS
Note: With on-going product development and improvements, specifications and/or
the cosmetic appearance of this unit may change without prior notice.
1/4” INPUT*
Receives unbalanced input signals.
Model Number:
XLR Input Impedance:
PW300
> 3.3KOhm
PW400
> 3.3KOhm
1/4” Input Impedance:
> 10KOhm
> 10KOhm
Nominal Input Level:
-10dBm
-10dBm
*NOTE: If you have the choice, we recommend utilizing the XLR input of the Power
Optimal Output Load:
4 Ohms
8 Ohms per side
Engine. Additionally, do not use both inputs at the same time.
RMS Continuous Power Output: 300W RMS @ 4Ω min load
XLR INPUT*
3-pin female XLR balanced input for professional applications. Reduces hum and allows
use of longer cables without signal degradation.
GROUND LIFT
Disconnects (isolates) the ground circuits between the XLR Output of the Power Engine
and the mixer to eliminate hum caused by ground loops. We recommend starting with
the ground lifted. If necessary, connect the ground by pushing the button in.
XLR OUTPUT
3-pin female XLR balanced output for professional applications to connect to a studio
mixer or P.A. Reduces hum and allows use of longer cables without signal degradation.
It is directly connected to the Input but unaffected by the Level control(s). If you require
more wattage for large venues, our XLR Output allows you to endlessly chain Power
Engines together.
PARALLEL SPEAKER OUTPUTS
1/4” speaker jacks. NOTE: Turn off Power Engine before connecting your speakers.
For Power Engine 300: Do not use speakers rated at less than 4 Ohms, as it could
cause undesirable distortion or potentially overheat the Power Engine. Speakers rated
at a higher value will result in loss of power.
For Power Engine 400: Do not use speakers rated at less than 8 Ohms, as it could
cause undesirable distortion or potentially overheat the Power Engine. Speakers rated
at a higher value will result in loss of power. NOTE: You cannot run the Power Engine
400 in bridge/mono mode. If you require less wattage for smaller venues, you can
choose to use only one side.
5
XLR Output Level:
200W RMS @ 8Ω
150W RMS @ 16Ω
200W RMS @ 8Ω min/side
150W RMS @ 16Ω
same as input
same as input
AC Input Power (factory set):
100V, 117V, 230V, 240V
Cycles:
50/60 Hz
NOTE: Each unit constructed for specific voltages. AC power cannot be switched.
Unit Dimensions:
Overall (with ears, feet and handles):
Weight:
17”w x 3.5”h x 10”d
19”w x 3.8125”h x 11.5”d
Power Engine 300: 22.3 lbs.
Power Engine 400: 26.25 lbs.
Optional Speaker Cabinets:
•4x12TM 4x12, 320-watt, 8-Ohm closed-back cabinet with special design
Celestion® speakers, available with black grill and silver piping or wheat grill
and white piping. Either style is available in slant or straight front formats.
•B410 4x10, 400-watt, 8-Ohm rear-vented bass cabinet with cast-frame,
custom-designed speakers; chrome-plated steel grill.
•B115 1x15, 300-watt, 8-Ohm bass cabinet with custom-designed
Eminence® Neodymium speaker; chrome plated steel grill.
Replacement parts (i.e., knobs, logo plate, handles, ears, hardware, etc.) are available through your authorized dealer, distributor or directly from Tech 21.
6