Transcript
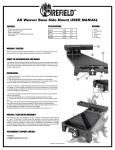
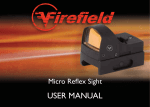
Red/Green Reflex Sight USER MANUAL
FEATURES:
INCLUDED ACCESSORIES:
•
•
•
•
•
•
•
• Adjustment tools
• Rubber lens cover
• Battery
Precision accuracy
Perfect for rapid fire or moving target shooting
Multi-reticle (4 patterns)*
Red or green reticle option
Unlimited eye relief
Quick target acquisition
Adjustable reticle brightness
SPECIFICATIONS:
Power
DIAGRAM:
(x)
Objective aperture
1
(mm)
33x24
Field of view (m @ 100m)
635
1 click
(MOA)
Length
(in)
4.5
1
Weight
(oz)
3.2
BATTERY ASSEMBLY:
1.
2.
3.
4.
5.
Brightness control
Reticle selection
Windage
Elevation
Battery compartment
1
The Firefield Red/Green Reflex Sight uses one 3V Lithium battery (CR2032 or equivalent).
Should the reticle grow dim or not illuminate, the battery needs to be replaced. To install
a new battery, unscrew the battery cover and insert the battery with the + side up and
replace the cover.
5
4
MOUNTING:
Check to make sure that all included items are present. This sight includes an integrated
rail that fits standard Weaver and dovetailed bases, which are suitable for most applications. Due to the unlimited eye relief of the sight, allow at least three inches of clearance
between the end of the LED, mirror housing and your eye when shooting. To mount,
loosen the clamp by unscrewing the two large bolts located on the right side of the unit.
Place the unit on the rail with the objective facing toward the muzzle; adjust as needed.
Make sure the sight is sitting flat on top of the rail, and that one of the clamping bolts is
located in a recoil groove. When the sight is in place, re-tighten the clamp.
2
3
ZERO ADJUSTMENT:
1. Select the desired reticle by turning the reticle selector knob and set the intensity to a
level that is most comfortable for you.
2. With the sight securely mounted, rest the gun on a solid support and aim at a target 50 to 100 yards (or meters) away. All test shots should be made under the same
conditions to achieve maximum accuracy – this includes using the same rest and same
cartridge type.
3. Fire a test group to see where the gun is shooting.
4. Adjust the reticle accordingly by changing the elevation & windage adjustments until
the reticle is zeroed on the point of impact of the bullet. (Note - each click adjustment
moves the point of impact by 1 MOA; approximately 1” at 100 yds, ½” at 50 yds). Adjust
the elevation first, then tighten the locking screw using the small allen wrench that is
included. Then adjust the windage.
WARNING / CAUTION:
1. Always unload your rifle or handgun before mounting.
2. When zeroing the sight follow all standard firearm safety precautions.
3. Avoid hitting or dropping the unit, as this may cause damage.
FIREFIELD 1 YEAR LIMITED WARRANTY
This Firefield product is warranted to be free of defects in materials and workmanship
for 1 year. In the event of a defect under this warranty, we will, at our option, repair or
replace the product. This warranty does not cover damages caused by misuse or improper
handling. Also, this warranty is null and void if modification or maintenance is provided
by someone other than Firefield. This warranty is non-transferable and is only valid if the
product is registered within 30 days after the product has been purchased.
FOR WARRANTY SUPPORT, CONTACT:
Firefield
[email protected]
Firefield. All rights reserved.
* 3 MOA dot, crosshair, 10 MOA dot crosshair
and 65 MOA circle with 3 MOA dot