Transcript
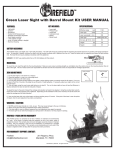
5mW Green Laser Sight w/ External Adjustments Kit
USER MANUAL
FEATURES:
KIT INCLUDES:
•
•
•
•
•
•
•
•
•
•
•
•
•
•
•
•
Lightweight
Compact
Shockproof
Tactical On/Off pressure pad
External windage/elevation adjustments
Quick target acquisition
1 mile visibility at night
Up to 100 yards visibility in daylight
Durable aluminum housing
SPECIFICATIONS:
Laser sight
Pressure pad
On/Off cap
Calibration tools
Battery
Weaver mount
Barrel mount
BATTERY ASSEMBLY:
Effective range
Power
(yd)
(mW)
Laser wavelength (mn)
Laser type
1,760
<5
532
visible green dot
Dot size, @ 100m (mm)
50
Length
(in)
4.8
Weight
(oz)
7.7
The Firefield 5mW Green Laser Sight w/ External Adjustments uses 1 CR-123A (3V) battery. The CR-123A should be positioned with the negative pole towards the front and
positive pole facing towards the back. To assemble or replace, unscrew the sight’s end cap counter-clockwise until it detaches from the unit. Insert the battery with the negative
pole toward the light emitting end. Re-install the end cap by rotating it clockwise until firmly tightened.
DANGER: DO NOT use anything other than a CR-123A battery with this product.
MOUNTING:
To mount the unit, insert the sight into the mounting bracket. Make sure the elevation knob is pointing straight up, and tighten down the center screw on the mounting bracket;
this will secure the sight. The two larger screws located on either side of the center screw secure the mount to your weapon’s rail.
point of impact
ZERO ADJUSTMENT:
1. Fix the laser sight to a rail system on a weapon.
2. Place the weapon in a vise or on a shooting bench.
3. Place a target about 25 meters away.
4. The next step assumes that the weapon’s iron sights or other sighting system is correctly zeroed for 25 meters. If not, turn
the laser off and fire 5 rounds at the target to see the point of impact grouping. If necessary, adjust your sights to the correct
point of impact.
5. Take aim again using the exact same sight picture as in step #4. Turn on the laser sight and you will see the difference in
distance between the laser dot and the real point of impact.
To adjust the laser to the point of impact, the windage and elevation will need to be adjusted. The elevation knob is located on
top of the unit, and the windage knob is on the side. To adjust, remove the caps and turn each of the knobs either clockwise,
or counterclockwise, until the laser is in position.
6. Now use the laser sight, aim at the target, and shoot another group of 5 rounds. If the point of the laser is near the points
of impact, then the zero adjustment has been accomplished.
WARNING / CAUTION:
1.
2.
3.
4.
5.
Make sure your weapon is unloaded and safe to handle before mounting the sight.
NEVER point the laser directly at, or into, an eye. This may cause damage to the eye, or blindness.
When zeroing the laser follow all standard firearm safety precautions.
If the laser sight is used on different weapons then zero adjustment may again be required.
The laser sight has an anti-shock design but a serious blow to the laser or rail may require re-zeroing.
FIREFIELD 1 YEAR LIMITED WARRANTY
This Firefield product is warranted to be free of defects in materials and workmanship
for 1 year. In the event of a defect under this warranty, we will, at our option, repair or
replace the product. This warranty does not cover damages caused by misuse or improper
handling. Also, this warranty is null and void if modification or maintenance is provided
by someone other than Firefield. This warranty is non-transferable and is only valid if the
product is registered within 30 days after the product has been purchased.
FOR WARRANTY SUPPORT, CONTACT:
Firefield
[email protected]
Distributed by Firefield. All rights reserved.
point of impact
point of laser
point of laser