1
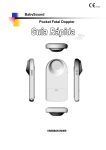
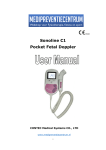
USER MANUAL
V. E. 4.0
2010-09
Copyright © Sunray
MEDIKRAMER
Table of Contents
About the User’s Manual
1
Classification of Fetal Heart Rate Doppler
1
I. Safe Sign
1
II. Precautions
1
III. Function
2
IV. Application
2
V. Main Technical Index
2
VI. Structural Composition
3
VII. Button Description
4
VIII. LCD Display Description
4
IX. Function Description
6
X. Operation Instruction
6
XI. Troubleshooting
10
XII. Instruction of changing the batteries
10
XIII. Requirement of Gel
10
About the User’s Manual
This manual is only for reference in the instrument operation. Manufacturer will
not be responsible for any result caused by using this manual for other purpose.
All the information in this manual are copyright protected, and no part of this
User’s Manual can be copied, duplicated, or translated into other languages
without the company’s written permission. All the information in the manual is
subject to change without prior notice.
Classification of Fetal Heart Rate Doppler
The product is mainly used to detect the fetal heart rate (FHR) and the sound of
the fetal heartbeat (SFH). The growth and development of a fetus can be found
out through examination of these indices.
In accordance with classification standard in Appendix IX on “Medical Device
Directive 93/42/EEC”, the product is consistent with the classification principle 10
i.e. “Devices for Direct Diagnosis or Detection on Physiological Process”, hence
the product should belong to Class IIa.
I. Safe Sign
This sign lies on the nameplate of the host machine, indicating the instrument
is classified as the Class-B equipment with a certain level of protection against the
hazard of electric shock.
WATERPROOF . This sign lies on the FHR probe
(Ultrasonic Doppler), indicating the waterproof grade of the probe is IP68
This sign lies on the nameplate of the host machine, indicating the
instrument has obtained the CE Certificate.
This sign lies on the nameplate of the host machine, indicating the User’s
Manual should be thoroughly read before operation.
II. Precautions
1. The instrument should not be collided to avoid damage.
Do not open the instrument since there are delicate circuits inside.
2. The instrument surface may be cleaned with corrosion-free detergent.
Never make high temperature disinfection, and no corrosive detergent is allowed
for cleaning. The probe can be disinfected by wiping with a little alcohol.
3. After every detecting, clean probes with a piece of dry cloth or tissue. Keep all
parts of the monitor externally clean by washing them with cloth dipped with
cleaning liquid regularly. Be sure not to get any liquid into the casing and
remember to wipe it off after cleaning.
4. Alkaline battery of high efficiency is the only kind of batteries that could be used
in the instrument. Other batteries may leak, causing severe damage to the
instrument.
5. When battery voltage is low (low voltage hint appears: the battery sign is empty
and flickering), the battery voltage is not enough and batteries should be renewed
in time.
6. Batteries should be taken out when the instrument is not in use for a long time.
Useless batteries should be disposed properly and safely according to
Environmental Requirement.
7. The instrument should be protected from water and moisture.
III. Function
The instrument is used to detect FHR and SFH.
IV. Application
The instrument is to detect FHR and SFH.
V. Main Technical Index
1. Ultrasonic emitting frequency: 2.5MHz.
Ultrasonic emitting power <10mW/cm2.
Average FHR test range: 50~210BPM
Manual FHR test range: 30~240BPM
Transient FHR range: 50~240BPM
2. Operating voltage:
Standard: 4.5V (1.5V*3, AA Size)
Optional: 3.6V (1.2V*3, Rechargeable batteries)
3. Continuous operation time: 8~20 hours (The maxim continuous operation time
varies according to the volume in operation and the performance of the
batteries).
4. Operation environment:
Environment temperature: +5ºC~+40ºC
Relative humidity ≤80%
Atmosphere pressure: 86kPa~106kPa.
5. Storage environment:
Environment temperature: -10ºC~+40ºC
Relative humidity ≤80%
Atmosphere pressure: 50kPa~106kPa.
6. The EUT complied with the requirements of IEC 60601-1-2.
VI. Structural Composition
Probe
LCD Display
MENU
-
+
POWER
Host
Earphone socket
Probe socket
Probe
Back clip
Probe clip
Battery cover
Cover
Attention: Do not release the plug if not necessary. You can release the plug only
when the instrument is power off. Make sure the probe mark “▲”is upwards when
you release it. Do not swing it when releasing in case of destroying the socket.
VII. Button Description
There are 2 operation modes:
FHR Display Mode & Function Selection Mode.
1. FHR Display Mode is for FHR Detecting;
2. Function Selection Mode is for setting a specific function.
The two operation modes can be selected by MENU key.
Please refer to the Operation Instruction for the details.
POWER Power key. It is for controlling the instrument.
MENU Function selection. The function key is for selecting a proper function.
+ Volume Up/Confirm key. In FHR Display Mode it is volume up key; in
Function Selection it is confirm key. It needs to be confirmed after every time
selecting a specific function.
- Volume Down/Cancel key: In FHR Display Mode it is volume down key; in
Function Selection Mode it is cancel key.
Note: There will be a click sound every time with pressing a key, as a confirming
response to the pressing. If there is no click sound heard, the former pressing is
invalid. A second harder pressing or a pressing for a longer time is required.
VIII. LCD Display Description
Volume Indication Bar
Status
Indicator
FHR Display
Alarming
Battery Type
Battery Voltage
Indicator
Auto Average
FHR Detection
Manual FHR
Detection
Note: The interface varies according to different setting of the operation
1. The following two signs or displaying are auto-set or displayed, can not be set
by the user.
FHR Display: Displays the detected FHR.
Battery Voltage Indicator: The quantity of black bars indicates the battery
voltage. The sign
shows if the voltage is low. So the batteries should be
changed. What’s more, if the voltage is too low the protection process will be
started with battery sign continuous flickering besides the sign
. The
instrument will stop collecting fetal heart beat signal, and cut off the power two
minutes later automatically. It indicates that the batteries are out of power, and the
batteries must be renewed at once.
2. Two operation modes: FHR Display Mode & Function Selection Mode. Please
refer to the Operation Instruction for the details.
Status Indicator: It just appears when FHR display mode is selected,
otherwise in function selection mode.
3. Volume Indication: It should be set manually with the key of “+” or “-”
Volume Indication Bar: The quantity and height of black bars indicate the
volume in six levels. It can be set manually by the key: “+”and “-”
This mark indicates current FH signal intensity in real time under detecting state.
4. The following four signs or functions must be set in function selection mode,
please refer to the Operation Instruction.
Manual FHR detection: It flashes when manual FHR mode is selected.
A
Auto average FHR detection: It appears when auto average FHR mode is
chosen, otherwise, transient FHR mode is selected.
Alarming: It displays when audio alarming function is selected.
Battery type: It should be set by the users. It appears when the rechargeable
batteries are used. The sign should be chosen not to appear when normal
batteries are used. Batteries type should be checked before use, otherwise the
battery voltage indicator would not show the proper voltage.
IX. Function Description
A. Modes of FHR display
a. Transient FHR: When in transient FHR detecting, the instrument detects
transient FHR and displays according to the fetal heart beat detected by the
probe.
b. Average FHR: When FHR display mode is selected the sign of “A” appears.
The detected fetal heart beat signal will be detected once every five seconds for
the average FHR and the value of FHR will be displayed.
c. Manual FHR: When the manual FHR detection is selected in the function
selection mode (
flickers) the instrument will be in the timing mode. Operator
can count according to the sound of fetal heart beat from the speaker. Press the
confirm key when fetal heart beat reaches 15, and the clock sign stops flickering
and stays still. The average FHR value will be displayed in the counting period.
B. Battery type
Batteries used in the instrument are normal alkaline AA batteries when no battery
type sign will show, otherwise the rechargeable batteries are in use.
C. Alarming
is shown. Instrument will sing a soft
The instrument is in alarming mode when
music when FHR is not in the range of 120 to 160BPM.
X. Operation Instruction
1. Function Selection Instruction
A. Operation Instruction
a. Enter function selection mode. Press “MENU” when FHR shows,
entering to the function select state, at this time there is no FHR displays, but with
corresponding function mark simultaneously. If the instrument is in FHR display,
will disappear, and the instrument will enter the
press “MENU” key, so that
function selection mode. Press “+” to confirm the mode selection.
b. Related signs and functions controlled by MENU key
Press the “MENU” key, the signs
A,
,
,
will show one by one, and
their functions are respectively:
: Manual FHR. Press MENU the first time,
appears and press“+” to
confirm this selection. Otherwise press “-” to cancel this selection.
A: Average FHR. Press MENU the second time,
disappears and
A
appears, then press “+” to confirm this selection. Otherwise press “-” to cancel
this selection.
: Alarming. Press MENU the third time,
A
disappears and
appears,
then press “+” to confirm this selection. Otherwise press “-” to cancel this
selection.
: Battery type. Press the MENU the forth time,
disappears and
appears, then press “+” to confirm this selection. Otherwise press “-” to cancel
this selection.
After the showing of
A,
,
to FHR display mode when
,
one by one, press “MENU” key can return
shows (not confirmed).
c. Confirmation and cancellation of a selection
After a function is selected make sure to press the “+” key to confirm the
selection, otherwise, press “-“to cancel the selection. After every confirmation or
cancellation, the instrument will exit function selection mode and get back to the
FHR display mode. And after 5 seconds without any operation it will get back to
FHR display mode.
d. The setting of volume and function selection status will be stored
automatically after confirmation. The instrument will stay the former status when
power on next time.
B. For Example
If alarming is required (or not):
Step1. In FHR display mode, press MENU key continuously three times, and
will show.
Step2. Press “+” (or “-”) to confirm (or cancel) the selection.
2. Backlight Control
The instrument’s backlight design adopts power saving mode, it will turn off
automatically when there is no button operation or FHR signal. Any button
operation or FHR signal will light the backlight automatically without manual.
3.Auto-gain Control
The instrument has intelligent auto-gain control function, it will stay mute when
there is no FHR signal input, and with low noise; When the instrument detects
FHR signal input, it will automatically switch auto-gain to the maximum to seek for
FHR signals, then the noise will increase. When detects stable FHR signal, it will
switch auto-gain to the optimal proportion. This function enables users easily to
obtain best FHR signals. Herewith it is normal for the increased noise during use.
The noise will get weak apparently when detects FHR signals.
4. FHR Detection
A. Auto FHR
a. Power-on
When the detect is not in use, it will be power-on if the POWER key is pressed for
2 seconds; when in use, it will be power-off when the POWER key is pressed for
2 seconds.
Press the POWER key to set up the instrument.
It starts self-check process till “---” shows.Then the instrument will be in operation.
When the instrument is in operation:
If
A shows, average FHR is detected; otherwise, transient FHR is detected.
b. FHR detection
Apply jelly on the proper part of the pregnant’s abdomen, push the probe on it
gently, making sure of close touching between the probe and the abdomen. SFH
will be heard at the appropriate part. After the sound becomes clear and stays
stable for a few seconds, proper value of FHR will show on the FHR display area.
Note: abnormal value may appear during the searching of fetal heart beat.
However, proper value can be obtained after clear and stable sound of fetal heart
beat is heard.
c. Volume adjustment
When in FHR display status, “+” and “-” keys are used to adjust volume up and
down respectively (the result of the adjustment will show in the volume indication
bar.). At the lowest and loudest level the following operation is invalid with no click
sound.
d. Manual Power-off
Press the POWER key for 2 seconds when it is in use, then the instrument will be
power off.
e. Auto Power-off
The instrument can be power off automatically when no fetal heart beat signal is
detected for 2 minutes.
B. Manual FHR
a. Power-on & fetal heart beat searching
Please refer to step a & b in Auto FHR.
Accordingly, volume adjustment and manual power off or auto power off are
similar to that in Auto FHR detection.
b. Enter the manual FHR detection
First of all, make sure the instrument is in function selection mode.
When in FHR display mode, press MENU once, and
confirm the selection, and
entered manual FHR detection.
will show. Press “+” to
will keep flickering. Then the instrument has
c. Operation Instruction of manual FHR detection
During the flickering of
, count the sound of the fetal heart beat from the
speaker till it reaches 15. Then press “+”,
will stop flickering and stay
displayed. The average FHR in this period will be displayed.
d. The following status of displaying the manual FHR value
After displaying the value of manual FHR or the “ERR” sign has shown for 6
seconds, the instrument will get back to Transient FHR or Average FHR.
e. Special key response in the manual FHR detection
During the counting in manual FHR detection, the instrument has no response to
“-” or MENU key, and “+” can confirm the ending of the counting, then the
detected FHR value will be shown.
During the display of manual FHR detection, the instrument has no response to
“+”, “-”, MENU. 6 seconds after the display, it will exit the manual FHR detection
automatically and enter Transient FHR or Average FHR detection.
f. If the manual FHR detection is required one more time, please repeat
the above steps.
XI. Troubleshooting
1. The instrument can not be properly power on or power off. Possible cause:
a. The batteries may be installed improperly (No sound is heard after
pressing the POWER key.).
b. The POWER key is not properly pressed. (There is a click sound after
pressing the POWER key, but it is not power on.)
Solution:
a. Install the batteries according to the instruction.
b. Press the POWER key harder and for a longer time, more than 2
seconds.
2. No FHR is heard. Possible cause:
a. Wrong probe position;
b. Coupling jelly is not coated to interfere ultrasonic echo.
Solution: Coat a suitable amount of coupling jelly and find out correct fetal heart
position.
3. Weak FHR or no FHR is shown.
Possible cause: Too weak signal to detect.
Solution: Coat a suitable amount of coupling jelly and find out correct fetal heart
position, or use manual FHR measurement.
4. Battery low voltage is shown in a very short time.Possible cause:
a. Battery type is not conformed to the instrument type selection;
b. Alkaline battery with low energy is used.
Solution: Adjust battery type to match the used battery, or use alkaline battery with
high energy.
XII. Instruction of changing the batteries
The batteries should be renewed according to the following steps:
Open the battery cabin: press the oval opening button (as shown in the picture),
then push the cover as the arrow on the cabin cover indicates. When the cover
reaches the position as shown in the picture, the battery cabin can be opened
smoothly.
Battery changing: Take out the used batteries, and install the new ones following
the installation sign in the battery cabin.
Close the battery cabin: put the cabin cover at the right place as shown in the
picture. Push the cover in the opposite direction as the arrow on the cabin cover
indicates. Then the cabin can be closed smoothly.
XIII. Requirement of Gel
Density = 1.0 g/cm3
Rapidity≤1.7m/s
Impedance ≤1.7 (105g/cm2.s)
Attenuation ≤0.02 dB/mm
MEDIKRAMER