1
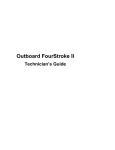
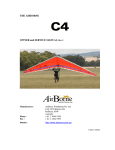
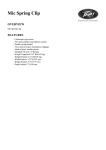
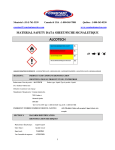
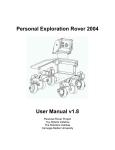
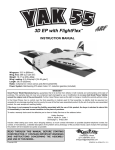
New Membership Manual
June 2011
www.RCSMP.com
RCSMP New Membership Manual.
Written by Joseph C. Elliott. Concept by Joseph A. Lupo
Updated by Thomas Mascialino June 2011
Acknowledgments
“No one can exist all alone.1” This is true in what ever we do and this project is no exception. First I
want to thank Joe Lupo for his unusual way of getting me to write this manual (I still can’t figure out
why he didn’t just ask me?), for his patience and support. The writing of this manual took longer than
expected due to the fact that I had a considerable amount of demand on my time and Joe has been very
patient. Also I want to thank him for the art work on the cover. Next I want to thank the other members
of the Executive Board of the Radio Control Society of Marine Park –
Ralph D’Ambra, George Ingram, J.J. Rodriguez, Neil Mancuso, and John Rosiello - for their support.
Last, but not least I want to thank Ugo Rosiello for going over this manual with a fine tooth comb and
pointing things out that I would have never found on my own.
1
From “Turn the Page” by Rush. Lyrics by Neil Peart
2
Contents
1.
Welcome
2.
Becoming a Member of the RCSMP.
3.
Meetings
4.
Our Flying Field
5.
New Member, Experienced Flyer
6.
Instructors, Qualifiers, and Experienced Qualified Flyers
7.
Buying and Building your First Airplane
8.
Your first day at the Flying Field
9.
Qualifying
10.
Who’s Who
3
Welcome
Welcome to the Radio Control Society of Marine Park (RCSMP)! The members of this club hope that
you will enjoy radio control model aviation as much as we do. We feel that you have come to the right
place to learn about and enjoy this wonderful hobby. You probably have a lot of questions. This
manual should answer most of the questions you may have. If you have a question and cannot find the
answer here, don’t be afraid to ask the other members of the club for help. That is one of the main
things we stress in this club: when in doubt, ask someone. We all share our experiences with each
other and we will share them with you, after all that is what being in a club is all about.
We want you to become an active part of our club and we have done a lot of work to see that you are
properly informed. This manual is only a part of our new membership kit.
•
A copy of the RSCMP New Member Manual
•
A copy of the RSCMP Field Rules
•
A copy of the RSCMP By-Laws
•
A current RCSMP Membership Roster
•
A cardholder for your AMA & RCSMP membership cards
•
A RSCMP Baseball Hat
This kit has everything you need to get started in our club (except a model airplane for you to fly – you
have to provide that). We may have a Trainer Plane available for you to learn with. Please inquire
with one of the Flight Instructors. Whether you are new to the hobby or an experienced flyer new to
the club, this membership kit will give you all of the necessary information about this hobby and the
club. No matter how much experience you have flying radio controlled model airplanes.
Please read this manual thoroughly. It has been set up for easy reference, but you should read it from
cover to cover first to get yourself acquainted with the material. After you have read the manual, you
will find it much easier to go through later. If you are an experienced flyer coming to us from another
club, please read the section called “New Member, Experienced Flyer” first. Then proceed to read the
rest of the booklet.
This booklet has been designed for the novice in mind. In here, you will find helpful hints and tops for
getting your first model airplane into the air in a safe and timely fashion. Take your time reading it.
There is a lot of information here for you to use.
Happy Flying !!
4
What You Have to do to Become an RCSMP Member
Anybody who is interested in radio control model aviation is more than welcome to become a member
of our club. Though there are no secret rites or rituals, however, there are a few things you much do
when you come to join our club:
•
You must have a current Membership Card from the Academy of Model Aeronautics (AMA)
•
You have to pay a one-time initiation fee of $50.00. This money goes directly to the upkeep of
the flying field.
•
Annual Dues must be paid when you join the club. Annual Dues are $60.00.
•
You must completely fill out your membership application and please make sure that the
information is correct. If you have a post office box, please put both your home address and
the post office box address. All correspondence will be sent to your post office box. Also,
please make sure to put your home phone number, cell number and email address on the
application. Just in case someone from the club has to get in touch with you.
We want to make the time you spend with our club as pleasurable as possible. However, these are
formalities that must be addressed. The sooner that they are taken care of, the sooner you can
concentrate on your flying.
Meetings
Our club has a general membership meeting every month.
Location:
The Flatlands Reformed Church; 3931 Kings Highway; Brooklyn, NY 11234
When:
Fourth Thursday of every month
*** Meeting dates are subject to change due to holidays, etc.
The monthly meeting dates are posted on the website www.RCSMP.com and announced in our
monthly email newsletter “Plane Talk”. So, make sure to check the newsletter for the correct date and
time.
5
Our Flying Field
Our flying field is located in the Gerritsen Beach section of Brooklyn, New York in a public park
known as Marine Park. The entrance to the flying field is located on Gerritsen Avenue between Seba
Avenue and Lois Avenue (see Map I), the entrance to the field has a gate. On the gate,"RCSMP
FLYING FIELD" is stenciled on in yellow paint. The best way to get there is by driving. Feel free to
call or email any member of the Executive Board of the club for directions to the field if you’re not
sure where it is or how to get there.
6
New Member, Experienced Flyer
Occasionally modelers leave a club for one reason or another, or in some cases join multiple clubs. If
you have been flying model airplanes for some time and you are a qualified flyer at another club, you
must re-qualify at our field. Often people have come to us and say that they have been flying for a
number of years and already proven themselves at another club. Please understand that we are not
doing this to intimidate anybody. Our field is located very close to a residential area. There is a little
league baseball field and a playground. Our airspace and landing patterns are very tight and well
defined. We have to know if you are capable of handling your airplane in the conditions set by our
field location. After all, we do not want to see anybody get hurt and safety must come first in our
hobby. That is why we ask you to please be patient and we’ll try to get you through the qualifying
procedures as quickly as possible.
Qualifying at our field is fairly straight forward. Our field has two runways that intersect. You must
take off and land on each runway in the two directions that it faces -- north to south, south to north,
east to west, west to east --for a total of four times (see Figure 1). Then you must do one dead stick
landing, with the engine off and then you will be allowed to fly on your own as a fully qualified flier.
This may sound like a lot to do, but it really isn’t. Everybody who is a qualified flier at our club has
had to go through this procedure to become a qualified pilot. So, we’re not doing this to be
inconsiderate to anybody, we’re doing it because we have to.
7
Instructors, Qualifiers, and Experienced Qualified Flyers
Instructors, Qualifiers, and Experienced Qualified flyers all have different responsibilities.
This section explains the responsibilities that each one has.
•
An instructor is a person who teaches a student flyer how to fly. Only instructors may take a
student’s new airplane up for its first (maiden) flight. An instructor cannot refuse any
student flight instruction. However, the student my have to wait their turn if there are
several students waiting to fly.
•
A Qualifier is a person who determines if a student pilot is either capable of flying on their
own or if the student requires further instruction.
•
An Experienced Qualified Flyer is a person who is not an instructor, however they may
help student pilots if an instructor is not available. An Experienced Qualified Flyer cannot
take a student’s airplane up for a first (maiden) flight. An Experienced Qualified Flyer has
the right to refuse instruction to a student.
A list of Instructors, Qualifiers, and Experienced Qualified Flyers can be found on the last page of this
manual.
8
Buying and Building your First Airplane
Ok, you’ve been looking around for a model airplane to fly, but you don’t know exactly what to buy.
You’ve been blind sided with terms like dihedral, anhedral, ABC, ARF, RTC, PCM, ASAP, XYZ,
BTO, ELO, ELP, and so on, and so on. You probably have a lot of questions: What is the best
equipment to buy? What’s a fair price? Where is a good place to buy this stuff? How do I know that
I’m not going to get ripped off? Should I buy new or used? Well, I’m going to try to answer these and
other common questions that all new modelers ask. So, get comfortable and we’ll get started with how
much it’s going to cost you’.2
The three major things you have to buy are the airplane kit, an engine, and a radio. They’re also are the
most confusing things to buy because there is such a wide range of products to select from and they
can each cost any where from under one hundred dollars to several hundred dollars. So, the first thing
you have to consider is your budget. A reasonable amount for you to set aside to get started in your
new hobby is about $600. This includes everything from the airplane kit to your club membership (the
chart below will give you a reasonable breakdown of how much to spend on each item). Do not buy
anything used! Buy all new equipment. This way you know that it’s going to work. If you do have a
problem with your equipment you can bring it back to the hobby shop or send it back to the
manufacturer for a refund, replacement, or to have it repaired with little or no additional cost to you. If
you do buy something used, you may buy someone else’s headache and you won’t have any options
other than having to pay extra to get it fixed or replaced. So, now we’ll look at what you should look
into buying and why. Most manufacturers now offer complete ARF plane with engine, radio for
approximately $300.
Items
ARF Airplane Kit
Engine
Radio
AMA Membership
Club Membership
Misc. Items *
TOTAL
Price
110.00
150.00
150.00
58.00
60.00
75.00
603.00
Fuel, glow plugs, glues, glow plug state, chicken stick, propellers, spinner, etc.
Most model airplanes are available as a kit that you can build right out of the box. There are three
general types of kits:
Almost-Ready-to-Fly (ARF) -- This is a model that is 75% to 90% pre-built. All you really have to do
is assemble the major pieces -- wing halves, stabilizers, and control surfaces -- then install your engine
and radio gear. This is a good plane to start off with. They can be constructed in a short amount of time
so you can start learning how to fly almost right away.
2
Any comments made by the author about products, services, and hobby shops listed throughout this manual are based
solely on the author’s personal experience. There have been no endorsements made by any hobby shop, corporation, or
individual on the behalf of their products or services. All comments are the author’s personal opinion.
9
Ready-to-Cover (RTC) -- this kit is based on the same idea as the ARF, however, you must put the
finish on the airplane. The big advantage of a RTC kit is that your building time is minimal and you
get to pick the color of your airplane. With an ARF kit you’re stuck with the color that is put on at the
factory. However, for the new flyer these airplane kits are not a good idea because most new flyers do
not know how to put the finish on a model airplane. Why waste your time trying to figure out how to
put the finish on an airplane when you could be out at the field flying!
Traditional -- This is basically a box of pre-cut wood that you have to put together. Almost all of the
really cool airplanes come in this form, however, they can be rather time consuming to build. These are
good to build after you have started to learn how to fly.
Your first airplane should be an Almost-Ready-to-Fly kit. The best kit to buy is the Hobbico
“Avistar.” The reason for this is that the kit is relatively inexpensive the average price is about
$110.00 -- and it’s simple to build. Moreover, the plane is made entirely out of wood. So if your plane
was to be moderately damaged (yes, they do break form time to time), it could be repaired fairly
quickly and easily. Also, the Avistar is a very good flying trainer airplane and it is the type of plane
that will take you from your first left and right turns to your first aerobatic maneuvers. Over all it is
probably the best “first plane” on the market today. Now what you need is something that it’ll get it in
to the air.
The saying “what you pay for is what you get” truly applies to model airplane engines. Though you
can buy a .40 size engine for as little as $50.00 they are not worth the money. Most of these engines
can be very problematic and you’ll spend more time in the pit area trying to get it to run than you will
in the air learning how to fly. A reasonable amount of money to spend on a model airplane engine is
about $150.00. Evolution, OS., and Supertiger have engines that are very reliable and have excellent
performance. They are also priced under $150.00. See the table on the next page for a breakdown on
the different engines that are available from these manufacturers.
Model Airplane Engines
Manufacturer
Evolution
Os.
Supertiger
Models available
40 NT, 46 NT, 46 NX and 52 NX
46 LA, 46 AX, 55 AX
GS40, GS45 or G51
There are two basic types of model airplane engines: two-stroke and four-stroke. The engines that are
listed above are all two- stroke engines. The two-stroke engine is very easy to setup and maintain. You
want to avoid as many problems as you can when you are learning how to fly and two-stroke engines
are the least problematic. Four-stroke engines are very good, once you get them running. Also, fourstrokes take longer to break-in and require more maintenance than a two-stroke. Don’t take this the
wrong way, four-stroke engines are great and they sound really cool. I own two four-stroke engines
and I love ‘em. However, they are not for the novice flyer. Remember what I have been saying all a
long: “You want to spend the time in the air not in the pit area.” With a four-stroke, you’ll spend a lot
of time in the pit area. As your piloting skills improve, you can move on to other types of airplanes
and try out four-stroke engines.
10
Now the next thing you have to get is a radio. This is where things can get really confusing. There are
five major radio manufacturers in the United States: Airtronics, Futaba, Hitech, JR and Spektrum. All
of these manufacturers have quality products and your radio selection is actually based on three things:
what brands are available at the local hobby shop, how many channels you’ll need, and its bandwidth.
Radios for model airplanes are available in three bandwidths: FM, PCM, and 2.4GHz.
•
FM = Frequency Modulation
•
PCM = Pulse Code Modulation
•
2.4GHz or Spread Spectrum
The only bandwidth you shouldn’t buy is AM. AM radios are for ground or surface-use only such as
cars or boats.
Buying either a FM, PCM radio is fine. FM, PCM radios are basically the same except that PCM
radios send out a digitized signal. I’m not an expert on radio theory and I don’t know exactly how it
works.
The newest bandwidth is 2.4GHz or Spread Spectrum. What makes Spektrum Technology superior to
currently used systems is a combination of two factors: the utilization of frequencies in the higher
2.4GHz Industrial, Scientific & Medical (ISM) radio band, and Spektrum’s patented Direct Sequence
DSM (Digital Spectrum Modulation) technology.
Using a frequency in the 2.4GHz range places the broadcast signal beyond the range of pesky modelgenerated noise from motors, speed controls, ignitions and metal to metal noise (which typically occurs
under 300MHz)
When you go to buy your radio, you will want to buy a radio that has a minimum of four channels, a
four channel radio will cost you about $150.00. The radio comes with the transmitter, receiver, and
servos. You will need (4) four servos to operate most trainer plans.
There are several miscellaneous items that you are going to have to get. Due to the limited amount of
space that I have I cannot explain everything in as much detail as I would like too (I would have a
novel and not a booklet!). I’m just going to list what you need and you’re going to have to take my
word for it. Here it is
Two part 20 minute epoxy, A 16 oz. bottle of rubbing alcohol, two inch wide fiberglass tape, Top
Flight six inch wide self adhesive trim sheet, thick Cyanoacrylate glue, thin Cyanoacrylate glue, about
three to six 10x6 plastic propellers, one gallon of 10% Nitro Glow fuel, at lest two glow plugs, glow
plug starter with charger, a hobby knife, number 11 hobby blades, a chicken stick, and (4) standard
servo -- if you did not get four servos with the radio that you bought.
Over all, the total amount that you should spend on all of these items should be any where from $75.00
to $100.00. Items that you are going to buy more than one of-- propellers and glow plugs -- you could
only buy one, but it is nice to have a few spares just in case one of them breaks or burns out.
11
Right now you’re probably asking yourself ”where can I buy these fine items?” There are several
hobby shops through out New York City. Most of the members of our club only deal with two places.
They are;
•
Bruckner Hobbies II, 2908 Bruckner Blvd., Bronx NY. 10465 (718) 863-3434
•
Brownies’s Hobbies, 124 Bennett Street, Staten Island, N. Y. 10302 (718) 727-2194
•
Big Apple (formerly Fantasia); 171-69 46th Ave, Flushing, NY 11358. 718-961-9611
There are other hobby shops and websites that you can deal with such as TowerHobbies.com and
AdvantageHobbies.com. I have done business with all of the hobby shops mentioned and they are all
very good.
That’s it! This is everything that you are going to need to get started in radio control model aviation:
the airplane, the radio, the engine, and all the little stuff needed to make it fly. Now, the next thing you
have to do is put everything together.
If you have bought the airplane that I recommended -- the Hobbico Avistar -- you should have no
problem constructing it on your own. The instruction manual is very well written and it has many
illustrations that will help you get the job done. However, there are a few things that are not covered in
the instruction manual that can really save you some grief: sealing the fuel tank area, re-enforcing the
wing’s center section with fiberglass, and securing the control surface’s hinges. I know that this may
sound like a lot of extra work, but the extra two or three hours that it will take you to do these things
will give you peace of mind in the long run
The first thing we will start with is sealing the fuel tank area. You are going to need five things:
• Two part 20 minute epoxy
• Rubbing alcohol
• Mixing sticks
• Epoxy brushes
• A few wax coated paper cups.
12
The best time to do this is before you start putting the stabilizers on the fuselage. Buy sealing the fuel
tank area now you don’t have to worry about damaging the stabilizers while you are working. Before
you do anything read through the procedures below. Immediately after the procedures I explain the
reasons for why you are doing this. Be sure to read through everything before you start to work on
your airplane!
1. Remove the hatch for the fuel tank area and the fuel tank.
2. Remove any dust and debris that may be in the fuel tank area. The best way to do this is to hold
the fuselage upside down and gently shake it. You only want to remove the heavy dust and
debris.
3. Pour equal amounts of Part A epoxy, Part B epoxy, and rubbing alcohol into a paper cup and
mix thoroughly using a mixing stick.
4. Using an epoxy brush, paint the entire fuel tank area from the fire wall to the first bulkhead (see
Figure 1 on the next page). Also, make sure to do the inside face of the hatch cover. Note: do
not cover the engine mount screws and nuts with epoxy. If you cover them you may not be able
to get them off later.
5. Place the fuselage out of your way and allow the epoxy to dry.
The reason you want to seal the fuel tank area with epoxy is fuel spillage and leakage. If fuel is
allowed to penetrate into balsa, the fuel will severely weaken the wood! If that happens, you may have
a major repair job on your hands and you’ll only wind up sealing the area any way. You’re better off
doing it now and if fuel does spill in the fuel tank area, all you have to do is wipe it out with a paper
towel.
You want to remove as much dust and debris form the area because it will make sealing the fuel tank
area a little easier. This way no dirt will get caught in your epoxy brush and you won’t use any more
epoxy than you have to. Also, if the surface is clean the epoxy will create a better bond to it.
13
Rubbing alcohol is a thinner for epoxy. Buy thinning the epoxy, not only do you use less epoxy, you
also allow the epoxy to penetrate deeper into the wood. The deeper the epoxy penetrates into the wood,
the better it will seal.
Make sure not to cover the engine mount screws and nuts with epoxy. If for any reason you have to
remove the engine mount, it will be very difficult to do so. Later on you can put a few drops of thin
Cyanoacrylate glue or Lock Tight on the threads to prevent them from vibrating loose.
The next thing that we’re going to do is re-enforce the wing’s center section with fiberglass. This will
be done after you have joined the two wing halves together. Note: When you join the two wing halves
together, be sure to use full strength epoxy. Do not use rubbing alcohol to thin the epoxy! You will
only weaken the joint and it will probably break on you in flight! Once again, read trough the
procedures and explanations first before preceding with re enforcing the wing.
Here is what you’re going to need to re-enforce the wing’s center section:
• Two part 20 minute epoxy.
• Rubbing alcohol.
• 2 inch wide fiberglass tape (medium or heavy)
• Wax coated paper cups
• Mixing sticks
• Epoxy brushes
• Hobby knife with number 11 blades
• Scissors
Let’s get to work.
I. Starting with the top of the wing, take your hobby knife and remove an 11/4’ of the covering from
either side of the wing’s center line, from the leading edge to the trailing edge. Do the same for the
bottom of the wing.
2. Using your scissors, cut two pieces of fiberglass tape. The tape should fit between the leading edge
and the trailing edge with no over hang. If there is a little over hang, don’t worry. You can sand it off
later.
3. Mix equal amounts of Part A epoxy, Part B epoxy, and rubbing alcohol in a paper cup and mix them
thoroughly.
4 Starting with the top of the wing, place the fiberglass tape on the wings center section. Using an
epoxy brush start covering the fiberglass with the epoxy, start from the middle of the wing and work
your way out to the leading and trailing edges. Don’t be cheep with the epoxy! Make sure to
14
completely saturate the fiberglass and the wood underneath. Also make sure to cover any exposed
wood with epoxy. Do the same thing to the bottom of the wing.
5. Place the wing out of your way and allow the epoxy to dry overnight.
6. Sand off any excess fiberglass from the leading and trailing edges.
7. You may want to buy a self adhesive trim sheet to cover up the work that you have just done.
Though you can fly the model with out it, it just won’t look very nice.
Fiber glassing the wing’s center section gives you additional strength in a very high stress and critical
area, though the Hobbico Avistar’s design is sufficient, over time the center section of the wing will
start to fail. However, buy fiber glassing the center section you greatly increase the time that it will
hold together.
Next you’re going to secure the hinges on all of the control surfaces on the plane. The control surfaces
are the ailerons, the elevator, and the rudder. Here is what you’re going to need:
• An electric powered drill
• a 3/32’s drill bit
• hobby knife and some #11 hobby blades or a hobby saw
• Tooth picks
• Thin Cyanoacrylate glue
NOTE: some ARF planes already come with pinned hinges
15
Let’s get started.
1. Install the hinges on all of the control surfaces as per the instruction manual. Allow the epoxy to dry
completely before you install the pins.
2. At each hinge drill a 3/32 hole through the hinge where it is in the control surface and in the
airplane. Make sure to drill all the way trough to the opposite side. See the drawing below for
clarification.
3. Once the holes are drilled in every hinge, put a toothpick in each hole. Make sure to push the
toothpick all the way trough to the opposite side.
4 Place a few drops of Cyanoacrylate glue on both sides of the toothpick and as close to the surface as
possible.
5. Allow the glue to dry for a few minutes (thin Cyanoacrylate dries very quickly, usually in a few
seconds). Then using a hobby knife or a hobby saw, trim the toothpicks flush with the surface.
The reason you want to pin the hinges is that sometimes not all of the epoxy used to install the hinges
adheres in the correct places. Buy installing the pins you know that hinges will not loosen up on you
during a flight. Also, don’t worry about covering the pins. Soaking them with thin Cyanoacrylate will
make them fuel proof.
There are other little tips and tricks that you will learn over time. These are what you need to know
now so that you get your first airplane in the air. Next we’ll cover what is going to happen your first
day at the flying field.
16
Your First Day at the Flying Field
Now that you have built your new airplane, you want to fly it. That’s understandable; however you
cannot just go down to the field and take off into the wild blue yonder. If you tried to do that, you’d
crash your plane and all of your time and money would go down the drain! Like learning how to drive
a car, you must also learn how to fly your airplane. What I’m going to tell you here is what is going to
happen the first day you go to the field to fly. There are several dos and don’ts, Each will be explained
to you as you read through this section. First there a few things you must understand before we get
started.
FIRST MAKE SURE THAT ALL OF THE BATTERIES FOR YOUR RADIO ARE
PROPERLY CHARGED. The best time to start charging them is the evening before you go to the
field. Most radio manufactures recommend that you charge your batteries about 15 hours before you
fly. So make sure to leave enough time so that they have a good long charge. However, make sure to
read the user manual for your radio just to be sure how to properly charge the batteries.
Our flying field is open seven days a week and flying glow fuel powered airplanes may begin at 10:00
A.M.. You are never to fly alone! There must always be at least two members at the field when you are
flying. This is to insure the safety of your property and yourself. If your plane were to crash, you can
go out to retrieve it while the other member stays and minds your equipment. If you are hurt or start to
feel ill, the other member can either help you or go call for help. If you are alone at the field, you have
no one there to help you. Now with that out of the way we can start talking about your first day at the
field.
After you have parked your car, go directly to the radio impound and sign in. You must sign your full
name, A.M.A. number, and list the radio channel(s) that you will be using for that day. After doing that
you may unload your car, place your equipment in the pit area, and place your radio transmitter in the
radio impound. Next setup your equipment, but do not get the airplane ready for flight.
Introduce your self to the other members at the field and find out who the instructors are (A list of
instructors, qualifiers, and experienced flyers can be found on the last page of this manual). Tell
everybody that it is your first day at the field and ask an instructor to check your airplane out for you. It
is important for you to know that only an instructor can check you plane out for you and take it on its
maiden flight. Nobody else can or will.
What the instructor will do is thoroughly inspect your airplane. The first thing he will ask for is your
transmitter and “Buddy Box”. You will have to get your radio transmitter from the impound. There is a
right way and a wrong way of doing this. What you must do is go to where you signed in. There will
be a clipboard with clothespins on it. Each clothespin has a number on it. The numbers range from 11
through 60. These numbers correspond to the number of channels that are used to fly radio controlled
model airplanes. Look for the clothespin that has the same channel number that is on your radio (i.e. if
your radio is on channel 51 then you must take the clothespin with the number 51 on it). Then place
the clothespin on the antenna of your radio and remove it from the impound. By doing this you are
letting the other flyers know that you are going to be flying on that channel. If there is no clothespin
with your channel number on it on the clipboard that means that someone else is currently using that
channel. You are not to remove your transmitter from the impound or turn it on! If you turn your
transmitter on while some one is flying, their airplane will crash! If that happens, you are going to have
a lot of explaining to do. You must wait until the clothespin has been placed back on the clipboard
before you can use your radio.
17
Now that you have retrieved your radio from the impound the instructor will check to see if everything
is installed correctly, that the plane is properly balanced, and that the plane is generally safe to fly. If
you haven’t broken in your engine tell the instructor and he will help you do it. If any problems are
found in the airplane the instructor will tell you how to fix the problem and he’ll probably help you get
it fixed.
If the instructor feels that the airplane is safe to fly he will ask you to get it ready for flight. The
instructor will help you get everything together -- secure the wing to the fuselage, fill the plane with
fuel, get the engine started, etc. -- and get you out to the runway. Do everything the instructor tells you
to do. Don’t be afraid to ask questions. However do not question his judgment. Remember that you
are there to learn and that the instructor has your best interests in mind.
Now your plane is on the runway and is ready to take to the skies, but you’re not at the controls, the
instructor is. The instructor will fly your airplane for a good part of its first flight. He will take off and
trim the airplane. If there are no problems he will give you your first lesson, and then land the
airplane. In the flights that follow you will spend more and more time at the controls. However,
remember this: while you are a student the instructor calls the shots. Listen to their advice and follow
their instructions. They are there to teach you how to fly your airplane, not how to crash it.
Over time you will become proficient at flying your airplane. When you feel confident enough you can
start to work on becoming a qualified pilot. The next section covers what you have to do to qualify.
18
Qualifying
Once you have built up the confidence, you may start to become a qualified pilot. First you must
approach a Qualifier and tell them you want to become a qualified pilot. Then the Qualifier will give
you a qualifying form. This form will tell you everything that you will have to do to become a fully
qualified pilot.
Qualifying at our field is fairly straight forward. Our field has two runways that intersect. You must
take off and land on each runway in the two directions that it faces -- north to south, south to north,
east to west, west to east -- for a total of four times (see the drawing below). Then you must do one
dead stick landing, with the engine off and then you will be allowed to fly on your own as a frilly
qualified flier. This may sound like a lot to do, but it really isn’t. Everybody who is a qualified flier at
our club has had to go through this procedure to become a qualified pilot. So, we’re not doing this to
be inconsiderate to anybody, we’re doing it because we have to.
Now since you have to take off and land in four different directions and do a dead stick landing, don’t
expect to get it all done in one day. Though some people have qualified in one day, they are the
exception. You will usually have to wait until the wind is blowing in the proper direction before you
may attempt to qualify on a particular runway. So, be patient. You’ll be a qualified pilot before you
know it!
19
RCSMP Officers for 2011
PRESIDENT
Pete Maldonado
[email protected]
TREASURER
George Ingram
[email protected]
CHIEF FIELD CONTROLLER
Lee Cordner
[email protected]
FIELD MANAGERS
Junior Pacheco
[email protected]
John Rosiello
[email protected]
RECORDING SECRETARY
Harold Hohne
[email protected]
CORRESPONDING SECRETARY
Tom Mascialino
[email protected]
Flight Instructors
Junior Pacheco * - Chief Instructor
Ralph Dambra *
George Ingram *
Pete Maldonado *
Tom Mascialino *
John Rosiello *
AFC (Assistant Field Controllers)
Lee Cordner - Chief Field Controller
Breton Alexandro
Dimitriy Borontson
Ralph Dambra
George Ingram
Jose Maldonado
John Rosiello
Max Ulitsky
Jose Angomas
Charles Capozello
Harold Hohne
George Lanos
Tom Mascialino
Junior Pacheco
* denote Qualifiers
20