1
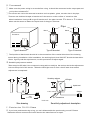
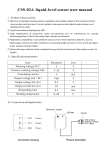
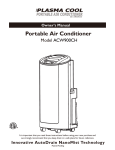
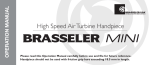
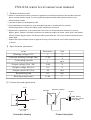
CSS-03A water level sensor user manual
Ⅰ. Product characteristic
① Electron-contactless inducing sensor is applied to be installed outside of the container without
direct contact with the liquid. It is not eroded by superacid and alkali liquid and also is not
affectted by the scale.
② Liquid level status is displayed by LED.
③ High stabilization & sensitivity, good anti-jamming and no interference by outside
electromagnetism. It fits for the using under complex environment.
④ Mightiness compatibility, it can penetrate various of non-metal material containers, such as
plastic, glass, ceramic and other container. Its inducing length can reach 10mm, and it can detect
Liquid, powder & grain object. Small size that is paste and use. Fit to use to detect the liqudi level
Of the pipe.
⑤ Output with open collector which is applied to every kind of control circuit. Max output current
is 30 mA.
Ⅱ. Specification parameter
Item
Working voltage VCC
Parameter
Unit
5
V
Exterior working voltage Vdd
5~24
V
Consuming current
5
mA
Output voltage Voh(Hi)
Vdd
V
Output voltage Vol (Lo)
0.5
V
Output current Iol (Lo)
30
mA
Responding time
0.5
Sec
Working temperature
0~60
℃
Ⅲ. Connection and application
Vcc+
LED light
Sensitivity adjuster
Socket
R1
OUTPUT
3 GND (Black)
2 OUTPUT (White)
1 VCC (Red)
GND
VCC=V dd=5V
R1=10K
Connection drawing
Product description
Ⅳ. User manual
① Make sure the power wiring is correct before using. It should be connected to the output part and
pull up the resistance R1 .
② The sensor can use in the nonmetal container such as plastic, glass, ceramic also in the pipe.
That can use double side tape or bracket to fix the sensor on the surface of container side
when installation. Use type B or type C bracket to fit the pipe size with
¢8-12mm or ¢12-26mm
when use the sensor to detect the liquid level of the pipe as below:
.
Pipe
Band
Band
Band
Band
Container
Type A bracket
Type B bracket
Type C bracket
③ The liquid level benchmark should lie in the centeraline of the vertical direction of the inducing
sensor during installation. After installation, the working liquid level ON/OFF should deviate within
10mm. If go beyond the requirement, use the special tool to adjust again.
④ Sensibility adjustment method
Take away the QC label, Use a responsive screwdriver to adjust the resistor inside the adjustment
hole on the top-left of the sensor. When the LED light turns on from the off state that means
adjustment is completed.
23
10
Sensitivity adjuster
19
LED light
Liquid level
32
1/2H=16mm
400
L= 1100
Output
Screwdriver
Unit: mm
Size drawing
Sensitivity adjustment description
Ⅴ. Exterior size 30×19×10mm
Ⅵ. If you have problems during using, you can't disassemble the products by yourself. Please
dismantle the entire sensor and return back to the manufacturer to repair.