1
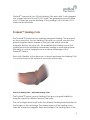
User Manual To see what results others are sharing, share the results you have received from your ProHeal™ device and view more information please visit www.ProHeal.com. Welcome to the ProHeal™ movement! User Manual Introduction ......................................................................................................... 2 Kit Contents ......................................................................................................... 2 Who can use the ProHeal™? ............................................................................. 3 Device Description ............................................................................................. 3 ProHeal™ Healing Coils ..................................................................................... 5 Healing Coils Placement Examples .................................................................. 7 General Instruction For Use ................................................................................ 9 Extension Cables .............................................................................................. 10 Storage .............................................................................................................. 10 General Precautions......................................................................................... 11 Device Set Up .................................................................................................... 11 ProHeal™ System Operation ........................................................................... 12 Protecting the Healing Coils ............................................................................ 13 Trouble Shooting Guide.................................................................................... 14 FAQ .................................................................................................................... 17 Technical Information ...................................................................................... 19 Warranty ............................................................................................................ 19 1 User Manual Introduction The basis for ProHeal™’s Time-Varying Electromagnetic Field (TVEMF) technology was created at NASA in conjunction with the development of cell therapies to treat injuries and diseases that astronauts might encounter during long term manned missions in outer space. The original concept of TVEMF was developed when NASA realized that cellular growth increased as the space shuttle crossed the earth’s magnetic poles. It took over eight years to define and develop a device that produced the same effect. This magnetic field device (TVEMF) was originally designed to enhance cellular expansion (growth) in NASA’s rotating wall bioreactor. After numerous experimental studies, the results were so significant with the bioreactor that a prototype was designed for use directly on the human or animal body. Electromagnetic pulses are responsible for many of the activities in our bodies. They are an integral part of what keeps our hearts beating and brains functioning. ProHeal™ is a portable TVEMF system. The unit uses a sophisticated miniaturized circuit board that delivers the specifically designed & proprietary electromagnetic field to a designated area of the body through the use of antennas (Healing Coils). Kit Contents ProHeal™ Control Box Two (2) Sets of Healing Coils Healing Coil Tester Two (2) 9 Volt NiMH Rechargeable Batteries 9 Volt NiMH Battery Charger Quick Start Guide 2 User Manual Who can use the ProHeal™? The ProHeal™ is intended to be used by anybody, including for pets or animals, in almost any environment, except exposed to rain or water. The device is intended to promote healing in hard and soft tissue injury and with chronic disease states. Do not use the ProHealTM device: 1. On the heart 2. On the brain 3. If you have a pacemaker or other electrical implant 4. If you are pregnant or will have the ProHealTM near a pregnant woman such as having a device on your arm and sleeping next to a pregnant woman where you might sleep with the arm on the woman’s stomach 5. If you currently have a virus. 6. If you currently have a diagnosis of cancer. If you have had cancer treatments in the past,please contact us before use. Quick Start Facts about ProHealTM Much of this information is covered elsewhere in this manual but is presented here briefly to give you a quick guide to ProHeal TM. Please do not consider this section a replacement for reading and understanding the entire manual. No metal can be in the Electromagnetic Field (within 12 inches of the Healing Coils). This includes the ProHealTM control box which must be 12 inches from the Healing Coils. (If needed, ask about an extension cable). Orthopedic screws and pins are made of 316L stainless steel or titanium and are acceptable in the field. It does not affect the ProHealTM if the user is using a cell phone or TV remote. 2. Use ProHealTM for a minimum of 8 hours per day. 3. Charge battery fully before starting and before each use. 3 User Manual 4. Do not leave batteries in an unplugged charger as they will discharge faster. 5. Never have the battery inserted if the Healing Coils are not attached. Always fully attach the Healing Coils first and then insert the battery second. 6. Do not submerge the ProHealTM control box or Healing Coils in water. No forms of ointment, liniment, unguent, oil or grease of any kind should ever be allowed to come into contact with the Healing Coils of the ProHealTM system. These substances may permanently damage the Healing Coils as well as causing a mild but visible irritation to the skin. We further advise avoiding direct contact between the Healing Coils surface and bare skin. At least one layer of bandages, sports tape, or other non-metallic sheet or film should be placed between the coils and the skin. In no case should the Healing Coils be allowed to come into contact with any topically applied cream, lotion, oil or liquid. 7. Smooth (not the bumpy) sides of the Healing Coils go next to the body. If stacking the Healing Coils, smooth side down, rough to rough and smooth side out/up. 8. The Healing Coils can be on opposing sides of the treated area or in a figure 8 position (side-by-side). 9. Do not use on heart, brain, or if you are pregnant. If you have had cancer treatments, please contact us before use. 10. Remember, the only way to turn the unit off is to remove the battery so take the battery out when you take the unit off. 11. Just because setting 3(H) and 4(X) is much more powerful, it will not heal faster than setting 1(L) if setting 1(L) is all that is needed. Please contact us if you have questions about which setting to use. Device Description The basic frequency is 5 Hz alternating bipolar magnetic pulses. This induces about 9 to 10 Hz bipolar electrical pulses in the tissue as the magnetic field ramps up and down for each magnetic pulse. The average power output is approximately 1/3 Watt (330 mW), which is about half the power output of a cellular telephone. Multiple studies have shown ProHealTM to be safe as well as effective. 4 User Manual ProHealTM comes with two (2) sets Healing Coils each with 2 coils plugged into a single socket with two (2) 20” leads. The generated pulse will travel over 5-7 times the circular diameter of the Healing Coils or at least 10-12 linear inches effectively. ProHeal™ Healing Coils The ProHeal™ System has two specially-designed Healing Coils powered by the control box. The two Healing Coils give you control over how the pulsed magnetic field is shaped so that you can better focus the magnetic field on the injury site. This maximizes the healing zone to the injured tissue while minimizing unnecessary healing to surrounding tissues. This ability to control healing zones is a unique advantage of the ProHeal™ System. Each coil is flexible, so this allows you to bend and shape the Healing Coils to conform them to the surface of most parts of the body. One Set of Healing Coils – Adjustable Healing Zones The ProHeal™ System’s pair of Healing Coils give you great flexibility in using the system for different areas of the body. The coil configurations result in the two different healing zones illustrated in the images on the next page. The darker regions of the healing zones indicate where the magnetic fields are strongest. The healing zone of the 5 User Manual opposite-side coil configuration is narrower and deeper, whereas the healing zone of the side-by-side configuration is wider and more shallow. Opposite-Side The Opposite-Side configuration is generally used for thinner body sections and joints, such as arms, elbows, knees, ankles, etc. In such cases the two Healing Coils are located on opposite sides of the healing zone. The ProHeal™ magnetic field is sufficient to penetrate deep into the body – such as a chest, or across the hips, etc. Stimulation zone of the opposite sides Stimulation zone of the side-by-side configuration Visualizing the magnetic field can be helpful when considering how to place the Healing Coils. When the Healing Coils are placed on opposite sides, they will generate a magnetic field that fills the space between the two coils. The closer together you place the Healing Coils, the stronger the field will be, and the more stimulation you will be able to focus onto the injured tissue. As always, place the bumpy side of each coil away from the skin. This ensures that the magnetic fields are lined up properly and not opposed to one another, which would cancel out the magnetic field at the injury site and render the system ineffective. 6 User Manual Also note that it is OK if the wound is larger than can be completely covered by the Healing Coils. The Healing Coils have a beneficial effect on tissues in the general area of healing, so coil size and placement do not need to be precise. The magnetic field from the Healing Coils also extends to the sides of the coil by upwards of 12 inches. It is best to visualize the magnetic field as a three-dimensional structure going on all sides of the coil. It may also be helpful to move and reposition the Healing Coils occasionally, especially if the exact site of the injury is not clear. This will change the orientation of the magnetic field, which may also be beneficial. Uninjured tissues do not seem to react to the magnetic fields, so it is OK to reposition the Healing Coils so that they envelop the injury from different directions. For example, on the first day or two you might place the Healing Coils on a limb on the outside/lateral and inside/medial surfaces. Then for the following day or two you might choose to reposition the Healing Coils on the back/dorsal and front/ventral surfaces around the injury. You might later decide to place them between these positions, ie, obliquely. To the extent possible it is best to try several options to determine what seems to work best. The preferred placement of the Healing Coils might ultimately be driven mainly by practical concerns such as ease of securing or bandaging the coils or placement of the magnetic pulse generator. Coil Placement Examples Tissue response often occurs more quickly when coil configurations are periodically alternated between configurations. You are encouraged to experiment with configurations and locations to determine what works best for you. The illustrations below show just a few of the areas that can benefit from the ProHeal™ device. Only the Healing Coils themselves are shown for clarity and are represented in their flat, non-flexed geometry. Try to keep the Healing Coils no further apart than 3 coil diameters (about 6 inches). Optimal separation distance is 4 inches or less. 7 User Manual Knee: side-by-side Knee: opposite-side Lower back: side-by-side Lower back: side-by-side Neck: opposite side Neck: side-by-side 8 User Manual Shoulder: side-by-side Shoulder: opposite-side Healing Coils may also be used separately on different parts of the body. For example, one coil can be used on one shoulder and the other coil can be used on the opposite shoulder. Similarly, one coil can be used over the front of the thigh on one side as well as on the front of the thigh on the other side. An additional configuration frequently used is to stack the coils one on top of the other, bumpy side to bumpy side with the smooth side of one coil touching the body. This appears to increase the field intensity by almost double that found by opposite side placements. The closer the coils are together, the higher the intensity of the field is between them. The stacked configuration amplifies the combined field significantly. Depending on the instruments used to measure the field intensity, the dimensions of the fields produced by stacking can be as much as 3 feet in diameter. Therefore, placing a coil over the front of the chest and the back of the chest will still fill the whole chest with a magnetic field. The same would apply to the abdomen and pelvis. General Instruction For Use Recharging Batteries 9 User Manual The systems can use any type of 9 Volt NiMH rechargeable battery that is commercially available. These batteries may only last for approximately 4 to 5 hours before they need to be recharged, depending on the setting on the control box. On the low setting that is correct for most applications you will likely see much longer battery charge times. You must leave the Healing Coils plugged into the control box. Remove bandages or dressing to gain access to the ProHeal™ device, and change the used, 9 Volt NiMH rechargeable battery for one that is fully charged. Re-check the Healing Coils to make sure they are fully connected into the device. As soon as the battery is replaced, the unit will automatically reset itself and the LED will blink three (3) times. It will then begin to generate the magnetic pulse protocols. You will also note that there is a simple mechanical “catch” to help prevent unintended pull-out of the Healing Coil plug from the control box. Caution: Partially unplugging the Healing Coil plug while the device is operating can still damage the device. It is good practice to first shut the device OFF and remove the battery before removing or inserting the Healing Coil plug. In addition to the simple mechanical catch, at the back end of the plug body, there is also a small loop just below the cableend of the Healing Coil plug. Extension Cables You can use a three-contact 1/8 in (3.5mm) stereo audio cable extension if you need longer cables to the Healing Coils. For this purpose you will also need a female-female coupler. Plug the extension cable in and then the coupler, followed by the original Healing Coil cable plug. Gold contacts for both the plug and the jack are recommended. Using an extension cable will reduce the magnetic power output to the Healing Coils. For example, connecting a quality 6-foot stereo-audio extension cable between the TVEMF pulse generator and the standard-length 50mm diameter coils will result in a magnetic pulse power reduction at the coils, by upwards of 27%. Storage 10 User Manual The ProHeal™ device can be stored but it is suggested to remove the battery to preserve its life cycle. Change or recharge battery before use if it has been in storage longer than 1 month. General Precautions This device by design emits an electromagnetic field. Electromagnetic fields go by various names, including RF energy, radio frequency energy, EMF, EMP, PEMF, and various other designations. For the pulsed time varying electro-magnetic emission from the ProHeal™, there is no valid scientific reason to believe it is harmful, but if you have concerns about exposure to these emissions you must not use this device. The energy emitted by the ProHeal™ systems is only one third of that emitted by cell phones. Individuals who are extremely sensitive to EMF energies may find this system to be irritating. In that case, you should work with a professional experienced in adjusting settings for these kinds of situations. Device Set Up 1.) Place the two coils across the area of injury (diagrams for placements above) or a wound and use wraps, bandages, paper tape or straps over the Healing Coils to hold them in place. You can protect the cables from damage by wrapping or bandaging appropriately. Be sure to place the Healing Coils with the bumps facing outward. 2.) Plug the Healing Coils into the ProHeal™ control box. 3.) To power-up, turn the power switch to the ON position. A green light will turn on and flicker continuously indicating full operation. The green light indicates power flowing to the coils, so as long as that light is ON, the system has power and is providing stimulation. (To reset the device, simply unplug and re-plug the battery.) 4.) Select the desired operation with the set switch. Setting “L” is the lowest power setting, setting “X” is the highest. Setting “L” is proper for most applications and will result in the longest battery life between charges. 11 User Manual 5.) The systems can use any type of 9 Volt NiMH rechargeable battery that is commercially available. These batteries may only last for approximately 4 to 5 hours before they need to be recharged, depending on the setting on the control box. On the low setting that is correct for most applications you will likely see much longer battery charge times. During normal operation the ProHealTM device will cycle through the different stimulation modes. So, the pattern of lights flashing will change with time as the device cycles through the stimulation (green light) and SLEEP mode (yellow light). When the lights grow dim or no longer flash, the device requires a fresh battery. Caution: Never unplug the coils while the battery is attached. ProHeal™ System Operation The device has 4 settings. You control these with a small slide switch on the front of the device. Think of these as “power levels”. Setting L= Low Power Level - This setting is recommended for superficial injuries or injures that are not deep in the body, where the Healing Coils can be placed relatively closer together (less gap between the coils), or for sensitive tissues that might be slightly irritated by higher power settings. This is the correct setting for most uses of ProHeal TM. Setting M = Medium Power Level - This setting is recommended for deeper injuries or injures that are within thicker tissue areas, where the Healing Coils must be placed relatively farther apart (greater gap between the 12 User Manual Healing Coils), or for tissues that are not responding to the lower power setting. Setting H = High Power Level - This setting is recommended for thick or deep tissue healing during the day and for shorter periods of use or otherwise as needed. Setting X = Highest Power Level - This setting is recommended for chronic and older injuries that would normally take longer to heal than recent injuries. This setting will disperse a wide healing zone. Light Indicators The working state of the device is indicated by the state of the lights on the left side of the flat surface of the device. ProHealTM Normal Operation (with Healing Coils attached): Power-on sequence: each time you attach a battery, the red LED should first flash 3 times, then the yellow LED and then the green LED, which will stay flashing while the stimulation patterns are cycling. After the initial start sequence of lights, the lights indicate as follows: Green LED on continuously or flickering slightly: normal operation during stimulation. Yellow LED flashing slowly: SLEEP mode. You can reset the unit to bypass the sleep mode by unplugging and reattaching the battery or returning the switch to zero and then back to whatever level is desired. Red LED, at start-up or cycling has stopped but the device is still receiving power. No LED activity or dim LEDs: batteries are dead or dying: recharge or replace. Protecting the Healing Coils When the system is used, sometimes marks are left on the skin that appear as areas of redness, which are generally painless. The most likely cause is the use of “horse liniment” applied to the skin or Healing Coils or both. The liniment likely interacts with the complex thermoplastic elastomer (TPE, synthetic rubber) used in the Healing Coils. The TPE is medical and food 13 User Manual grade but when exposed to some liquids may cause both discolorations of the TPE, as well as swelling. We advise you the following: no forms of ointment, liniment, unguent, oil or grease of any kind should ever be allowed to come into contact with the rubberized coils of the ProHeal™ unit. These substances may permanently damage the coils as well as causing a mild but visible irritation to the skin. We further advise avoiding direct contact between the rubber coil surface and bare skin. At least one layer of bandages, sports tape, or other non-metallic sheet or film should be placed between the coils and the skin. But in no case should the rubberized coils be allowed to come into contact with any topically applies cream, lotion, oil or liquid other than water. Trouble Shooting Guide Simple Testing: If you received a Coil Life Tester chip, place it on one of the Healing Coils. If the green lights on the chip start blinking, the system works. We do recommend replacement of the Healing Coils every 4 weeks of use. The ProHealTM and/or the Healing Coils make an annoying “clicking” sound. How can I make this go away? The clicking sounds are an indicator of correct device operation. The basic operation of the device involves the generation of rapid electromagnetic pulses, which interact with the coil material to create a slight clicking sound. Just like a fire naturally gives off heat and light, these devices generate sound when they are working properly and there is no way to prevent this. The ProHealTM device itself and the Healing Coils can be wrapped in thick bandages or placed in or under pillows, or bedding to muffle the sound without interfering with the operation of the device. I cannot hear the Healing Coils “clicking”. 1.) Inspect the wires to make sure no breaks are visible. Check the Healing Coils to make sure they are not physically broken. 14 User Manual 2.) Unplug the Healing Coil connector and clean it using a clean cotton cloth. Pinch the gold contacts between layers of the cotton material and rotate the connector to remove any residue of grease or other forms of contamination. Reinsert the plug. 3.) Check that the plug for the Healing Coils is fully inserted. Always make sure the Healing Coil plug is fully inserted before installing the battery and operating the ProHealTM device. 4.) Do the lights come on? If you get a flickering light that gradually gets dimmer over the course of about 1 minute, the ProHeal™ control box is probably working and the problem may be due to damaged Healing Coils. Under normal use the Healing Coils typically last about a month or two, much longer than most treatment periods. However, if the Healing Coils do have visible damage or you suspect they are internally damaged, you should visit www.ProHeal.com or contact a ProHeal™ representative to purchase a new set of Healing Coils. 5.) Replace the 9 Volt NiMH rechargeable battery with one you know is fully charged. 6.) If no physical damage is found and the connectors are firmly in place and a new battery does not solve the problem, you will need to replace the Healing Coils. Visit www.ProHeal.com or contact a ProHeal™ representative to purchase a replacement set of Healing Coils. The LED lights are not working, or they turn off after a short period of time. Replace the 9 Volt NiMH rechargeable battery with one you know is fully charged, making sure that there is a good connection for the battery to the ProHeal™ control box. If after replacing the battery, the lights are not working, visit www.ProHeal.com or contact a ProHeal™ representative. My ProHeal™ control box got exposed to excess water. 15 User Manual The ProHeal™ control box is not waterproof, although exposure to water for a very short period of time may not permanently damage the device. If the unit has been exposed to water, it may be possible to recover by placing the unit is a sealed bag or container with dry uncooked rice for 2 to 3 days. Retry the unit again with a fresh battery. If it does not work, visit www.ProHeal.com or contact a ProHeal™ representative to purchase a new unit. My unit fails to help the problem for which it was purchased. First, verify that the ProHealTM device is functioning: 1.) Make sure that the battery is fully functional for the duration of usage each time it is applied. 2.) Make sure the LED lights are functioning and that you have a “green” blinking light. 3.) Make sure the Healing Coils are making a clicking sound by holding next to your ear. Speak to a ProHeal™ representative about the device and how to use it. It is entirely possible that the device has been placed incorrectly for the application. There are several different ways to correctly place the Healing Coils, and there are many ways to incorrectly place the Healing Coils. In many cases, simply adjusting the Healing Coil placement greatly improves the effectiveness of the device. It is also possible that the period of use is not long enough to effect the change being sought. Consider using the device for longer periods during the day or night, continuous use day and night, and extending the treatment period. Usually beneficial effects are seen within the first few days, but for major musculoskeletal tissue damage or when treating very thick tissues, the treatment period may need to be extended for several months. Recent injuries respond more quickly than old, chronic injuries. The ProHeal™ device is designed to reduce pain and accelerate healing for a wide range of musculoskeletal, neuromuscular and other tissues, however, no device will work for all types of injuries to all types of tissues. Consult your ProHeal™ representatives about particular applications. 16 User Manual The device seems to help, but then the problem comes back again at a later time. If a short period of treatment with the device yielded good results, but then after disuse of the device the problem recurs, consider using the device for a longer treatment period. A good rule of thumb is to use the device for at least twice as long as it took to see the first beneficial results. So, if there was a clear reduction in discomfort after a week of use, consider continuing to use the device for an additional week to make sure that the healing is complete. Extended use of the device should not cause any problems, so it is OK to continue using the device in this manner. FAQ Q: What is the most important thing about using my ProHealTM device? A: Always plug in the Healing Coils before connecting the battery, and then be sure the Healing Coils are always plugged in all the way, or the device may be permanently damaged. Q: My device does not seem to be working properly. What should I do? A: First, try the Troubleshooting page in the User Manual to see if there is an easy fix. If this fails, you will probably need to return the device to your supplier for a replacement if still under warranty and within the terms of ProHealTM purchases. Q: How do I know if my device is working properly? A: A simple test is as follows: First, plug in your Healing Coils. Make sure they are plugged in all the way. Second, connect a fresh 9V battery. Watch the LEDs: They should quickly turn to a blinking green. Listen to the Healing Coils. Put one close to your ear. You should hear a definite “click-click- click”. If you hear this clicking, then your entire system is functioning properly. If you do not hear clicking, check using the Healing Coils test device. Q: What happens if I am using ProHealTM for my pet and it chews into the wire or Healing Coils? A: Nothing. The device is very low power and your pet will not feel more than a slight tingle from the electric pulses. We know this because one of our engineers chewed into the wires and felt the slight tingle himself. No harm will be done to the animal but the Healing Coils are most likely destroyed. You might have to buy another set from our website. Q: The Healing Coils appear to be broken or cracked. Can I order a replacement set? 17 User Manual A: Yes, you can order from your vendor or you can order directly from the ProHealTM website. Q: How will I know when the battery needs charging? A: The LED lights will become dim or show no color at all. You will no longer be able to hear the Healing Coils clicking. A freshly recharged NiMH battery should last for 4 to 6 or more hours before requiring recharge depending on the strength setting you are using. Q: Can I use any battery charger to recharge the battery or must I use the one supplied? A: Any commercial battery charger will work as long as you have rechargeable batteries. We recommend using only NiMH rechargeable batteries with a proper charger. Q: I dropped the ProHealTM Control Box in water. What do I need to do? Will it ever work again? A: You will need to dry the ProHealTM Control Box thoroughly. First, immediately disconnect the battery to prevent damage. It will actually help if you shake the ProHealTM Control Box in order to shake out any excess water. Then, without guarantee, we suggest an excellent trick we have found also works (sometimes) with cell phones: Place the ProHealTM Control Box into a jar or Tupperware bowl that has a tight lid with some dry white rice. First add a half inch layer of dry white rice to the jar, then place the ProHealTM Control Box on top of it and seal the lid tightly. Discard the rice after use. This works because rice is a mild desiccant (a substance that absorbs water from the atmosphere). This is also why you sometimes find grains of rice in the salt shaker at restaurants: to absorb water that would otherwise cause the salt to cake. We suggest that you discard the rice after use. If you have a better laboratory-grade desiccant such as silica gel, and you know how to use it, then go ahead and try this method. DO NOT place the ProHealTM Control Box in an oven or microwave to dry. Q: One of the Healing Coils seems not to be working (no noise or clicking sound) but the other one still works. Will the device still be effective if used? A: You need to replace the Healing Coils for a full effective treatment. Having only one coil functioning will severely reduce the beneficial effects. You may see some help, but there is no guarantee that it will help. Place an order for a new set of coils from your vendor or the ProHealTM web site. Q: I sat the ProHealTM too close to the coffee pot and the ProHealTM Control Box case is now warped. Can I still use the system? A: Unlikely. This, and any other kind of damage, would void the warranty. A new ProHealTM would need to be purchased. Q: If the ProHealTM Control Box gets damaged in any way, is there a chance for the device 18 User Manual to cause a fire? A: The best advice is to NEVER use a damaged device. Although the risk of creating an ignition source with the device is very remote, we recommend that you not take any chances. Q: Why don’t I feel the current when the system is in operation and will it give me a shock or will it give a pet a shock? A: The output is a magnetic field and NOT an electric current. The device is very low power. In fact, all of the energy that goes into the magnetic field first passes through the green LED, so the total amount of output power is very low, about 300mW. This is about 1/3 of the power of a typical cell phone. The voltage and amperage is too low to give a painful shock. A slight tingling may be felt if the wires are exposed, but no damage to the skin will result. Technical Information System Information: Waveform: Square/Trapezoidal Number of Programs: Four (4) Program Duration: Continuous Power: 9V NiMH rechargeable battery Warranty We offer a 1-year warranty on the ProHeal™ control box, void if damage is due to negligent use or if the unit has been opened, and a 30 -day money back guarantee. Returns of the ProHeal™ device will be subject to a $300 restocking fee. 19