1
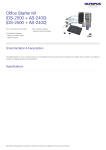
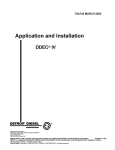
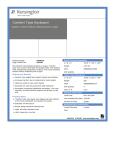
Administrator/Supervisor Manual Contents INTRODUCTION: .............................................................................................................................. 1 DASHBOARD: .................................................................................................................................... 4 Jobs Status Summary ............................................................................................................................... 4 Online Users ............................................................................................................................................... 4 Available Typists and Typists with Jobs: .......................................................................................... 4 AUDIO: ................................................................................................................................................ 5 Upload Audio Files ................................................................................................................................... 5 upload instructions .................................................................................................................................. 7 JOBS ..................................................................................................................................................... 9 Open Job ..................................................................................................................................................... 12 Job Details ................................................................................................................................................. 13 Editing .............................................................................................................................................. 17 Edit Online ................................................................................................................................................ 17 USERS ............................................................................................................................................... 21 Authors ....................................................................................................................................................... 21 Staff .............................................................................................................................................................. 25 Administrators ........................................................................................................................................ 32 MANAGE .......................................................................................................................................... 34 Company .................................................................................................................................................... 35 Template Bank ........................................................................................................................................ 36 Job Types ................................................................................................................................................... 37 Notification ............................................................................................................................................... 38 Rules ............................................................................................................................................................ 40 Rates ............................................................................................................................................................ 42 Conferences .............................................................................................................................................. 44 REPORTS ......................................................................................................................................... 47 Audio ........................................................................................................................................................... 47 Transcriptions ......................................................................................................................................... 47 Production ................................................................................................................................................ 48 Comprehensive ........................................................................................................................................ 48 Deleted ....................................................................................................................................................... 49 Invoice ........................................................................................................................................................ 50 Purchase .................................................................................................................................................... 51 Typist availability ................................................................................................................................... 52 SEARCH ............................................................................................................................................ 53 Advanced Search ..................................................................................................................................... 53 SUPPORT ......................................................................................................................................... 54 Support Listings ...................................................................................................................................... 56 New Ticket Support ............................................................................................................................... 56 MESSAGING ..................................................................................................................................... 58 Sent items .................................................................................................................................................. 58 Sending Email Notification. ................................................................................................................. 59 INTRODUCTION: This manual sets out step by step how to use every function and sub-‐menu in the system. The Administrator can access all parts of the system. The Supervisor can access every function except REPORTS. The Supervisor accessibility can be changed to suit individual licensees. Please contact Support if you wish to vary the accessibility. The Dashboard is a snapshot of the system at any given time. It shows you the number of jobs in every category, whom is logged on and typist availability. At a glance • The Transcriptus workflow management system is designed to be used efficiently by a transcription service of any size. • It contains every function the Administrator needs to set up clients and staffs, process audio files, manage transcriptions and invoice clients and staff. • The screens are very clear and easy to read with colour coding to identify critical information such as turnarounds. • The Search and Reports functions are multi-‐layered, providing you with an instant picture of every aspect of your workflow. • A support ticket function enables the Administrator, staff and clients to receive fast responses to queries and issues. • Valuable time is saved using the built in email function. Transcriptus – Administrator / Supervisor Manual 1 Fig. 1. -‐ Screenshot of Administrator Logon Below is a list of the Tabs that create the functionality of the system. (See Fig.2) • DASHBOARD • UPLOAD AUDIO FILES • JOBS • USERS • MANAGE • REPORTS • SEARCH • SUPPORT • MESSAGING Transcriptus – Administrator / Supervisor Manual 2 Fig. 2. -‐ Screenshot of Dashboard Transcriptus – Administrator / Supervisor Manual 3 DASHBOARD: Settings/Logout buttons are located at top left of the screen. Click Settings to change: • login details • number of Jobs to show per page (we suggest 50) JOBS STATUS SUMMARY Categories are shown below. The number of jobs in each category is shown in brackets. Click on the category to see job details. • New Jobs that have been uploaded by client that are awaiting allocation out to a typist • Finished Jobs that have been completed and final transcript made available to client for download • Awaiting Typist Jobs that have been allocated out to a typist, but have not yet been downloaded by typist • In Process Typist Jobs that have been downloaded by typist and are in process of being transcribed • Awaiting Editor Transcript has been uploaded by typist, and is awaiting finalisation by an editor • In Process Editor Transcript is being edited and will shortly be finalised and available to client for download ONLINE USERS All users currently logged onto the system will show in this area. This includes Administrators, Editors, Clients and Typists. AVAILABLE TYPISTS AND TYPISTS WITH JOBS: Lists typists currently available as well as all typists with jobs. Hover the cursor over a typist’s name to see availability and click the typist’s name to bring up details on allocated jobs. Transcriptus – Administrator / Supervisor Manual 4 AUDIO: UPLOAD AUDIO FILES This screen (see fig.3) replicates what the Author (client) sees. It is used by an Administrator to upload audio files from their hard drive. This usually occurs when an Author has sent an audio file outside the system eg. on disk or via yousendit etc., or Author (client) files have been downloaded in order to convert them to different formats and are then re-‐uploaded. cda Format files: Please note .cda format audio files can't be transferred via the internet. Please refer to your user manual regarding converting these files to mp3. This warning alerts clients who may attempt to upload this file format unaware that a .cda file does not contain any audio. In the event .cda file is uploaded (it will show 0 megabytes and 0 minutes), the Author (client) should be advised the file needs to be ripped to mp3 format using Windows Media Player, or similar audio conversion program, and re-‐uploaded to the system. The system won’t allow an upload before one of the two options below has been selected: Once an option has been selected, complete the fields to upload the audio against the correct Author (client). (See fig.3) [*] Fig. 3. – Screenshot of Audio file Information Transcriptus – Administrator / Supervisor Manual 5 [*] Conference (only applies to pre-‐booked jobs), Job Type fields – select these from the drop down menus. • Turnaround Type Currently set to short (24-‐48 hour) and Long (7-‐14 days) however this can be customised to suit an individual company’s requirements. • Notes • Used by clients to input information relating to their audio files eg name spellings, file start and stop times, layout instructions etc. The Notes box is visible to the Administrator and the typist. • Purchase Order No May not apply to all clients. If provided, the purchase order number appears on the Author invoice. • Duplicate audio files Please note the system will not allow the upload of an audio file with exactly the same file name. • Note: The maximum file size is 100MB The file limit is deliberate as larger files can take a long time to upload risking breaks in the connection resulting in loss of audio from the file. Many clients have slow connections and large files can cause upload issues. If an Author has a file greater than 100MB (the system will actually allow about 110MB to be uploaded), we suggest you email them a file conversion link such as NCH Switch which is a free download from nch.com.au. Transcriptus – Administrator / Supervisor Manual 6 UPLOAD INSTRUCTIONS Add as many files as you wish, however it is advised that you do not upload more than 150 megabytes in total per upload as this will slow the rate of transfer and may result in the upload failing. [1] [2] [3] [4] [5] [6] Fig.4. – Screenshot of audio drag and drop process Transcriptus – Administrator / Supervisor Manual 7 Complete Topic, Name of Speakers and No. of Speakers for each audio file uploaded. If this information is not relevant to your files, you do not need to complete these fields [4]. Add a template file if required [5]. Click Upload Audio Files [6]. A progress bar (See fig.5) shows the rate of transfer. When the transfer is complete the new file(s) will appear under New Jobs on the Dashboard. Fig.5. – Screenshot Drag and Drop Audio Files Transcriptus – Administrator / Supervisor Manual 8 JOBS This screen is the engine room of the system showing all jobs in number order, the status, date of upload, due date etc. (See fig. 6) Key to Jobs Screenshot Image: [1] Job Listings. Number of jobs shown in brackets [2] Search feature. Type in Author name, file name or job number. All jobs regardless of status will appear. [3] Advanced Search. As per above plus a date range can be added. Show jobs for: [4] Select Company. Drop down list of all Author accounts. [5] Select Status. Drop down of eight options. [6] Select Author. Drop down list of all user names. [7] Select Turnaround Time. Filter for short or long turnaround Status Bar: [8] Tick in box. Tick box for jobs that you want to perform a Selected Job Action on. [9] Status. Shows he status of each job eg. New, In Process, Awaiting Editor etc [10] Job Number. Listed in numerical order are automatically created by the system. Select a job by clicking on the job number. [11] Company. Shows company name [12] Author. Shows Author name [13] Staff. Shows typist name [14] Job Type. Show job type [15] Dictated On. Shows the date and time the audio file was uploaded. [16] Transcribed On. Shows the date and time the typist uploaded the Word document [17] Due. Shows the remaining time for the typist to complete the job. The time changes to red once the elapsed time exceeds the turnaround. [18] Auth Due. Shows the remaining time to the turnaround for the Author. The time changes to red once the elapsed time exceeds the turnaround. [19] Audio File icon. Hover the cursor to see the file name and length in minutes. Transcriptus – Administrator / Supervisor Manual 9 [20] Speech Bubble icon. Shows text in Client Notes box. [21] Typed Page icon. Hover the cursor the Job Details. Shows rate, Client Invoice Number and purchase order number. [22] Clock icon. Blue for short turnaround job and red for long turnaround job. Selected Job Actions: [23] Check/Uncheck All. Use to select all jobs listed by category. [24] Delete. Delete a job. A box will show to enter he reason for the deletion with a Delete jobs/Cancel button to complete this action. Note: if a job is deleted it can only be re-‐instated by Support staff. [25] Print Reports. Select the required job(s) for print outs of the Word file(s). Works only with Internet Explorer. [25] Download Jobs. Downloads Word files (transcripts). [27] Select Editor. Select jobs to be edited by ticking the box to the left of the job numbers then select the editor you want to edit those jobs. The editor will receive a noreply email advising of each job to be edited. (See fig. 6 – next page) Transcriptus – Administrator / Supervisor Manual 10 [1] [2] [5] [4] [8] [9] [3] [10] [6] [7] [11] [12] [13] [14] [15] [16] [17] [18] [19] [21] [22] [22] [20] [27] [23] [24] [25] [26] Fig. 6. – Screenshot of Jobs page Transcriptus – Administrator / Supervisor Manual 11 OPEN JOB To open a job, click on the job number. (See fig. 6 – item [10]) In the following example, job 29973 in fig. 6, has been “opened”. (See fig. 7) Duplicate Notes. A will appear on a job if any files with the same name have been uploaded to the system. Authors are prevented from uploading files with duplicate names however sometimes a file is re-‐named after uploading in which case the Warning will appear. The warning will not show on the “Edit Job Details” page. (See fig. 7) Click on “Edit Job Details” button to access job detail fields. (See fig. 8) Transcriptus – Administrator / Supervisor Manual Fig. 7. – Screenshot of “open” job 29973 12 JOB DETAILS Click on the “Edit Job Details” (See fig. 7) button on the open job to access job detail fields. (See fig. 8) [1] Fields completed when the audio file was uploaded are already filled in eg Company, Author job type, No of speakers, Name of Speakers etc. • Note the typist can see only certain fields-‐ Job type, typist rate, typist turnaround, template, audio quality and typist instructions. [2] In Process. Leave the default In Process. [3] User Type. Leave the default Typist. [4] Assigned To. Select typist from drop down menu. [5] Rate. Select rates from drop down menu. [6] Extras. If applicable, select from Postage, Courier, File conversion, Bulk file upload, Tech support. • Select 1-‐5 for the charge. The charge rate is calculated in multiples of 5 therefore for a charge of $5 select 1, or a charge of $10 select 2 etc. The item and charge will appear as the last entry on the invoice. • File Conversion charge – applies when author audio files are converted by the Administrator. • Bulk File Upload: applies when an author has a large number of files eg 100 plus which can be uploaded from the system back-‐end by Transcriptus support. • Tech Support: applies to support the Administrator provides to an author which is not directly related to the Transcriptus platform. [7] Turnaround Time. Select either Hours or Date and time for typist. [8] Client Turnaround Time. Select when Author TAT is time critical. Otherwise it may not be necessary to select a time. [9] Template/s. Select the template/s to be used for the job. • [10] Click Template to open a Templates List screen. Select template, click Add. The selected template will appear as a downloadable file. The selected template/s will be available to download by the typist assigned to the job. Audio Quality. Select from drop down menu. Clear is the default (we live in hope!). Transcriptus – Administrator / Supervisor Manual 13 [11] Instructions. Type any information typists will require to do the job. Information in the Instructions box is only viewable by the typist/administrator/editor, and is not viewable by the Author. [12] Notes. This is information provided by the Author at the time of uploading the audio file. It is viewable by all uses of the system, so it may be appropriate to delete notes from the Author that you do not want typists to see. E.g. It may contain contact phone numbers or email etc. provided by the Author, or the information from the Author may be expressed unclearly etc. [13] Update Job. Click to update details and trigger an automated noreply email (See fig. 10) to be sent to the typist advising the job has been allocated. [14] Audio File. The uploaded audio file appears on the right hand side of the Job Details screen. You can listen to mp3 files by clicking the player icon to the right of the audio file name. However if you wish to stop and re-‐start the file at various places to check the quality you will need to download the audio file into a program such as ExpresScribe or FTW Transcriber. [15] Rename Audio File. Click to rename. [16] Delete Audio File. Click to delete. Reasons to delete an audio file include uploading audio file converted into a different format. [17] Download Audio File. You can download either by clicking this button or clicking on the audio file name. Both will open a download/save window. [18] Edit Details. Click to edit Topic, File Length, No of speakers or name of speakers. [19] File length. The file length is automatically recorded by the system for most file types eg. mp3, DSS, wma, ogg etc. The system rounds up the minute after 15 seconds eg a file that is 10:15 shows as 10 minutes and a file that is 10:16 shows as 11 minutes. If the audio file length has not been automatically inserted, it can be done manually. [20] Upload Audio File. You can add more files to the job buy browsing for the file on your desktop and clicking Upload Audio files. [21] Split This job Into. Select number of jobs. You may want to split a job if the audio file is too long for one typist to complete in the required turnaround. [22] View Logs. Click to view a log of the history of the job. (See fig. 9) Transcriptus – Administrator / Supervisor Manual 14 [14] [15] [1] [19] [1] [16] [17] [18] [20] [2] [3] [4] [21] [22] -‐ See Fig. 10 [5] [6] [7] [8] [9] [10] [11] [12] [13] Fig. 8. – Screenshot of job after “Edit Job Details” button has been clicked Transcriptus – Administrator / Supervisor Manual 15 Fig. 9. – Screenshot of View Logs screen Transcriptus – Administrator / Supervisor Manual 16 EDITING EDIT ONLINE This feature is only available to the Administrator and only using Internet Explorer. It is a quick and useful way for the Administrator to check a transcript or to do an edit for an urgent job. You can play the audio as normal if required and fully edit using the Microsoft Word task bar. When the Word file is uploaded by the typist and the status changes to Awaiting Editor, an Edit Online button appears below the Word file shown in the screen shot below. Click the button and a new screen will open displaying the transcript. Transcriptus – Administrator / Supervisor Manual Fig. 10. – Screen shot of Online Editor 17 Click edit Online [*] and a new screen opens showing the Microsoft Word task bar, the transcribed document and three buttons: Save A Copy: Saves to your hard drive. This is useful if you do a track changes as you can save the file showing the changes perhaps to email to the typist or other staff, then accept the changes and save the updated file for the Author. Save Online: Saves the changes (as described above). A dialogue box confirms This File was Successfully Saved. Click OK. Close: Closes the online edit screen and returns you to the Job Details. Open Edit Job Details, select Finished from the Job Status drop down and click Update Job. Final will appear under the Word File name and the job status changes to Finished. Change the status of a job and/or the details manually The Administrator can change all the option fields in Job Details eg typist, editor, rate, TAT etc by clicking Edit Job Details. Rework Typist A Job becomes rework status if the transcript is rejected by the editor for poor quality, use of incorrect layout etc. [1] Editor downloads and rejects document sent by the typist: [1] Transcriptus – Administrator / Supervisor Manual 18 [2] After the file has been downloaded, a “Reject This Job” button appears under the Word document file. If the Editor wishes to reject the transcript, this button is clicked. A Reason for Rejection window opens and the Editor types the reason. The reason then appears under Job Details: [2] Transcriptus – Administrator / Supervisor Manual 19 [3] The status of the job changes to Rework Typist. The Typist will receive email notification from the system rejecting the job and stating the reason. The typist can also see the reason displayed in Job Details. [4] Typist will see all rejected jobs under “Rework Typist” job status: [4] 5. Typist corrects document and re-‐uploads and the status changes back to Awaiting Editor. Transcriptus – Administrator / Supervisor Manual 20 USERS This is where you set up clients, administrators, typists and editors. (See fig. 12) AUTHORS The first step in setting up an Author is to set up the company under Manage (further explained under Manage), regardless of whether they are GST inclusive or tax free (eg. off shore clients). Edit/Delete You can edit Author login details or delete the Author by clicking on Edit or Delete. [1] [2] [3] [4] [6] [7] [8] [9] [10] [5] [11] [12] [13] [15] [14] Fig. 11. – Screenshot of USERS screen, Authors tab Transcriptus – Administrator / Supervisor Manual 21 Add a New Author Account: Note: This is the second step in setting up a new client. The first step involves setting up new Company under the MANAGE tab. Refer to page 34 of this Manual for instructions. [1] User Name. Create name. If you create an existing name the system will advise and you should select a different user name. [2] Password. Can be inserted or left blank as system will create a random password. [3] Accounting code. 4 digit code (explained further under Manage). To locate the last allocated Accounting code go to View Page: and click the last page number. [4] Email address. You can list as many as required separated by a comma – no spaces. All system generated noreply emails will go to email addresses in this field. [5] Author Rate. Enter rate the Author has been quoted. [6] Skype ID. Enter address is applicable. [7] Phone Number. Can be typed in any format. [8] Staff Group. Staff groups are set up under Staff. See instructions on page 24. Select a staff group for Author if applicable. [9] Time Zone. Recommended to use the time zone of the business head office as the time zone selected will be reflected in the turnaround times for jobs. • If you have off shore clients and typists you may wish to select different time zones for them. [10] Taxable. Select whether sales tax inclusive or sales tax free. [11] Typist Retail. Enter typist rate. • The reason for putting the rates here is so that Administrators will know which rate has been quoted by the Sales person. [12] Only Allowed to Pre-‐Order Conference transcriptions -‐ this is further explained under Manage/Conferences. [13] Require PO Number (Purchaser Order Number) upon creating a job. • [14] Tick this if the Author’s company/institution requires Purchase Order Numbers for every job. Once ticked, the Author will not be able to upload an audio file without completing the PO field in the Audio File Upload Screen. The PO will automatically appear on the Client invoice. Clear all. Cancel Client set up. Transcriptus – Administrator / Supervisor Manual 22 [15] Add This New Author. Click to save information and send an automated noreply email to the Author advising login details (See fig. 14) Edit Author account If changes need to be made to an existing Author, eg. Change of phone number, add or remove email address, or Author needs a new logon generated, find the Author in the All Author Accounts screen, and click “Edit”. (See fig. 13) [2] [1] [3] [4] Fig. 12. – Screenshot of Edit Existing Author Account [1] Resend Account Information Email. Click if Author requires their login to be re-‐sent. The system will generate a new password, and send all email addresses listed a noreply email containing login details. [2] Save. Click to save any changes made to Author account. [3] Cancel. Click to cancel any changes made to Author account. [4] View Logs. Enter a date range to generate a report showing all jobs that have been processed for Author during that date range. Transcriptus – Administrator / Supervisor Manual 23 Fig 13. Transcriptus – Administrator / Supervisor Manual 24 STAFF: This is where new staff members (eg. Typists and editors) are set up, and existing staff member information can be edited. (See fig. 15) [*] [1] [1] Fig. 14. -‐ Screen shot of All Staff Accounts Show only staff with type: select Typist or Editor. [*] Staff Group: Click Edit, Add a new Staff Group, save. A dialogue box will pop up confirming staff group has been created. Click Done. The staff group will now appear in the Add a New Author Account screen and the Add a New Staff Account. A staff group is created when you have a group of typists/editors you wish to always allocate certain work types and/or certain authors. For example, you may have US authors with strong accents and you have three typists and two editors who are familiar with these accents. Therefore you could create a staff group called US Accents and you put the three typists and two editors in that group and you select Staff Group US Accents in the account setup for those authors. In short: • a Staff can be a member of multiple Staff Groups. • an Author account can be assigned to ONLY one Staff Group. • an Author can have no assigned Staff Group. Transcriptus – Administrator / Supervisor Manual 25 • in Job Details, when assigning a Job to a Staff, if the Author has a Staff Group allocated, the Staff under that Group will show up as available for selection. • in Job Details, when assigning a Job to a Staff, if the Client has no Staff Group allocated, all the Staff in the System will show as available for selection. Create a Staff Group [*] Go to USERS/STAFF tab, and click on Edit in the Staff Group box. (See fig. 15) [1] Fill in the field and click the “Save” button: [1] [2] Pop up message will show. Click “OK”. [2] [3] Click “Done” button to save all changes. [3] Transcriptus – Administrator / Supervisor Manual 26 Assigning Group to Staff Users In the USERS/STAFF tab click on “Add a new staff account” or scroll down to “Add a New Staff Account” section. [1] Look for the “Staff Groups” field. [2] Click to check any of the listed groups. [3] Click “add this new staff” button to save the changes. [1] [2] [3] Transcriptus – Administrator / Supervisor Manual 27 Add a New Staff Account: (See fig. 16) [1] User Name. Create name. If you create an existing name the system will advise and you should select a different user name. You will have staff set up multiple times if they are a typist and an administrator. For each login in their User Name must be unique. [2] Password. Can be inserted or be left blank as system will create a random password. [3] Accounting code. TYP+4 digit code. [4] Email address. You can have as many as required separated by a comma. Noreply emails generated by the system will go to emails addresses listed in this field. [5] Skype ID. Type in address is applicable. [6] Type. Select typist, editor, QA. [7] Phone. Can be typed in any format. [8] Time Zone. Recommended to use the time zone of the business head office as the time zone selected will be reflected in the turnaround times for jobs. • If you have off shore clients and typists you may wish to select different time zones for them. [9] Staff Groups. Select Staff groups are set up under Staff. See instructions on page 24. Select a staff group for Author if applicable. [10] Taxable. Select whether sales tax inclusive or sales tax free. [11] Allow only login from this IP Address. Input address if you want the user to only access the system from that address i.e. an inhouse user who is not allowed to access the system from another address (eg. at their home). This will not apply to outsourced staff. [12] Allow System to auto assign jobs to this User. Click to allow typist to be automatically allocated whatever new jobs are uploaded. The typist will only be auto assigned if he/she is listed as available. As soon as a new job has been auto assigned it changes status to Awaiting Typist and shows the typist who has been assigned. The status changes to In Process once the typist has downloaded it. Note that no fields in Job Details will be completed – rate, template, TAT etc. These need to completed after the auto assign by the administrator. [13] System will assign jobs to this user ONLY if a Rule exists. See instructions under Manage/Rule on page 37. Click tick box to allow auto assign as per a rule. If this option is ticked the job will be auto assigned to designated typists. Note the Administrator would not usually tick both these options as they may conflict. Auto assign also applies to editors in the same way as described for typists above. Transcriptus – Administrator / Supervisor Manual 28 [14] Maximum number of jobs that can be auto assigned. [15] Add this new staff. Click to save and trigger an automated noreply email to be sent to the typist. (See fig.16(a)) [16] Clear All. Cancel Staff set up. Edit/Delete You can edit Staff login details or delete the Staff by clicking on Edit or Delete. [1] [2] [3] [4] [5] [6] [9] [10] [11] [12] [13] [14] [7] [8] [15] [16] Fig. 15. – Screenshot of USERS screen, Staff tab Transcriptus – Administrator / Supervisor Manual 29 Fig. 16(a) – Example of noreply emailing continuing typist login Transcriptus – Administrator / Supervisor Manual 30 Edit Staff Account: If changes need to be made to an existing Staff member, eg. Change of phone number, add or remove email address, or Staff needs a new login generated, find the Staff member in the All Staff Accounts screen, and click “Edit”. (See fig. 16) [2] [3] [1] [4] Fig. 16. – Screenshot of Edit Existing Staff [1] Resend Account Information Email. Click if Staff member requires their login to be re-‐sent. The system will generate a new password, and send all email addresses listed a noreply email containing login details. [2] Save. Click to save any changes made to Staff account. [3] Cancel. Click to cancel any changes made to Staff account. [4] View Logs. Enter a date range to generate a report showing all jobs that have been processed for Staff member during that date range. Transcriptus – Administrator / Supervisor Manual 31 ADMINISTRATORS This is where new Administrators/Supervisors are set up, and existing Administrators/Supervisors information can be edited. (See fig. 18) Filter results on this screen by selecting Administrator or Supervisor Edit/Delete You can edit Administrator details or delete by clicking Edit or Delete. [1] [2] [3] [4] [5] [6] [8] [7] [9] [10] [11] [12] Fig. 17. – Screenshot of USERS screen, Administrators tab Transcriptus – Administrator / Supervisor Manual 32 Add a New Administrator Account: [1] User Name. Create name. If you create an existing name the system will advise and you should select a different user name. [2] Password. Can be inserted or left blank as system will create a random password. [3] Accounting code. ADMIN+4 digit code or SUP+4 digit code. [4] Email address. You can as many as required separated by a comma. [5] Skype ID. Type in if applicable. [6] Type. Select Administrator or Supervisor. [7] Phone. Can be typed in any format. [8] Time Zone. Recommended to use the time zone of the business head office as the time zone selected will be reflected in the turnaround times for jobs. [9] Allow only login from this IP Address. Input address if you want the user to only access the system from that address i.e. an inhouse user who is not allowed to access the system from another address (eg. at their home). This will not apply to outsourced staff. [10] Notify by email when new pre-‐booked conference is added? Select this if Administrator is to receive email notification from conference Authors. [11] Add This New Administrator. Save changes and add new Administrator/Supervisor. A noreply email will be generated by the system and sent to Administrator/Supervisor with login information. [12] Clear All. Do not save new Administrator/Supervisor. Transcriptus – Administrator / Supervisor Manual 33 MANAGE [1] [2] [3] [4] [5] Fig. 18. – Screenshot of MANAGE screen, Company tab Transcriptus – Administrator / Supervisor Manual 34 COMPANY Listed in alphabetical order. Search function at bottom of screen. The main screen shows Name, Code, State, Phone, Contact person and edit/delete. (See fig. 19) Add a new company Note: This is the first step in setting up a new client. The second step involves setting up the Author under the USERS tab. Refer to page 20 of this Manual for instructions. [1] Name. Type Company name or if Author is an individual, type Author’s own name, which can be the same as the User name. [2] Account Code. Create a four-‐digit code eg 1000. This code is then entered into the accounting package you use eg. MYOB (Australia) Sage (USA and UK). The software uses the code matching to create the correct invoice in the accounting program. [3] Address/State/Country/Email/Phone number. Type details. You can add as many email addresses as required, separated by a comma. [4] Contact Person. Name of Author or another contact person, could be an accounts person whom invoices should go to. [5] Add this new company. Click to save details. Transcriptus – Administrator / Supervisor Manual 35 TEMPLATE BANK [1] Template. Lists the templates created under Template Types [2] Document. Lists the description of the templates [3] Edit/Delete. Click as required. Upload Template: [A] Template Name. Type name. [B] Template Description. Describes the template eg Use for Author x. [C] Attach File. Browse and attach template file. [D] Upload. Click to create the template. [2] [1] [3] [A] [B] [C] [D] Fig. 19. – Screenshot of MANAGE screen, Template Bank tab Transcriptus – Administrator / Supervisor Manual 36 JOB TYPES This is where you can add all the job types you require. Once added, the job type will appear in the drop down menu in the Dashboard/Upload Audio Files screen and the Jobs/Job Details screen. (See fig. 21) [1] Job Type Names. Click “Edit” to add a new job type. This will open a box with Add a new Job Type. Type the new name eg focus group ad save. Focus Group will then appear in the job type list. Add a new job type: [2] Please Select A Job Type Name. Select the job type you have just created (refer to step above) eg. focus group. Create a code, which could be the full name or another name and put in the turnaround. The turnaround may not be relevant in which case use a standard time eg. 24 or 48. The TAT you put in does not impact elsewhere in the system. [3] Add This New Job Type. Saves and creates the new Job Type. [4] Clear All. Deletes the information and does not create the new Job Type. [1] [2] [3] [4] Transcriptus – Administrator / Supervisor Manual 37 Fig. 20. – Screenshot of MANAGE screen, Job Types tab NOTIFICATION Message Notification Creates a message which appears on the Dashboard, for categories eg Administrator, Author, Typist, and Editor. For example, you may want to tell all typists that a new template has been added and will be used for Client A. Or you may want to tell all clients that due to a high volume of work files uploaded on Friday will be completed on Monday and to email you if that will cause a problem. Fig. 21. – Screenshot of MANAGE Screen, Notification tab [1] [2] [3] [4] [5] [7] [6] [1] Message. Type message. [2] Display From/Display to. Use calendar icons to select from and to dates. [3] User types to inform. Select which category/ies are to see message. [4] Attach File. Using the new template example, you can attach the template for the typists to view. [5] Add another file. Attach another file if required. [6] Update this message. Click to show the message between the selected dates. Fig. 22. – Screenshot of MANAGE Screen, Message fields Transcriptus – Administrator / Supervisor Manual 38 [7] Cancel. Click to delete the message. Transcriptus – Administrator / Supervisor Manual 39 RULES The All Rules function allows the Administrator to set up the rules for auto assign (described on page 27 at [12]). Administrators can set which staff can type and/or edit which jobs. [1] [2] [3] [4] [A] [B] [C] [D] [5] Fig. 23. – Screenshot of MANAGE Screen, Rules tab Create a New Rule [1] Company. Select from the drop down menu [2] Author. Select from the drop down menu. [3] Job Type. Select from the drop down menu. [4] Will always be assigned to: Transcriptus – Administrator / Supervisor Manual 40 [A] Select Type. Select staff type [B] Select Staff. Select from drop down menu. [C] Add another staff. Opens a new field. [D] Notes. Add a descriptor. [5] Submit Data. click to upload. Note: System will not assign jobs to a user if any of these rules are not done or configured properly. Transcriptus – Administrator / Supervisor Manual 41 RATES This is where you can add all the rates you require. The system is programmed to show the rates per audio minute in USD, AUD and GBP currencies but is not currency specific. Eg a rate is shown as 1.75 -‐ this could be one dollar 75 cents or one GBP 75 pence. 0.75 could be 75 cents or 75 pence. The numerals only become a monetary value once they are imported into your accounting program. Once added, the rate will appear in the drop down menu in the Job Details screen. Fig. 24. – Screenshot of MANAGE Screen, Rates tab All Rates The top window shows all the rates you have created. (See Fig. 25) [1] Edit/Delete. Use these buttons to make changes or delete. [2] [3] [5] [4] [6] [7] Fig. 25. – Screenshot of Create a New Job Rate Create a New Job Rate: [2] Name. eg Focus Group or the actual Author and Typist rate eg 2.00-‐1.20. This means the Author is charged 2.00 and the typist is paid 1.20. [3] Author Rate. Enter rate eg 2.45. Transcriptus – Administrator / Supervisor Manual 42 [1] [4] Typist Rate. Enter typist rate eg 1.30. [5] Code. Enter the code you want to allocate to the rate. [6] Add this New Job Rate. Click to upload the rate information. [7] Clear All. Deletes the information. Transcriptus – Administrator / Supervisor Manual 43 CONFERENCES This function is designed for companies/authors who have regular files such as teleconferences with specific TAT’s that require advance booking. It may not be applicable to your service in which case ignore this tab. If you require this function please utilise the following instructions. There is a manual for the Company/Author which is available as a separate download. When setting up an author account click Only Allowed to Pre-‐Order Conference transcriptions if applicable. Leave unticked if not applicable. If ticked, the Author name will appear in the Show Conferences for Author drop down. The Author will be able to book conference calls by accessing Manage/Conference screen and using Add a New Conference to make the booking. The fields Owner ID, Country to Bill and Leader Name are optional and need only be completed if applicable to the booking. Each time a booking is made both the system Administrator and the Author receive a noreply email containing the conference details. All Conferences Show conferences for author: The drop down lists all authors who have been set up for Conference bookings by the Administrator. Show: The drop down lists All Active Conferences, All inactive Conferences, All Pending Conferences. All Active Conferences: Shows list of booked conferences that have not taken place. Country: Applicable to some companies which operate in and outside Australia. Optional field. Conf Code: The code given to a booking by the Author. Owner ID: The code given by the Author. Optional field. Company: The ID given by the Author. Book Date/Time: Date and time of booking. Green Tick: A green tick box appears next to the Conf date/Time column when the audio file for the booking has been uploaded by the Author. If the audio is not uploaded then the green tick does not appear and the booking stays in the list. This allows the administrator to easily identify and follow up bookings that should have been Transcriptus – Administrator / Supervisor Manual 44 uploaded. The Administrator can manually cancel the booking if the Author confirms the booking is not proceeding. TAT: Shows the turnaround time (TAT) required for the booking. Edit/Cancel: The Administrator can edit details or cancel the booking. The system removes conferences with a green tick from the All Active Conferences every 7 days and they are re-‐listed under All Inactive Conferences. All Inactive Conferences: Lists all conferences that have taken place. All Pending Conferences: Lists all conferences that have been booked less than 48 hours for a turnaround of 3, 6 or 12 hours and less than 24 hours notice of a conference that has been booked les s than 24 hours before the call date and time. The administrator receives a noreply email notifying of a pending booking. If the booking is to be accepted the Administrator goes to Manage/Conferences and Clicks the Pending booking Accepted box which appears at the bottom if the Add A New Conference screen. A confirmation noreply email is then sent to the author and the Administrator. Add a New Conference: The Administrator or Supervisor can add a booking manually. Click add this conference to upload the booking. The message below advises an Author: -‐ NOTE: If you proceed, a booking request will be sent to the System Administrator and you will be advised if the booking is accepted Transcriptus – Administrator / Supervisor Manual 45 Fig. 26. – Screenshot of MANAGE Screen, Conferences tab Transcriptus – Administrator / Supervisor Manual 46 REPORTS This is where you access a wide range of reports for all functions in the system. AUDIO Search uploaded audio files for selected date range by all companies, individual companies plus all authors or individual authors. Generate the Report: Click to see details. View Data as PDF/View Data as MS Excel: Select report type. Save or open. Show only Finished Jobs: Do not tick if you want all jobs including those in process to show. Fig. 27. – Screenshot REPORTS Screen, Audio tab TRANSCRIPTIONS Search completed transcriptions selected date range by all companies, individual companies plus all authors or individual authors. Generate the Report: Click to see derails. View Data as PDF/View Data as MS Excel: Select report type. Save or open. Fig.28. – Screenshot REPORTS Screen, Transcriptions tab Transcriptus – Administrator / Supervisor Manual 47 PRODUCTION Search completed transcripts for individual typists for selected date range. Include only completed jobs: Do not tick if you want all jobs including those in process to show. Generate the Report: Click to see details. View Data as PDF/View Data as MS Excel: Select report type. Save or open. Fig. 29. – Screenshot REPORTS Screen, Production tab COMPREHENSIVE Select date range and search by all companies, individual companies plus all authors or individual authors. Fig. 30. – Screenshot REPORTS Screen, Comprehensive tab Transcriptus – Administrator / Supervisor Manual 48 DELETED Search deleted audio files for selected date range for all companies or an individual company. Please note deleted files can be restored by contacting Support. Click the Support tab and create a ticket requesting that Job xxxx be restored. Fig. 31. – Screenshot of REPORTS Screen, Deleted tab Transcriptus – Administrator / Supervisor Manual 49 INVOICE All Finished jobs appear in Company alphabetical order ready for exporting to your hard drive and importing into your accounting program either MYOB (Australia) or Sage (USA and UK). Create Company Invoice Reports: (See previously Created Invoice) – click to search list and re-‐ download if required), Select the Date Range for Finished Jobs: It is a good idea to select at least a month prior to the current date so htat any jobs that may have been issued in a previous Invoice report, will be captured. Create One Invoice for Each Job: Tick if a company requires a separate invoice for every job. Note that you will need to create a separate Invoice Report file for companies which require this eg select each company then the date range then tick Create One Invoice for Each Job. This report will contain only invoices for single jobs. Generate the Company Report: Click and a window will appear with: Are you sure you want to generate a report? Click either Ok or Cancel. If OK, then a download box opens. Select either open (it is a text file) or Save file. Save to a folder ready to import into your accounting program. Fig. 32. – Screenshot of REPORTS Screen, Invoice Tab Transcriptus – Administrator / Supervisor Manual 50 PURCHASE CREATE TYPIST PURCHASE REPORTS: (See previously Created Purchase Invoice) – click to search list and re-‐download if required. Tick boxes for all typists to be included in the report. Select the Date Range for Finished Jobs: You can select either the date jobs are finished by the typists or date when jobs were finished for the companies, depending on when you pay your typists. Generate the Typist Report: Click and a window will appear with: Are you sure you want to generate a report? Click either Ok or Cancel. If OK, then a download box opens. Select either open (it is a text file) or Save file. Save to a folder ready to import into your accounting program. Fig. 33. – Screenshot of REPORTS Screen, Purchase tab Transcriptus – Administrator / Supervisor Manual 51 TYPIST AVAILABILITY This is where typists put in their availability preferably a week in advance so that Administrators can plan ahead when required. View Typist Availability Report: Select date range and the Report shows all typists available, their start and end times per day and the work types. The screen shot shows short and long Turnarounds. This column can be customised to suit your requirements. Report Options: Download as an Excel file or print. Fig. 34. – Screenshot of REPORTS Screen, Typist Availability tab Transcriptus – Administrator / Supervisor Manual 52 SEARCH ADVANCED SEARCH Select Company, Typist, Author, Job Status, Job Number, Job Type, Date Range. Search for Jobs: Click to show report. Fig. 35. – Screenshot of SEARCH Screen (Advanced Search) Transcriptus – Administrator / Supervisor Manual 53 SUPPORT This function is available for Administrators, typists, editors and clients. (See fig. 37) Fig.36. – Screenshot of SUPPORT tab Administrator: The Administrator creates a support ticket for a technical issues directly relating to the Transcriptus platform. The ticket is sent to the Transcriptus Support Team. Examples: 1: The system goes down. This is a rare occurrence however if it occurs, the Administrator should wait 15 minutes before creating a support ticket as occasional minor outages may occur. First check your internet connection to ensure the fault is not with your provider. After 15 minutes the Administrator should create the support ticket. History shows an outage greater than 15 minutes occurs less than three times a year. Transcriptus – Administrator / Supervisor Manual 54 2: An audio file is deleted in error. Only tech support can re-‐instate a deleted file. 3: Mal function of any feature. This is rare but may occur. 4: Noreply email is not received. Check thoroughly before creating a ticket as non delivery of a noreply to a client or staff may be the result of an issue with the recipient’s email eg noreply emails can be automatically deleted by anti-‐spam programs. If a login email has not been received, re-‐ sending perhaps to a different recipient email address will usually fix this issue. Do not create a support ticket for issues such as: 1. An author cannot upload an audio file. There are many reasons why an upload fails, virtually all to do with the sender’s internet connection or the size of the upload. Check the details of what files the sender is trying to upload. The files may be too big, the internet connection too slow. Advise the sender to try again at another time. 2. A typist can’t download an audio file or upload a transcript. The above also applies. A “golden rule” is reboot. The majority of technical issues experienced by clients and staff when trying to transfer files will be cleared when they reboot. Author: An author creates a support ticket for an issue directly related to use of the Transcriptus system. The ticket is sent to the Administrator. Examples: 1. Difficulty transferring files. 2. A request to delete audio files uploaded in error or duplicated. 3. A rate or template query. 4. Change a turnaround. 5. Require login to be re-‐sent. 6. To provide addition information about a file. The Administrator is not responsible for providing technical assistance for any issues that do not directly relate to use of the Transcriptus system. However the Administrator may choose to do so if they have the knowledge to assist. The Administrator may choose to charge for assistance. Transcriptus – Administrator / Supervisor Manual 55 Typist/Editor: A typist/editor creates a support ticket for an issue directly related to use of the Transcriptus system. The ticket is automatically sent to the Administrator. Examples: 1. Difficulty transferring files. 2. A rate or template query. 3. Change of job status from Awaiting Editor back to Awaiting Typist so that a Word file can be corrected and re-‐uploaded. 4. Change of turnaround request. 5. Query about audio file length, audio quality, speaker ID’s, name spellings etc. 6. Require login to be re-‐sent. 7. *Editor gives feedback on typist quality of work. * The feedback can be copied into a new Support ticket and sent to the typist. SUPPORT LISTINGS Show Support for: Click drop down menu to select New Ticket, Acknowledged or Issue Resolved. NEW TICKET SUPPORT This shows fields for Subject, Job Number (not mandatory) and Message. When completed click Add and the status of the ticket will change from New Ticket to Acknowledged. Both the ticket creator and the recipient will receive a noreply email such as this: Ticket Number: 11 Hi Author Two, Thank you for lodging a support ticket. Please log into http://testsite.transcriptussoftware.com with your user name and password to view updates to your ticket. Subject: I need a new login Message: Can you create a new login thanks Regards John Smith Transcriptus Support Team Transcriptus – Administrator / Supervisor Manual 56 At the end of the exchange of messages between the creator and the recipient the Administrator clicks View and Complete. The status then changes to Issue Resolved. Ticket No: shows the number. Author: The ticket creator. Created On: Date. The created tickets are listed in descending date order. View: click to open the ticket. Transcriptus – Administrator / Supervisor Manual 57 MESSAGING The messaging function allows the Administrator to send emails to any user in the system – authors, editors and typists. The recipient can’t send a response that is received within the system. If the recipient responds, the email will appear in the Administrator’s email program eg Microsoft Outlook. Messaging is most efficiently used for emails that don’t require a response from the recipient. Example: Email to typist: Please note the TAT for #2041 has changed from Thursday at 2pm to Thursday at 11am. SENT ITEMS 1. View Sent Items Summary list of sent items. Click “view” button to see the full details. Transcriptus – Administrator / Supervisor Manual 58 2. Adding user under “To” field. a b c d Steps: a. Select user type b. Select user c. Click the “Add” button d. Added user will show under the “To” field. *Repeat the process for additional recipients. SENDING EMAIL NOTIFICATION. a b Steps: a. After adding recipients, complete the subject and message fields. Transcriptus – Administrator / Supervisor Manual 59 b. Click “Send” button to complete the process. The supervisor can use the same functionality as the Administrator except they do not have access to Manage, Reports or Messaging. Transcriptus – Administrator / Supervisor Manual 60