1
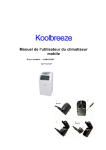
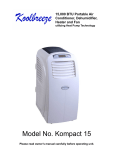
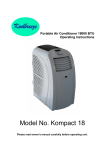
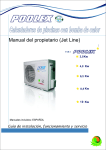
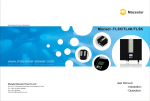
Koolbreeze Portable Air-conditioner User’s Manual For Model : CLIMATEASY 14 P14HCP Table of Contents 1 . I n s t a l l a t i o n … …………………………………………………………….. … … 2 2 . G e n e r a l S a f ety R e q i re men ts……………………………….… …… …….… 4 3. Product safety………………………………………………..……………..… 5 4. Safety Awareness…………………………………………..……….. … … … 6 5. Name of Parts………………………………………………..…… ……..…… 7 6. Control Panel and Display………………………………………………… … 8 7 . O p e r a t i o n … ………………………………………….……….. …….……….. 9 8. M a i n t e n a n c e … … … … … … … … … … … … … … … … … … … … … … … … … . . 11 9. Fault Fin ding ..................................................................................................... 13 10 Specif icat ion a nd W ar r ant y ............................................................................. 15 Before you use your portable air-conditioner, please read this instruction manual carefully so that you get the best from the unit. This instruction manual is used for guidance and does not form part of a contract. We reserve the right to make technical changes without prior notice thus the machine illustrated may look slightly different to that you have purchased. IMPORTANT Installer and Users please note: These instructions should be read carefully and left with the user of the product for future reference. BEFORE USE Inspect the product including its cable and plug for any signs of damage. If the product is damaged, DO NOT use it, and contact your supplier immediately. The appliance contains a refrigerant gas, so must be kept upright at all times. After unpacking wait 3 hours for the refrigerant gas to stabilise before use. INSTALLATION Stand the CLIMATEASY 14 on a firm, flat, level surface. Connect the exhaust hose as follows: expand a small section of the end, and screw into the indoor adaptor; then slide the indoor adaptor into the slot at the back of the unit. Expand a small section of the other end of the hose, and screw into the fish-tail-shaped adaptor. Page 2 Slide the two-part window adaptor to the correct length to fit the window. Close the window as far as possible to keep the window adaptor in place. Clip the fish-tail shaped adaptor into the aperture in the window adaptor. Keep the hose as straight as possible, avoid dips where the moisture from the exhaust air can condense and fill the tube with water. Do not allow the hose to be crushed. Correct Mounting Correct bend of Exhaust Incorrect Bending of the Exhaust can cause malfunction Page 3 The hose can be expanded up to 2 m long, but the shorter it is the more efficiently the CLIMATEASY 14 will operate. Do not extend the hose, or replace with another type of hose. Remote Control Fit one lithium 3V battery to the remote control, observing the correct polarity. Use only lithium 3V batteries. Remove the battery if the remote control is not used for a month or longer. Do not attempt to recharge the batteries. Do not dispose of the batteries in a fire as they may explode. GENERAL SAFETY REQUIREMENTS Domestic wiring must be tested periodically by a qualified electrician at least once every 10 years or at every change of occupancy. For office and retail premises, and buildings such as village halls, the wiring must be inspected at least once every 5 years. It is recommended that all building be fitted with smoke alarms (it is mandatory for new buildings). Page 4 PRODUCT SAFETY This appliance is not intended for use by persons (including children) with reduced physical, sensory or mental capabilities, or lack of experience and knowledge, unless they have been given supervision or instruction concerning use of the appliance by a person responsible for their safety. Children should be supervised to ensure that they do not play with the appliance Place the appliance on a firm flat surface. Ensure that the it is kept upright at all times Ensure that there is at least 300mm (1') between the sides of the appliance and any flammable materials Ensure that there is at least 900mm (3') from the top of the appliance and any flammable materials. Do not place on soft surfaces. Donotcover. Do not obstruct the air intakes and exhausts. For indoor use only Not suitable for use in boats, caravans or similar locations. Do not use in bathrooms, or in wet locations. Do not place the mains lead beneath a carpet or rug. Do not use the appliance in locations where paint, petrol or other flammable liquids are used or stored. Always transport and store in an upright position. Do not allow the appliance to fall over when there is water in the bucket. PAT TESTING. When used in an office environment, this product must be safety-tested yearly by a qualified electrician (PAT Tested) in order to comply with the Electricity at Work Regulations. We recommend that it is PAT tested regularly when used in a domestic environment. Page 5 Safety Awareness 1. Do not use the unit on a socket under repairs or not installed properly. 2. Do not use the unit: A: Near to source of fire. B: An area where oil is likely to splash. C: An area exposed to direct sunlight. D: An area where water is likely to splash. E: Near a bath, a shower or a swimming pool. 3. Never insert your fingers, or rods into the air outlet. Take special care to warn children of these dangers. 4. The appliance is not intended for use by young children or infirm persons without supervision. 5. Young children should be supervised to ensure that they do not play with the appliance. 6. Keep the unit upward while transporting and in storage to protect the compressor. 7. Before cleaning the air-conditioner, always turn off or disconnect the power supply. 8. When moving the air-conditioner, always turn off and disconnect the power supply, and move it slowly. 9. Do not use an electric heater near the air outlet or within 15 mm of plastic parts. 10. To avoid the possibility of fire the air-conditioner should not be covered. 11 .All the air-conditioner sockets must comply with the local electric safety requirements. If necessary, please check it for the requirements. Notes: — If any parts become damaged, please contact the dealer or a designated repair shop; In case of any damage, please turn off the unit, disconnect the power supply, and contact the dealer or a designated repair shop; Ensure the power cord shall is firmly grounded. If the power cord is damaged, please turn off the unit and disconnect the power supply. It must be replaced from the dealer or a designated repair shop Page 6 1 Page 7 Appearance and Function of Control Panel Operation Display Page 8 Operation Introduction Notice: - Operation temperature range: MAXIMUM HEATING MINIMUM HEATING DB/WB ( 27/--- 0/--MAXIMUM COOLING MINIMUM COOLING DB/WB ( ) 35/24 16/12 1. Before Using Check whether the exhaust hose has been mounted properly. Cautions for cooling and dehumidifying operations: - When using functions on cooling and dehumidifying, keep an interval of at least 3 minutes between each ON/OFF. - Make sure the water pump is mounted correctly. - That the power supply meets the requirements. - The socket is for AC use. - Do not share one socket with other appliances. - Power supply is AC220--240V50Hz 2. Cooling operation - Press the “Mode” button till the “Cool” icon appears. - Press the “+" or “ - ” button to select a desired room temperature. ( 1 6 - 3 1 ) - Press the “Fan Speed” button to select wind speed. 3. Dehumidifying operation Press the “Mode” button till the “Dehumidify Indicator Lamp” blinks - Set the selected temperature to current room temperature minus 2 . (1 6-3 1 ) - Set the fan motor to LOW wind speed. 4. Heating operation (this function is not available for a cold- only Unit) Press the “Mode” button till the “Heat” icon appears. - Press the “+”o r “ - ” button to select a desired room temperature. ( 1 6 -3 1 ) - Press the “Fan Speed” button to select wind speed. Timer operation Timer ON setting: - When the air-conditioner is OFF, press the “Timer” button . . - ON time can be regulated at any time in 0-24 hours. Next select the desired ON time using the temperature buttons to set one hour increments. When the correct number of hours flash on the display, confirm the choice by pressing the TIMER button again Timer OFF setting - With the air-conditioner ON, press “Timer” button. Next select a desired OFF time using the temperature buttons to select one hour increments. When the correct number of hours flash on the display, confirm the choice by pressing the TIMER button again. - OFF time can be regulated at any time in 0-24 hours. Page 9 6 Water Pump Drainage There is self-evaporation water pump in the machine. In most circumstances , the self-evaporation water pump will work with the compressor to evaporate any water. . In exceptionally humid circumstances, the unit may produce more water than it can evaporate in which case follow the procedure for gravity drainage below. 7. Continuous Gravity Drainage - When you plan to leave this unit unused for a long time, please remove the rubber bung from the drainage hole at the bottom of unit, and connect a drain hose to the lower fixing clip. All the water in the water tank will drain out.. NOTE In the unlikely event of water pump damage, gravity drainage can be used, and under this condition, the water pump is not activated. The unit will continue to work efficiently. Under this condition, please connect a drain hose to the lower fixing clip, then all the water in the water tank will drain outside. You can either leave the drainage hose clipped permanently to the outlet or remove the rubber blockage when the tank is full and the water alarm operates. 8. Internal Tank Water Full Alarm Function The inner water tank in the air-conditioner has a water level safety switch. When the water level reaches an anticipated height in the internal water tank, the water full indicator lamp lights up. Note: it is normal that the water full indicator lamp will light up when the build-in water tank is full as the unit works at room relative humidity of up to 70%. Page 10 MAINTENANCE Before cleaning, turn the appliance off, and disconnect from the mains supply. The appliance may then be cleaned using a damp cloth with a drop of washing-up liquid to remove any dust or dirt from the case. Do no use stronger detergents or solvents as these may damage the plastic. Cleaning the filter: The filter is located on the back panel of the appliance. Unclip to remove, then remove dust and dirt using a vacuum cleaner. The filter should be cleaned every two weeks to maintain optimum performance. Using a dry 1" (25mm) paint-brush, remove any dust from the grilles. If the mains lead is damaged, it must be replaced by the manufacturer or an authorised service centre. If the mains plug needs to be replaced, proceed as follows: Connect the brown wire to the terminal labelled "L". Connect the blue wire to the terminal labelled "N". Connect the green/yellow wire to the terminal labelled with the earth symbol or "E". Make sure that the cord-grip is positioned correctly (over the outer sheath of the cable) and it fully tightened. Page 11 FAULT CODES If any error codes appear on the display,see the Trouble Shooting page below. END OF SEASON STORAGE. Before putting the appliance into storage, empty all water from the drain, and run the appliance on "fan only" mode fo a few hours to dry the inside thoroughly. Clean the filter, unplug the mains cable, and store the appliance in its origin box in an upright position. DISPOSAL AND RECYCLING You must not dispose of this appliance with domestic household waste. Most local authorities have specific collection system for appliances and disposal is free of charge to the end-user. When replacing an existing appliance with a similar new appliance your retailer may take the old appliance for disposal. This air conditioner contains R410a refrigerant gas. At the end of its life the disposal of this product must be in accordance with local regulations. Page 12 FAULT-FINDING If the CLIMATEASY 14 is not operating, proceed as follows: Check that the mains plug is firmly in the socket, and that the socket is switched ON. When the unit if switched on there will be a delay of about 1 minute before it starts to operate. Unit stops running: Mains supply is disconnected or has failed Target temperature has been reached. Timer has been set. Water tank is full (WATERFULL indicator will illuminate) In cooling mode, no cool air is produced: Room temperature is lower than set temperature The unit is defrosting (this will take a few minutes, and afterwards, it will resume operation) Filter is blocked Cooling is poor on hot days Too much direct sunshine is heating the room Windows or doors are open allowing hot air into the room A lot of people in the room (each person contributes about 75W of heating) Electrical equipment in the room producing heat Heating is poor on cold days The heat pump can only heat effectively when the outdoor temperature is above 7 °C. The unit is not intended as a primary means of heating premises. Remote control does not work: Check batteries are correctly installed, and are not exhausted. Make sure that the remote control is pointed towards the main unit when being used. Page 13 Troubleshooting Troubles Possible Causes Suggested Remedies 1. UNIT DOES NOT START - Water full indicator lamp Dump the water out of the water WHEN PRESSING ON/OFF blinks, and water tank is full. tank. BUTTON Reset the temperature - Room temperature is higher than the setting temperature. (Electric heating mode) Reset the temperature - Room temperature is lower than the setting temperature. (Cooling mode) 2. Not cool enough - The doors or windows are not Make sure all the windows and doors are closed. closed. - There are heat sources inside the room. Remove the possible heat sources if - Exhaust air hose is connected or blocked. - Temperature setting high. 3. Auto mode Power-Off in 4. Noisy 5. E0 Code 6. E2 Code not Connect or clean the exhaust air hose. is too Reset the temperature - Air inlet is blocked. heating - Heating protection, when the temperature at the air outlet exceeds70 d e g r e e s ,the unit will power off automatically. - The ground is not level or not flat enough Clean the air inlet. Restart the unit at when a lower room temperature. Place the unit on a flat, ground if possible It is normal. level - The sound comes from the flowing of the refrigerant inside the air conditioner Room temperature sensor Replace room temperature failed sensor (the unit can also work without replacement.) 1.Very high humidity RH70%. - It is n o r m a l : the air is too humid: drain by hand.and Restart the unit. Note: In the event of failure, contact the retailer from whom it was purchased. Page 14 TECHNICAL SPECIFICATION Dimensions: Net Weight: Power supply: Power consumption (cooling): Power consumption (heating): Operating current (cooling): Operating current (heating): Heating capacity: Cooling capacity: Dehumidifying capacity: Working temperature (cooling): Working temperature (heating): Air flow: Refrigerant: 440 ×410 ×830 mm 31kg 240V ~ 1450 W 1500 W 6.6A 6.8A 4100W (14000 BTU/hour) 4100W (14000 BTU/hour) 36 litres/day 16-32°C 7-27°C 450 m 3/h R410a (620 g) SERVICE WARRANTY Cottage Stores LLP guarantees the product free from defects in materials and workmanship for a period of twelve months. Should this unit be operated under conditions other than those recommended, at voltages other than the voltage indicated on the unit, or any attempts made to service or modify the unit, then the warranty will be rendered void. Please Note: any attempt to extend the exhaust hose will invalidate the warranty. The product you buy may sometimes differ slightly from illustrations. This warranty is in addition to, and does not affect, your statutory rights. If you have any problems with this product, please in the first instance call the retailer from whom you purchased it. Koolbreeze Division Cottage Stores LLP Claverdon Cottage The Green, Claverdon CV35 8LL United Kingdom Page 15