1
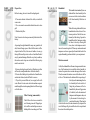
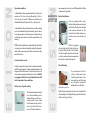
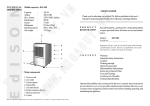
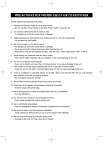
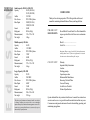
E d I S O N
TECHNICAL
SPECIFICATION
Small capacity: ED-10A / ED-12B
Capacity
:
10L/D (ED-10A)
12L/D (ED-12B)
Airflow
:
95 CMH
Elec. Source :
220V/50Hz/1phase.
Rated Input
:
200W (ED-10A)
220W (ED-12B
Sound
:
45 dB
Refrigerant
:
R134a (140g)
Dimension (mm):
515 x 270 x 345
Net weight
:
14 kgs.
Middle capacity: ED-16A
Capacity
:
16L/D
Airflow
:
135 CMH
Elec. Source :
220V/50Hz/1phase.
Rated Input
:
370W
Sound
:
42 dB
Refrigerant
:
R134a (212g)
Dimension (mm):
575 x 315 x 285
Net weight
:
16 kgs.
Large Capacity: ED-35B
Capacity
:
35L/D
Airflow
:
280 CMH
Elec. Source :
220V/50Hz/1phase.
Rated Input
:
680W
Sound
:
53 dB
Refrigerant
:
R134a (330g)
Dimension (mm):
580 x 350 x 445
Net weight
:
25.5 kgs.
The above specifications and name of models are subject
to change without prior notice due to our continuous
imporvement policy and market management reasons. Pls.
contact us or nearest distributors in your area for up-todates and full specifications.
USER’S GUIDE
Thank you for selecting our product! Pls. follow guideline in this user’s
manual for maximizing dehumidification efficiency and longer lifetime.
P R O D U C T
REGISTRATION
Record Model No. and Serial No. of this dehumidifier
in space provided below for future service and maintenance.
Model:........................................
Serial No:...................................
Important: Keep a copy of your bill of sales and warranty
card for future service. If service is performed, it is in your
best interest to obtain and keep all receipts.
C O N T E N T
Warranty
Important Safety Instructions
Location
Working principle
Operation procedure
Dehummidifier Main features
Removing Collected Water
Care and Cleaning
Avoid Service Checklist
Technical Specifications
Operate dehumidifier only as instructed in this user’s manual. these instructions
are not meant to cover every possible conditions and situations that may occur.
Common sense and general caution must be used when installing, operating, and
maintaining any appliance.
I M P O RTA N T
S A F E T Y
INSTRUTION
The warranty period is 12 months from the date of purchasing.
The warranty is limited to free replacement and shipping
of any faulty part, or manufacturing errors. All claims must
be supported by evidence that the failure has occurred
within the warranty period, and that the unit has been operated within the designed parameters specified.
All warranty claims must specify the model/serial number.
These details are printed on the unit identification plate.
Read all instructions before using this dehumidifier. To reduce the risk of fire, electric shock, or injury to persons
when using your dehumidifier, follow basic precaustions,
including the following:
WARNING !
For your safety
Do not store or use gasoline or other flammable vapors
and liquids in the vicinity or this or any other electrical appliance. Read product labels for flammability and other
warnings.
Child Safety Precautions
Destroy the carton, plastic bags, and any packing materials immediately after the dehumidifier is unpacked. Children should never use these items for play.
Do not leave children unattended in an area where the
appliance is operating. Do not allow them to sit or stand
on the appliance.
E d I S O N
E d I S O N
WA R R A N T Y
F R O S T
APPEARS ON
COIL ABOVE
B U C K E T
NOISE IS LIKE
A
FAN
Dehumidifier has been turned on recently. This is normal
due to refrierant rushing through the coil. Frost will usually
disappear within 60 minutes.
Room temperature is too low. Unit will not operate satisfactorily if room temperature is below 5oC for type B
models or 15oC for type A models.
Air is moving through the dehumidifier. This is a normal
sound.
INTERNATIONAL
STANDARD
We, at EdISON, feel very confident that you satisfy
with our product as all our products’ quality are assured by ISO9002 manufacturing plant.
All EdISON products also comply with other international standard and codes:
* UL: USA Safety Standard.
* CE: Europe Safety Standard.
* SAA: Australia Safety Standard.
* GS: The Electrical Safety Standard for Europe.
* TUV Rhineland: One German Company (Approved
by Germany Government) whose business is to help /
charge manufacturers applying CE.
DEHUMIDIFIER
IS OPERATING
BUT ROOM IS
NOT
DRY
E N O U G H
Windows or doors near dehumidifer are open to outdoors.
Close all windows or doors to outside.
Area to be dehumidified is too lare. Check with your dealer
to see if capacity is adequate.
Air movement through dehumidifier is blocked. Grill may
be dirty. Use brush attachment of vacuum cleaner to clean
grill.
Dehumidifying coil on back of unit may be dirty. See “Care
and Cleaning”. Dehumidifier must be placed in a space
that does not restrict air flowing into the rear coil or out of
the front grill.
Dehumidifier has been installed or restarted recetly. The
higher the moisture in the room, the longer the dehumidifier will operate.
Humidistat is set at continuous. Dehumidifier will not turn
off if humidistat is at continuous.
Humidistat is set too low. Turn the humidistat to a higher
setting.
Dehumidifier has been installed or restarted recently. The
higher the moisture in the room air, the longer it takes for
the room air to become dry.
Dehumidifier does not have sufficient clearance to operate. Air flow to front and rear grill is blocked. See “Selecting a location”.
Refer to causes under dehumidifier runs to much.
E d I S O N
E d I S O N
DEHUMIDIFIER
RUNS
TOO
M U C H
SELECTING
L O C AT I O N
Electrical Information
Your dehumidifier must be plugged directly into a properly
grounded and polarized receptacle. If you not sure the
outlet is adequately grounded or protected by a time delay or circuit breaker, have qualified electrician install the
proper outlet according to the EdISON electrical code
and applicable local codes and ordinances. Do not use
extension cord and adapter plug.
Never unplug the dehumidifier by pulling on the power
cord. Always grip the plug firmly and pull straight out from
the receptacle.
Do not pinch, bend, or knot the power cord.
In case of damage to the power cord or plug does not fit
receptacle, it should be replaced by an authoruized technician.
IMPORTANT:
1. Dehumidifier must be operated in a enclosed area to be
most effective. Close all doors, windows, and other outside openings to the room. The effectiveness of the dehumidifier depends on the rate at which new moisture-laden
air enters controlled room.
2. Place dehumidifier in a location that does not restrict air
flow into rear coil or out of the front grill.
3. A dehumidifier operating in a basement will have little or
no effect in drying an adjacent enclosed storage area, such
as a closet, unless there is adequate circulation of air in
and out of the area. It may be necessary to install a second
dehumidifier in the enclosed area for satisfactory drying.
O P E R AT I O N
PROCEDURES
When the unit is started, the fan
begins to pull moisture-laden air
across the dehumidifying coils
(Evaporator). The coils cool
down air below its dewpoint temperature, where moisture vapor
in the air starts to condense
around the coils. The condensed moisture drops into the
bucket or is continuously drained away. This cool and dry
air then flows through the heating coils (Condenser coils)
to recover the temperature, the dry and warm air then
going through the front grill into the room.
The bucket has a hose/drain connection. The dehumidifier
should be kept in operation as long as excess moisture is
present in the room air.
To begin operating the dehumidifier, follow these steps:
1. Plug the power cord into a properly grounded 220V
volt outlet.
Note: before operating this unit, see the “Removing Collected Water” section for proper placement of the bucket.
Dehumidifier will not operate if the bucket is full or not
properly positioned.
2. When first using the dehumidifier, turn the humidistat
knob clockwise to the Continuous position. The unit will
run continuously at this setting.
3. Allow the dehumidifier to operate at the above setting
for three to four days. After this, adjust humidistat knob to
the required position.
E d I S O N
E d I S O N
HOW
IT
W O R K S
conditions can reduce ability of unit to do its job.
To clean filter, wash with a mild detergent and warm water. Rinse filter well, gently shake excess water from filter.
Dry filter well before reinstalling.
Removing and Installing Filter.
Grasp filter from top, pull up to remove and put back to
install.
OPERATION SELF-DIAGNOSIS CHECKLIST & SOLUTION
DEHUMIDIFIER
DOES
NOT
OPERATE
Before calling for service, review this list. It may save you
time and expense. This list includes common occurrences
that are not the result of defective workmanship or materials in this appliance.
CAUSES & SOLUTION
Plug is disconnected from outlet. Push plug firmly into wall
outlet.
House fuse blown or circuit breaker tripped. Replace fuse
with time delay type or reset circuit breaker.
The dryness level in the room has been achieved, the
dehumidifier is turn-off by humidistat.
Bucket not installed properly. Re-position bucket.
Water in the bucket has reached its preset level. Dehumidifier automatically turns off when this occurs. Empty
bucket and return bucket to position.
Dehumidifier is not turned on. Turn the humidistat to start
the unit.
Proper Care
E d I S O N
E d I S O N
CARE
AND
CLEANING
M A I N
F E AT U R E S
Before cleaning, be sure to turn off and unplug unit.
1. Clean outer cabinet with an oil-free cloth, or wash with
warm water.
2. Use a vacuum cleaner and brush attachment to clean
grill.
3. Wash and dry filter.
Note: Fan motor has been permanently lubricated at the
factory.
Air passing through dehumidifier may carry quantities of
dust, lint and fungus spores. Much of this matter will be
deposited on the filter, but some of smaller size can go
through filter and deposites on the coil and then flushed
away by natural drainage. But in the very dusty condition,
this matter can develops on coils and the following step
must be carried out:
1. Remove buidup when soft and wet. Brush away with a
soft brush (a small paintbrush or old clothes brush).
2. Do not allow buildup to dry and harden. It must then be
soaked and softened, and is difficult to remove.
3. If you feel you must flush coil, use a spray bottle with
water. Do not let water enter electrical-machine compartment through the circular opening behind coil. Do not spray
coil with a hose.
Filter Cleaning (some models)
Check filter at least once a month to
see if cleaning is needed. Trapped particles in filter can buildup can cause a
buildup of frost on cooling coils. These
Humidistat
The humidistat automatically turn on
dehumidifier when humidity in the
room exceeds the set value and turn
it off when humidity fall below set
value.
When first using dehumidifier, turn
humidistat knob clockwise to Continuous position. Unit will run continuously at this setting. Operate dehumidifier at the Continuous setting
for three to four days. During this
time, observe the dampness conditions in the area being dried. When any condensation and
dampness ordors are gone adjust humidistat knob to the
required humidity position suitable to your requirement.
Moisture removal
At first, the dehumidifier will remove large amount of moisture. It will continue to do so until the relative humidity is
reduced to a point where moisture damage will not occur.
Then, the amount of moisture removed from the air will be
a lot less. This indicates the dehumidifier is operating effectively and is maintaining the relative humidity at the desired level.
Judge the perfromance of the dehumidifier by the use of hygrometer
(if available) or the elimination of
WATERFULL
dampness and dampness ordor, not
by the amount of water being deposited in the bucket. When bucket
is fulled with water, the unit automatically stops and the
water full lamp will glow until the bucket is emptied and
the return to the initial position.
A dehumidifier will not operate satisfactorily if room temperature is 5oC or lower for type B models (or 15oC or
lower for type A models). Under these conditions, the
dehumidifier should be turned off. See “defrost cycle”.
A dehumidifier will not eliminate frost on windows during
winter. the dehumidifying coild normally operates above
freezing temperatures and cannot prevent moisture from
condensing on the inside of a window panel that is below
freezing.
TIP: It may be helpful to use a dehumidifier in the kitchen
or laundry area where the humidity is high. Reducing humidity in these areas may reduce frost on windows in other
parts of the home.
Frost formation on coils
A light coating of frost on the coils is normal when dehumidifier begins to operate. Under normal conditions it will
disappear within 60 minutes. Frost also forms on the coil
when room temperature or humidity level is low. Models
not equipped with Frost control should be turn off if
frost forms under these conditions.
Defrost cycle (Type B models)
DEFROST
The defrost feature prevents frost
or ice from reamaining on the
dehumidifying coil for an extended period of time. when
frost formation occurs, this defrost cycle turns off the compressor. The fan continues to
E d I S O N
E d I S O N
Operation conditions.
REMOVING
CONDENSED
MOISTURE
run, causing any frost or ice to melt. Dehumidifier will then
resume normal operation.
Bucket Installation
Units are supplied with a water
bucket, which positions conveniently
on the front of the unit to accumulate
water removed from the air. The
bucket also has a built-in hose connection to carry water directly to a
drain.
Bucket is equipped
with an Auto shut-off switch which is activated by a float or the like. The Auto shutoff switch stops the unit before the bucket
overflows, and turns the unit on again after
the bucket is emptied and replaced.
Direct Draining
Drain hose position
If you want water to flow directly to a drain connect any
standard garden hose to the
drain outlet on back of the unit
or on the bucket, or place the
dehumidifier over the drain.
Note: When using either of the above direct method, the
unit should place a bit higher than the ground so that water
can flow out by gravity force.