1
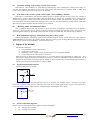
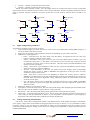
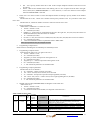
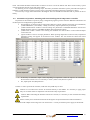
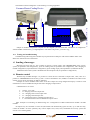
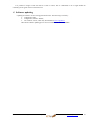
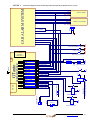
GSM SMS/DIAL security and remote control system User’s guide Prog. Version GTauto v3 APPLICATION The module may be applied for remote monitoring and control of vehicles, motorcycles, boats or other vehicle as well as for their protection via GSM network. Individual protection of houses, garages, cottages and other premises. Remote control of the devices via GSM network Access control. Gate/door control. Automation of premises, temperature and voltage control. GSM Temperature controllerThermostat Remote voice listening. FEATURES 7 inputs. Fully programmable zones. 2 inputs for arm/disarm the security system. The module can be controlled from the central lock of the vehicle or from additional keyboard or from other access control device. 3 programmable outputs for remote control or for fulfillment of selected function. 1 output for monitoring of system’s state. LED indicator. 16 users who receive information about protected object. Reception of information in a form of SMS or via DIAL short call. 400 users, enabling to control gate or electromagnetic lock via free short call. ARM/DISARM of the system via free short call. Temperature measurement. For temperature control, alarm and control. Voltage measurement. Voltage monitoring and alarm. External microphone. Remote voice listening option via external microphone. Option to connect BELL for alarm indication. For protection of car, house, garage. System state BUZZER. (Optional output type) Light FLASH feature can be used for car direction indicator or for light alarm indication of other objects (Optional output type) Sending of periodical test including system parameters. SMS about state of each sensor, alarms, power supply voltage and GSM communication level. Built-in GSM module. Testing and diagnostic of the module via USB by using program SERA Remote setup via SMS messages. Configuration of the module via USB. Free configuration program SERA. GSM SMS/DIAL security and remote control system www.topkodas.lt 2 Content 1 2 3 4 5 6 Safety requirements .................................................................................................................................................. 5 Application of the device .......................................................................................................................................... 5 Used definitions and terms........................................................................................................................................ 5 Short description of operation principle.................................................................................................................... 5 Specifications............................................................................................................................................................ 6 General view of the product and layout of control devices....................................................................................... 8 6.1 Application of LEDs ....................................................................................................................................... 8 6.2 Input/output connector pinouts........................................................................................................................ 9 7 Users ......................................................................................................................................................................... 9 7.1 Control and programming of the module via SMS messages ......................................................................... 9 7.1.1 Installer ....................................................................................................................................................... 9 7.1.2 User ............................................................................................................................................................ 9 7.2 Users to receive SMS/DIAL messages............................................................................................................ 9 7.3 Remote control USERs. Users who are able to control the module via short call........................................... 9 8 ARM/DISARM of the module................................................................................................................................ 10 8.1 ARM/DISARM via short call........................................................................................................................ 10 8.2 ARM/DISARM by sending SMS message ................................................................................................... 10 8.3 ARM/DISARM by using Lock and Unlock inputs ....................................................................................... 10 8.4 Automatic arming of the security system “Auto rearm” ............................................................................... 11 8.5 Activation of the security system via IN7 input. „Force ARMing“ function ................................................ 11 8.6 “Blocking ARM” IN6 additional feature....................................................................................................... 11 8.7 Bell confirmation signal by arming/disarming the security system............................................................... 11 9 Inputs of the module ............................................................................................................................................... 11 9.1 Equivalent diagrams of inputs ....................................................................................................................... 11 9.2 Sensor connection diagrams .......................................................................................................................... 11 9.3 Input configuration parameters...................................................................................................................... 12 9.4 Voltage measuring IN8 (internal).................................................................................................................. 12 9.5 Temperature sensor input IN9 ....................................................................................................................... 13 9.6 Microphone and voice listening .................................................................................................................... 13 10 Programmable outputs ............................................................................................................................................ 13 10.1 Equivalent diagrams of diagrams .................................................................................................................. 13 10.2 Output connection diagrams.......................................................................................................................... 14 10.3 Operational parameters of inputs................................................................................................................... 14 11 Timers of the security system ................................................................................................................................. 14 12 Sending of automatic periodical test ....................................................................................................................... 14 13 Preparation for operation ........................................................................................................................................ 14 13.1 Configuration and control of GSM communication module via SMS messages .......................................... 15 13.1.1 Examples of typical programming messages:...................................................................................... 16 13.2 Configuration of the module via PC.............................................................................................................. 20 14 Installation of the product and connection diagram ................................................................................................ 20 14.1 Mounting instruction and connection diagram of security system for premises ........................................... 20 14.2 Car GSM messages system. Installation manual and connection diagram.................................................... 22 14.3 Automation of premises, mounting and connection diagram of temperature controller ............................... 23 14.4 Testing and troubleshooting .......................................................................................................................... 24 15 Sending of messages ............................................................................................................................................... 24 16 Remote control........................................................................................................................................................ 24 17 Software updating ................................................................................................................................................... 25 ANNEX 1 Connection diagram of the module in parallel with already available security system ............................ 26 GSM SMS/DIAL security and remote control system www.topkodas.lt 3 .......................................................................................................................................................................................... 26 ANNEX 2 Lock an Unlock inputs diagram................................................................................................................ 27 GSM SMS/DIAL security and remote control system www.topkodas.lt 4 1 Safety requirements Before applying the module GTAUTO, please read this user's guide. Any operations, related with mounting of the module and connecting of peripheral devices, should be performed only after unplugging the module from the mains. 2 Application of the device GSM communication module GTAUTO (hereinafter the Module) is applied for transferring of GSM SMS messages to the mobile phone of a user. The module GTauto may be applied for protection of house, garages, cottages, vehicles as well as for access control, gate control, objects' automation, smart house and temperature control. The module may be used for protection of vehicle or in combination with the vehicle security system, which has control lock control. The module may also be used for protection of objects and for wide scope of application. In the event of burglary the device depending on algorithm of programming is able to call or to send SMS to up to 16 users. A user is able to hear what is going on in his vehicle or premises after answering a call or he may call to the module himself. The user is able to receive an SMS with detailed information about status of each protected zone and occurrence of alarms. The user is able to control the device via SMS messages only if he knows user's password. If s call is being performed from the telephone number not included in the system‘s storage, the call is cancelled immediately. SMS message is being sent to the user also if power supply voltage drops. The SMS message includes voltage of backup battery. The module has external temperature sensor. The user receives temperature alarms and restores via SMS messages. The SMS about voltage of the module and ambient temperature is also available. Temperature may be measured in Celsius and Fahrenheit. SMS periodical test ensures constant control of the module. The module is able to send periodical test. Test time is programmable. The test will include GSM communication strength, system (battery) power supply voltage, temperature and IMEI of the module. The module GTauto ideally suits for remote control of gate, barrier gate operator systems and electromagnetic locks. In order to open gate, a user calls to the number of GTauto module. The module compares incoming number with programmed users' numbers and in a case of compliance activates gate control device and interrupts the call automatically. Up to 400 users are able to control gate. All parameters of the module should be configured via PC by using software SERA or in remote manner by sending appropriate SMS including password. Additional information. The module may be used as measure to track and to detect the location of the vehicle having the module installed. Example see: www.traceamobile.co.uk . Contact your GSM communication provider due to this additional feature. 3 Used definitions and terms 4 Installer – a person provided with INST (installer's) password. User – a person provided with USER (user's) password. Authorized user - a person whose mobile phone’s number is entered in GSM module. Two equal authorized users may be entered into the module. Configuration – programming of the module settings, which will define the operation of the item. E.g. users telephone numbers, sending of SMS message, input names etc. Event – event the user receives information about. ARM – status of the security system. The module is activated. DISARM – status of the security system. The module is in standby mode; only 24h inputs are active. NO - input type (Normal Open) - this means that the alarm will be send when the input will be connected with ground (-V). NC input type (Normal Close) - this means that the alarm will be send when the circuit between input and ground (-V) will be broken. EOL - (end of line resistor) input type with resistor Service messages – on/off, test, resetting of the system. DIAL – the system calls to the set number. Pull-up resistor - the pull-up resistor is that it weakly "pulls" the voltage of the wire it's connected to towards +V (or whatever voltage represents logic "high"). MIC - microphone COM – negative terminal of power supply. +V - positive terminal of power supply. SSR – Solid State Relay Short description of operation principle GSM SMS/DIAL security and remote control system www.topkodas.lt 5 The module transfers messages about event of the security system to the mobile phone of a user via GSM communication channel. Upon alarm response of the security system, the module will generate SMS message about alarmed sensors, which is being sent to the user along with short call. it is possible to send SMS and to call to 16 users. Algorithm of message sending is SMS1, SMS2...SMSn till all SMS messages will be send. After DIAL1, DIAL2....DIALn. All messages are being sent until all users will be notified about the event. Preferred messages and texts of these messages should be set when programming the module. The module understands when the call is rejected and will not repeat calling. When the module is calling to the user’s phone, the user can not reject the call at least 15 seconds. Otherwise the module will understand that the user‘s number is busy and will try to repeat the call again. In a case user‘s number is busy, the module will try to call in so far as set when programming the module. Note: Operation of this function depends on interpretation of call control by the operator; in some cases the operator may wrongly interpret rejection of the call and in this case the module will repeat calling each 60 seconds and in so far as the amount of programmed repetitions (by default 3 repetitions). In such case GSM operator may be changed or simply the amount of DIAL repetitions reduced. Operational parameters of the module should be set by sending SMS messages or via PC by using programming cable and configuration program SERA, which is available at www.topkodas.lt website. In order to activate voice listening it is necessary to call from the user‘s telephone number. When calling the module will immediately activate voice listening, which will last as long as the user will cancel the call or when the module will start performing other commands. Calls from other telephone numbers (of non-authorized users) are ignored. 5 Specifications Parameters of built-in GSM module: Quad-band (850/900/1800/1900 MHz) Sending of SMS messages Receiving of calls and dialing Microphone Outputs: OUT1 max current .................................................................................- (-V) 1500 mA. OUT2 max current ................................................................................- (-V) 1500 mA. OUT3 max current ................................................................................- (+V) 100 mA. All outputs can be controlled via short call DIAL or via SMS message. This feature may be used for gate opening, ignition locking etc. Output alarm parameters may be programmed. Programmable algorithms for outputs operation: CTRL/SMS/DIAL, SIREN, BUZER, ARM state, Zones OK, Light Flash INI-IN7 inputs: SMS text for input alarm and restore Programmable enabling or disabling of inputs; Input type ...............................................................................................NC/NO/EOL Algorythm for zones operation: delay, interior, instant, 24 hours, silent, fire Response time; Time of additional response; IN8 voltage control (virtual input) Alarm voltage (programmable); Restore voltage (programmable); Programming-based voltage calibration; Measuring scale ...................................................................................0.01V; IN9 (temperature control) parameters: External temperature sensor; Alarm temperature (programmable); Restore temperature (programmable); Programming-based calibration of temperature sensor; Temperature measurement range ...........................................................from -40 oC to +60 oC Measuring system ..................................................................................Farenheit/Celcius Measuring scale .....................................................................................0.1 oC / 0.18 oF; Module control: ARM/DISARM of the security system via LOCK/UNLOCK outputs. via SMS message via short call DIAL Automatic periodical test: Test sending in a form of SMS message. Sending communication control messages (tests) at time range from 1 to 24 hours after pressing RESET button or after entering into ARM (security) mode. Discretion of settings is one hour. Power supply voltage: Nominal power supply voltage...............................................................12,6 V. GSM SMS/DIAL security and remote control system www.topkodas.lt 6 Power supply voltage range ..................................................................9 - 16 V. Consumption current: In standby mode......................................................................................less than 50 mA. In a mode of short call/SMS sending......................................................less than 300mA. Environmental parameters: Temperature range for storage of the module ........................................from -40 to +85 oC / from -40 to 185 oF Operation temperature range .................................................................from -30 to +75 oC / from -22 to 167 oF Max relative humidity under 40 oC / 104 oF .......................................... 95% Mass of the package:.....................................................................................430g Overall dimensions of the module:................................................................90x63x32 mm GSM SMS/DIAL security and remote control system www.topkodas.lt 7 6 General view of the product and layout of control devices 6.1 Application of LEDs Table 1 Designation Indication variations Blinking, remains lit for External LED on the 50ms, turns off for system cable “ARM 300ms. state” Blinking, remains lit for 50ms, turns off for 10s. Blinking, remains lit for 50ms, turns off after “TST” (green) 1000ms. Off Lights continuously Flashes, remains lit for “REG” (yellow) 50ms, turns off for 300ms. Off Flashes “MOD” (red) Note: 1. 2. 3. 4. 5. 6. 7. 8. TST (green) LED see table No 1 MOD (red) LED see table No 1 REG (yellow) LED see table No 1 Programming connector RESET button Antenna connector Button for SIM card removing SIM card holder 9. Power supply and input/output connector Meaning GSM module is in ARM (security) mode. GSM module is in DISARM (non-security) mode. The module is functioning. The module is out of order or no voltage. Modem has been registered to the network. Modem is being registered to the GSM network. Modem failed to register to the network. Power supply OK and the module is registered to the GSM network. Lights continuously Modem power supply OK, and the module failed to register to the GSM network. Off Modem power supply failure or it is switched off. All LEDs turn off for 15sec when resetting GSM modem of the module. GSM SMS/DIAL security and remote control system www.topkodas.lt 8 1 11 2 12 3 13 4 14 5 15 6 16 7 17 8 18 9 19 10 20 7 7.1 Name Contact No 6.2 Input/output connector pinouts Table 2 GND +V Input 1 Input 2 Input 3 Input 4 Input 5 Input 6 Input 7 Lock Unlock OUT1 OUT2 OUT3 LED(K) LED(A) Temp+ TempMICP MICN Wire color Black Red Green/Yellow Green Yellow Brown Blue Orange Grey Black/White Black Green/Yellow Green White Black/White Black Black/White Black Black/White Black Description Negative supply voltage (GND) Positive supply voltage Power supply voltage 8-16V 1 zone/input, NC/NO/EOL 2 zone/input, NC/NO/EOL 3 zone/input, NC/NO/EOL 4 zone/input, NC/NO/EOL 5 zone/input, NC/NO/EOL 6 zone/input, NC/NO/EOL 7 zone/input, NC/NO/EOL Input for security ARMING Input for security DISARMING First output 1500mA. Open Collector. Second output 1500mA. Open Collector. Third output 100mA. Open Collector +V ARM/DISARM state LED cathode ARM/DISARM state LED anode Temperature sensor input Temperature sensor input Positive differential input of the microphone. Negative differential input of the microphone. Users Control and programming of the module via SMS messages 7.1.1 Installer Installer us able to carry out all (INST) commands available in the Table 3. The installer is able to change parameters of the module only with INST password 7.1.2 User User is able to carry out only user’s (USER) commands available in the Table 4. The User is able to make an inquiry anytime and to receive parameters of the security system as well as to control outputs of the module (Out1, Out2, Out3) and to activate AMR/DISARM modes. The User is able to control the module only when using USER password. 7.2 Users to receive SMS/DIAL messages The amount of users is up to 16. These users are able to receive messages or/and calls after alarm response of the security system or communication test or system state test messages, which are being generated after alarm response of the security system or following test sending schedule. The amount of users is up to 16. It is possible to select type of SMS messages to be sent to each user. 7.3 Remote control USERs. Users who are able to control the module via short call. The amount of users is up to 400. These users are able to control outputs via short call, to activate voice listening and to activate ARM/DISARM mode of the system. Action of the user is free-to-select. It is possible to select the actions of the module regarding telephone number of each user when it will recognize a telephone number. The following actions may be selected regarding telephone number of each user: To activate outputs OUT1,OUT2,OUT3 optionally. This feature may be used for gate control, car ignition blocking or to release a dog. ARM/DISARM security system Activate voice listening via external microphone MIC GSM SMS/DIAL security and remote control system www.topkodas.lt 9 8 ARM/DISARM of the module The module can work in the ARM mode and DISARM mode. ARM/DISARM state of the module may be changed in several manners: via short call, via SMS message or by using Lock/Unlock inputs. All possible ARM/DISARM methods may complement one another. E.g. it is possible to activate the module from the keyboard and to deactivate via short call. 8.1 ARM/DISARM via short call It is possible for 400 users to activate/deactivate the module via short call. The module will recognize user‘s number and will automatically cancel the call. Not recognized numbers are being ignored. Programming of user’s numbers see manual of SERA software. 8.2 ARM/DISARM by sending SMS message It is possible to ARM/DISARM of the module by sending SMS message and using USER or INST password. Example of SMS message: Deactivate the system USER 123456 59 0 Activate the system USER 123456 59 1 More info see clause 13.1. 8.3 ARM/DISARM by using Lock and Unlock inputs It is possible to ARM/DISARM the module by using Lock and Unlock inputs. These inputs may be used when it is necessary to control the module with any peripheral device using NO or NC output: Signal of central lock of vehicle; Access control device, e.g.: RFID, IBUTTON, keyboard; It is possible to use switch, button, reed switch etc for generating of control signal. Several Lock/Unlock modes are available: Mode 1 (V+ Pulse using Lock and Unlock inputs). Lock input sets ARM mode after pulse or steady signal. Unlock sets DISARM mode. It is comfortable to use 1 or 2 mode when connecting the module to the central lock of vehicle. Central lock mostly generates lock and unlock signals with two wires. Mode 2 (V- Pulse using Lock and Unlock inputs) similar as 1 mode only inverted. Mode 3 (V+ Level using Lock input) used only one Lock input. Unlock input is not used. These modes are comfortable to use when activating/deactivating the system by using switch or other access control device. Mode 4 (V- Pulse using Lock and Unlock inputs) similar as 3 mode only inverted. 1,2,3,4 see diagrams annex No 3. Lock and Unlock inputs have no Pull-Up resitor inside the module. In that cases when there is no external signal, you need to connect external 2,2K pull-up resistor. The resistor should be connected between power supply positive terminal +V and input. Such case may be when switch is connected beween lock input and ground as shown in Fig. 1. Example of wiring diagram with two switches. One switch for ARMing, another - DISARMing. 1 or 2 modes should be set by using two switches. +V GTauto Pull Up resistor 2.2K Lock +V Lock switch Unlock Pull Up resistor 2.2K UnLock switch Fig. 1 Example of wiring diagram with central lock of vehicle, see annex 2. GSM SMS/DIAL security and remote control system www.topkodas.lt 10 8.4 Automatic arming of the security system “Auto rearm” If the function „Auto-reARM“ is on, the module will automatically return to ARM state, if during „Entry Delay“ no one zone was alarmed. This feature is active only if the module was deactivated via telephone DIAL or SMS. This protects from random deactivation of the system via telephone. 8.5 Activation of the security system via IN7 input. „Force ARMing“ function This feature is comfortable to use when the module operates in parallel with other security system. For example, if default security system is used in the module, thus bell signal may be used for IN7. If default security system will be alarmed for appropriate reasons and will activate the bell, thus GTauto module will automatically turn into ARM state. and will send all information related with alarmed sensors. Thus the user gains additional protection from undesirable deactivation of GTauto module. This IN7 feature may be disabled. 8.6 “Blocking ARM” IN6 additional feature This is additional feature IN6, which enables to block activation of ARM State. This feature may be applied in vehicles by connecting IN6 input to ignition. If GTauto module was deactivated and after ignition was turn on thus while the ignition will be on, the module would not be able to enter into ARM state. This feature may be disabled. 8.7 Bell confirmation signal by arming/disarming the security system The bell will generate confirmation signal when arming/disarming the security system, if function „Siren signal on ARM/DISARM“was selected in the software SERA. When the security system is being ARM the bell will beep once. When security system is being DISARM – the bell will beep twice. 9 Inputs of the module The module GTauto has: 7 programmable external inputs (zones). 1 temperature sensor input. Measuring of power supply voltage. Internal input is seen in programming table. 2 control inputs Lock and Unlock, see clause 9.3 Each input may be related with selected output, i.e. to switch selected output depending on output state. This feature allows applying module for automation of premises, as well as for temperature control and handling. E.g. if temperature drops till the permissible limit, the module is able to automatically activate heating system and also to inform a user about critical temperature in a form of SMS. 9.1 Equivalent diagrams of inputs Equivalent diagram of 1-5 inputs: +V GTauto 2.2K IN1-IN5 6 and 7 inputs are used only when Pull-Up resistor is not desirable. For example, when it is necessary to get signal from siren or ignition of the vehicle or from other device for which outside signal can not be given. These inputs have no internal Pull-Up resistor. Input resistance is 22kOhm. Equivalent diagram of 6-7 inputs: GTauto IN6-IN7 Sensor connection diagrams 9.2 Sensors may be connected following 4 different connection diagrams: NC – normally closed contact; NO – normally open contact; GSM SMS/DIAL security and remote control system www.topkodas.lt 11 NC/EOL – normally closed with end of line resistor, NO/EOL – normally closed with end of line resistor, NOTE. All resistors should be 1 kOm ± 10%. The length of wires for connection of sensors can not exceed 300m and resistance of wire connected to sensor contacts can not exceed 300 Ohms. Resistors should be mounted as near the sensor as possible. Improper connection of resistors system will not work properly. Pull-Up resistors should be 2,2 kOhm. +V +V Pull Up resistor 2.2K IN1-IN5 IN6-IN7 NC COM Pull Up resistor 2.2K IN1-IN5 NC IN6-IN7 NO COM NO COM COM +V IN6-IN7 NC/EOL COM COM 1K 1K NC/EOL COM Pull Up resistor 2.2K IN6-IN7 NO/EOL IN1-IN5 +V Pull Up resistor 2.2K IN1-IN5 1K NO/EOL COM 1K Input configuration parameters 9.3 The following parameters may be set for all inputs: Text of SMS messages for alarms and restores. This text will be included when sending SMS message to a user about alarms and restores of zones. Input types: NC,NO,EOL. These parameters should be set depending on type of zone connection. Definitions of input application: o Delay – Entry/Exit zone. Set "Entry delay" and "Exit Delay" are applied for this zone. Such type zones are used for connection of door sensor. o Interior – disturbance of this type of the zone will not be responded if alarm of “Delay” type zone occurred and “Entry Dlay” or “Exit Delay” time still have not run out. Such type zones may be used for connection of motion sensor in front of the door. The input will be activated immediately if the door has not been open before. o Instant – Instant zone. Upon disturbance of this zone, the system will immediately activate burglary alarm. If the security system was ARM’ed. o 24 hours - Upon disturbance of this zone, the system will activate burglary alarm not depending whether the security system is ARM or DISARM. The applications of this type zones are safes, storehouses, tampers of the sensors. o Silent - silent zone is always active not depending on whether the security system is ARM or DISARM. Upon disturbance of this zone, SMS messages are being generated but the siren will not be activated. These zones may be applied for voltage, temperature control, AC mains failure control and for alarm of silent panic. o Fire - this zone is always active not depending on whether the security system is ARM or DISARM. The zone generates a special siren signal with interruptions. The zone is applied for smoke sensors and for fire alarm. Enabling or disabling of zone alarm or restore. Input speed – time of the input reaction, this is the time period during which changed input state should remain stable in order to let the module to register alarm or restore input state. Repeat time – this is the time period, during which repeated event of the input will be ignored. Input action – switching of selected output (OUT1, OUT2, OUT3) after changing input state event of alarm of restore. May be used for automation of objects, e.g. for temperature control in premises. Upon dropping of temperature will critical limit, heater would be switched on automatically. 9.4 Voltage measuring IN8 (internal) This input is visible only in configuration window of the SERA software of the module. IN8 input is intended for power supply voltage control. If the module is being applied for the security of vehicle, it is very comfortable to follow cat battery voltage. A user will always be alerted that car battery has been discharged. This the car battery will be protected from full discharge or damage. Alarm and restore voltages are programmable. Voltage measurement may be calibrated additionally. GSM SMS/DIAL security and remote control system www.topkodas.lt 12 Temperature sensor input IN9 9.5 Temperature sensor is connected to the system wire contacts 9 Temp(+) and 19 Temp(-). Temperature input number in “Inputs” configuration table is IN9. Alarm and restore temperature may be changed. Upon temperature alarm, the module will send SMS message to a user. And if set when programming, the module will commutate the output. It is comfortable to use this function for premises heating management. In a case of accuracy shortage, temperature sensor may be calibrated additionally. Following the equation “Temperature=X*ADC+Y“ and by selecting X and Y coefficients. Temperature calibration may be performed in software SERA in testing window. It is necessary to have accurate thermometer in order to measure temperature at least in two points. In testing window temperature ADC indications in these points should be read. Following the equation “Temperature=X*ADC+Y“ and by calculating X and Y coefficients. Calculated X and Y coefficients should be programmed in the module. It is easy to calculate X and Y coefficients in MC Excel by using trendline. y = 0,3284x - 269,26 40 35 30 Teperature 25 20 15 10 5 0 800,00 -5 820,00 840,00 860,00 880,00 900,00 920,00 940,00 ADC Temperature may be measured in Celsius and Fahrenheit. 9.6 Microphone and voice listening The microphone may be connected to the contacts 10 MICP and 20 MICN of system wire. In order to avoid noises, the microphone should be mounted as far as possible from GSM antenna. 400 users are allowed activating voice listening in the objects. In order to allow a user to activate voice listening, it is necessary in user table „GSM remote control“ to check the box „MIC“. Note: If a user number is enabled for ARM/DISARM and MIC thus after making a call to the module, the state ARM or DISARM will be changed and also microphone will be activated. 10 Programmable outputs The module GTauto has 3 programmable outputs. Outputs of the module may be used to switch relay, LEDs, siren or other sound device. Current commutated by OUT1 and OUT2 is 1500mA. Current commutated by OUT3 output is 100mA. Equivalent diagrams of diagrams 10.1 OUT1 and OUT2 outputs are open collector in terms of grounding –V. OUT3 output is open collector in terms of power supply positive terminal +V. OUT1 and OUT2 Equivalent diagram: GTauto OUT3 Equivalent diagram: GTauto +V OUT1,OUT2 10E OUT3 COM GSM SMS/DIAL security and remote control system www.topkodas.lt 13 10.2 Output connection diagrams Examples of input connection diagrams see below: 1500mA OUT1,OUT2 GTauto +V COM +V COM Siren COM GTauto +V LED indicator 1500mA OUT1,OUT2 GTauto 10E OUT3 1K-3K 100mA 10.3 Operational parameters of inputs The following parameters may be set for each output: SMS text for ON output state SMS text for OFF output state Output operation algorithm „OUT def“: o CTRL/SMS/DIAL – output used for remote control via short call or SMS. E.g. for ignition blocking, for gate control or for remoter starting of a car etc. o SIREN – output used for connection of siren. o BUZER – sound signaling device. Upon alarm of the zone beeps continuously. When security system starts calculating Exit time “Exit Delay”, the used is able to hear short voice signals. When 10 seconds are left till the activation, signals are being repeated each 0.5 seconds. If after expiry of delay time all zones remains unalarmed, the system turns into ARM state along with conformation beep. o ARM state – state of alarm system ARM/DISARM. For light indication may be used. When the output is set for operation in pulse mode, this feature may be used to close car windows or roof ventilation. Impulse time should be set 20-30 seconds. When the security system will be turn on, the output will generate signal to close windows. o Inputs OK- if any of zones is disturbed, the output will be alarmed. This feature is usually used for indication whether all zones are in order. o Light Flash – used for connection of light signal. Upon alarm of the security system the light starts blinking. Lights will also blink when activating/deactivating the security system. This feature may be applied to connect car direction signals. Output inversion; Output type level or impulse; Output impulse duration. 1-65535 seconds. 11 Timers of the security system „Entry Delay“– time period, during which the user after activate „Delay“ zone should manage to turn off the security system. “Exit Delay“– time period, during which the user should manage to leave premises and pass „Delay“zone. “Siren time” – siren operation time after alarm occurrence; “Test time” – time of automatic periodical test. 12 Sending of automatic periodical test Periodical test may be used for communication control of the module. Test sending time is programmable [Test Time]. Asynchronous periodical test may be programmed. This means that after each activation of the system test time is being calculated from the beginning „Reset test counter ARMing“. Test sending may be disabled when setting test time 00. Periodical test may be used for SIM card balance control. The following parameters of the module are available in a test message: GSM communication strength, power supply voltage, temperature, IMEI number of the module, software version. 13 Preparation for operation Before or after mounting of the module it is necessary to set its parameters. SIM card settings may be performed by using only GSM phone. The following steps should be fulfilled: check and if necessary enter SMS message center number (this should be done by using GSM phone); disable PIN code requirement of the SIM card (this should be done by using GSM phone); GSM SMS/DIAL security and remote control system www.topkodas.lt 14 GSM communication strength, IMEI, SMS message center number is visible in software window “Test”; see SERA description. configure telephone numbers to which information should be transferred*; set the numbers to send SMS and to make a call*; set active inputs, which will be used. E.g. if microwave sensor will not be used, its input should be disabled*; set periodicity of communication test (if 00 is entered, the test will not be send); set input parameters. set output OUT1, OUT2, OUT3 states (if applied)*; After inserting SIM card or upon changing parameters of the module, it is necessary to press RESET button. There are two types to configure the module. The first – via SMS messages. The second – via PC, by connecting the module to PC via programming cable. Full change of parameters is possible only via PC by connecting programming cable. If possible we recommend configuring the module via PC. 13.1 Configuration and control of GSM communication module via SMS messages Only basic parameters of the module, shown in the table No 1, may be configured via SMS messages. All parameters of the module may be changed via USB by using configuration software SERA. Configuration of the module via SMS messages may be performed only with installer‘s password. The table No1 shows configuration and control codes of the module. Configuration of the module may be performed via SMS messages. Command structure: Verifier: INST – Install. This verifier is used for configuration of parameters of the module. USER – User. This verifier is used for module control. Installer’s or user’s password. Command code. Parameters of the command. wor d Comma nd code. 123456 INST Prad žia Pass One SMS message may include as many commands as one SMS message may cover, i.e. 160 symbols (including spaces). In such case firstly verifier should be sent, password should be written without space after the verifier and further comes command code, parameter, command code, parameters etc. separated with space „_“. The module performs the commands following the sequence: firstly performs the first command next after the password and further come all other commands from the left to the right. Table 3 Installer’s command codes. Command parameters default settings Examples of command parameters Clarifications Telephone number of users whom to send SMS and whom to make a call (DIAL) up to 16 symbols, the end symbol “#”) after the symbol “#” user priority number comes 01-16 Delete selected user’s telephone number according to priority number. Priority number from 01 to 16 Delete telephone numbers of all users Lock/Unlock modes: 0,1,2,3,4 see diagrams in annex No 3 Periodicity of communication test (from 00 am to 00 pm), 00 – no test In the example test to users will be send each hour. LED indication Test, Reg (1-On, 0-Off) Input IN1,IN2,IN3,IN4,IN5,IN6, IN7, IN8, IN9 modes (0-'delay',1-'interior',2'instant',3-'24h',4-'silent',5-'fire') Input IN1,IN2,IN3,IN4,IN5,IN6, IN7, IN8,IN9 types (0-NO type,1-NC type,2-EOL ) Service messages: Arm, Disarm, Reset, Test (1-On, 0-Off) In the example service messages Reset and Test will be sent. Input alarms: IN1,IN2,IN3,IN4,IN5,IN6, IN7,IN8, IN9 (1-On, 0-Off) In the example alarms of IN6 IN8 IN9 will be activated. Input restores: IN1,IN2,IN3,IN4,IN5,IN6, IN7,IN8, IN9 (1-On, 0-Off) In the example restores of IN1, IN3, IN5, IN6, IN8, IN9 will be activated. 01 none 3701111111#01 02 none 01 03 05 none 1 4 06 24 01 07 1 0 08 111111211 021111333 09 111112211 021111111 10 1111 0011 11 111111111 000001011 12 111000011 101011011 21 22 23 24 25 26 27 28 29 Alarm Luggage # Alarm Bonnet# Alarm Door# Alarm Microwave# Alarm Shock.# Ignition On# Siren on# Low Battery# Low Temperature# Atidare bagazine# Atidare kapota# Atidare duris# Suv. mikr.# Suv. smug.# Ijunge degima# Suv Siren# Low Battery# Low Temp# IN1 input name changing up to 16 symbols, the end symbol “#” IN2 input name changing up to 16 symbols, the end symbol “#” IN3 input name changing up to 16 symbols, the end symbol “#” IN4 input name changing up to 16 symbols, the end symbol “#” IN5 input name changing up to 16 symbols, the end symbol “#” IN6 input name changing up to 16 symbols, the end symbol “#” IN7 input name changing up to 16 symbols, the end symbol “#” IN8 input name changing up to 16 symbols, the end symbol “#” IN9 temperature alarm name changing up to 16 symbols, the end symbol “#” 31 Rest. Luggage # Uzdare bagazine# IN1 input restore name changing up to 16 symbols, the end symbol “#” GSM SMS/DIAL security and remote control system www.topkodas.lt 15 32 33 34 35 36 37 38 39 Rest. Bonnet# Rest. Door# Rest. Microwave# Rest. Shock.# Ignition Off# Siren Off# Battery Restore# Temp Restore# Uzdare kapota# Uzdare duris# Atsistate mikr.# Atsistate smug.# Isjunge degima# Siren off# Battery Restore# Temperature Res# IN2 input restore name changing up to 16 symbols, the end symbol “#” IN3 input restore name changing up to 16 symbols, the end symbol “#” IN4 input restore name changing up to 16 symbols, the end symbol “#” IN5 input restore name changing up to 16 symbols, the end symbol “#” IN6 input restore name changing up to 16 symbols, the end symbol “#” IN7 input restore name changing up to 16 symbols, the end symbol “#” IN8 input restore name changing up to 16 symbols, the end symbol “#” IN9 temperature restore name changing up to 16 symbols, the end symbol “#” 40 41 42 43 44 45 Out1 ON# Out2 ON# Out3 ON # Out1 OFF# Out2 OFF# Out3 OFF # Degimas on# Blokavimas on# Kondic.on# Degimas off# Blokavimas off# Kondic. off# 46 000 111 47 000 102 50 none 1,2,3 51 52 53 59 none none none none 0 or 1 0 or 1 0 or 1 0 or 1 60 none 3701111111#001#00010 61 none 001 62 none Out1 output activation text changing up to 16 symbols, the end symbol “#” Out2 output activation text changing up to 16 symbols, the end symbol “#” Out3 output activation text changing up to 16 symbols, the end symbol “#” Out1 output deactivation text changing up to 16 symbols, the end symbol “#” Out2 output deactivation text changing up to 16 symbols, the end symbol “#” Out3 output deactivation text changing up to 16 symbols, the end symbol “#” Outputs OUT1 OUT2 OUT3 states: 1-Inverted, 0-Normal In the case of example OUT1 OUT2 OUT3 outputs are inverted Description of outputs operation algorythm: Out1, Out2, Out3 0-CTRL,1-SIREN,2-BUZZER,3-ARM state,4-Zones OK,5-Flash In the example output OUT1 will work in siren mode; OUT2 – for remote control; OUT3 – for activation of Buzzer. 1-OUT1, 2-OUT2, 3- OUT3. Change state of selected OUT. Output state: changes every time when sending command code. Clarification see below the table. Activates or deactivates OUT1 output. 0 – activate, 1- deactivate Activates or deactivates OUT2 output. 0 – activate, 1- deactivate Activates or deactivates OUT3 output. 0 – activate, 1- deactivate ARM/DISARM command. 0- activates ARM state, 1- activates DISARM state Command to enter new user for remote control via short call. Command parameters: User telephone number, end symbol #, user ID number from 001 to 400, #, dial mode 0 – off or 1 - on, sequence OUT1,OUT2,OUT3,ARM/DISARM,MIC Delete selected user’s telephone number according to priority number. User ID from 001 to 400 Delete all telephone numbers of remote control users from 001 to 400 80 none 1 90 123456 654321 91 123456 948921 Send a part of information regarding configuration of the module in a form of SMS: 1. 05…12 parameters of command codes will be sent; 2. 21…28 parameters of command codes will be sent; 3. 31…38 parameters of command codes will be sent; 4. 40…49 parameters of command codes will be sent; 5. make an inquiry about states of Out1-Out3 outputs; 6. test inquiry; 7. system state inquiry. input/output states will be sent along with current state of the system (ARM/DISARM). To change installer’s (INST) code (recommended to change before applying the module in operation) To change user’s (USER) code (recommended before applying the module in operation) 13.1.1 Examples of typical programming messages: Programming of users telephone numbers to send SMS and to make a call: INST123456 01 37011111111#01 123456 – installer’s code; 01- command code (programming of users’ numbers); user’s telephone number without (+) comprised of country code, operator’s code and user’s telephone number. the end symbol #; 01 – User’s priority number 01-16. In this example telephone number of the first user will be entered; After the telephone number has been entered all events of the security system will be sent to a user. Optional events to be sent may be selected only when configuring via USB. 1. 2. It is possible to delete telephone numbers one by one according order of priority or all 16 numbers at once: INST123456 02 15 Detele user‘s telephone number whose priority number is 15. It is possible to select from 01 to 16. INST123456 03 Delete all 16 users‘telephne numbers. 3. To enter user’s telephone number for remote control via short call: INST123456 60 3701111111#001#00010 123456 – installer’s code; 60 – command code (programming of users’ telephone numbers for remote control via short call); 3701111111# - user’s telephone number without (+) comprised of country code, operator’s code and user’s telephone number. the end symbol #; GSM SMS/DIAL security and remote control system www.topkodas.lt 16 001 – user’s priority number from 001 to 400. In this example telephone number of the first user will be entered; 00010 – What actions should be done after making call to a user. Sequence from the left to the right: OUT1,OUT2,OUT3,ARM/DISARM,MIC 0 - active functions, 1- non-active function. In the example function ARM/DISARM is selected. 4. Delete user’s for remote control via short call telephone number according to priority number or all numbers at once: INST123456 02 61 001; Delete user’s number whose priority number is 001. It is possible to select from 001 to 400. INST123456 62 ; Delete all numbers of remote control users from 001 to 400. 5. Inputs programming INST123456 11 000001111 12 011011111 80 1 123456 – installer’s code; 11 – command (see table) 000001111 – used inputs are calculated from the left to the right. IN1, IN2, IN3, IN4, IN5 alarms are disabled and IN6,IN7, IN8, IN9 alarms are enabled. 12 – command (see table) 011011111 - IN1, IN4 restores are enabled, IN2, IN3, IN5, IN6, IN7,IN8, IN9 restores are enabled. 80 – command (see table) 1 will send command code 05-12 parameters back to SMS sender. More input parameters may be changed via USB. 6. Programming of input names: INST123456 21 Alarmbagazi# 22 Alarmkap# 23 Alarmdurys# 80 2 7. Programming of outputs names: INST123456 40 ignition on # 43 ignition off # 80 4 123456 – installer’s code; 40 – command (see table) „degimas ij.#“ name of output state when ignition is on. 43 – command (see table) „degimas isj.#“ – name of output state when ignition is off. 80 – command (see table) 4 – will send 40-49 parameters of command codes. 8. Programming of output parameters: INST123456 46 101 47 000 80 4 46 – command – outputs inversion (see table) 101 – OUT1 inverted, OUT2 normal, OUT3 inverted. 47 – command - description of operation output algorithm (see table) 105 – OUT1 siren, OUT2 – remote control, OUT3 light signalling device (FLASH). 80 – command (see table) 4 – will send 40-49 parameters of command codes. 9. Module control modes (ARM/DISARM) see diagrams in the annex No3: INST123456 05 1 123456 – installer’s code; 05 – command (see table) 1- lock/unlock modes of the module, see diagrams in the annex No 3 Beginin g Password Command code. Table 4 Table of users codes. Command parameters default settings USER 123456 50 none 1,2,3 51 52 53 none none none 0 or 1 0 or 1 0 or 1 59 none 0 or 1 Possible commands GSM SMS/DIAL security and remote control system Clarifications 1-OUT1, 2-OUT2, 3- OUT3. Change state of selected OUT output. Output state: changes every time after sending command code. Explanation see below the table. Activates or deactivates OUT1 output. 0 - activates; 1- deactivates Activates or deactivates OUT2 output. 0 - deactivates; 1- activates Activates or deactivates OUT3 output. 0 – deactivates, 1 - activates ARM/DISARM command. 0 – DISARM the security system, 1 ARM the security system www.topkodas.lt 17 80 none 1,2,3,4,5,6,7 Send a part of information regarding configurations of the module in a form of SMS: 1. 05…12 parameters of command codes will be sent;; 2. will send command code 21-28 parameters; 3. will send command code 31-28 parameters; 4. will send command code 40-49 parameters; 5. make an inquiry about states of outputs (Out 1 – Out 3); 6. test inquiry. 7. System state inquiry. will send information on input/output states and system state (ARM/DISARM). Outputs control via SMS messages: Output states of the module may also be controlled via SMS messages. Let‘s say that car ignition should be blocked, thus the first output should be connected to ignition blocking relay. For outputs control the following commands are used: 50,51,52,53,58. Command 50 changes (inverts) state of selected output. When this command is being sent, output state is being changed, i.e. if output has been deactivated, it is activated and vice versa. 51, 52, 53 commands sets preferred output state: if 0 is being sent, the output is being deactivated; if 1 – the output is being activated. 50 and 51, 52, 53 commands perform the same action, i.e. changes output states. The user may use commands, which are more convenient for him. Command 58 changes state of selected output for set time period. If you wish to change (invert) OUT1, OUT3 states and to receive information about outputs changes, the following message should be sent: USER123456 50 1 50 3 123456 – user code 50 – to change state of selected output; 1 – to change state of first output; 50 – to change state of selected output; 3 – to change state of first output; If you wish to activate OUT1 and to deactivate OUT2: USER123456 51 1 52 0 123456 – user code 51- set OUT1 state; 1 – deactivated output; 52- set OUT2 state; 0 – deactivated output; Outputs control by selecting output reaction timeout: USER123456 58 1#48# (enable OUT1 for 48 seconds) USER123456 58 2#5# (enable OUT2 for 5 seconds) 123456 user code 58 command (see table) 1 enable OUT1 output (1-OUT1, 2-OUT2, 3-OUT3); # delimiter 48 output alarm time is 48 seconds; after 48 seconds OUT1 will be disabled automatically; # delimiter ARM/DISARM of the security system via SMS message: To DISARM the security system: USER123456 59 0 or to ARM the security system: USER123456 59 1 It is possible to receive test of the module on the basis if inquiry command: USER123456 80 6 123456 – user code 80- information inquiry command (see table No 3) 6 – command (test inquiry) Upon sending command SMS (USER123456 80 6) test message will be sent to the number, from which SMS message has been sent. Below see the example of received test SMS message: Events: GSM SMS/DIAL security and remote control system www.topkodas.lt 18 --Test-Signal strength: 17 Sistem voltage: 12.60 V Temperature: +23.3 C IMEI: 353358010231707 HW:GTauto2 SW:GTauto v2 071124 Clarifications: Signal strength: Numerical values of communication signal level. Corresponds the following meanings (according GSM telephone): 0- very weak signal (communication loss limit); 1...5 - very weak signal (correspond to one bar on the monitor of a mobile phone); 6...9 - satisfied signal (correspond to two bars on the monitor of a mobile phone); 10...14 - good signal (correspond to three bars on the monitor of a mobile phone); 15 and more - excellent signal (corresponds to four bars on the monitor of a mobile). Voltage: Voltage of car battery or other power supply source the module is connected to. Temperature: temperature sensor’s showings (C or F). IMEI: IMEI number of GSM modem. HW: hardware version SW: software version. Inquiry of system state according to the command: USER123456 80 7 123456 – user code; 80 - command (see table No 3) 7 – command (system state inquiry) The module will sent two part message to the number the SMS was sent from. Below you will see the exmaple of received SMS message following inquiry command (USER123456 80 7): The first of two SMS: System info: State:ARM (Explanation: system state) Inputs: In0:Luggage closed . (Explanation: state of the first input) In1:Bonnet closed . (Explanation: state of the second input) In2:Door closed . (Explanation: state of the third input) In3:MicrowaveRestore (Explanation: state of forth input) In4:Shock restore . (Explanation: state of the fifth input) The second of two SMS: Inputs: In5:Ignition OFF . (Explanation: state of sixth input) In6:Siren OFF . (Explanation: state of seventh input) In7:Batery restore . (Explanation: state of eight input) In8:Temp restore . (Explanation: state of nineth input) Output states Out1 OFF . (Explanation: state of the first controlled output) Out2 OFF . (Explanation: state of the second controlled output) Out3 OFF . (Explanation: state of third controlled output) The module is considered equipped properly and communication is reliable, if all messages and calls are received properly and all user command is being performed properly. GSM SMS/DIAL security and remote control system www.topkodas.lt 19 13.2 Configuration of the module via PC This configuration is being performed by using the software “SERA”, which you may download at www.topkodas.lt 14 Installation of the product and connection diagram The module should be installed in such way to ensure GSM communication. It is necessary to properly select site for GSM antenna. GSM antenna can not be hidden deeply in metal constructions, because thus GSM communication may be screened. GSM antenna should be mounted as far as possible from electronic sensors, shock, microwave, microphone, temperature sensor etc., because GSM electromagnetic field may disturb operation of sensors or other electronics. We are not liable for disturbances related with your GSM communication service provider. Connection diagram is available in the ANNEX 1; however other connections versions are also possible. Fuses are mandatory. In order to check operation of the module it is necessary to activate used sensors, door, shock sensor etc. and to observe their operation. The user should receive messages a about alarmed zones (depending on programming). If SMS messages have not been received, please check GSM communication and whether the module is configured properly by sending 80 commands with 1,2,3,4,5,6,7 parameters. We recommend to check configurations of the module and test with the software SERA. The module is considered to be equipped properly and communications is reliable, if all sent SMS and calls are properly received as well as all user commands are being performed. 14.1 Mounting instruction and connection diagram of security system for premises It is recommended to place security system for premises into metal box. Antenna should be fixed to the top part of metal box from the outer side. 3x0,75 sq. mm cable of double insulation should be used for connection of 110V230V power supply voltage. Chop switch or other voltage disconnection device should be mounted in line, which is used for powering 230V transformed. It is recommended to use standard motion, fire, and glass breaking sensors. For powering of sensors we recommend to use standard 6-8 cores single core cable for, designed for installation of security system. For voice signaling we recommend to use siren DC12V up to 1500mA. It is recommended to connect the siren to the system by using 2x0,75 sq. mm double insulation cable. GSM SMS/DIAL security and remote control system www.topkodas.lt 20 It is possible to supply the security system from stabilized power supply source 10-15V and not less than 1,5A. It is necessary to calculate max current of power supply. Current consumption of the security system is comprised of; total current of the module, sensors, relays, siren and other devices. It is most convenient to use power supply source applied for power supply of security systems with the option to connect backup lead battery. It is recommended to mount remote control relays into sockets. Sockets may be easily fixed in metal box. It is necessary to select relays according to preferred voltage and current. Auxiliary BUZZER is recommended to mount inside the premises not far from entrance. Buzzer operates together with the main siren also when the systems starts calculating the time for leaving the premises and the time till alarm of the security system after entering the premises (see clause 7.1). It is possible to use buzzer of Hitpoint PB12N23P12Q or similar modified piezoelectric 12V DC, 150mA max. Antenna Reset Configuration Connector To PC GTauto System State Black COM COM +12V AC Fail +12V Backup Battery 12V Black Black/White Black Black/White Black Black/White White Green Green/Yellow Black Black/White Grey Orange Blue Brown Yellow Green Green/Yellow Red Black MICROPHONE AC 18V AC 18V 20 10 19 9 18 8 17 7 16 6 15 5 14 4 13 3 12 2 11 1 AC 110-220V BAT+ BAT- MICN MICP Temp(-) Temp(+) Led(A) Led(K) Out3(+ 50mA) Out2(-1.5 A) Out1(-1.5 A) Unlock Lock In7 In6 In5 In4 In3 In2 In1 +13.5V GND 20 10 19 9 18 8 17 7 16 6 15 5 14 4 13 3 12 2 11 1 GSM SMS PAGER-ALARM SYTEM Transformer ~18-24V Simcard External power supply Temperature sensor Door Sensor 1K EOL/NC EOL/NC EOL/NC Glass Break Sensor Motion Sensor PIR 1 1K +12V 1K +12V+12V COM EOL/NC EOL/NC 2.2K 2.2K +12V 1K BELL 1K COM 2.2K + Out2 SMS control BUZZER Smoke Fire sensor t° Motion Sensor PIR 2 Black/White +12V COM NC (ARM/DISARM) Any accsess control device with NC or NO output. COM COM COM Tamper1 Tamper2 Tamper3 NC NC NC COM COM Sample of module configuration template for this diagram you will find after installation of configuration software SERA in the directory „ConfigTemplates“. File name: House_Office_Alarm.tcfg GSM SMS/DIAL security and remote control system www.topkodas.lt 21 14.2 Car GSM messages system. Installation manual and connection diagram Black 20 Black/White 10 Black 19 Black/White 9 Black 18 Black/White 8 White 17 Green 7 Green/Yellow 16 Black 6 Black/White 15 Grey 5 Orange 14 Blue 4 Brown 13 Yellow 3 Green 12 Green/Yellow 2 Red 11 Black 1 MICN MICP Temp(-) Temp(+) Led(A) Led(K) Out3(+ 50mA) Out2(-1.5 A) Out1(-1.5 A) Unlock Lock In7_Siren In6_Ignition In5_Shock In4_Microwave In3_Door In2_Eng_Bonnet In1_Luggage +13.5V GND 20 10 19 9 18 8 17 7 16 6 15 5 14 4 13 3 12 2 11 1 The module may be mounted in all vehicles with petrol and diesel engines and 12V batteries negative pole of which is connected to car body. The system should be mounted in a saloon of vehicle following installation manual of the manufacturer. The module may be installed in line with already available security system as GSM SMS pager or as independent separate system for car protection. The connection diagram of the module in parallel with already available security system is available in annex No1. Connection diagram of the module as independent protection system see below: MICROPHONE Black Control GND Turn Lamps +V Temperature sensor t° Turn Lamps +V +12V FUSE 5A FUSE 15A Turn Lamps +12V CAR central Lock and Unlock signals GND +12V GND +12V Engine bonnet switch Siren Switch in the door strut Ignition Cut 40A Out remote control(Ignition) Microwave GND Shock sen +12V Ignition +12V Luggage compartment switch Black/White Car Battery GND GND GND Sample of blank of this module configuration for this diagram you will find after installation of configuration software SERA in the directory „ConfigTemplates“. File name: CAR_alarm_pager.tcfg In the saloon of the vehicle the module should be placed in hard-to-reach place. The device should be mounted in a place protected from impact of humidity or other materials causing corrosion as far as possible from heating elements of passengers’ saloon and sources of electromagnetic disturbances (auto computer, air conditioning system, relay units). Do not mount the unit directly to metal parts of the vehicle in order to avoid accumulation of condensate within system GSM SMS/DIAL security and remote control system www.topkodas.lt 22 block. The module should be mounted thus connectors of wires to be at the bottom side. Wires of the security system can not be laid near moving or hot part of the vehicle. For fastening screws or plastic fastening straps. The battery should be mounted in a place protected from impact of humidity or other materials causing corrosion as far as possible from heating elements of passengers’ saloon. It is necessary to equip fuses mentioned in the diagram. Fuse seat should be mounted as near as possible to the car battery. 14.3 Automation of premises, mounting and connection diagram of temperature controller Preparation of the module to operate by using configuration program (pictures and more additional information see the description of configuration program SERA): Set parameters of selected output. Output state SMS text; output operation description (OUT definition) „CTRL/SMS/DIAL“, (state mode) – Steady. If necessary output operation may be inverted. „GSM Communication“ window is used for setting user parameters to send SMS and DIAL. Also the user should check the options to send SMS and DIAL about temperature alarms. „GSM remote control“ window is for entering user numbers who will be able to control selected outputs via shot free call. „Inputs“window is used to set input parameters. When pressing temperature sensor line IN9, temperature parameters setting will appear at the bottom of the window. The user should set alarm and restore temperatures If necessary set automatic output control depending on temperature. Select the output to be controlled at the end of the line IN9. Also it is necessary to check „Alarm“ and „Restore“ options. Set „Input speed“ and „Reapeat time“ . In order to control powerful AC facilities, solid state relays SSR may be used. Caution! It is not allowed to connect AC facilities directly to the module. It is necessary ti apply proper relays or use other means in compliance with electrical safety requirements. Caution! When controlling the facilities from the AC network, it is necessary to stick with electrical safety requirements. Please consult your licensed electrician/electrical engineer for professional advice before installation. Standard AC/DC adapter with voltage 10V-14V and current >=1A may be used for power supply of the module. GSM SMS/DIAL security and remote control system www.topkodas.lt 23 The module connection diagram to control heating or cooling equipment: 20 10 19 9 18 8 17 7 16 6 15 5 14 4 13 3 12 2 11 1 t° AC/DC adapter 10-14V, >1A + MICN MICP Temp(-) Temp(+) Led(A) Led(K) Out3(+ 50mA) Out2(-1.5 A) Out1(-1.5 A) Unlock Lock In7 In6 In5 In4 In3 In2 In1 +13.5V GND - 20 10 19 9 18 8 17 7 16 6 15 5 14 4 13 3 12 2 11 1 ~ Black Black/White Black Black/White Black Black/White White Green Green/Yellow Black Black/White Grey Orange Blue Brown Yellow Green Green/Yellow Red Black AC 85-260V DC 85-260V ~ Solid State Relay SSR Output Temperature sensor Furnance/Heater/Cooling Device GND 5-24V Input - GND DC 10-14V, >1A +V FUSE 5A + +12V Sample of module configuration template for this diagram you will find after installation of configuration software SERA in the directory „ConfigTemplates“. File name: Temperature_Controller.tcfg 14.4 Testing and troubleshooting Troubleshooting and testing of the module may be performed via USB port with software SERA. Please read SERA user manual for more information. 15 Sending of messages Messages are being sent in a case of alarm of security system's inputs, after ARM/DISARM of the security system (if specified in the configuration), upon test sending time (if specified in the configuration), after changing of module configuration (if specified in the configuration), upon sending inquiry about parameters (command code 80). SMS about alarm of the system is doubled with short telephone call (if specified in configuration). 16 Remote control With the help of SMS messages it is possible to control devices connected to outputs Out1, Out2, Out3. It is possible to ARM/DISARM of the security system. Control command for user (USER) is available in the Table 4 The amount of users when controlling via SMS is unlimited. Example of control command when states of all three outputs are being changed and inquiry is made to send information in a form of SMS about input states after changing of output states: USER123456 51 52 53 80 5 123456 – user code; 51- changing of the first output state 52 – changing of the second output state 53 – changing of third output state 80 – information inquiry command (see table No 3) 5 – send information in form of SMS about outputs’ states. More examples of controlling via SMS message see “Configuration of GSM communication module via SMS modules. All outputs may be controlled via short call (the module will automatically ignore the call). Up to 400 users may control the module. All users optionally may control outputs Out1, Out2, Out3, arm/disarm the security system and activate voice listening (MIC). GSM SMS/DIAL security and remote control system www.topkodas.lt 24 It is possible to assign to each user that he is able to control. This is comfortable to use a single module for controlling of few gates when several masters are. 17 Software updating Updating of firmware version is being performed via PC. The following is necessary: configuration cable, configuration software “SERA”, new software version, which may downloaded at www.topkodas.lt. More about software updating process see user manual of the software „SERA“. GSM SMS/DIAL security and remote control system www.topkodas.lt 25 www.topkodas.lt 26 GND Black Control MICROPHONE Black/White Out3 SMS control Out1_SMS_control(Ignition) Ignition 40A +12V t° +12V +12V S1 +12V GSM SMS PAGER GND - + 20 10 19 9 18 8 17 7 16 6 15 5 14 4 13 3 12 2 11 1 GTauto MICN MICP Temp(-) Temp(+) Led(A) Led(K) Out3(+ 50mA) Out2(-1.5 A) Out1(-1.5 A) Unlock Lock In7_Siren In6_Ignition In5_Shock In4_Microwave In3_Door In2_Eng_Bonnet In1_Luggage +13.5V GND Reset 20 10 19 9 18 8 17 7 16 6 15 5 14 4 13 3 12 2 11 1 Antenna FUSE 5A Simcard Temperature sensor Out2 SMS control Black Black/White Black Black/White Black Black/White White Green Green/Yellow Black Black/White Grey Orange Blue Brown Yellow Green Green/Yellow Red Black Ignition CAR BATTERY GSM SMS/DIAL security and remote control system GND GND GND Configuration Connector To PC Switch in the door strut Engine bonnet switch Luggage compartment switch CAR ALARM SYSTEM Lock Siren Sensor_out1 Sensor_out2 Ground +12V Shock sensor Sensor_out1 Sensor_out2 Ground +12V Microwave sensor Unlock ANNEX 1 Connection diagram of the module in parallel with already available security system GSM SMS/DIAL security and remote control system State of Module Only Lock input is used Mode 4 Only Lock input is used Mode 3 Lock/Unlock Mode 2 Lock/Unlock Mode 1 -V +V -V +V -V -V +V +V -V -V +V +V Lock Lock Lock UnLock Lock UnLock ARM State >100ms >100ms DISARM State >100ms >100ms ARM State ANNEX 2 Lock an Unlock inputs diagram www.topkodas.lt 27