1
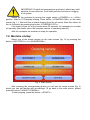
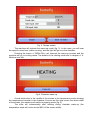
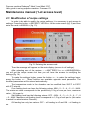
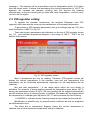
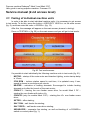
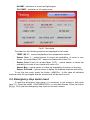
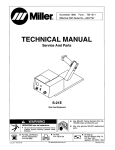
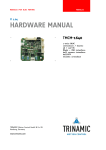
Popcorn machine Robopop® Mark 3 and Mark 3 DF User guide to set up popcorn machine. Firmware V3 User manual 1.1. Circulate oil Prior to start making popcorn it is required to perform some preparatory actions. First, fill up the feeder with corn; second, check up the salt availability in the salt feederand the oil level in oil canister. In case of using the oil with melting temperature exceeding the room temperature (coconut oil, palm oil), warm up the oil and check the oil feeding system prior to start the machine. If you fail to do this, the solidified oil can result in machine damage. Robopop® machine is equipped with the heated oil chamber. However, this chamber is intended only to keep the oil in melted condition and should not be used for melting the solidified oil. It is also recommended to use this chamber for the storage of oil nozzle and oil hose when the machine is not in use. This will help to avoid oil solidification inside the feeding system. To switch on the chamber, it is necessary to set toggle switch <<OIL WARMER>> to <<ON>> position (see fig.1). Fig. 1. Control panel of Robopop® machine After the oil is melted, it is necessary to bleed the oil nozzle to make sure that oil enters the sifter. To do this, dip the oil suction unit into the oil canister. IMPORTANT! Oil shall be homogeneous and liquid, without any solid particles of non-melted oil. Such solid particles can lead to clogging of oil system. Switch on the machine by turning the toggle switch <<POWER>> to <<ON>> position. Wait for LCD-display booting. Press button <<PUMPING ON>> on the main screen (fig. 1.). Wait until the oil starts dripping from the oil nozzle. After this switch off the oil circulation by pressing the button <<PUMPING OFF>>. If oil doesn’t come out of the nozzle within 30 seconds, it’s necessary to circulate oil manually (the details see in the complete version of operating manual). After oil circulation the machine is ready for operation. 1.2. Machine startup Select one of the preset recipes on the main screen (fig. 2) by pressing the button <<BUTTERLY>> or <<MUSHROOM>>. Fig. 2. Main screen After pressing the corresponding button you will see the recipe screen (fig. 3) where you can get familiar with pre-settings. To go back to the main screen, please press the button <<BACK TO MENU>>. To start popping, press the button <<START>>. Fig. 3. Recipe screen The machine will activate the warm-up mode (fig. 3). In this case, you will hear the specific noise from turbine running, and the light will go on in the chamber. Pressing the button <<TURN ON>> will interrupt the warm-up process and the machine will go to cooling mode. The details of the cooling mode see in chapter «1.6. Machine turn off». Fig.4. Chamber warm-up A wide white strip in the middle of the screen is the temperature scale showing the temperature increase in the chamber. As soon as this strip covers the whole width of the screen, the machine will switch to popping mode (fig. 5). The sifter will automatically start rotating during chamber warm-up (the temperature scale will cover around 80% of the screen width). Fig.5. Popping mode As soon as popping process starts, the corn feeder will be activated, and the corn will be fed into chamber. If the recipe requires the use of salt and oil, they will be automatically supplied only after popcorn comes into sifter. This will start within around 3 minutes in case of standard settings. 1.3. Interrupt the machine operation In case of any need to interrupt the popping process, press the button <<PAUSE>>. The machine will go to standby mode (see fig. 6). Fig.6. Standby mode The activation of standby mode will immediately stop the corn feeding process, but salt and oil feeding will be stopped with some delay automatically. In case of standard settings oil and salt feeding will be stopped only in 1,5 minutes — this time is required for popcorn to leave the sifter completely. To continue the process, press button <<BACK TO POPPING>> (fig. 6). 1.4. In-process messages If during the popping process there will be no more corn in feeder, the machine will inform you by giving the alarm signal and displaying the corresponding alert message on the screen (fig. 7). Fig.7. No more corn If the hopper is not filled up with corn within 30 sec, the machine will automatically go to standby mode (fig. 6). If during the popping process the bag with popped popcorn becomes full to the top, the machine will inform you by giving the alarm signal and displaying the corresponding alert message on the screen (fig. 8). Fig.8. Popcorn bag is full to the top If you do not replace the bag within 30 sec, the machine will automatically go to standby mode (fig. 6). 1.5. Replacement of corn feeder (only for Mark 3 DF) IMPORTANT! This information applies only to model Robopop® Mark 3 DF. A model Robopop ® Mark 3 has not function change corn feeder. Popcorn machine Robopop® Mark 3 DF is equipped with double corn feeder, which allows to quickly switch between salted popcorn butterfly and popcorn mushroom for further caramelization. Every recipe is linked to it’s feeder (fig. 2). So, the recipe <<BUTTERFLY>> will enable the left feeder with index «Х», and the recipe <<MUSHROOM>> will activate the right feeder with index «О». It means that if you select <<MUSHROOM>> recipe, corn will be supplied from the right feeder. To switch from one feeder to the other during popping process, it’s necessary to press the button <<CHANGE FEEDER>> (fig. 9). Fig.9. Operation mode for the machine Mark 3 DF In this case, the machine will go to popcorn change mode (fig. 10). The active corn feeder will be disabled immediately, salt and oil supply will be stopped in 1,5 min, and sifter will be disabled in another 1,5 min. Fig.10. Change of corn feeder The machine will go to feeder selection mode (fig. 11). As soon as the sifter stops, it will be necessary to clean it by removing oil and salt residues, and afterwards select another feeder by pressing the button <<MUSHROOM>>, for example (fig. 11). Fig.11. Feeder selection after popcorn change The sifter will start immediately and go to popping mode (fig. 9). The feeder change normally takes about 3-5 minutes. 1.6. Machine turn off The machine can be stopped both during the chamber warming-up (fig. 4) and during popping (fig. 5) by pressing the button <<TURN ON>>. The machine will automatically go to cooling mode (fig. 12). Fig.12. Cooling mode The activation of the cooling mode will immediately stop the corn feeding process, salt and oil feeding (if used for the recipe selected) will be stopped with some delay, heating elements will be disabled. The sifter will be disabled with 3 min delay. This time is enough for all popcorn to leave the chamber. Wide white strip in the middle of the screen is the temperature scale showing the temperature decrease in chamber. As soon as the strip disappears from the screen, the turbine will be automatically stopped. The chamber cooling process usually takes 10-12 minutes. IMPORTANT! To stop popcorn machine Robopop ® Mark 3 DF during popping process, first press the button <<PAUSE>> (fig. 9) and then <<TURN ON>> (fig. 6). By pressing the button <<RESUME POPPING>> (fig. 12) you will activate the machine warming-up, and the popping process will be resumed. 1.7. Statistical data review To review the data on machine operation, press the button <<INFORMATION>> on the main screen (fig. 2). The following data are available on the screen (fig .12-2): Popcorn machine model (Mark 3 or Mark 3 DF); Software version; Total operation time of the machine; Tons of corn popped by the machine; Number of chamber overloads; Number of emergency shutdowns of the machine; Main recommended temperature ranges for various types of corn. Fig.12-2. Information screen The data on this screen are only for reading and cannot be modified. To go back to the main screen, press the button <<BACK>>. Popcorn machine Robopop® Mark 3 and Mark 3 DF User guide to set up popcorn machine. Firmware V3 Maintenance manual (1-st access level) 2.1. Modification of recipe settings In order to be able to modify the recipe settings, it is necessary to get access to settings. Press the button <<SECURITY LEVEL>> on the main screen (fig. 2) and then enter the code <<666666>> (fig. 13). Fig.13. Entering the access code Then the message will appear on the main display (access to all settings). After selecting one of the recipes — <<BUTTERFLY>> or <<MUSHROOM>> you will get the recipe screen but now you will have the access to modifying the settings (fig. 14). To make the settings higher, press the button >> ; to make the settings lower, press the button << . These buttons are available opposite each parameter. The modified parameters will be stored automatically. The temperature mode in the chamber can be modified from 200*С to 235*С with 5*С interval. Corn feeding level can have the following values: MIN – 2 – 3 – 4 – 5 – 6 – MAX. The minimum value corresponds to the productivity 10 kg of corn per hour, maximum value – 34 kg per hr. Salt feeding level has the following values: OFF – MIN – 2 – 3 – 4 – 5 – 6 – 7 – 8 – 9 – MAX. Maximum salt feeding level corresponds to 1,5 kg of salt per hr (this value is actual for salted mixture Flavacol). Oil feeding has only two values: OFF – oil feeding is off and ON – oil feeding is on. Fig.14. Modification of recipe settings <<MUSHROOM>> recipe has one more setting – <<Chamber cleaning>>. This setting has to be activated if you are working with corn Preferred Popcorn Jumbo and the burnt corn is collected in chamber. If this setting is activated when the machine has been continuously running for 52 minutes (this value can be modified in settings), the machine will automatically pause the operation, clean the chamber (by reducing the temperature) and go back to normal operation. In this case, the collection of the burnt corn in chamber will be minimized. Automatic chamber cleaning will normally take 8-10 minutes. 2.2. Modification of machine units’ operating parameters To modify the machine units operating parameters, it is also necessary to get the access to settings (see par. 2.1). Then press the button <<SETINGS>> on the main menu and you will get to the screen of settings (fig. 15). Digital parameters highlighted with blue color can be changed by pressing. Digital parameters highlighted with black color are only for reading. The button [DEFAULT] will bring all parameters to default settings, incl. the recipe parameters, the button [EN] will change the language of machine interface. It is possible to modify the following parameters on the screen of settings: Chamber cleaning … min – the time of continuous operation of the machine after which the chamber will be automatically switched to cleaning mode. After alarm pause … s – the time within which the machine will be automatically switched to pause mode. During this time, the alarm signal will also go on if the bag is filled to the top with popcorn, if the corn feeder is empty and the chamber is overloaded. MIN sifter speed … rpm – minimum sifter speed corresponding to minimum supply of corn. MAX sifter speed … rpm – maximum sifter speed corresponding to maximum supply of corn. Sifter rotation speed depends on corn feeding speed. This is done to ensure the equal sifter filling with corn. MAX salt rate speed … rpm – maximum speed of salt feeder screw rotation corresponding to maximum recipe value. Fig.15. Screen of settings Flavoring feed rate delay … s – delay in activating the feeding of oil and salt after corn feeding is enabled. This delay is necessary in order salt and oil are not supplied directly on popcorn. Flavoring stop delay … s – delay in stopping the feeding of oil and salt after corn feeding is off. Time for popcorn to leave the chamber is 60 sec, i.е. popcorn will stay in sifter for minimum 1,5 min after the corn feeding is off . MIN feed rate speed … rpm – minimum speed of corn feeder screw rotation corresponding to minimum recipe value. In addition, the screw rotation speed is in strict compliance with the productivity, i.e. if the screw rotation speed is 34rpm (rev/min), the productivity will be 34 kg of corn per hour. Speed step … rpm – number of revolutions by which the corn feeding speed is increased in case of higher level of corn feeding Feed rate increase … s – delay after which the machine will go to the next level of feeding. Corn feeder always starts operation from minimum speed. The corn is supplied step-by-step with some delay, from minimum level to the second level, from the second level to the third level, etc until it reaches the level set in the recipe. This is done to avoid the significant temperature decrease in the chamber and to adjust PID-regulator to the availability of corns in the chamber. Example. Having the parameters shown in fig. 15 and corn feeding level 5, the corn feeding will be increased from 10 to 26 kg per hour (level correspondence to revolutions/productivity 10 – 14 – 18 – 22 – 26 – 30 – 34 rpm) within 4 minutes. Motor turn off temperature … *С – the temperature which will start the sifter during the warming phase, and which will stop the motor in case the temperature goes below the set value during the chamber cooling phase . The cooling temperature is also a critical parameter for the mode <<Chamber cleaning>>. The chamber will be cooled down from the temperature which 10 C higher than the preset value. It means that decreasing the cooling temperature to 160*С, for example, will increase the chamber cleaning time but improve the cleaning effectiveness, as the air viscosity will go down with lower temperature , and the carryout force will be higher. 2.3. PID-regulator setting To regulate the chamber temperature, the machine Robopop ® uses PIDregulator, which ensures the more precise maintenance of the preset temperature. To get access to PID-regulator parameters, first go to settings (see par. 2.2), then press the button <<NEXT>> (fig. 15). There are numeric parameters and indicators on the top of PID-regulator screen (fig. 16) , and chamber temperature diagram in the range of 180*С - 250*С on the bottom of the screen. Fig.16. PID-regulator screen Most of parameters are only for reading. Therefore, PID-regulator screen will display the current temperature in the chamber, max and min temperature (this temperature will be calculated automatically dependent on the temperature set for chamber). Min and max temperature – is the range within which the corn feeder is activated. For example, if during popping process the temperature goes below 190 *C having the parameters shown in fig.16, the corn feeding will be stopped automatically and the machine will go to warming mode. In addition, the feeder will be stopped when the temperature in chamber goes up above 230 *С, which prevents the corn burning. <<HEATER>> indicator shows if heating elements are enabled at the moment. Modification is possible only for proportionality coefficient as well as integration and differentiation time. The black line in temperature diagram shows the current temperature in chamber, the red line shows the temperature setting in chamber. 2.4. Modification of parameters during machine operation To get access to parameters’ modification during the machine operation, it is necessary first to get access to settings (see par. 2.1), and then start the machine in normal manner. Additional functions will be available in popping mode: Modification of PID-regulator parameters and viewing of chamber temperature diagram ; Modification of current recipe parameters; Modification of machine units operating parameters. In order to go to PID-regulator screen, press the button [Temp. 210 *С] (fig. 17) during the popping process. Fig.17. Popping mode To modify the popping parameters, it is necessary to pause the machine by pressing the button <<PAUSE>>. After this press the button [TEMPORARY STOP] (fig. 18). You will get to the screen for modification of popping parameters (fig. 19). In this case, the machine will go to standby mode. Fig.18. Standby mode This screen is similar to the screen shown in fig.14. The popping parameters are modified by pressing the buttons << or >>. To go back, press the button <<BACK>>. To resume the operation, press the button <<BACK TO POPPING>> (fig. 18). Fig.19. Modification of popping parameters To get access to the machine units performance settings, press the button <<SETTINGS>> (Fig. 19). To reset the access level to zero, press <<SECURITY LEVEL>> on the main screen (fig. 2), and then press<<ENTER> (fig. 13) without entering any password. Popcorn machine Robopop® Mark 3 and Mark 3 DF User guide to set up popcorn machine. Firmware V3 Service manual (2-nd access level) 3.1. Testing of individual machine units In order to be able to start individual machine units, it is necessary to get access to test mode. To do this, press the button <<SECURITY LEVEL>> on the main screen (fig. 2), and then enter the code <<333333>> (fig. 13). After this, the message will appear on the main screen (access to testing). Press <<TESTING>> (fig. 20) on the main screen and you will get to test mode. Fig.20. Test mode access It’s possible to start individually the following machine units in test mode (fig..21): MOTOR – startup of the main motor and chamber lighting, motor startup delay is 10 sec; 2700 RPM – turbine rotation speed in real time, it is updated every 6 sec, speed is shown in revolutions per minute; HEATER – activation of heating elements. Encouraged to include heating elements only after the launch of the main motor; CORN F1 – starting the corn feeder screw drive, for model Mark 3 DF – starting the corn feeder with index «Х»; CORN F2 (only for models Mark 3 DF) – starting the «O» corn feeder screw drive ; SIFTER – sifter starting; SALT FAN – salt feeder fan starting; SALT FEED. – salt feeder screw drive starting; SEPARATOR – separator fan starting, as well as blocking of <<POWER>> switch on control panel (fig. 1); ALARM – activation of sound and light signal; OIL PUMP – activation of oil supply pump. Fig.21. Test mode The data from the following sensors are displayed in test mode: TEMP. 180 *C – current temperature from temperature sensor; Sensor Corn 1 – optical sensor to check the availability of corns in corn feeder , for model Mark 3 DF - sensor for feeder with index «Х»; Sensor Corn 2 (only for models Mark 3 DF) – optical sensor to check the availability of corns in corn feeder with index «O»; Sensor Bag – optical sensor to check the availability of popcorn in the bag; Sensor Overload – optical sensor to define the chamber overload with corns. To exit the test mode, press the button <<BACK>>. In this case all activated machine units will be stopped and the access level will be reset to zero. 3.2. Emergency stop meter reset To reset the emergency stop meter, it is necessary to get access to test mode (see 3.1). Press the button <<INFORMATION>> on the main screen. Press the button [R] (fig. 12-2) near the emergency stop meter on the main screen. 3.3. Error codes on display While the machine is heated, the working capacity of the main machine units is checked. Fig .22. Displaying the error messages during machine heating In case of any failures the corresponding information will be displayed on the screen (fig. 22). The machine will go to automatic OFF mode without participation of the operator (fig. 23). Fig.23. Machine automatic OFF Error codes, their causes and elimination methods are described below . ERR01. Check temperature sensor. The machine will analyze the temperature sensor data. The temperature parameters from 10*С to 270*С are considered as correct. If the temperature inside the chamber is different from mentioned above, the error will be detected. Elimination method for this problem is the replacement of temperature sensor. In some cases, such error can occur if the machine was kept under low temperatures for a long time and was not able to get heated enough. In this case, it is recommended to wait until the machine gets heated. ERR02. Check chamber light. One of the main causes of such error is the failure of either the lighting lamp in chamber or the lamp power unit. To eliminate this problem, replace the failed unit. If during diagnostics it is detected that the lamp and the power unit are in order, then such error is caused by the failure of chamber overload sensor (the sensor is constantly darkened) or by foreign objects, eg. corn peels falling onto the sensitive element. ERR03. Check overload sensor. This error means the failure of the chamber overload sensor (sensor is constantly lightened). Replace it. ERR04. Check impeller assembly. During operation the machine constantly controls the turbine rotation speed. If the speed falls below 2500 revolutions per minute, this error will be displayed. There can be several causes of failures: breakdown of V- belt, electrical motor failure, seizure of the turbine bearing unit, failure of speed sensor. It’s necessary to define the exact cause of the failure and replace the failed element.