1
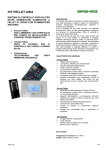
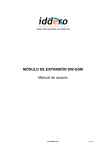
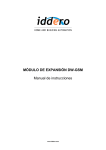
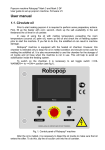
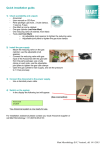
A Higher Level of Precision…
A Higher Level of Performance
Intell-Lab Moisture Analyzer Series IL
Models:
IL-50.001 & IL-50.01
I
L
5
0
L
5
© 2012 Intelligent Weighing Technology, Inc. All rights reserved worldwide.
0
The information contained herein is the property of Intelligent Weighing Technology, Inc. and is supplied without liability for errors or omissions. No part
-
may be reproduced or used except as authorized by contract or other written permission. The copyright and the foregoing restriction on reproduction
and use extend to all media in which the information may be embodied.
0
1
Contents
1. Brief Introduction ·······················································································2
1.1 Safely Precautions ··················································································2
2. Installation ····································································································3
2.1 Placement ····································································································3
2.2 Components ·····························································································3
2.3 Power Connection ···················································································4
3. Operation ······································································································4
3.1 Level Adjustment ·····················································································4
3.2 Display ·······································································································5
3.3 Operation Panel ·······················································································6
3.4 Operation Mode ·······················································································7
3.5 Test Procedure ·························································································9
Thanks for choosing our Intell-Lab series Moisture Analyzer!
1. Brief Introduction
Moisture Analyzer is used for determination moisture in samples.
1.1 Safely Precautions
For safe and dependable operation, please comply with the following instructions:
·This Moisture Analyzer is used for determination moisture in the samples. Any improper
operation can endanger personnel and damage the instrument or other equipment.
·Please confirm the input voltage on label and plug type matches your local AC supply.
This Moisture Analyzer is supplied with a 3–pin power cable with an equipment
grounding conductor. Disconnecting grounding conductor is prohibited.
·Make sure power cable will not be an obstacle or cause any tripping risk.
·Never use this Moisture Analyzer in hazardous, wet or unstable environment.
4. Testing ············································································································9
4.1 Temperature & Time ···············································································9
4.2 Weight of Sample ····················································································9
4.3 Sample Preparation ················································································10
4.4 Types of Sample ······················································································10
5. Maintenance ····································································································10
5.1 Calibration ··································································································10
5.2 Problems & Solutions ··············································································11
6. Parameter ······································································································12
6.1 Specifications ····························································································13
6.2 Interface ······································································································ 13
·Please unplug the power before cleaning the instrument.
·Never convert power during a test. (E.g. from 110V to 220V or vice versa)
·Ensure sufficient free space around the instrument. (Approximately 3 ft free space
above the unit)
·This Moisture Analyzer must be operated by trained personnel who are familiar with the
properties of the samples and with the handling of the instrument.
·You should use goggles, gloves, protective clothing and masks to operate the
instrument.
·Never make any modifications or constructional alterations to the instrument.
7. Standard Configuration ············································································13
·After-sale service is offered only by professionals authorized by our company.
1
2
Caution: This moisture analyzer works by utilizing a strong heat source.
2.2 Components Installation
·Never place inflammable materials on, below or next to the instrument as the area
around the dryer unit warms up.
·Exercise caution when removing the sample. The sample itself, the sample chamber
and any, sample containers may still be very hot.
·For samples with any potential danger, be careful to analyze the probable dangers.
Consequences.
·Fire/Explosion: During heating, some solvents, samples of flammable or explosive
materials will liberate flammable or explosive gas or steam. Avoid fire or explosion, by
using such samples in a dry environment and use a low temperature.
(1)Place windshield (2)Place bracket and screw (3)Place pan on bracket.
Be very careful not to damage the internal mechanism during this process.
2.3 Power Connection
Plug in at the back of moisture analyzer and attached to power outlet 120 VAC.
·Toxin/Inflammability: Only dry toxic or corrosive samples in a correctly operating fume
cupboard.
·Corrosion: Samples which release corrosive vapors. In the case of such samples, we
advise you to work with small amounts of sample as the vapor can condense on cooler
housing parts and cause corrosion.
Note: Damage to the equipment by corrosive or flammable samples is not covered by
the warranty.
2. Installation
2.1 Placement
Note: For getting the best testing results, please warm-up at least 30 minutes before
testing.
3. Operation
3.1 Level Adjustment
Adjusting the level with level indicator and adjustable feet. As illustrated in the pictures
below:
Please ensure the operation table is stable and level at all times.
·Choosing a safe and well ventilated place.
·Please avoid placing the moisture analyzer in the severe temperature fluctuations,
excessive humidity, vibration, drafts, electromagnetic fields or direct sunlight.
3
Correct
Incorrect
Note: Must re-adjust the level if location changed.
4
3.2 Display
Model Identification DSH (Digital Signal Halogen - Capacity & Readability)
3.3 Operation Panel
Key
Turn on /Turn off
Unstable
TARE/BACK
(short press)
Stop the test, cancel current setting Tare
the pan
Percentage of dry weight
TEMPERATURE
(short press)
Temperature Setting
TIME (short press)
Time Setting
Model
Percentage of moisture
g
Gram
UP
Temperature setting or Current temperature
DOWN
Time setting (M / S)
CAL/PRINT
Heating now
(short press)
Temperature or time rise in sequence
(long press)
Temperature or time rise steadily
(short press)
Temperature or time reduce in sequence
(long press)
Temperature or time reduce constantly
(long press)
Calibration
(short press)
Print
TEST (short press)
5
Meanings
ON/OFF
IL-50
*
Title
6
Begin to test
3.4 Operation Mode
Time Setting
Setting time from 1-99 minutes, stepping is 10 seconds.
Standby
Moisture analyzer is in standby mode when connected to AC power.
Go to time setting mode, digits flash
(short press)
Start operation and go to weighing mode
(short press)
Weighing Mode
Zero the display
(short press)
Time reduces by 10s
(long press)
Time reduces steadily
(short press)
Time increases in sequence by 10s
(long press)
Time increases steadily
Confirm the value and save
(short press)
(short press)
Digits displayed, go to set temperature
Exit without saving
(short press)
(short press)
Digits displayed, go to set time
(short press)
(short press)
Go to testing mode. The weight of sample must > 0.5g.
If < 0.5g, “< 0.5g” flash, then press it to cancel
Begin to calibrate
(long press)
Temperature Setting
Working temperature is 50-160ºC, stepping is 1º C
IL Series provide two easier time setting ways.
(1) Automatic Mode
During heating, if the weight of sample reduces < 0.001g, moisture analyzer will stop
work.
AUTO Mode Setting
Go to temperature mode, digits flash
or
→
( Choose “AUTO” mode) →
(confirm)
(short press)
(short press)
Temperature increases in sequence by 1ºC
(long press)
Temperature increases steadily
(short press)
Temperature reduces in sequence by 1ºC
(long press)
Temperature reduces steadily
Confirm the value and save
(2) Time Setting Mode
Setting heating time manually. Moisture analyzer will stop heating if the setting time is
up.
Time Setting
(short press)
(short press)
7
or
→
Exit without saving
→
8
or
(choose time setting) →
(change time) →
(confirm) →
(save and back to weighing mode)
3.5 Test Procedure
Temperature Setting →Time Setting → Sample Preparation → Put on Empty Pan
→
(clear the weight of pan) → Put Sample on Pan ( > 0.5 g ) → Close
Shield →
(test) → Dry Weight % and Moisture % → Beeping →
(back)
Note: If heating cover opens, it will stop the heating and return to weighing mode. Test is
invalid.
4. Testing
In the process of heating and drying, we obtain the moisture according to the weight
loss of the sample.
The speed and quality of testing are affected by the following parameters. Ideal setting
parameters should be confirmed by several trial tests.
The best testing results depend on the following settings:
·Heating Temperature ·Heating Time ·Sample Weight ·Sample Work ·Sample Types
4.1 Heating Temperature
·Heating temperature control heating time. (e.g. Lower temperature will need more
time.)
·Heating temperature must not cause any disintegration or change of chemical structure.
(Generally setting is 105ºC, except for special requirements of samples and industry.)
·For some samples, different moisture content will be measured at different heating
temperatures. In this case, try to increase the temperature to compensate the errors of
testing.
4.3 Sample Preparation
Samples should be representative then you can get accurate and repeatable results.
When preparing the samples, make sure to place the material on the pan evenly and
avoid excessive accumulation and do not use too much material.
4.4 Types of Samples
·Mushy, fatty and liquefiable materials
Enlarge surface area of sample with glass fiber pad. (E.g. Butter. Moisture is distributed
more evenly through use of a pad. Moisture evaporates faster and more completely by
enlarging surface area)
·Liquid
Liquid will become droplets and hinder fast drying. Using pad to distribute liquid evenly
on a larger area to save drying time. (Pads and pans are available from your balance
supplier)
·Easily encrusted, temperature-Sensitive Materials
Sample will be encrusted on its surface which will hinder testing. Using pad to cover the
sample and use a suitable temperature. Then repeatability will be better.
·Sugary Materials
A sugary sample will become scorched easily. Choosing modest temperatures and
making sure to distribute the sample evenly and thinly. Improving repeatability of testing
with a pad will help.
Caution! The above materials may cause fire, explosion, damage or injury.
For any samples with security risks, please be careful about the possible dangers.
5. Maintenance
5.1 Calibration
Regular calibration is important to ensure the long term validity of the sample results.
Please ensure you use the supplied weight to calibrate the unit often. (Allow 30 mins
warm up)
(1) In a no load condition, a long press
4.2 Weight of Sample
The weight of sample affects testing time and repeatability of results. Max Weight is 50
g.
Larger samples, more moisture to evaporate.
9
, until displays “cal” and “50.00 g”
flashes load the supplied 50 g test weight. (Do not close the lid with the weight on
the pan). When the unit displays 50g not flashing, remove the test weight and
resume testing as normal.
10
5.2 Problems and Solutions
Phenomenon
6. Parameter
Reasons
Solutions
Will not turn on
No connection to power
Check power and voltage
“<0.5g” flashes
on right side
Weight of sample < 0.5g
Increase the weight of the sample
back to weighing mode
Heating cover open
Close cover
Environment
The following parameters are acceptable:
Temperature: 10ºC - 30ºC. (50ºF - 86 ºF)
(The unit will still function between 5ºC - 40ºC. (40ºF - 104ºF) Under extreme
temperatures, testing is less reliable).
flashes
Relative Humidity: 15 % - 80 %, RH
on right side
Low Accuracy
Bad calibration
Unstable
environment
working
Calibrate correctly
Choose a suitable work place
No Calibration
Wrong calibration procedure
Wrong calibration weight
Calibration in correct way
Use Standard Calibration weight
Err01
Faults in Storage Circuit
Please contact with your distributor
Err02
Faults in Weighing Circuit
Please contact with your distributor
Err03
Faults
in
Temperature
Measurement Circuit
Please contact with your distributor
Err04
Temperature
Sensor
Damaged or not connected
Please contact with your distributor
Err05
Faults
in
Temperature
Controlled Circuit
Please contact with your distributor
Err06
Calibration Data Lost
Re-calibration required
Err07
Temperature
Data
Err08
Overheated
Please contact with your distributor
Err10
Incorrect power input
Use correct AC power
No Data but
Buzzer Beeps
Display Broken
Please contact with your distributor
Sensor
Lost
Warm-up: 30 mins before starting a test.
Power: Input AC: 120VAC 3A,50Hz
Voltage Fluctuation: 120 ± 10 %
Power Load: Max. Output is 250 W
Protection: Avoid Dust, Damp, Pollution
Degree: Class II
Please contact with your distributor
12
11
6.1 Specifications
6.2 Interface
Model
IL-50-001
IL-50-01
Rs232 connection via DB9
Capacity (g)
Readability (g)
Repeatability (g) ( 3g sample)
Min. Weight of Sample (g)
Suggested Sample Weight (g)
Heating Time (M.)
Heating
Working Temperature (ºC)
Interface
Time Control
Heating Temperature (ºC)
Display
Pan (mm)
Outline (mm)
NW / GW
Heating Method
13
50 g
0.001 g
0.01 g
0.2%
0.5%
0.5 g
0 - 10 g
1 - 99 minutes (stepping is 1 m.)
Standard
10º C - 30ºC
RS232C
Setting time by artificially or automatically
50ºC - 160ºC (stepping is 1ºC)
Moisture %, Solid %, Weight, Time, Temperature
Pin 2: TxD, Transmit
Pin 3: RxD, Receive
Pin: 5: GND, Ground
Rs232 Setting (Default)
Baud rate: 9600
Data-bits: 7
Even-odd: N
Stop bit: 2
7. Standard Configuration
100 mm
285×160×150 mm
6.6 lb / 9.25 lb (3 kg / 4.2 kg)
Halogen (Digital Signal Halogen)
Main Unit ········································1 pc
Sample Pan Support····················1 pc
Power Cord ····································1 pc
Pan ···················································1 pc
50 g weight ·····································1 pc
Operation Manual ·························1 pc
Intelligent Weighing Technology has more than 50 years experience in the weighing
industry, both in the USA and worldwide. With contacts in over 50 countries including
the USA, we provide you with the weighing equipment you need.
When you invest in weighing equipment from Intelligent Weighing Technology, you’re really
buying peace of mind.
Quality - Scales and balances solidly built from the ground up with superior engineering and
components for exacting results.
Value - From bench scales to analytical balances, weighing equipment priced for real-world
business applications, with superior service and support.
Experience - Expert advice to help you choose just the right product for your application.
Quality + Value + Experience…it adds up to the Intelligent Investment.
Intelligent Weighing Technology, Inc.
www.intelligentwt.com
2012 © Intelligent Weighing Technology, Inc. All rights reserved worldwide.
The information contained herein is the property of Intelligent Weighing Technology, Inc. and is supplied without liability for errors or omissions. No part
may be reproduced or used except as authorized by contract or other written permission. The copyright and the foregoing restriction on reproduction
and use extend to all media in which the information may be embodied.