1
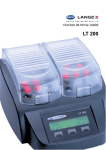
DOC022.98.00742.JAN06
LT 200
DOC022.98.00742.JAN06
Thermostat LT 200
USER MANUAL (english)
January 2006, Edition 2
© Hach Lange GmbH, 2006. All rights reserved. Printed in Germany.
CK/SK
42
Table of Contents
Section 1 Specifications .................................................... 45
Section 2 General Information .......................................... 47
2.1 Safety Information ..............................................................47
2.1.1 Use of Hazard Information ........................................47
2.1.2 Precautionary Labels ................................................48
2.1.3 Warning .....................................................................48
2.2 General Product Information ..............................................49
2.3 Important information about the manual ............................49
2.3.1 Safety Against Risk of Fire ........................................50
2.3.2 Chemical and Biological Safety .................................50
2.4 Overview of Product/Function ............................................51
2.5 Disposal in accordance with EU directive 2002/96/EC ......51
Section 3 Installation ......................................................... 53
3.1 Unpacking the Instruments ................................................53
3.2 Front- and back view ..........................................................54
Section 4 Operation ........................................................... 57
4.1 Software Menu ...................................................................57
Section 5 Start up .............................................................. 59
5.1 Starting up ..........................................................................59
5.2 Routine operation ...............................................................61
5.2.1 Thermometer symbol ................................................61
5.2.2 Clock symbol .............................................................62
5.2.3 Beep functions ..........................................................62
5.2.4 Stop function .............................................................62
5.3 Selecting the program ........................................................63
5.4 User programs ...................................................................65
5.5 Language ...........................................................................66
Section 6 Maintenance ...................................................... 67
6.1 Cleaning the Instrument .....................................................67
6.2 Instrument test ...................................................................68
6.3 Changing the protective covers .........................................68
Section 7 Troubleshooting ................................................ 71
43
Table of Contents
Section 8 Contact Information ...........................................73
Section 9 Warranty, liability and complaints ....................75
44
Section 1
Specifications
Specifications are subject to change without
notice.
Performance Specifications
Type
Thermostat with one heating block or two separate
heating blocks with integrated protective lid for
heating cuvette tests and reaction vessels.
Temperature programs
COD program (148 °C, 120 min)
100 °C program (100 °C, 30, 60, 120 min)
40 °C program (40 °C, 10 min)
and freely selectable 37–150 °C (no cooling)
Timer programs
freely selectable 0–480 min; acoustic signal when the
set time expires
Heating rate
from 20 °C to 148 °C in 10 min (to DIN 38409-44)
Temperature stability
+/- 1 °C
Number of cuvettes
LTG082.xx.10xxx: 9 x 13 mm diameter, 2 x 20 mm
diameter
LTG082.xx.21xxx:
left: 15 x 13 mm diameter
right: 6 x 13 mm diameter, 4 x 20 mm diameter
Physical and Environmental Specifications
Width
250 mm
Height
145 mm
Depth
310 mm
Weight
LTG 082.xx.10xxx : 2 kg instrument, 3.5 kg packed
LTG 082.xx.21xxx : 2.8 kg instrument, 4.3 kg packed
Ambient conditions
Operating temperature: 10–45 °C
Storage temperature: -40–60 °C
Relative humidity: max. 90%, non-condensing
Additional technical data
Mains connection
115/230 V, +5%/-15%, 50/60 Hz, protection class I
Power input
LTG 082.xx.10xxx : 115 V: 300 VA; 230 V: 450 VA
LTG 082.xx.21.xxx : 115 V: 600 VA; 230 V: 900 VA
Safety checks
CE, GS and cTUVus
Guarantee
2 years
45
Specifications
46
Section 2
General Information
2.1 Safety Information
Please read this entire manual before
unpacking, setting up, or operating this
equipment. Pay attention to all danger and
caution statements. Failure to do so could result
in serious injury to the operator or damage to
the equipment.
To ensure that the protection provided by this
equipment is not impaired, do not use or install
this equipment in any manner other than that
specified in this manual.
2.1.1 Use of Hazard Information
DANGER
Indicates a potentially or imminently
hazardous situation which, if not avoided,
could result in death or serious injury.
CAUTION
Indicates a potentially hazardous situation
that may result in minor or moderate injury.
Important Note: Information that requires
special emphasis.
Note: Information that supplements points in the
main text.
47
General Information
2.1.2 Precautionary Labels
Read all labels and tags attached to the
instrument. Personal injury or damage to the
instrument could occur if not observed. A
symbol, if noted on the instrument, will be
included with a danger or caution statement in
the manual.
This symbol, if noted on the instrument, references the instruction manual
for operation and/or safety information.
Electrical equipment marked with this symbol may not be disposed of in
European public disposal systems after 12 August of 2005. In conformity
with European local and national regulations (EU Directive 2002/96/EC),
European electrical equipment users must now return old or end-of life
equipment to the Producer for disposal at no charge to the user.
Note: For return for recycling, please contact the equipment producer or
supplier for instructions on how to return end-of-life equipment,
producer-supplied electrical accessories, and all auxiliary items for proper
disposal.
This symbol, when noted on the product, indicated that the marked item
can be hot and should not be touched without care.
2.1.3 Warning
DANGER
The ventilation slits in the lid must not be
covered, otherwise overheating may occur.
The protective lids must always be closed
during operation.
The surface of the heating blocks is thermally
insulated. Never insert a finger into an opening,
as there is a danger of suffering burns.
The LT 200 thermostat should only be
connected to a socket outlet with earthing
contact. Be sure to use an undamaged cable.
48
General Information
2.2 General Product Information
The thermostat has been designed in
accordance with the current state of the
technology and the acknowledged safety
regulations.
The manufacturer certifies that this instrument
was tested thoroughly, inspected and found to
meet its published specifications when it was
shipped from the factory.
Nevertheless, under certain circumstances
users may be at risk, or the proper functioning of
the instrument may be impaired.
2.3 Important information about the manual
The manual contains all the information needed
to enable the instrument to be operated without
any problems throughout its lifespan.
Such adherence results in less down-time and
lower repair costs, and increases the lifespan of
the instrument.
Copyright
The copyright to this User Manual remains with
the manufacturer.
The Manual contains instructions, notes and
drawings of a technical nature, which may not,
either in full or in part, be
•
duplicated
•
disseminated
•
used without authorization for competitive
purposes or
communicated in any other way.
49
General Information
2.3.1 Safety Against Risk of Fire
Certain electrical circuits within this equipment
are protected by fuses against over-current
conditions. For continued protection against a
risk of fire, replace fuses only with the same
type and rating specified.
2.3.2 Chemical and Biological Safety
DANGER
Handling chemical samples, standards and
reagents can be dangerous. Users of this
product are advised to familiarize
themselves with safety procedures and the
correct use of chemicals, and to carefully
read all relevant Material Safety Data Sheets.
Normal operation of this instrument may involve
the use of hazardous chemicals or biologically
harmful samples.
50
•
The user must observe all cautionary
information printed on the original solution
containers and safety data sheet prior to
their use.
•
All waste solutions must be disposed in
accordance with local and national law.
General Information
2.4 Overview of Product/Function
The LT 200 thermostat can heat solutions in
round cuvettes of various sizes at 37–150 °C for
a period of 0–480 minutes.
The LT 200 thermostat has one
temperaturecontrolled heating block or two
separate ones.
The small openings (diameter 13 mm) in the
heating block are suitable for the HACH LANGE
cuvette tests, e.g. COD and phosphate
cuvettes. The larger openings (diameter 20 mm)
are intended for reaction vessels. Sample
preparation, e.g. the sample digestion for a
number of cuvette tests, is carried out in the
reaction vessels.
The actual temperatures of the heating blocks
and the remaining time are permanently visible
in the digital display.
The LT 200 thermostat has 3 permanent and 6
freely programmable temperature programs.
The LT 200 thermostat comes with a
multi-language support.
2.5 Disposal in accordance with EU directive
2002/96/EC
How to prepare an electrical instrument for
disposal:
•
remove any cuvettes that are still in the
instrument
51
General Information
52
Section 3
Installation
DANGER
Only qualified personnel should conduct the
tasks described in this section of the
manual.
3.1 Unpacking the Instruments
1. Remove the LT 200 thermostat and
accessories from the shipping container.
2. Do not push any loose objects under the
instrument, as this could affect its stability.
3. Inspect each item for any damage that may
have occurred during shipment
4. Do not send the instrument back without
previous arrangement.
53
Installation
3.2 Front- and back view
Figure 1 Front view of the LT 200 thermostat
1
Protective lid
5
Touch-sensitive Keys
2
20 mm digestion cuvettes
6
Display
3
13 mm cuvette tests
7
Left heating block
4
Right heating block
54
Installation
Figure 2 Back view of the LT 200 thermostat
1
On/Off switch
2
Plug in power supply
3
Nameplate
55
Installation
56
Section 4
Operation
4.1 Software Menu
SELECT BLOCK
LEFT/RIGHT
Select the heating block.
SELECT PROGRAM
100 °
Selection of 100 °C temperature program. Heats
cuvettes for 30, 60, or 120 minutes at 100 °C.
DIGESTION PERIOD?
120’/60’/30
Selection of temperature time.
100 °C: 100 °C 60’
OK
For example, the “100 °C, 60 minutes” setting is
needed to digest samples using the LCW 902
Crack Set. Start the program with OK.
SELECT PROGRAM
COD
Selection of COD Temperature program. Heats
cuvettes for 2 hours at 148 °C. In the cooling
phase, 4 beeps indicates that the cuvettes have
cooled to 80 °C. Remove and carefully invert the
cuvettes several times, before allowing them to
cool further in a rack.
COD: 148 °C 120’
OK
Start the program with OK.
SELECT PROGRAM
40 °
Selection of 40 °C temperature program. Heats
cuvettes for 10 minutes at 40 °C.
40 °C: 40 °C 10’
OK
SELECT PROGRAM
PRG1
Start the program with OK.
Programming a user-specific temperature program
(5.4 User programs auf Seite 65).
57
Operation
58
Start up
Section 5
Start up
5.1 Starting up
Place the thermostats on a stable, level,
heat-resistant surface.
Plug one end of the power supply into the back
of the thermostat, below the power switch, and
plug the other into an earthed mains power
socket (115/230 Volt +5%/-15% / 50/60 Hz).
Switch on the thermostat by pressing the power
switch on the back.
Note: Do not switch the instrument off and on in rapid
succession. Always wait about 20 seconds before
switching the instrument on again, otherwise you may
damage the electronic and mechanical systems.
The first time the instrument is turned on, the
language selection screen will appear
(section 5.5 on page 66).
After initialization the instrument is ready for
operation.
59
Start up
.
Figure 3 Display and Keys of the LT 200 thermostat
1
Display
2
Touch-sensitive Keys
The instrument is operated using three
touch-sensitive keys located below the display
(Figure 3). The function of the key depends on
the display.
If no function is shown for a specific key, that
key is not currently active.
After the instrument has been initialized, the
display always shows the most recent setting of
the temperature programs.
60
Start up
5.2 Routine operation
•
Prepare the cuvettes as described in the
working procedure.
•
Switch on the thermostat and open the
protective lid.
•
Place the cuvettes in a heating block and
close the protective lid.
1. Select the required temperature program
using the appropriate keys.
•
The thermostat heats to the set temperature
and the time automatically counts down to
zero.
•
The actual temperature and the remaining
time are permanently visible in the display.
•
Three beeps indicate that the temperature
program is finished; the thermostat cools.
5.2.1 Thermometer symbol
Thermometer
symbol
Description
Heating block is heating.
Heating block has reached
the set temperature.
Heating block is cooling.
61
Start up
5.2.2 Clock symbol
Clock symbol
Description
The remaining time counts
down to zero.
5.2.3 Beep functions
Beep function
Description
1 beep
Thermostat is ready for
operation after
initialization.
2 beeps
Set temperature has been
reached.
3 beeps
End of temperature
program.
4 beeps
COD program - cooling
phase 80 °C - remove
cuvettes and invert a few
times.
5.2.4 Stop function
The stop function can be used to terminate a
temperature program at any time.
1. Select the program you want to stop.
2. Terminate the temperature program with
STOP.
Note: Press the UP ARROW KEY to allow the
temperature program to proceed without being
terminated.
62
Start up
5.3 Selecting the program
The temperature programs can be selected
totally independently for the right and the left
heating blocks. If a change of setting is
selected, the user is prompted to specify
whether the change concerns the right or the left
heating block. A choice of 3 permanently
programmed temperature programs then
appears and the user selects one by pressing
the appropriate key.
The COD program heats cuvettes for 2 hours at
148 °C.
In the cooling phase, 4 beeps indicate that the
cuvettes have cooled to 80 °C. At this point, the
cuvettes must be removed and carefully
inverted a few times. This setting is suitable for
all COD cuvette tests.
Note: Press OK to confirm your selection or press the
UP ARROW KEY to return to the program selection
screen.
63
Start up
The 100 °C program heats cuvettes for 30, 60 or
120 minutes at 100 °C.
The setting “100°C, 60 minutes” is needed, for
example, to determine phosphate and
chromium or for digesting heavy metals.
Note: Press OK to confirm your selection or press the
UP ARROW KEY to return to the program selection
screen.
The 40 °C program heats cuvettes for
10 minutes at 40 °C.
This setting is used for, for example, enzymatic
food tests.
Note: Press OK to confirm your selection or press the
UP ARROW KEY to return to the program selection
screen.
64
Start up
5.4 User programs
The LT 200 can accommodate 6 user programs
in the storage locations PRG1 to PRG6.
The following example illustrates how users can
program their own temperature programs:
1. Press key below PRG1.
2. Press key below PROG.
3. Press PRG1 to assign a 4-character
program name. Press this key for several
times to run through the digits and letters.
Note: Press the RIGHT ARROW KEY to move the
cursor to the next position. Press OK to confirm
the entry.
4. Press the UP AND DOWN ARROW KEYS to
set the temperature to a value between
37 °C and 150 °C.
Note: Press OK to confirm the entry.
65
Start up
5. Press the UP AND DOWN ARROW KEYS to
set the time to a value between 0 and 480
minutes.
Note: Press OK to confirm the entry.
6. Press OK to confirm the program.
Note: The program can be changed by pressing
PROG.
Note: Press the UP ARROW KEY to return to the
program selection screen.
5.5 Language
If this setting needs to be changed, press the
left key while you switch on the instrument.
Press the RIGHT ARROW KEY to scroll through
the menu.
Press the corresponding key to select the
required language.
The thermostat is automatically initialized and
the instrument is then ready for operation.
66
Section 6
Maintenance
6.1 Cleaning the Instrument
The thermostat is a maintenance-free
instrument. To ensure reliable and precise
operation, it must be kept clean.
•
Before cleaning the thermostat you should
switch it off, unplug the power cord and
allow the instrument to cool.
•
Wipe the instrument with a soft, damp cloth.
Make sure that no water penetrates into the
instrument during cleaning!
If a cuvette overflows or bursts, or small
amounts of liquid are spilled, proceed as
follows:
•
Switch off the thermostat, unplug the power
cord and allow the instrument to cool.
•
Draw off the liquid with a pipette, avoiding
any contact with the skin.
DANGER
Caution should be exercised with acids and
lyes, as they can cause burns.
•
Transfer liquid residues to an empty cuvette
for proper disposal.
•
Remove broken glass with tweezers - avoid
any contact with the skin.
67
Maintenance
6.2 Instrument test
The temperature shown in the display
corresponds to the temperature in a closed
LANGE cuvette filled with an aqueous medium.
During the heating phase, the real block
temperature in the vicinity of the heater may be
higher than the temperature shown in the
display.
An empty LANGE cuvette (LCW 906), glycerol
(approx. 5 ml) and a stem-type thermometer
calibrated over the range from 95 °C–155 °C
(type 67C to ASTM) are needed to check the
block temperature.
•
Fill the cuvette with glycerol at room
temperature and insert the thermometer
until it touches the bottom of the cuvette.
•
When the thermometer is in the cuvette, the
level of the glycerol must be 62 mm
+/- 0.5 mm.
•
Insert the cuvette in the centre opening of
the second row of the test block.
•
Start the temperature program for 100 °C,
60 min for this block.
When the heating phase is complete, the
temperature shown by the thermometer should
be equal to the temperature shown in the
display.
6.3 Changing the protective covers
To change the protective covers, proceed as
follows:
1. Half open the protective cover (approx.
45 °) and take hold of it above the external
hinge with your thumb inside (Figure 4).
68
Maintenance
2. Press your thumb against the inside of the
cover and carefully bend the cover upward
and lift it out of its mounting (Figure 5).
3. Lift the protective cover slightly and take the
other side out of the mounting.
4. Fit a new protective cover by carrying out
the above steps in the reverse order.
Figure 4 Changing the Protective lid (Step 1)
Figure 5 Changing the Protective lid (Step 2)
69
Maintenance
70
Section 7
Troubleshooting
BLOCK IS TOO HOT!
PLEASE WAIT
OK
The temperature of the heating block is higher than
the target temperature. Wait until the heating block
cools.
INIT ERROR
The thermostat is defective. Please contact
Customer Service.
71
Troubleshooting
72
Section 8
Contact Information
Orders/Repair service
Please contact your representative:
HACH LANGE GMBH
Willstätterstraße 11
D-40549 Düsseldorf
Tel. +49 (0)2 11 5288-0
Fax +49 (0)2 11 5288-143
[email protected]
www.hach-lange.de
HACH LANGE LTD
Pacific Way
Salford
Manchester, M50 1DL
Tel. +44 (0)161 872 14 87
Fax +44 (0)161 848 73 24
[email protected]
www.hach-lange.co.uk
Information Required
•
Hach account number (if available)
•
Billing address
•
Your name and phone number
•
Shipping address
•
Purchase order number
•
Catalog number
•
Brief description or model number or
series-production number
•
Quantity
73
Contact Information
74
Section 9
Warranty, liability and
complaints
The manufacturer warrants that the product
supplied is free of material and manufacturing
defects and undertakes the obligation to repair
or replace any defective parts at zero cost.
The warranty period for instruments is
24 months. If a service contract is taken out
within 6 months of purchase, the warranty
period is extended to 60 months.
With the exclusion of the further claims, the
supplier is liable for defects including the lack of
assured properties as follows: all those parts
that can be demonstrated to have become
unusable or that can only be used with
significant limitations due to a situation present
prior to the transfer of risk, in particular due to
incorrect design, poor materials or inadequate
finish will be improved or replaced, at the
supplier's discretion. The identification of such
defects must be notified to the supplier in writing
without delay, however at the latest 7 days after
the identification of the fault. If the customer fails
to notify the supplier, the product is considered
approved despite the defect. Further liability for
any direct or indirect damages is not accepted.
If instrument-specific maintenance and
servicing work defined by the supplier is to be
performed within the warranty period by the
customer (maintenance) or by the supplier
(servicing) and these requirements are not met,
claims for damages due to the failure to comply
with the requirements are rendered void.
Any further claims, in particular claims for
consequential damages cannot be made.
Consumables and damage caused by improper
handling, poor installation or incorrect use are
excluded from this clause.
75
Warranty, liability and complaints
76