1
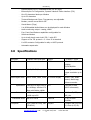
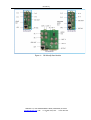
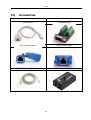
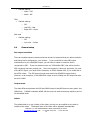
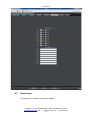
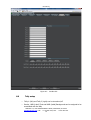
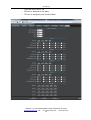
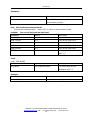
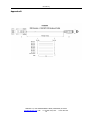
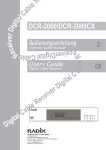
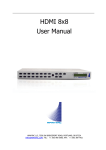
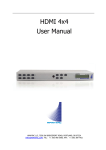
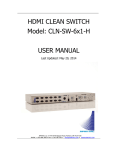
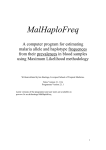
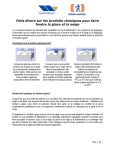
HDMI-8x8 OG-MicroQ User Manual APANTAC LLC, 7470 SW BRIDGEPORT ROAD, PORTLAND, OR 97224 [email protected], TEL: +1 503 968 3000, FAX: +1 503 389 7921 OG-MicroQ COPYRIGHT and TRADEMARK All rights reserved by APANTA LCC, Porland, Oregon, USA. No part of this document may be reproduced in any form or by any means without written permission from the product manufacturer. Changes are periodically made to the information in this document. They will be incorporated in subsequent editions. The product manufacturer may make improvements and /or changes in the product described in this document at any time. All the registered trademarks referred to this manual are belonging to their respective companies. WARRANTY STATEMENT Apantac LLC (herein after referred to as “Apantac”) warrants to the original purchaser of the products manufactured by Apantac (the “Product,”) will be free from defects in material and workmanship for a period of three (3) year from the date of shipment of the Product to the purchaser. If the Product proves to be defective during the three (3) year warranty period, the purchaser’s exclusive remedy and Apantac’s sole obligation under this warranty is expressly limited, at Apantac’s sole option, to: (a) repair the defective Product without charge for parts and labor or, (b) provide a replacement in exchange for the defective Product or, (c) if after a reasonable time, is unable to correct the defect or provide a replacement Product in good working order, then the purchaser shall be entitled to recover damages subject to the limitation of liability set forth below. 19B Limitation of Liability Apantac’s liability under this warranty shall not exceed the purchase price paid for the defective product. In no event shall Apantac be liable for any incidental, special or consequential damages, including without limitation, loss of profits for any breach of this warranty. If Apantac replaces the defective Product with a replacement Product as provided under the terms of this Warranty, in no event will the term of the warranty on the replacement Product exceed the number of months remaining on the warranty covering the defective Product. Equipment manufactured by other suppliers and supplied by Apantac carries the respective manufacturer’s warranty. Apantac assumes no warranty responsibility either expressed or implied for equipment manufactured by others and supplied by Apantac. APANTAC LLC, 7556 SW BRIDGEPORT ROAD, PORTLAND, OR 97224 [email protected], TEL: +1 503 968 3000, FAX: +1 503 389 7921 1 OG-MicroQ This hardware warranty shall not apply to any defect, failure or damage: a) Caused by improper use of the Product or inadequate maintenance and care of the Product; b) Resulting from attempts by those other than Apantac representatives to install, repair, or service the Product; c) Caused by installation of the Product in a hostile operating environment or connection of the Product to incompatible equipment; Table of Contents APANTAC LLC, 7556 SW BRIDGEPORT ROAD, PORTLAND, OR 97224 [email protected], TEL: +1 503 968 3000, FAX: +1 503 389 7921 2 OG-MicroQ Limitation of Liability ......................................................................................... 1 1.0 WHAT’S IN THE BOX................................................................................. 4 2.0 Key Features ............................................................................................ 4 3.0 Specifications ........................................................................................... 5 4.0 Rear Modules ........................................................................................... 6 5.0 Accessories ............................................................................................. 8 6.0 Dashboard Control .................................................................................. 9 6.1 Getting Started ....................................................................................... 9 6.2 Running Dashboard ................................................................................. 9 6.2 Default settings....................................................................................... 9 6.4 General setup ........................................................................................10 6.5 Window specific setup ............................................................................12 6.5.1 Labels ..........................................................................................12 6.5.2 Meters …………..…………………………………………………………………………12 6.5.3 Borders …………………………………………………………………………………….12 6.5.4 Alarms ……… …………………………………………………………………………… 13 6.5.5 Auto Aspect Ratio ……………………………………………………………………. 13 6.5.6 Set Safe Area ………………………………………………………………………… .. 13 6.6 GPI setup ..............................................................................................13 6.7 Preset setup ……………………………………………………………………………………….14 6.8 Tally setup …………………………………………………………………………………………15 Appendix A AXP_Lite ………………………………………………………………………………….17 Appendix B RJ50 to DB9 pinout ………………………………………………………………….. 19 APANTAC LLC, 7556 SW BRIDGEPORT ROAD, PORTLAND, OR 97224 [email protected], TEL: +1 503 968 3000, FAX: +1 503 389 7921 3 US-3x00 1.0 WHAT’S IN THE BOX There are 3 different OG-MicroQ sets OG-MicroQ-SET-1 • 1 x OG-MicroQ-MB • 1 x OG-MicroQ-RM • 1 x RJ50 to DB9 cable for GPI/Tally and terminal block OG-MicroQ-SET-2 • 1 x OG-MicroQ-MB • 1 x OG-MicroQ-RMx • RJ45-HDMI receiver • RJ45-DVI receiver • 1 x 15ft CATx cable • 1 x RJ50 to DB9 cable for GPI/Tally and terminal block OG-MicroQ-SET-3 • 1 x OG-MicroQ-MB • 1 x OG-MicroQ-RML • 1 x RJ50 to DB9 cable for GPI/Tally and terminal block Important Note: Default IP address: 192.168.1.151 The configuration PC must be on the same subnet as the MicroQ, for example, “192.168.1.1” The default output resolution is set to [email protected] Hz for 60Hz countries and 1024x768@60Hz for 50Hz countries to accommodate the most common display resolution 2.0 Key Features – Low power consumption - 12 W and Silent – No fan! – Fixed Quad Split, each window can go full screen – Accepts 4 x auto-detect 3G SDI, HD SDI, SD SDI and Composite video signals – Simultaneous HDMI and SDI outputs 4 OG-MicroQ – Decode/display up to 8 embedded audio per SDI input – Ethernet port for Configuration, Dynamic Labels & Tallies interface (TSL) – One 32 characters labels per Window – Up to 32 characters – Text and Background Colors, Transparency are adjustable – Borders, can be turned ON or OFF – Visual Alarms (Tags) – 0 to 8 Embedded Audio Meters can be displayed for each Window – Audio monitoring output – analog, HDMI – Four Front Panel Buttons capabilities configurable for: – Safe Area Markers – Up to 4 tally levels control with TSL, 2 with GPI – Support of the TSL protocol v. 3.1 over IP is standard – 8 x GPI contacts: Configurable for tally or ASCII protocol – Automatic aspect ratio 3.0 Specifications Decription Compact video quad split Output 1 x HDMI, 1 x SDI Total Windows 4 HDMI 800x480 to 1920x1200 (1080p) 50/59.94/60Hz Inputs 3G/HD/SD-SDI/Composite SDI Matching the HDMI output resolution up to 3G Serial Digital Video SMPTE 424M, 292M, 259M On Screen Display Border, Tally, Audio meters, Alarm tags, Safe area marker Equalization 120m at 2.97 Gbps, 140 m GPI at 1.48 Gbps, 400m at 270 8 for tally or AXP (ASCII commands) Mbps with Belden 1694A Return Loss >15db up to 1.485 Gbps IP >10db up to 3G Embedded Audio 100 Base-Tx, TSL, AXP_Lite SMPTE-272M-A Electrical 12 W, 90-250V 50/60Hz Composite NTSC (SMPTE-170M), PAL (ITU624-2) EMI/RFI Complies with FCC Part 15, Class A, CE, EU, APANTAC LLC, 7556 SW BRIDGEPORT ROAD, PORTLAND, OR 97224 [email protected], TEL: +1 503 968 3000, FAX: +1 503 389 7921 5 OG-MicroQ EMC, C-tick Signal Level 1V nominal Power DC 5V 3.2A DC Offset 0V, ± 0.1V Size 171 mm W x 120 mm D x 44.45 mm H 4.0 Impedence 75 Ω Mount Magnetic Return Loss 40 db up to 5MHz Option Rack Mount Rear Modules There are three different types of rear modules that can accompany the OG-MicroQ-MB, OG-MicroQ-RM OG-MicroQ-RMx OG-MicroQ-RML Video Inputs 4 4 4 Loopouts 0 0 4 SDI Output 1 1 1 HDMI out 1 0 0 HDMI RJ45 out 0 1 0 GPI 8 8 8 AA out 1 1 1 Slot width 2 2 4 Table 1: OG-MicroQ Rear Module comparison table APANTAC LLC, 7556 SW BRIDGEPORT ROAD, PORTLAND, OR 97224 [email protected], TEL: +1 503 968 3000, FAX: +1 503 389 7921 6 OG-MicroQ Figure 1: OG-MicroQ Rear Module APANTAC LLC, 7556 SW BRIDGEPORT ROAD, PORTLAND, OR 97224 [email protected], TEL: +1 503 968 3000, FAX: +1 503 389 7921 7 US-3x00 5.0 Accessories RJ50 to DB9 Terminal Block RJ45 to HDMI (RMx) RJ45 to DVI (RMx) 15 ft CAT6 cable (RMx) HDMI-1-R (RMx) 39 OG-MicroQ 6.0 Dashboard Control 6.1 Getting Started The openGear Dashboard is design to allow you to quickly access all the feature sets of the OG-MicroQ on a simple User Interface. This section will help you get the OG-MicroQ up and running as quickly as possible. 6.2 Running Dashboard Before you can successfully run the Dashboard, you must first copy it from the CD prvided and place it in an appropriate location on your computer’s HDD. Now you can run the Dashboard by double clicking on the Dashboard icon. 6.2 Default settings The default settings of the On screen Elements on the MicroQ are as follows, Labels • Default settings o On o On top of the video o Text - <Label> o Color – Dark blue o Fit to Text Borders • Default settings o On o Color – Dark Blue Audio meters • Default settings o Off o Width - 16 Alarms APANTAC LLC, 7556 SW BRIDGEPORT ROAD, PORTLAND, OR 97224 [email protected], TEL: +1 503 968 3000, FAX: +1 503 389 7921 9 OG-MicroQ • Default settings o Video – Off o Audio - Off Tally • Default settings o Off o Left LED – Red o Right LED – Green o Safe area • Default settings 6.4 o Off o Line color – Yellow General setup Set output resolution There are multiple output resolutions that can be set it is important that you select resolution and timing that is optimized for your monitor. If you would like to have SDI output simultaneous to your HDMI/DVI output, you will have to select a resolution that is recognized by SDI. There are selections such as “1920x1080+SDI”, that will ensure the SDI out timing has been properly set. Also, the frequency is also very important, for most of the NTSC region, you must set the frequency to 59.94 instead of 60, if you would like to have SDI output. The SDI output format must match the HDMI/DVI output timing. However, as an exception, if the HDMI/DVI output is set to 1080p, the SDI output can also be set to 1080i. Output mode The main difference between the DVI and HDMI output is that DVI does not carry audio, but HDMI does. If HDMI is selected, HDMI will also carry the audio monitoring output as part of its embedded audio Labels The default label is on top (inside) of the video, but this can be modified so the label is outside of the video. The aspect ratio of the video will be adjusted automatically. APANTAC LLC, 7556 SW BRIDGEPORT ROAD, PORTLAND, OR 97224 [email protected], TEL: +1 503 968 3000, FAX: +1 503 389 7921 10 OG-MicroQ Audio monitoring output One pair of audio can be embedded into the SDI and HDMI out. You can select this pair from the SDI inputs and their embedded audio groups. Figure 2: General setup APANTAC LLC, 7556 SW BRIDGEPORT ROAD, PORTLAND, OR 97224 [email protected], TEL: +1 503 968 3000, FAX: +1 503 389 7921 11 OG-MicroQ 6.5 Window specific setup 6.5.1 Labels Default Labels are on top of the video. IGo to the General setup tab to change the Got the labels outside the video, if desired. o Set label properties § Turn on/off label § Change label text § Change label background color § Change label text color § Change label width • The maximum width is 32, which the same as the maximum number of characters • If the number selected is less than the number of characters on the label text, it will default to <Fit to Text> § Change label transparency • Change Label Transparency • 100% = opaque • 0% = 100% transparent § 6.5.2 o Meters Set Meters § 0 – 8 meters can be turned on/off § Meter width can be set to 4 – 16 pixels § SDI embedded audio channels can be assigned to individual meters § One pair of audio meters can be selected as monitor output to go to the analog audio output or the HDMI output 6.5.3 o Borders Set Borders 6.5.4 § Border can be turn on/off § Border color can be set Alarm Tags APANTAC LLC, 7556 SW BRIDGEPORT ROAD, PORTLAND, OR 97224 [email protected], TEL: +1 503 968 3000, FAX: +1 503 389 7921 12 OG-MicroQ o Set Alarm Tags § 6.5.5 o 6.5.6 o 6.6 Video Format and Audio Status alarm tags can be turned on/off Auto Aspect Ratio Set Auto Aspect Ratio § Auto Ratio can be turn on/off § Aspect Ratio can be set by the user to any ratio § Default is 4x3 for SD and 16x9 for HD Set Safe Area Safe Area can be turn on/off § With a mask § With a line § Or with both mask and line o The safe area line color can be changed o The safe area can be freely assigned GPI setup GPI can be set to be used as Tally or AXP. When AXP is selected, AXP commands needs to be entered into blank space APANTAC LLC, 7556 SW BRIDGEPORT ROAD, PORTLAND, OR 97224 [email protected], TEL: +1 503 968 3000, FAX: +1 503 389 7921 13 OG-MicroQ 6.7 Preset setup 15 presets can be defined, saved and recalled. APANTAC LLC, 7556 SW BRIDGEPORT ROAD, PORTLAND, OR 97224 [email protected], TEL: +1 503 968 3000, FAX: +1 503 389 7921 14 OG-MicroQ Figure 6.1: 6.8 Double click Tally setup o Tally 1 (left) and Tally 2 (right) can be turned on/off o Border, UMD (Label) Text and UMD (Label) Backgruond can be assigned to be associated with the tally APANTAC LLC, 7556 SW BRIDGEPORT ROAD, PORTLAND, OR 97224 [email protected], TEL: +1 503 968 3000, FAX: +1 503 389 7921 15 OG-MicroQ o Tally LED colors can be set o GPI can be assigned to the tallies o TSL can be assigned to the dynamic tallies APANTAC LLC, 7556 SW BRIDGEPORT ROAD, PORTLAND, OR 97224 [email protected], TEL: +1 503 968 3000, FAX: +1 503 389 7921 16 OG-MicroQ Appendix A Apantac eXchange Protocol – MicroQ Revision Date: November 23, 2012 Introduction The AXP-Lite is a set of text commands to allow 3rd party interface to control the OG-MicroQ via TCP/IP Port Description TCP/IP: Default port = 101 AXP-Lite Commands set Overview Command FW Release Overview Audio Set audio monitoring output Exit Exit from text command mode Ledumd Turn on/off tally and set label text AXP-Lite command sets Audio: Note: Set audio monitoring output OG-MicroQ only supports 2 groups of embedded audio (8 channels), audio monitoring must be done in pairs, therefore, when you choose meter 1, you will get a stereo pairs, therefore, when you choose meter 1, you will get a stereo pair of 1 and 2, when you choose 3, you will get a stereo pair of 3 and 4 and so on … Audio [SDI_Number][Group][Channel/PAIR] Parameters Value Description [SDI_Number] 1–4 SDI input number [Group] 1–2 [Channel/Pair] 1 – 4 channel Pair of audio meters to be monitored APANTAC LLC, 7556 SW BRIDGEPORT ROAD, PORTLAND, OR 97224 [email protected], TEL: +1 503 968 3000, FAX: +1 503 389 7921 17 OG-MicroQ Examples: Command Description Audio 1 2 3 Select SDI input 1, Group 2, Channel 3 and 4 to the monitoring ouptut Exit: Exit from text command mode Exit the text command mode. Ledumd: Press <CR> to return to text command mode Turn on/off tally and set label text Paramaters Values Description [WIN_ID] 0~4 [LED 1 on/off 1, 0 Turn on/off Tally LED 1 [LED 2 on/off 1, 0 Turn on/off Tally LED 2 [LED 3 on/off 1, 0 Turn on/off Tally LED 3 [LED 4 on/off 1, 0 Turn on/off Tally LED4 [TEXT] Text Label text. Must be bracked with “| |” Load: Load [ FILE_NAME] Parameters Values Description [file_name] The preset file name *The file name mus be bracketed with “| |” Example: Command Description Load | 1_full.pt1| Load preset name “1_full.pt1” APANTAC LLC, 7556 SW BRIDGEPORT ROAD, PORTLAND, OR 97224 [email protected], TEL: +1 503 968 3000, FAX: +1 503 389 7921 18 OG-MicroQ Appendex B APANTAC LLC, 7556 SW BRIDGEPORT ROAD, PORTLAND, OR 97224 [email protected], TEL: +1 503 968 3000, FAX: +1 503 389 7921 19