1
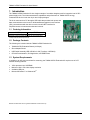
78M6610+PSU Evaluation Kit User Manual April 2013 Rev 2 Maxim Integrated cannot assume responsibility for use of any circuitry other than circuitry entirely embodied in a Maxim Integrated product. No circuit patent licenses are implied. Maxim Integrated reserves the right to change the circuitry and specifications without notice at any time. Maxim Integrated 160 Rio Robles, San Jose, CA 95134 USA 1-408-601-1000 © 2013 Maxim Integrated Products, Inc. Maxim Integrated and the Maxim Integrated logo are trademarks of Maxim Integrated Products, Inc. 78M6610+PSU Evaluation Kit User Manual Table of Contents 1 Introduction ......................................................................................................................................... 4 1.1 Ordering Information .................................................................................................................. 4 1.2 Package Contents...................................................................................................................... 4 1.3 System Requirements ............................................................................................................... 4 1.4 Safety and ESD Notes ............................................................................................................... 6 1.5 Testing the 78M6610+PSU Boards Prior to Shipping ............................................................... 6 2 Installation ........................................................................................................................................... 7 2.1 USB Driver Installation ............................................................................................................... 7 2.2 Confirm COM Port Mapping ...................................................................................................... 7 2.2.1 FTDI COM Port Trouble Shooting.................................................................................... 8 2.3 Basic Connection Setup ............................................................................................................ 9 2.4 Jumper and Switch Settings .................................................................................................... 11 3 Graphical User Interface (GUI) ......................................................................................................... 13 3.1 GUI Initialization ....................................................................................................................... 13 4 Schematics, Bill of Materials, and PCB Layouts............................................................................ 14 4.1 78M6610+PSU 16-Pin Evaluation Board Schematics ............................................................. 14 4.2 78M6610+PSU 16-Pin Evaluation Board Bill of Materials ....................................................... 15 4.3 78M6610+PSU 16-Pin Evaluation Board PCB Layouts .......................................................... 16 4.4 78M6610+PSU 24-Pin Evaluation Board Schematics ............................................................. 18 4.5 78M6610+PSU 24-Pin Evaluation Board Bill of Materials ....................................................... 19 4.6 Shunt Adaptor Board Schematics............................................................................................ 22 4.7 Shunt Adaptor Board Bill of Materials ...................................................................................... 23 4.8 Shunt Adaptor Board PCB Layouts ......................................................................................... 24 5 Included Documentation .................................................................................................................. 26 6 Contact Information .......................................................................................................................... 26 Revision History ........................................................................................................................................ 26 2 Rev 2 78M6610+PSU Evaluation Kit User Manual Figures Figure 1: 78M6610+PSU Evaluation Kit Application Diagram .............................................................................. 5 Figure 2: 78M6610+PSU Evaluation Board .......................................................................................................... 9 Figure 3: 78M6610+PSU Evaluation Kit Connections .......................................................................................... 9 Figure 4: Shunt Adaptor Board Connections ...................................................................................................... 10 Figure 5: 78M6610+PSU 16-Pin Evaluation Board Electrical Schematic ........................................................... 14 Figure 6: 78M6610+PSU 16-Pin Evaluation Board PCB Top View .................................................................... 16 Figure 7: 78M6610+PSU 16-Pin Evaluation Board PCB Bottom View ............................................................... 17 Figure 8: 78M6610+PSU 24-Pin Evaluation Board Electrical Schematic ........................................................... 18 Figure 9: 78M6610+PSU 24-Pin Evaluation Board PCB Top View .................................................................... 20 Figure 10: 78M6610+PSU 24-Pin Evaluation Board PCB Bottom View ............................................................. 21 Figure 11: Shunt Adaptor Board Electrical Schematic ........................................................................................ 22 Figure 12: Shunt Adaptor Board PCB Top View ................................................................................................. 24 Figure 13: Shunt Adaptor Board PCB Bottom View ............................................................................................ 25 Tables Table 1: 16-Pin Evaluation Board Connector Descriptions ................................................................................. 11 Table 2: 24-Pin Evaluation Board Connector Descriptions ................................................................................. 11 Table 3: Shunt Adaptor Board Connector Descriptions ...................................................................................... 12 Table 4: 78M6610+PSU 16-Pin Evaluation Board Bill of Materials .................................................................... 15 Table 5: 78M6610+PSU 24-Pin Evaluation Board Bill of Materials .................................................................... 19 Table 6: Shunt Adaptor Board Bill of Materials ................................................................................................... 23 Rev 2 3 78M6610+PSU Evaluation Kit User Manual 1 Introduction The 78M6610+PSU Evaluation Kit is a design example of a modular daughter card for integration into AC-DC power-supply units. The kit demonstrates the capabilities and performance of 78M6610+PSU energy measurement device in both the 16-pin and 24-pin packages. The kit is connected to a PC through a USB cable that provides both power and data communication to the board. A Windows®-based graphical user interface (GUI) communicates with the device over the serial UART interface for simplified access to measurement data and controls. 1.1 Ordering Information PART 78M6610+PSU/EV#1 TYPE Evaluation Kit #Denotes a RoHS-compliant device that may include lead that is exempt under the RoHS requirements. 1.2 Package Contents The following are included with the 78M6610+PSU Evaluation Kit: • • 78M6610+PSU Evaluation Boards (16/24-pin) Shunt Adaptor Board • • USB Cable Assembly USB A-B 28/24 1.8M (Tyco/Amp 1487588-3) CD with Documentation, GUI Application, and USB Drivers 1.3 System Requirements In addition to an AC source and load for measuring, the 78M6610+PSU Evaluation Kit requires use of a PC with the following features: • • 1GHz processor and 1GB RAM Minimum 1024 x 768 video display resolution • • Available USB port ® Microsoft Windows 7 or Windows XP Windows and Windows XP are registered trademarks of Microsoft Corp. 4 Rev 2 78M6610+PSU Evaluation Kit User Manual 120/240V Single Phase AC Source J1 78M6610+PSU Board J3 Shunt Adaptor Board 5V Voltage Divider J2 J4 DC/DC USB Controller Line Earth Gnd 78M6610 +PSU Current Shunt Neutral Isolation 3V3 Reg J11 USB Host PC Load Under Test Figure 1: 78M6610+PSU Evaluation Kit Application Diagram Rev 2 5 78M6610+PSU Evaluation Kit User Manual 1.4 Safety and ESD Notes EXERCISE CAUTION WHEN LIVE AC VOLTAGES ARE PRESENT! Standard ESD precautions must be taken when handling electronic equipment. The 78M6610+PSU contains ESD protected interfaces. Do not connect test equipment or external development boards directly to the 78M6610+PSU hardware. Damage to the 78M6610+PSU and external equipment will occur due to the 78M6610+PSU’s “high side” reference topology. The 78M6610+PSU’s V3P3 supply rail (i.e., “high side”) is connected directly to Neutral (Earth Ground) creating a ground reference disparity with any properly grounded external equipment. The board components and firmware settings are designed to operate with the following nominal AC electrical ranges: Voltage Current Line Frequency 10–240 VAC 10mA–20A 46–64Hz 1.5 Testing the 78M6610+PSU Boards Prior to Shipping Before every 78M6610+PSU Kit is shipped, the following procedures have been performed at the factory: • Full Calibration – Precise energy source equipment is used to calibrate the current, voltage, and ambient temperature for both the 16-pin and 24-pin daughter cards • Accuracy Test – A “bench” level test ensures the energy accuracy is within ±0.5%. 6 Rev 2 78M6610+PSU Evaluation Kit User Manual 2 Installation 2.1 USB Driver Installation This Evaluation Kit includes an isolated USB interface for serial communications with a PC. The FTDI USB controller IC FT232R performs the USB functions. The FTDI Windows driver presents a virtual COM port for enabling serial communications. The FTDI Windows driver is a certified driver for Windows XP and Windows 7. Upon attaching the 78M6610+PSU Evaluation Kit to the PC, the Found New Hardware Wizard should automatically launch and install the appropriate driver files. If your PC does not find the FTDI driver files on its local hard disk drive, locate and reference the FTDI USB Driver and Utilities subdirectory on the CD. The FT232R controller is powered from the USB cable and is active even when no AC power is applied to the 78M6610+PSU Evaluation Kit. Note: If an older FTDI driver has been previously installed, it is recommended to remove the older version before installing this newer FTDI driver. Execute the ftdiClean.exe utility from the FTDI USB Driver and Utilities subdirectory. For FTDI driver support on other operating systems, refer to FTDI’s website at www.ftdichip.com. 2.2 Confirm COM Port Mapping • Launch the Control Panel and click on the System icon. Rev 2 7 78M6610+PSU Evaluation Kit User Manual • The System Properties screen appears. Click on the Hardware tab. Click on Device Manager. Under Ports (COM & LPT), look for the USB Serial Port assignment. • Take note of the COM port assignment for the USB Serial Port. COM Port: 2.2.1 FTDI COM Port Trouble Shooting If the FTDI device driver did not install properly, there would be no assigned COM port number for the FTDI controller. Repeat the USB Driver Installation, see Section 2.1. Microsoft Windows may associate a Ball Point device to the FTDI USB controller. When this occurs a FTDI device COM port assignment is available via HyperTerminal but there is no communications data. Verify if a Ball Point device has been added to the “Human Interface Devices” via the Device Manager. See Section 2.2 for access to the Device Manager. If a Ball Point device exists, delete it and unplug and replug the Evaluation Kit’s USB cable. 8 Rev 2 78M6610+PSU Evaluation Kit User Manual 2.3 Basic Connection Setup Figure 1 shows the basic connections of the 78M6610+PSU Evaluation Kit for use with external equipment. The shunt adaptor board consists of the host side components necessary for the evaluation environment that would be replaced by the target system. This host board provides a USB serial UART controller, serial interface DC-DC power isolator, a current shunt, and AC wiring terminals. After connecting the USB cable to J11 and installing the USB drivers, one can plug the 78M6610+PSU Evaluation Board into the Shunt Adaptor Board as shown below. Connector to Shunt Adaptor Board Figure 2: 78M6610+PSU Evaluation Board Figure 3: 78M6610+PSU Evaluation Kit Connections Rev 2 9 78M6610+PSU Evaluation Kit User Manual Attach an AC source and AC load to the Shunt Adaptor Board as shown below. Connect J1 and J3 to an external AC power source. Connect J2 and J4 to the load to be measured. The 78M6610+PSU Evaluation Kit hardware is designed for 120 VAC and 230 VAC (nominal) up to 300 VAC (max). AC Source LINE AC Load NEUTRAL AC Load LINE AC Source NEUTRAL AC Source Earth GND USB Connector AC Load Earth GND Figure 4: Shunt Adaptor Board Connections 10 Rev 2 78M6610+PSU Evaluation Kit User Manual 2.4 Jumper and Switch Settings The following tables describe the 78M6610+PSU Evaluation Kit jumpers and switches and their setting for different configurations. Table 1: 16-Pin Evaluation Board Connector Descriptions Schematic and Silkscreen Reference Description J2 Power Connector to Shunt Adaptor Board J3 Sensor Connector to Shunt Adaptor Board J4 UART Connector to Shunt Adaptor Board J5 External Temperature Sensor Connector J7 SPI Connector J13 Relay Connector J14 AC Critical Connector TP11 Optional Relay LED Connector TP12 Optional AC Critical LED Connector TP14 UART RX Test Point TP15 UART TX Test Point Table 2: 24-Pin Evaluation Board Connector Descriptions Rev 2 Schematic and Silkscreen Reference Description J2 Power Connector to Shunt Adaptor Board J3 Sensor Connector to Shunt Adaptor Board J4 UART Connector to Shunt Adaptor Board J5 External Temperature Sensor Connector J7 SPI Connector J13 Relay Connector J14 AC Critical Connector J16 AC Fault Connector TP11 Optional Relay LED Connector TP12 Optional AC Critical LED Connector TP13 Optional AC Fault LED Connector TP14 UART RX Test Point TP15 UART TX Test Point 11 78M6610+PSU Evaluation Kit User Manual Table 3: Shunt Adaptor Board Connector Descriptions 12 Schematic and Silkscreen Reference Description J1 AC Neutral to Source J2 AC Neutral to Load J3 AC Line to Source J4 AC Line to Load J5 AC Earth GND to Source J6 AC Earth GND to Load J7 Sensor connector to 78M6610+PSU Evaluation Board J9 Optional UART communications connector J10 USB controller TX jumper. Default = Installed Remove when using J9. J11 USB controller connector J12 UART connector to 78M6610+PSU Evaluation Board J13 Power connector to 78M6610+PSU Evaluation Board Rev 2 78M6610+PSU Evaluation Kit User Manual 3 Graphical User Interface (GUI) A graphical user interface (GUI) is included on the 78M6610+PSU Evaluation Kit CD to facilitate quick evaluation of the 78M6610+PSU energy measurement device. The GUI requires Microsoft.NET Framework 4 on the PC for which the GUI is to execute on. Upon invoking the GUI executable file, an installation wizard may appear if Microsoft.NET Framework 4 is not installed on the PC. Follow the installation wizard instructions, or download Microsoft.NET Framework 4 from the Microsoft web site prior to launching the GUI. 3.1 GUI Initialization The GUI is self-explanatory when used with the 78M6610+PSU Data Sheet. The user, however, should note the following about the evaluation kit hardware: 1. Serial COM Port: Following the installation instructions in Section 2, launch the GUI executable and click the “Scan Ports” button to populate the drop-down menu with the available COM ports. Select the COM port assigned to the evaluation kit and leave the baud rate set to 38400 (default) 2. SSI ID: Use SSI ID 2 for the 78M6610+PSU Evaluation Kit then click “Connect”. Upon successful communication with the evaluation kit, the firmware revision field will be green and populated with the revision of the 78M6610+PSU firmware. 3. Register Addresses: Rev 2 Common measurement and configuration parameters have their own labeled cells. For direct register read/writes, reference the byte-addressable registers in the data sheet for the synchronous serial interface (SSI) protocol. 13 78M6610+PSU Evaluation Kit User Manual 4 Schematics, Bill of Materials, and PCB Layouts This section includes the schematics, bill of materials, and PCB layouts for the 78M6610+PSU Evaluation Boards and the Shunt Adaptor Board. 4.1 78M6610+PSU 16-Pin Evaluation Board Schematics . 3.3V COMM 5V C2 0.1uF 0603 VOUT EN NC R13 500 0603 5 4 C3 4.7uF 0805 C4 0.1uF 0603 C5 0.1UF 0603 R17 150 0603 R15 360 0603 TCMT1107 U5 1 C1 4.7uF 0805 VIN 1 3 4 1 1 2 GND J2 2 5V COMM 5V 3.3V R18 500 0603 ISO UART TX 4 U1 MC78PC33 SOT23-5 U4 TCMT1107 R8 4 HEADER 750 0603 J5 Connection for external 10K NTC Thermistor 3.3V t 1 2 3 3.3V 16 13 ATEMP1 V3P3A 2 3 CON2 TCMT1107 U9 4 J16 2 1 CON2 /AC_CRITICAL 3.3V C17 0.1uF 0603 R4 39 0603 U3 78M6610+PSU/C R14 10K 0603 3.3V D1 J7 /RELAY CTRL GREEN or BLUE 0603 R23 220 AIP AIN IFCONFIG RT1 DNP THERMISTOR Vin Ext 0603 R21 220 14 15 R22 500 0603 4 C15 1000pF 0603 /RELAY CTRL 5 12 11 10 7 6 2 DNP C16 0.1uF 0603 DNP TP 3 0603 NEUTRAL 4 8 ACFAULT SPCK/ADDR0 SDI/RX/SDAO SDO/TX/SDAI ACCRIT SSB/DIR 3.3V 3 1 2 3 4 AVP AVN J13 2 1 GNDD 750 1 2 V3P3D C7 1000pF 0603 GNDA J4 C6 0.1uF 0603 TCMT1107 U6 1 9 DNP R7 LOAD RETURN UART 500 R16 0603 3.3V TP15 3.3V 1 2 3 4 COMM 5V RETURN TP14 DNP TP UART TX 3 1 3.3V NEUTRAL 2 0603 3 0603 J3 ISO UART RX 1 750 0603 3.3V C13 1000pF 2 LINE_SENSE C14 0.1UF 1 DNP R25 UART RX 5V 1 TP11 DNP TP 1 TP12 DNP TP D2 /AC_CRITICAL R5 3k 0603 1 2 3 4 5 V3P3 DIO8 SSB *RESET GND MOSI GND SCK GND MISO 10 9 8 7 6 SPI PORT RED Figure 5: 78M6610+PSU 16-Pin Evaluation Board Electrical Schematic 14 Rev 2 78M6610+PSU Evaluation Kit User Manual 4.2 78M6610+PSU 16-Pin Evaluation Board Bill of Materials Table 4: 78M6610+PSU 16-Pin Evaluation Board Bill of Materials Rev 2 Item Q Reference Part PCB Footprint Part Number Manufacturer RoHS-6 1 2 C1,C3 4.7uF 805 C2012Y5V1C475Z/0.85 TDK Yes 2 7 C2,C4,C5,C17 0.1uF 603 C1608Y5V1H104Z TDK Yes 3 3 C7,C13,C15 1000pF 603 C1608X7R2A102K TDK Yes 4 1 D1 Green 603 LG Q971-KN-1 OSRAM Yes 5 1 D2 Red 603 LTST-C190CKT Lite-On Yes 6 1 J2 5V Through hole PBC36SAAN Sullins Yes 7 1 J3 CON4- FEMALE Through hole SSA-132-S-G Samtec Yes 8 1 J4 UART Through hole PBC36SAAN Sullins Yes 9 1 J5 SIP100P3 Through hole PBC36SAAN Sullins Yes 10 1 J7 SPI port Through hole PBC36SAAN Sullins Yes 11 2 J13,J16 CON2 Through hole PBC36SAAN Sullins Yes 12 1 RT1 THERMISTOR 603 NCP18XH103F03RB Murata Yes 13 1 R4 39 603 ERJ-3GEYJ390V Panasonic Yes 14 2 R7,R8 750 0.1% 603 ERA-3YEB751V Panasonic Yes 15 1 R5 3K 603 ERJ-3EKF3001V Panasonic Yes 16 1 R14 10K 603 ERJ-3EKF1002V Panasonic Yes 17 1 R15 360 603 ERJ-3EKF3600V Panasonic Yes 18 1 R17 150 603 ERJ-3EKF1500V Panasonic Yes 19 4 R13,R16,R18,R22 499 603 ERJ-3EKF4990V Panasonic Yes 20 2 R21,R23 220 603 RC0603FR-07220RL Yageo Yes 21 1 R25 0 603 ERJ-3GEY0R00V Panasonic Yes 22 1 U1 MC78PC33 SOT 23-5 MC78PC33NTRG ON Semi Yes 23 1 U3 78M6610+PSU TSSOP16 78M6610+PSU/C00 Maxim Yes 24 4 U4,U5,U6,U9 TCMT1107 SOP-4 TCMT1107 Vishay Yes 15 78M6610+PSU Evaluation Kit User Manual 4.3 78M6610+PSU 16-Pin Evaluation Board PCB Layouts Figure 6: 78M6610+PSU 16-Pin Evaluation Board PCB Top View 16 Rev 2 78M6610+PSU Evaluation Kit User Manual Figure 7: 78M6610+PSU 16-Pin Evaluation Board PCB Bottom View Rev 2 17 78M6610+PSU Evaluation Kit User Manual 4.4 78M6610+PSU 24-Pin Evaluation Board Schematics . 3.3V COMM 5V U1 MC78PC33 SOT23-5 TP15 22 23 4 HEADER 750 0603 1 2 3 Connection for external 10K NTC Thermistor 3.3V D1 8 ATEMP1 ATEMP2 t 3.3V Vin Ext GREEN or BLUE 9 10 Y1 1 3 C8 0603 10K R14 0603 1 TP11 DNP TP 1 TP12 DNP TP 1 TP13 DNP TP RED 0603 R24 220 D3 /ACFAULT CON2 TCMT1107 U8 J14 2 1 R12 0603 15K CON2 3.3V J7 0603 1 2 3 4 5 D2 /AC_CRITICAL J16 2 1 DNP 20 MHz R19 DNP 15K 0603 R23 220 4 R20 500 0603 DNP 27PF 3.3V TCMT1107 U9 /AC_CRITICAL C11 0603 DNP 27PF R4 39 3.3V 0603 /RELAY CTRL CON2 DIO6 /ACFAULT U2 78M6610+PSU/B C17 0.1uF 0603 XIN XOUT R22 500 0603 4 V3P3D AIP AIN 2 J5 0603 R21 220 24 1 DNP THERMISTOR RT1 MP1 MP0 J13 2 1 3 C15 1000pF 0603 /RELAY CTRL 15 14 13 12 7 6 5 4 3 4 R8 C16 0.1uF 0603 DNP TP 18 3 DNP RESETB TCMT1107 U6 2 16 17 NEUTRAL 1 RELAY _CTRL SPCK/ADDR0 SDI/RX SDO/TX AC_CRITICAL SSB/DIR ADDR1 ACFAULT IFCONFIG 3.3V 750 0603 GNDA 1 2 3 4 AVP AVN GNDD J4 19 20 11 C7 1000pF 0603 C6 0.1uF 0603 V3P3A DNP R7 LOAD RETURN 21 3.3V UART R16 500 0603 3.3V 4 NEUTRAL 1 2 3 4 COMM 5V RETURN TP14 DNP TP UART TX 3 1 C12 0.1uF 0603 3.3V 0603 1 0603 2 0603 750 J3 ISO UART RX 1 LINE_SENSE R11 10K 0603 3 3.3V C13 1000pF C14 0.1UF U4 TCMT1107 2 DNP R25 ISO UART TX 1 5V TCMT1107 U5 1 C5 0.1UF 0603 3.3V C4 0.1uF 0603 C3 4.7uF 0805 R18 500 0603 R17 150 0603 2 NC R15 360 0603 R13 500 0603 4 1 EN 5 2 C2 0.1uF 0603 VOUT 4 C1 4.7uF 0805 VIN 3 3 UART RX 1 2 GND 1 J2 COMM 5V 3.3V 2 5V R26 3k 0603 DIO8 V3P3 SSB *RESET MOSI GND SCK GND MISO GND 10 9 8 7 6 SPI PORT Y ELLOW Figure 8: 78M6610+PSU 24-Pin Evaluation Board Electrical Schematic 18 Rev 2 78M6610+PSU Evaluation Kit User Manual 4.5 78M6610+PSU 24-Pin Evaluation Board Bill of Materials Table 5: 78M6610+PSU 24-Pin Evaluation Board Bill of Materials Item Q 1 2 C1,C3 4.7uF 805 C2012Y5V1C475Z/0.85 TDK Yes 2 8 C2,C4,C5,C12,C17 0.1uF 603 C1608Y5V1H104Z TDK Yes 3 3 C7,C13,C15 1000pF 603 C1608X7R2A102K TDK Yes 4 2 C8,C11 27PF 603 CC0603JRNP09BN270 Yageo Yes 5 1 D1 Green 603 LG Q971-KN-1 OSRAM Yes 6 1 D2 Red 603 LTST-C190CKT Lite-On Yes 7 1 D3 Yellow 603 LTST-C190YKT Lite-On Yes 8 1 J2 5V Through hole PBC36SAAN Sullins Yes 9 1 J3 CON4 Through hole PBC36SAAN Samtec Yes 10 1 J4 UART Through hole PBC36SAAN Sullins Yes 11 1 J5 SIP100P3 Through hole PBC36SAAN Sullins Yes 12 1 J7 SPI port Through hole PBC36SAAN Sullins Yes 13 3 J13,J14,J16 CON2 Through hole PBC36SAAN Sullins Yes 14 1 RT1 THERMISTOR 603 NCP18XH103F03RB Murata Yes 15 1 R4 39 603 ERJ-3GEYJ390V Panasonic Yes 16 2 R7,R8 750 0.1% 603 ERA-3YEB751V Panasonic Yes 17 2 R11,R14 10K 603 ERJ-3EKF1002V Panasonic Yes 18 1 R15 360 603 ERJ-3EKF3600V Panasonic Yes 19 1 R17 150 603 ERJ-3EKF1500V Panasonic Yes 20 1 R12 15K 603 ERJ-3EKF1502V Panasonic Yes 21 5 R13,R16,R18,R20,R22 499 603 ERJ-3EKF4990V Panasonic Yes 22 4 R21,R23,R24 220 603 RC0603FR-07220RL Yageo Yes 23 1 R25 0 603 ERJ-3GEY0R00V Panasonic Yes 24 1 R26 3K 603 ERJ-3GEYJ302V Panasonic Yes 25 1 U1 MC78PC33 SOT 23-5 MC78PC33NTRG ON Semi Yes 26 1 U2 78M6610+PSU QFN24 78M6610+PSU/B00 Maxim Yes 27 5 U4,U5,U6,U8,U9 TCMT1107 SOP-4 TCMT1107 Vishay Yes 28 1 Y1 887-1143-1-ND 20MHz 4-SMD 8Z-20.000MAAJ-T TXC Yes Rev 2 Reference Part PCB Footprint Part Number Manufacturer RoHS-6 19 78M6610+PSU Evaluation Kit User Manual Figure 9: 78M6610+PSU 24-Pin Evaluation Board PCB Top View 20 Rev 2 78M6610+PSU Evaluation Kit User Manual Figure 10: 78M6610+PSU 24-Pin Evaluation Board PCB Bottom View Rev 2 21 78M6610+PSU Evaluation Kit User Manual 4.6 Shunt Adaptor Board Schematics . Isolated DC/DC Male NEMA 5-15 . J1 STERM VR1 VBT1-5V NEUTRAL R1 0.004 1% 2.5W 2512P VIN VOUT VGND GND 2 USB5P 1 C6 0.1uF 0603 C5 4.7uF 1206P 8 7 6 3 C4 4.7uF 1206P R2 0 0603 NC4 NC3 NC2 NC1 5 4 CURRENT INPUT 1 2 3 4 ISO5V NEUTRAL 1 2 3 4 Isolated +5V LOAD_RETURN J13 J2 STERM USBGND ISOGND 2 1 USB5P FEMALE CON2 UTX URX USBGND 1 2 3 4 J9 J3 STERM 1.5M A/B White Cable 1 2 3 4 R5 750 0603 R8 R10 1MR_1206 1206 1MR_1206 1206 FEMALE CON4 LINE_SENSE LINE VOLTAGE INPUTS FEMALE CON4 1 2 3 4 R4 0 0603 1 2 J4 STERM J12 Isolated UART 3 11 2 9 10 6 23 22 13 14 12 J10 U2 28-SSOP RXD TXD VCCIO VCC RTS CTS DTR DSR DCD RI USBDM USBDP NC1 RESETB NC2 4 20 16 15 8 19 24 USB5V USBDM USBDP C3 4.7uF 1206P 1 2 3 4 5 6 J11 USB-B CBUS0 CBUS1 CBUS2 CBUS3 CBUS4 OSCI OSCO TEST GND3 GND2 GND1 AGND J7 LOAD_RETURN 1 2 LINE_SENSE 3 4 LINE 5 1 26 21 18 7 25 R3 10K 0603 USBRX USBTX PSU board interface 1 2 3 4 3V3OUT 27 28 17 C2 0.1uF 0603 J5 STERM 1 2 3 4 FG EGND 1 2 3 4 J6 STERM Female NEMA 5-15 Figure 11: Shunt Adaptor Board Electrical Schematic 22 Rev 2 78M6610+PSU Evaluation Kit User Manual 4.7 Shunt Adaptor Board Bill of Materials Table 6: Shunt Adaptor Board Bill of Materials Item Q Reference Part PCB Footprint Part Number Manufacturer RoHS-6 1 2 C2,C6 0.1uF 0603 C0603C104K5RACTU Kemet Yes 2 3 C3,C4,C5 4.7uF 1206P C3216Y5V1C475Z/0.85 TDK Yes 3 4 G1,G2,G3,G4 MTHOLE MTGPS.PRT 561-PS500A Eagle Plastic Devices Yes 4 6 J1,J2,J3,J4,J5,J6 STERM STERM VERTICAL 8191 Keystone Electronics Yes 5 1 J7 CON4 FEMALE Through hole SSA-132-S-G Samtec Yes 6 1 J9 CON4 Through hole PBC36SAAN Sullins Yes 7 1 J12 CON4 FEMALE Through hole SSA-132-S-G Samtec Yes 8 2 J10 CON2 Through hole PBC36SAAN Sullins Yes 9 1 J11 USB-B USBB 154-2442-E Kobiconn Yes 10 1 J13 CON2 FEMALE Through hole SSA-132-S-G Samtec Yes 11 1 R1 0.004 1% 2.5W 2512P ULR25R004FLFTR IRC Yes 12 2 R2,R4 0 0603 ERJ-3GEY0R00V Panasonic Yes 13 1 R3 10K 0603 ERJ-3EKF1002V Panasonic Yes 14 1 R5 750 0.1% 603 ERA-3YEB751V Panasonic Yes 15 2 R8,R10 1M 1206 RNCS1206BKE1M00 Stackpole Yes 16 1 U2 FT232QFN32 28-SSOP FT232RL-REEL FTDI Yes 17 1 VR1 VBT1-5V VBT1 VBT1-S5-S5-SMT CUI Inc Yes 23 78M6610+PSU Evaluation Kit User Manual 4.8 Shunt Adaptor Board PCB Layouts Figure 12: Shunt Adaptor Board PCB Top View 24 Rev 2 78M6610+PSU Evaluation Kit User Manual Figure 13: Shunt Adaptor Board PCB Bottom View Rev 2 25 78M6610+PSU Evaluation Board User Manual 5 Included Documentation The following 78M6610+PSU documents are included on the CD: 78M6610+PSU Data Sheet 78M6610+PSU Evaluation Kit User Manual 6 Contact Information For more information about Maxim products or to check the availability of the 78M6610+PSU, contact technical support at www.maximintegrated.com/support. Revision History Revision Date Description 0 7/25/2012 First publication. 1 8/17/2012 Expanded GUI initialization instructions. 1.1 11/30/2012 Modified Schematics, BOM, and GUI screenshot. 2.0 4/9/2013 Corrected ordering part number, removed legacy Teridian doc# 26 Rev 2 Mouser Electronics Authorized Distributor Click to View Pricing, Inventory, Delivery & Lifecycle Information: Maxim Integrated: 78M6610+PSU/EK#1 78M6610+PSUEVK1#