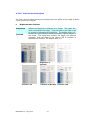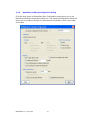
1
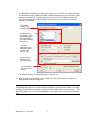
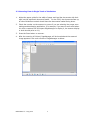
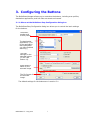
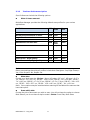
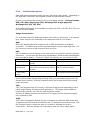
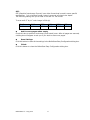
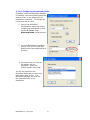
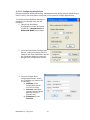
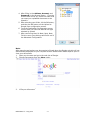
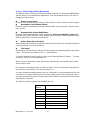
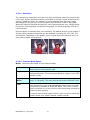
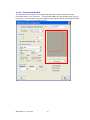
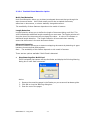
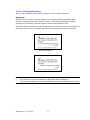
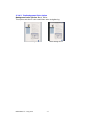
iVina BulletScan Manager User’s Manual Aug 2010 Copyright Copyright© 2010 iVina Inc. All rights reserved. Information in this document is subject to change without notice. The software described in this document is furnished under a license agreement or nondisclosure agreement. The software may be used or copied only in accordance with the terms of those agreements. No part of this publication can be reproduced in any form or by any means without prior written permission of iVina Inc. Trademark iVina is the trademarks of iVina Inc. Adobe®, and Adobe PDF Signature are either registered trademarks or trademarks of Adobe Systems Inc. in the United States and/or other countries. Optical characters recognition (OCR) capabilities are provided by ABBYY. ABBYY®, and the ABBYY Logo are either registered trademarks or trademarks of ABBYY Software Ltd. Microsoft and Windows are registered trademarks of Microsoft Corporation. Other names and products mentioned in this document may be trademarks or registered trademarks of their respective companies. BSM Manual V .4 Aug 2010 ii Table of Contents 1. Installing the BulletScan Manager ............................................................................... 1 2. Scanning From the Button ........................................................................................... 2 2.1 The Default Button Settings ................................................................................................. 2 2.2 Checking the Button Configurations .................................................................................. 3 2.3 Scanning From A Single Touch of the Button .................................................................. 6 3. Configuring the Buttons............................................................................................... 7 3.1 A Glance at the BulletScan Easy Configuration dialog box ........................................... 7 3.2 Choosing New Settings from the Easy Mode..................................................................... 8 3.2.1 The Scan Destination Option ................................................................................... 11 3.2.2 The Scan Preferences Option ................................................................................... 12 3.2.3 The Saving Options (Easy) ...................................................................................... 13 3.2.4 The file format options ............................................................................................. 14 3.3 Settings in Advanced Mode ................................................................................................ 16 3.3.1 BulletScan Destination Configuration dialog ......................................................... 16 3.3.2 BulletScan Scan Configuration dialog .................................................................... 24 3.3.3 BulletScan Feeding Configuration dialog ............................................................... 30 3.3.4 BulletScan Image Processing dialog ....................................................................... 33 BSM Manual V .4 Aug 2010 iii 1. Installing the BulletScan Manager Minimum System Requirements Microsoft Windows XP/Vista/7 1.2 GHz CPU or greater * 512 MB RAM for Windows XP (2+ GB RAM recommended) 1 GB RAM for Windows Vista and 7 (2+ GB RAM recommended) 500 MB available on the Hard Drive for complete software installation USB 2.0 Port CD-Rom drive Display supporting full color (32 bit) at 800 x 600 * File conversion speeds and OCR performance are linked to CPU speed. The faster your processor, the better your results. BulletScan Manager provides you an easy way to scan your document and then link the scanned image to your designated software application. All this can be done with a simple touch of the button on the scanner. Installing the BulletScan Manager is easy. Please follow these steps: Note: To ensure the scanner buttons work properly, please install the scanner driver and BulletScan Manager FIRST before connecting the scanner. 1. Insert the supplied CD into your CD-ROM drive. The following installation graphic appears. If not, browse to your CD drive and double-click ―Setup.exe‖. 2. Click ―Easy Install‖ to have all of the standard software including BulletScan Manager installed automatically for you. 3. The InstallShield wizard appears to guide you through the rest of the installation. The default options should be ideal for your usage. BSM Manual V .4 Aug 2010 1 2. Scanning From the Button With the single press of the Scan button on your scanner, your document will be scanned, converted, processed, and sent to the designated application. Before you start scanning, you may wish to check the button configurations first to ensure you get the results you expect. 2.1 The Default Button Settings The scanner is shipped with preconfigured button settings for your basic scanning tasks such as scan-to-folder, scan-to-email, or scan-to-printer. The following table shows these factory default settings. You can change any of these settings. Button Name Number Destination Preset Scan Settings Application 1 B&W PDF NewSoft Presto! PageManager Normal Size Documents, PDF, 8.5‖ x 11‖ 2 Color PDF NewSoft Presto! PageManager Normal Size Documents in color, PDF, 8.5‖ x 11‖ 3 Google Docs Google Docs Normal Size Documents, PDF, 8.5‖ x 11‖ 4 Email Default Windows Mail Application Normal Size Documents, PDF, 8.5‖ x 11‖ 5 BizCard NewSoft Presto! Bizcard Business Card, BMP, Autocrop 6 Print Default Printer Normal Size Documents, 8.5‖ x 11‖ 7 Storage Save and launch nothing Autodetect Color and Size, PDF, 8.5‖ x 11‖ 8 Storage Save and launch nothing Black and white text document, PDF, 8.5‖ x 11‖ 9 Storage Save and launch nothing Black and white text document, PDF, 8.5‖ x 11‖ Note: These default settings will depend on the software that you have installed. If the ABBYY OCR engine is not installed, the PDF and editable text options will be removed. By default your scans will be stored in the My Documents\BulletScan folder, with a subfolder for whichever application you have selected. BSM Manual V .4 Aug 2010 2 2.2 Checking the Button Configurations 1. After the BulletScan Manager and the scanner driver have been successfully installed on your computer, whenever the scanner is ready and connected the status light will be a solid blue and the BulletScan Manager icon will be displayed in the Windows System Tray at the bottom right corner of your computer screen. BulletScan Manager icon on Windows XP BulletScan Manager icon on Windows Vista/7 2. From the Start Menu->Programs->BulletScan select BSM Configuration. Or Right-click the BulletScan Manager icon. Choose Configuration when the pop-up menu is displayed. Or Left-click the BulletScan Manager icon to prompt the following BulletScan Button Panel and right-click on the button number that you wish to change 3. Both the Configuration Dialog and the Button Panel should now be open, as seen below: Configuration dialog BSM Manual V .4 Aug 2010 Button Panel 3 The BulletScan Configuration dialog box will either start with button #1 selected or the button number on the Button Panel you right-clicked on. The BulletScan Configuration dialog box This indicates the scanner model The selected button number and display name The selection for Easy and Advanced modes BSM Manual V .4 Aug 2010 4 4. The BulletScan Configuration dialog box allows you to control your button settings in either Easy mode or Advanced mode. The Easy Mode allows you to choose simple settings, like what are you scanning, where’s it going, and what format it uses. From the Configuration dialog window, choose the button number you want to change and hit Next. The button number and friendly name. The destination application. (This is the application that opens after you have finished scanning.) The scan settings for the selected button. (in this case button #1). Folder and file name for the scanned image The file format of the scanned image. The default settings for the buttons are in section 2-1. 5. After changing the settings to your liking, click the Finish button to save your settings and close the dialog box. Important: If the BulletScan button icon has not been displayed in the Windows System Tray after installing the BulletScan Manager, simply press the Scan button on the scanner. The BulletScan button icon will then be displayed on the right corner of the Windows System Tray. BSM Manual V .4 Aug 2010 5 2.3 Scanning From A Single Touch of the Button 1. Adjust the paper guide for the width of paper and load the documents with their tops into the automatic document feeder. For the F200, the documents face up, all other BulletScan models should have the documents loaded facing down. 2. Check the number on the scanner to ensure if you are selecting the proper scan settings and destination application. (For example, if you want to scan with button #1 which creates a PDF and opens PageManager to display it, the scanner display or knob should point to #1). 3. Press the Scan button on scanner. 4. After the scanning is finished, PageManager will be launched and the scanned image appears in the main window of PageManager as below. BSM Manual V .4 Aug 2010 6 3. Configuring the Buttons The BulletScan Manager allows you to customize the buttons, including scan profiles, destination applications, and how files are stored and named. 3.1 A Glance at the BulletScan Easy Configuration dialog box The BulletScan Easy Configuration dialog box allows you to control the basic settings for the buttons. The button number and friendly name. The destination application. (This is the application that opens after you have finished scanning.) The scan settings for the selected button. (in this case button #1). Folder and file name for the scanned image The file format of the scanned image. The default settings for the buttons are in section 2-1. BSM Manual V .4 Aug 2010 7 3.2 Choosing New Settings from the Easy Mode For each button, you can control the Destination Application, Scan Configuration (What is being scanned), and File Format from the Easy Configuration mode. Click the dropdown to configure a different button number Choose the destination to send the scanned image. When you change the destination, the File Format and Folder will update. Choose a how the scan will be performed Select the folder the file will be saved in, and select the naming pattern. Select the file format for the scanned image. BSM Manual V .4 Aug 2010 8 To choose new settings for a button, 1. Right click the BulletScan Button icon ( ) in the system tray at the bottom right corner of the screen. Click Configuration on the popup menu. 2. The BulletScan Configuration dialog box appears. Click the dropdown menu to choose the button number you want. 3. Choose Easy mode and then click the Next button to go to the BulletScan Easy Configuration dialog box. BSM Manual V .4 Aug 2010 9 4. From the Scan Destination list, select the application to send the scanned image to. (see section 3.2.1) 5. From the Scan Preferences section, select What is being scanned (document type), which sides to scan (if this is a duplex scanner), and What size of image will be scanned. (see section 3.2.2) 6. From the Saving section, enter the folder path or browse to the folder to select your desired folder. Type in your desired file name. (see section 3.2.3) 7. From the File Format option, select a proper file format supported by the selected application. (see section 3.2.4) 8. Click Finish to save your settings and close this window. BSM Manual V .4 Aug 2010 10 3.2.1 The Scan Destination Option The BulletScan Manager will automatically detect your compatible destinations and make them available. You should see the following types of applications as destinations: Category o Example application Email o Microsoft Outlook o Microsoft Outlook Express Remote Applications o Google Docs o Evernote o YouSendIt Printers o All printers and fax devices detected by Windows Document Management o NewSoft Presto! PageManager Business Card Readers o NewSoft Presto! Bizcard PDF Viewers and Editors o Adobe Acrobat Reader, Standard, and Professional o iBooks for iTunes Text Editing Applications o Microsoft Word o Microsoft WordPad o Microsoft Notepad Image Viewers and Editors o Microsoft Paint o Adobe Photoshop o Irfanview If your application is installed, but not automatically detected, you can manually add the application. See section 3.3.1 Adding a New Software Application for more details. Important! You need to install BulletScan OCR Engine in order to use any of the PDF or Text Editing applications. This is installed automatically as part of the Easy Installation. BSM Manual V .4 Aug 2010 11 3.2.2 The Scan Preferences Option Scan Preferences include the following options. What is been scanned: BulletScan Manager provides the following default scan profiles for your various applications. Profile Name DPI Scan Mode Page Size Normal Size Documents 200 BW Letter Normal Size Documents in Color 150 Color Letter Legal Size Documents 200 BW Legal Mixed Size Documents 200 BW Auto Autodetect Color and Size 200 Auto Business Card 300 Auto Color Gray Business Card in Color 300 Color Auto Color Photo 200 Color Auto Color Photo - High Quality 400 Color Auto Color Photo - Very High Quality 600 Color Auto Auto Note: Other scan settings shared by all profiles include Auto-Straighten: Yes, Edge Cleanup: Yes, Color Dropout: No, Duplex: No. What size: Choose your ideal scan size. Choice: None, US Letter- 8.5‖x 11‖, US Legal – 8.5‖ x 14‖, ISO A4 – 21 x 29.7 cm, ISO A5 – 14.8 x 21 cm, ISO A6 – 10.5 x 14.8cm, ISO A7 – 7.4 x 10/5 cm, ISO B5 – 17.6 x 25 cm, ISO B6 – 12.5 x 17.6 cm, ISO B7 – 8.8 x 12.5 cm, JIS B5 – 18.2 x 25.7 cm, JIS B6 – 12.8 x 18.2 cm, JIS B7 – 9.1 x 12.8 cm. Note: Some options may be restricted when scanning off the flatbed for scanners that have that option. Scan which side: Choose the side of document you wish to scan. You will not have the option to choose Both Sides if you do not have a duplex model. Choice: Front Side, Both Sides BSM Manual V .4 Aug 2010 12 3.2.3 The Saving Options (Easy) Folder: Enter the path or click Browse to select the path for your scanned image. Default: C:\Document and Settings\<username>\My Documents\BulletScan\<Program Name> File Name: The filename consists of text, and special naming options that automatically generate a name. The tokens are always in the <> type brackets. To see the available naming options, click on the ―Naming Options‖ button. To insert an option, click on it in the displayed list. When a scan is performed, these options are automatically converted to their actual values at scan time. For example, the default setting of ―Scan<####>‖ will be converted to Scan0001 for the first scan, Scan0002 for the second, and so on. You may change the default name in the box, although it is recommended that you use a counter or a unique identifier so that no two output files will have the same name. You may also check the option ―Select name when finished‖ to enter the file name when scanned job is finished. The following naming options are available for use: BSM Manual V .4 Aug 2010 Naming Option # Output Name YYYY Current Year, 4 digits YY Current Year, 2 digits MM Current Month, 01-12 DD Current Day, 01-31 HH Hour, 1-24 hh Hour, 1-12 mm Minute, 00-59 ss Second, 00-59 B Barcode from document U Current User’s name C Computer Name MMDDYYYY Month, Day, and Year Numbered Counter 13 3.2.4 The file format options Each destination application typically can only open certain file formats. Depending on the application you select, the available formats will automatically change. Choose your preferred file format for the current button number. Choices includes BMP, GIF, JPEG, Single-page TIFF, Multipage TIFF, Single-page PDF, Multipage PDF, RTF, TXT, DOC. If the ABBYY OCR engine is not installed, the options for PDF, Multi PDF, RTF, TXT, and Doc will not be available. Image Format notes: For all formats that have additional controls over quality, compression, or processing type, these functions are accessible in the Advanced mode for your button. BMP: BMP is the standard Windows image format on DOS and Windows-compatible computers. The BMP format is not compressed and will usually create large files. It is not commonly used as a final format to save your files. PDF: PDF (Portable Document Format) is the most commonly used file format for scanned documents. You can view PDF files using PageManager, Adobe Acrobat, Adobe Reader and most eBook readers. There are 3 types of processing you can choose for PDF: Mode Use Advantage Image Only OCR with Text replacement Searchable PDF - Text under image Saving only the image in a PDF format For high resolution document scans with mixed text and picture content Best option for most uses fastest smaller output files when there is mixed content retains original look and feel, but is also fully text searchable If you wish to create change the processing used, go to the Advanced menu for the desired button number, click the Properties button and choose the OCR processing mode you prefer. TIFF: TIFF (The Tagged-Image File Format) is a flexible image format supported by many paint, image-editing, and page-layout applications. Tiff images support different compression types for color and for black and white images. Virtually all desktop scanners can produce TIFF images, but this format has largely been replaced by PDF. JPEG: JPEG (Joint Photographic Experts Group) compression provides the best results with continuous-tone color and the smallest file size. To change the compression level, click the Properties button. Adjust the slider to increase or decrease the level of compression. Note the greater the compression level, the lower image quality. BSM Manual V .4 Aug 2010 14 GIF: GIF (Graphics Interchange Format) is an older format that is used in some specific applications. It is a lossless format, but only supports a limited color depth. The following table gives you an idea of file size v.s. file format To scan an 8.5‖ by 11‖ color image in 200 dpi, File Format File Size BMP 10M TIFF 1.2MB PDF 53KB JPEG 212KB GIF 1.3MB Ask for more pages when empty Check this box to perform continuous (multi-stack) scan. After all pages are scanned, a dialog box will appear to ask you if you wish to scan more pages. Save Settings: Click this button to save all the settings in the BulletScan Easy Configuration dialog box. Finish: Click this button to close the BulletScan Easy Configuration dialog box. BSM Manual V .4 Aug 2010 15 3.3 Settings in Advanced Mode 3.3.1 BulletScan Destination Configuration dialog BulletScan Advanced Mode (BulletScan Destination Configuration) dialog box allows you to have greater control over the scan process, including OCR features and compression features, file name, and advanced scan settings. Change the Friendly Name Select the scan profile to edit. Change the Advanced Destination Properties Select the Destination Select the OCR Language Select the Format Change the file format properties Choose details for your folder. Select file name for the scanned image. Click to select more scan settings. BSM Manual V .4 Aug 2010 16 3.3.1.1 Scan Destination The Scan Destination dropdown list contains all of the currently valid scan destinations. See section 3.2.1 for more information. 3.3.1.2 Adding A New Destination Application The BulletScan Button Manager allows you to add your own software applications as a destination for your scanned image. To add a new destination application: 1. 2. Go to the Advanced Mode configuration for any button number. From the BulletScan Destination Configuration Window, click the Scan Destination dropdown list, and select Add from the list. A blank destination properties dialog box will open. 2. From the Add Application dialog box, follow these steps. Step 1: Enter the Application Path or browse to the new application. Step 2: Name the application. This is the name will be shown in the Scan Destination list. Step 3: Select at least one file format supported by the application and click Add to complete. 3. The new application will then be shown in List of Scan Destinations. BSM Manual V .4 Aug 2010 17 3.3.1.3 Advanced Destination Properties In the BulletScan Manager Advanced mode there is an extra button that allows you to configure additional settings for the Scan Destination. From the Destination properties window, you can adjust the following settings: Application Path Application Name Additional Arguments – Before Filename/After Filename Only pass folder name Compatible Filetypes The Application Path is the location of the application that will be launched when the scan is completed. Application Name is the friendly display name of the application. This is how it will show up in the list of Scan Destinations. Additional Arguments – Before Filename/After Filename is a setting that allows you to give special commands to the destination application. Only pass folder name is used for certain destinations, typically that process multiple single page image types, like BMP or JPG. This launches the application with just the folder name instead of the individual filenames. Compatible Filetypes are where you can add or remove each filetype from the list presented in the BulletScan Manager. If the OCR engine is not installed, it will not matter if you enable the text formats, they will still not show in the list of compatible file-types. BSM Manual V .4 Aug 2010 18 3.3.1.4 Configuring the selected printer By default, when the BulletScan Manager is installed, it will automatically select the default printer to use when the Print destination is selected. To change the printer that will be used: 1. Launch the BulletScan Configuration, select the button number that is assigned to print usually 6 - Print, select Advanced Mode, and press next. 2. From the BulletScan Destination Screen, click on the Properties button next to the dropdown list of printers. 3. All the printers you have on the system will be displayed. Select the desired printer and hit OK. You will be returned to the BulletScan Destination screen, click Next, Next, Next, Finish. The BulletScan Manager will now use the selected printer as the destination. BSM Manual V .4 Aug 2010 19 3.3.1.5 Configuring Google Docs Google provides a document hosting, management and editing service called Google Docs to every user that either uses Gmail or the premium Google Apps service. To configure the BulletScan Manager to upload to your Google Docs, do the following: 1. Launch the BulletScan Configuration screen and select number 3 – Google Docs and Advanced Mode and hit Next. 2. From the Destination Configuration Screen, make sure Google Docs is listed as the Scan Destination and hit the Properties button to open the Google Docs configuration screen. 3. From the Google Docs configuration screen, there are 3 settings you need to fill in manually: a. Address of the Google Docs server you will be using. b. Account username, typically this will be an address ending in @gmail.com c. Password for the Account BSM Manual V .4 Aug 2010 20 4. After filling in the Address, Account, and Password hit the Browse button. From the window that comes up, select the folder that you want your uploaded documents to be placed in. 5. After selecting your folder, hit the OK button, and then the OK button on the Upload to Google Docs configuration screen. 6. From the Destination Configuration screen, confirm that you have the desired file-type selected to upload. 7. After confirming that, hit Next, Next, Next, Finish to save your settings and finish out of the Advanced Configuration. Note: After scanning and saving your documents to Google docs, the Google web site will not automatically displayed on your computer screen. Please follow these steps to open or view your documents: 1. Start your browser and go to the web site of Google. 2. Choose Documents from the More option. 1. 2. Sign in with your Google account. View your document. BSM Manual V .4 Aug 2010 21 3.3.1.6 The Saving Options (Advanced) The default folder to store your scanned images is named ―My Documents\BulletScan‖ and the name of your destination application. Click the Browse button if you wish to change the folder name. Select at scan time: Check to enable automatic prompting of which folder to scan to when the scan begins. Remember Last Selected Folder: Check to enable remembering the last selected folder when using the ―Select at scan time‖ option. Automatically Create Subfolders: Check to enable automatically create a subfolder. Choice of subfolder name: Daily (MM-DD-YYYY), Daily (DD-MM-YYYY), Weekly (Week number), Weekly (Week ending), Monthly (MM-YYYY), Monthly (Month name). Select Name when finished Automatically prompts for the output file name when finished, pre-setting the filename with the settings in the File Name box. File Name: The filename consists of text, and special naming options that automatically generate a name. The tokens are always in the <> type brackets. To see the available naming options, click on the ―Naming Options‖ button. To insert an option, click on it in the displayed list. When a scan is performed, these options are automatically converted to their actual values at scan time. For example, the default setting of ―Scan<####>‖ will be converted to Scan0001 for the first scan, Scan0002 for the second, and so on. You may change the default name in the box, although it is recommended that you use a counter or a unique identifier so that no two output files will have the same name. You may also check the option ―Select name when finished‖ to enter the file name when scanned job is finished. The following naming options are available for use: BSM Manual V .4 Aug 2010 Naming Option # Output Name YYYY Current Year, 4 digits YY Current Year, 2 digits MM Current Month, 01-12 DD Current Day, 01-31 HH Hour, 1-24 hh Hour, 1-12 mm Minute, 00-59 Numbered Counter 22 ss Second, 00-59 B Barcode from document U Current User’s name C Computer Name MMDDYYYY Month, Day, and Year Next Click the Next button to continue to the BulletScan Scan Configurations dialog box. BSM Manual V .4 Aug 2010 23 3.3.2 BulletScan Scan Configuration dialog Click the Next button on the BulletScan Destination Configuration dialog box to open the BulletScan Scan Configuration dialog box. The BulletScan Scan Configuration dialog box allows you to configure basic scan settings for an individual button. The options are listed here. BSM Manual V .4 Aug 2010 24 3.3.2.1 Resolution The resolution is measured in dots per inch (dpi) (sometimes referred to as pixels per inch or ppi). Higher resolutions result in more detail in the scan, slower scanning and in general, greater file sizes. For example, an uncompressed letter size color image scanned at 300 dpi with color mode consumes approximately 25 MB of disk space. When OCR (Optical Character Recognition) is to be performed on a scan, 300dpi should be used for most languages except Asian languages. For Asian languages, 400 dpi is recommended. Move the slider or manually enter your resolution. The default value for most profiles is 200 dpi. Other standard resolutions are also available including 100, 150, 200, 300, 400 and 600. Depending on the quality of your original document and text size, you may want to adjust the resolution. Resolution: 100 dpi Resolution: 200 dpi 3.3.2.2 The Scan Mode Option Mode: Select the color depth for the scanned image. Color Choose Color to scan color photographs or color documents. Color scan produces the largest file size. Gray Choose Gray to scan documents containing drawings or black and white photographs. This scanning produces an image of up to 256 shades of gray. Black and White Choose Black and White to scan document containing purely text, pencil, or ink sketch. This scan mode produces the smallest file size. Automatic Color Choose Automatic Color to automatically detect and scan you’re your documents in color and automatically convert your non-color documents to grayscale or Black and White. This option is useful when you have a mix of color and non-color documents, but may be slower on some systems. To specify your desired output mode for your non-color document, please consult your specific scanner model’s manual. BSM Manual V .4 Aug 2010 25 3.3.2.3 The Preview Window The Preview button allows you to perform a trial scan of your document at low resolution before your final scan. This preview image lets you allocate your scan or crop area. You can specify your scan area by entering the values in the Height, Width, Vertical Offset, or Horizontal Offset option. BSM Manual V .4 Aug 2010 26 3.3.2.4 The Paper Size and Location Option The paper size and location option allows you to adjust the specific area to scan. Units: Defines the primary measurement system. Inches, Millimeters, and Pixels are available. Paper Size: Choose your desired paper size with the drop-down list box. Custom Automatic Maximum Size US Letter- 8.5‖x 11‖ US Legal – 8.5‖ x 14‖ ISO A4 – 21 x 29.7 cm ISO A5 – 14.8 x 21 cm ISO A6 – 10.5 x 14.8cm ISO A7 – 7.4 x 10/5 cm ISO B5 – 17.6 x 25 cm ISO B6 – 12.5 x 17.6 cm ISO B7 – 8.8 x 12.5 cm JIS B5 – 18.2 x 25.7 cm JIS B6 – 12.8 x 18.2 cm JIS B7 – 9.1 x 12.8 cm. Automatic: Automatically adjusts the cropping window according to different document sizes. Use this option for batches of mixed-sized documents. Maximum Size: Uses the maximum available area. Height — the height of the scan area. Width — the width of the scan area. Vertical (Y) Offset — the position from the top end of the document to the top end of the scan area. Horizontal (X) Offset — the distance from the left end of the scanner to the left edge of the scan area. BSM Manual V .4 Aug 2010 27 3.3.2.5 The Color Controls Option The Color Controls option allows you to adjust the color quality of the image so that it comes close to the original. Brightness and Contrast Brightness Contrast Adjusts the lightness or darkness of an image. The higher the value, the brighter the image. Drag the slider to the right or left to increase or decrease the brightness. The default value is 0. Adjusts the range between the darkest and the lightest shades in the image. The higher the contrast, the bigger the different grayscale. Drag the slider to the right or left to increase or decrease the contrast. The default value is 0. Brightness: -50 Contrast: -50 BSM Manual V .4 Aug 2010 Brightness: 0 (Normal) Contrast: 0 (Normal) 28 Brightness: +50 Contrast: +50 Gamma Adjusts the midtones of the image without dramatically altering then lightest and the darkest areas. When the value of gamma changes, the image changes accordingly. Manual gamma adjustment options vary based on model of scanner. Gamma Value: 1.0 BSM Manual V .4 Aug 2010 Gamma Value: 1.4 29 Gamma Value: 2.0 3.3.3 BulletScan Feeding Configuration dialog Click the Next button on BulletScan Scan Configuration dialog box to go to the BulletScan Feeding Configuration dialog box. The Feeding Configuration dialog box allows you to configure settings for the document orientation and for multi-page documents. BSM Manual V .4 Aug 2010 30 3.3.3.1 The Orientation Option Auto-Orient to Text Automatically rotate your document orientation based on your document text. Rotation Manually select rotation angle for your document if necessary. Choice: None, 90 degrees left (counter clockwise), 90 degrees right (clockwise), 180 degrees around, 180 degrees flipped. Original 90 degrees right 180 degrees around 180 degrees flipped 90 degrees left 3.3.3.2 Batch Types 1 output File per Stack This is the normal mode – Every load of paper in the feeder will generate one output file, as long as the file format supports it. 1 output File with [] Images This mode allows you to split your output files every so many pages. This is commonly used to scan two sided documents and have each piece of paper (2 images in duplex) generate a single output file. Use a blank page to separate output files With this mode, output files are split whenever a blank page is detected. Use a barcode to separate output files With this selected, every time a barcode is detected, a new blank page is created. This is best used in conjunction with the <B> naming token to assign each output file a name based on the barcode. Ask for more pages when empty Check this option and you can use the same settings to load another batch of document and continue scanning. 3.3.3.3 Stitch Front and Back This option allows you to take a duplex image, and merge the output of each duplex scan into a single image, like a panorama image. It supports Side by Side and Top and Bottom modes. BSM Manual V .4 Aug 2010 31 3.3.3.4 The Multi-Feed Detection Option Multi-Feed Detection Multi-Feed Detection allows you to detect overlapped document that go through the auto document feeder. Multi-Feed usually occurs due to stapled documents, adhesives on documents, or electro-statically charged document. The availability of these features depends on the model of scanner. Length Detection Length Detection allows you to define the length of document being multi-fed. This value indicates the additional length exceeding your scan area. The Display window will show the size of the document as you change the value. A value of 0 indicates no additional length detection. The Length Detection is best used when scanning same-size documents in the auto document feeder. Ultrasonic Detection Ultrasonic Detection allows you to detect overlapping documents by detecting air gaps between documents that feed together. Note: The availability of this feature depends on the model of scanner. There are two options available if Multi-Feed is detected. Stop Scanning after Multi-Feed If this is selected, the scanner will stop the feeder and display the following Warning dialog box if multi-feed is detected. Action: 1. Remove the remaining pages in the Feeder per your scanner’s hardware guide. 2. Click OK to close the Warning dialog box. 3. Scan the rest of the pages. BSM Manual V .4 Aug 2010 32 3.3.4 BulletScan Image Processing dialog Click the Next button on the BulletScan Feeding Configuration dialog box to advance to the Image Processing dialog box. The Image Processing dialog box provides advanced features to enhance your image quality. 3.3.4.1 The Edge Cleanup Option Check White or Black if you wish to add white or black edge on the border of your scanned image. Enter the value from 0 to 5 mm. Default value is 0. Original BSM Manual V .4 Aug 2010 Edge Fill: 5mm (Black) 33 3.3.4.2 The Despeckle Option Note: The availability of this feature depends on the model of scanner. Despeckle: Occasionally small dots or specks appear in the background of a scanned image. Remove unwanted speckles provides a cleaner image for OCR (Optical Character Recognition) processing, and also helps to reduce compressed file size. Define the speckles (also known as image noise) you wish to remove by specifying its sensitivity value (size). The higher the value, the more speckles will be removed. Before Despeckle After Despeckle Note: The function is currently available for Black and White image only. To scan at rated speed, it is recommended to set the noise radius up to 10 pixels. BSM Manual V .4 Aug 2010 34 3.3.4.3 The Background Color Option Background color: Choice: Black, White. This option sets the fill color used when auto-straightening. Black Background White Background BSM Manual V .4 Aug 2010 35 3.3.4.4 The Color Dropout Option Color Dropout is a special type of image processing designed to improve OCR results by removing specific types of background color content. Typically this is used in conjunction with specially designed forms that have colored boxes or checkboxes that people fill in. Using dropout allows you to remove these specially colored boxes from the image and provides you with better OCR results. It can also be used to remove a specific background color if it is causing a lot of noisy speckling. Red, Blue, Green (RGB): The Red, Blue, and Green dropdown list allows you to specify your desired color to be removed by entering its RGB (Red, Green, and Blue) value respectively. Note: This function applies only when outputting black & white or gray images. Original Remove Blue Color Channel 3.3.4.5 The Blank Page Removal Option To automatically remove blank pages, check the Blank Page Removal option. You may also adjust the sensitivity level. BSM Manual V .4 Aug 2010 36