1
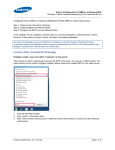
mini PhotoScanner
User Guide
For additional technical support visit
www.kaiserbass.com/support
mini PhotoScanner
Contents
1.Introduction
1.Features
2.Safety
2.
Product Specifications
3.
Package Contents
4.
Product Description
5.
Using the mini PhotoScanner
8.
Connecting to a PC
9.Maintenance
10.Troubleshooting
User Manual
mini PhotoScanner
mini PhotoScanner
Introduction
Congratulations on the purchase of your Kaiser Baas mini PhotoScanner.
Please take a few minutes to read through this user guide, which will
provide instructions for you to install, operate and maintain the product.
Features
• Auto-feed design
• Auto-cropping function
• Scan up to 4” x 6” photos or documents
• 300 dpi scan resolution
• Able to save to SD card, USB memory stick or scan directly to the PC
• Able to scan panoramic prints or long receipts up to 40cm in length
User Manual
mini PhotoScanner
pg1
mini PhotoScanner
Safety Notice
• Do not try and disassemble or remodel the Kaiser Baas mini PhotoScanner Doing so may cause the unit to malfunction and may void the warranty
• Do not place the Kaiser Baas mini PhotoScanner in places that are exposed to oil, water or dust
• Keep your Kaiser Baas mini PhotoScanner away from heated sources such
as direct sunlight and heaters
• Do not touch the power plug with wet hands or use defective power cables as it may cause electric shocks or fire
• Do not drop the Kaiser Baas mini PhotoScanner as it may cause serious
damage and may void the warranty
Product Specifications
Paper size: 2” x 2” – 4” x 6”
Image format: JPEG
Image resolution: 300 dpi
Scan colour depth: 48 bit
Output colour depth: 24 bit
Interface: SD/SDHC, USB, Mini USB
Power: Input – 100-240W, Output – 5V 2A
User Manual
mini PhotoScanner
pg2
mini PhotoScanner
Package Contents
• 1 x Kaiser Baas mini PhotoScanner • 1 x Software CD
• 1 x Power adaptor • 1 x Calibration card
• 1 x USB cable • 1 x Quick start guide
• 1 x Roller cleaning tool • 1 x Sensor cleaning tool
• 1 x Photo sleeve
User Manual
mini PhotoScanner
pg3
mini PhotoScanner
Product Description
1.
Power on /off button 5.
Power input
2.
Calibration/cleaning button 6.
Mini USB connector
3.
Guide lever
7.
Memory stick slot
4.
Feeding slot
8.
SD card slot
5VDC
To PC
SD / MMC
1
2
4
5VDC
To PC
5
6
User Manual
3
SD / MMC
7
8
mini PhotoScanner
pg4
mini PhotoScanner
Using the mini PhotoScanner
1.
Make sure you have calibrated the device as described in the quick start guide. Press and hold the power button for 0.5 seconds to turn on the scanner. The green power indicator will blink and stay on to indicate
that the scanner is ready.
2. It is recommended that you use the provided photo sleeve when
scanning to ensure the best results. The sleeve helps eliminate the possibility of de-focusing due to uneven surfaces. Insert the photo into the sleeve as shown below –
When feeding the protected photo into the mini PhotoScanner, make sure the sealed end goes in first to avoid jamming the auto loading.
User Manual
mini PhotoScanner
pg5
mini PhotoScanner
Notes
•
Keeping the original flat and level when feeding prevents
possible jamming
•
Keep the original free from finger prints, oil, or dust for optimum
scanned image quality
•
Remove photos from the sleeve after scanning to prevent the sleeve from sticking to the photo
•
Keep the sleeves in a safe place when not in use to prevent them
from accumulating dust
3. Place the photo/document on the left edge of the feed slot and
adjust the guide lever so that it aligns to the right hand side of the photo/document
4. Gently push the photo/document into the feeding slot and let go
when it begins to feed into the slot
5. When the scan has completed, a folder will be created on the SD card
or USB memory stick called ‘Photo1’. This folder can hold 9999 files. A ‘Photo2’ folder will be created for the next 9999 scans.
Each scanned image is given a file name with the prefix ‘scan’ followed
by a 4 digital sequential number in the order the images are stored.
For example Scan0001, Scan0002, etc.
6. When you have finished scanning, press and hold the power button
for 2 seconds to turn off the mini PhotoScanner. You can now safely
disconnect the power and remove the SD card or USB memory stick
from the scanner.
User Manual
mini PhotoScanner
pg6
mini PhotoScanner
LED light status
Green on – The scanner is ready to use
Green blinks continuously –
Initialising system and memory card/
USB memory stick / Busy scanning and storing images / Sensor cleaning in progress
Two blinks –
Paper jam. Press the power button for 0.5 seconds, the scanner will back out the photo/document so you can remove from the output slot
Three blinks
– Memory card error. Remove the memory card to clear the error status
Four blinks
– Calibration failed
Five blinks
– Scan To PC failed. The PC may be busy
or unavailable
No light – The scanner is turned off or there is
no power
User Manual
mini PhotoScanner
pg7
mini PhotoScanner
Connecting to a PC
By connecting the mini PhotoScanner to the PC, you can access the scanned
images on the SD card directly, or you scan directly to the hard drive.
1.
Insert the provided CD into the PC and install the ‘Scan To PC’ software.
Connect the mini PhotoScanner to the PC using the supplied USB cable. Press and hold the power button for 0.5 seconds to turn on the scanner.
The PC will now detect the scanner. Double click the ‘Scan To PC’ icon on your desktop. You will now see the following screen –
On ‘Save Type’ select ‘Scan To PC’, press the ‘Browse’ button to select a
different save folder. You can also save to the SD card, if you have one inserted,
by selecting ‘Memory Card’. All saved photos and documents will be saved in a
folder titled ‘Photo1’. Each scanned image is given a file name with the prefix
‘scan’ followed by a 4 digital sequential number in the order the images are
stored. For example Scan0001, Scan0002, etc.
User Manual
mini PhotoScanner
pg8
mini PhotoScanner
Maintenance
Cleaning the roller
1. With an SD card or USB memory stick inserted, press and hold the
power button for 0.5 seconds to turn on the scanner
2. Place the supplied roller
cleaning tool into the feed slot
3. The cleaning tool will be feed
through the slot and the cleaning
process will begin
Cleaning the image sensor
1. With the scanner turned off, insert
the sensor cleaning tool into one end
of the output slot
2. Gently slide across back and
forth around 5 or 6 times
3. Remove the sensor cleaning tool
and store it in a safe place to
protect from dust
User Manual
mini PhotoScanner
pg9
mini PhotoScanner
Troubleshooting
Q. There are lines on the scanned image or the image is not clear
A. Check the following –
Are there scratches on the original print? Remove any stains or dust
before scanning
Has the scanner been used for a long period of time without cleaning or
calibration? Follow the instructions for cleaning and calibrating the scanner
and try again
Q. The photo/document gets stuck halfway in the feeding slot
A. Press the power button, the scanner will back out the photo/document
so you can remove from the output slot
Q. The LED light blinks rapidly and no scan is possible
A. Check the following –
Is the SD card inserted properly into the SD card slot?
Re-insert and try again
Is the SD card locked or write protected?
Unlock the SD card and try again
Q.
A. Is the memory card full?
The LED indicator blinks when the free space on the memory card is below 1MB. Delete some files or use a different SD card
Make sure the file format is FAT or FAT32. Do not use NTFS
Q.
A.
The scanner feels warm to the touch
It is normal for the scanner to emit a small amount of heat after prolonged use. If there are strange odours coming from the device or it feels hot to the touch, disconnect the power immediately from the power supply
User Manual
mini PhotoScanner
pg10