1
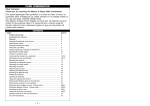
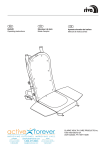
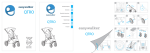
EN
INDEX
WHAT YOU GET ........................................................3
PLEASE NOTE ............................................................4
FIRST STEPS ..............................................................5
FIRST SETUP
WHEELS
HANDLEBAR HEIGHT
FOLDING AND UNFOLDING
PARKING BRAKE
STAGE 1: BABY .........................................................7
CARRYCOT
STAGE 2: TODDLER ..................................................8
SAFETY HARNESS
SEAT
ACCESSORIES ...........................................................9
SAFETY BAR
CANOPY
APRON
RAIN COVER
OTHER ACCESSORIES
CARE AND MAINTENANCE ....................................11
Dear parents, grandparents, and friends,
Thank you for choosing xari and making it part of your
family!
Our products are designed and developed with great care
for your own comfort and safety and that of your child.
We hope you enjoy xari.
Please read these instructions carefully before using the
pushchair for the first time, this will guarantee safe usage
of the product and enable you to find out about all its
handy features.
mima
2
WARRANTY ............................................................12
EN
WHAT YOU GET
You have received 2 boxes. Please make sure that they contain all the parts that are listed below. If anything is missing,
please contact your supplier.
Box 1:
Box 2:
1 chassis with 2 baskets attached
1 seat pad with safety harness
1 seat with carrycot inside
1 apron flap
1 safety bar
1 carrycot mattress
1 canopy
2 front wheels
2 rear wheels
1 rain cover
1 carrycot apron
canopy
apron
carrycot
seat
carrying handle
handlebar
height adjuster
folding lock
parking
brake
seat release button
seat height adjuster
basket
basket
3
EN
PLEASE NOTE
IMPORTANT!
• Read these instructions very carefully before using the
product and keep them for future reference. Failure to
follow these instructions might put your child’s safety
at risk.
• Always use the crotch strap in combination with the
waist belt.
• This stroller is intended for children from birth and up
to 17 kg. When used for children under the age of 6
months we recommend to use the supplied carrycot
until the child can sit unaided.
• Do not stand on the crossbars between the wheels.
This is unsafe and may damage the stroller.
• This stroller can be used for transporting a maximum
of one child at a time. The recommended maximum
load is 17 kg.
• The maximum weight allowed in each of the two
baskets is 3 kg.
WARNINGS!
• Your child’s safety is your responsibility.
• It may be dangerous to leave your child unattended.
• Ensure that all the locking devices are engaged before
use.
• Do not add a mattress thicker than 20 mm. Do not add
an additional mattress in the carrycot, only use the one
provided by mima.
• As soon as your child can sit in the seat unaided make
sure to always use the safety harness. Ensure the
harness is fitted correctly to prevent the risk of your
child sliding or falling out.
• The seat is not suitable for children under 6 months.
• Any load attached to the handle affects the stability
of xari and increases the risk of it tipping over
accidentally.
4
• This product is not suitable for running or skating.
• Check that the carrycot and/or seat are installed
correctly and securely locked in place before usage.
• Always apply the brake when standing still even for
only a few moments! Apply brake when loading or
unloading children.
• Make sure children are clear of any moving parts
before making adjustments or folding/unfolding
stroller. Ensure that fingers are kept away from the
folding mechanism when folding the stroller.
• Do not use the stroller if any parts are damaged or
missing. It may be unsafe to use replacement parts
that or not supplied by mima.
• Do not let your child play with this product.
• This carrycot is suitable for a child who cannot sit up by
itself, roll over and cannot push itself up on its hands
and knees. Maximum weight of the child: 9 kg (20 lb).
FIRST STEPS
EN
FIRST SETUP
1. Unfold chassis
Pull up the handlebar while holding down the tip of the
chassis with your foot.
Continue to pull the handlebar towards you until the
chassis completely unfolds and stands by itself.
1
R
R
2+3
4+5
6
WHEELS
• Please note the L/R indication on the chassis and on
each wheel.
2. Attach rear wheels
Press in the wheel axle hub and insert the axle into the
wheel fitting.
Check if the wheels are properly attached by attempting
to pull them out again.
3. Remove rear wheels
Press in the wheel axle hub and pull out the wheel.
4. Attach front wheels
Insert the wheel rod into the wheel fitting and push in
until it clicks.
5. Front wheel swivel lock
Use the front wheel swivel lock when you are using xari
on rough terrain.
Push down the swivel lock button to activate.
Pull it up again to deactivate.
6. Remove front wheels
Slide the unlock button sideways and pull out the front
wheel.
5
3
HANDLEBAR HEIGHT
7. Adjust handlebar height
Press and hold both buttons located on the outside of
the handlebar and rotate the handlebar into the desired
position.
4
2
1
FOLDING AND UNFOLDING
7
8
• WARNING: Child should not be near to the stroller
when folding or unfolding!
• Ensure the brake is on while folding and unfolding the
chassis.
8. Unfold chassis
Pull the handlebar upwards until it clicks into place. The
chassis will subsequently completely unfold and stand by
itself (don’t force the front fork in advance). Rotate the
handlebar into the desired position.
9. Fold chassis (with seat attached)
• xari can be folded with the seat attached (i.e. in its
upright position and forward facing).
• xari cannot be folded with the carrycot attached.
Rotate the handlebar into position 4 (see fig. 7)
Push down the safety button then pull the 2 folding locks
upwards, then lower down the handle bar until it locks
into folding lock underneath.
Grab the chassis at the two hinge parts and pull it
upwards so the front section fork folds down.
Let the chassis stand and rest onto the front wheels. To
transport the chassis grab the carrying handle.
9
PARKING BRAKE
• WARNING: Always use the brake even when
standing still for only a few moments!
10. Apply and release parking brake
Press down the brake pedal to park.
Press it down again to release.
10
6
STAGE 1: BABY
11
12
13
14
15
EN
CARRYCOT
• When using xari for children under the age of 6
months, we recommend using the supplied carrycot
until the child can sit unaided.
11. Set up carrycot
Zip open the seat and take out the carrycot.
Push the two flaps underneath the carrycot tube.
Place the mattress inside the carrycot and attach the
safety bar (see fig 25).
12. Adjust carrycot angle
It is easier to fit the carrycot onto the chassis if the
attachment brackets are in position III, pointing straight
downwards. To achieve this pull the angle adjustment
lever and rotate the brackets. The carrycot angle can also
be adjusted when fitted to the chassis.
13. Attach carrycot
Position the carrycot so that the angle adjustment lever
is at the front end of the stroller. Lower the carrycot onto
the chassis until it clicks in place.
14. Remove carrycot
Press the two buttons on both sides of the carrycot and
lift it up.
15. Adjust height of carrycot
• There are two height positions for the carrycot.
Press the height adjustment buttons on both sides of the
chassis and move the carrycot up or down.
16. Collapse carrycot
Remove the mattress and the safety bar. Release the
sideflaps from the carrycot frame. Open the seat and
position the collapsed carrycot inside the seat. Align the
angle adjustment lever with the hole in the rear shell of
the seat. Make sure the seat brackets stay out of the seat.
16
7
STAGE 2: TODDLER
17
18
20
19
21
3
2
1
22
8
23
SAFETY HARNESS
• Whenever a child is placed in the seat, ensure that the
safety harness is correctly fitted.
• The shoulder straps can be set at two different height
positions. Choose the position closest to the top of the
child´s shoulders.
17. Set up harness
Take each harness attachment and slide off the
bottom part. Push the harness attachment through its
corresponding hole in the seatpad and the seat. Zip
open the seat and slide the bottom part onto the harness
attachment from the inside of the seat until it clicks in
place.
18. Buckle up
Push the shoulder strap buckles into the buckle slot until
it clicks. Pull the loose ends on the shoulder straps to fit
the harness snugly around the child.
19. Buckle down
Push the central buckle button to release the harness.
SEAT
• The seat is suitable for children from the age of 6
months and up to 17 kg.
• The seat can be attached either forward facing or
backward facing.
20.Attach seat
Lower the seat onto the chassis until it clicks in place.
21. Remove seat
Press the two seat release buttons on both sides of the
seat and lift it up.
22. Adjust seat angle
Pull up the lever on the top of the seat, and rotate the
seat into the desired angle.
23. Adjust height of seat
• There are two height positions for the seat.
Press the height adjustment buttons on both sides of the
chassis and move the seat up or down.
ACCESSORIES
24
25 + 26
27
28 + 29 + 30
EN
SAFETY BAR
• Always use the safety bar for the safety of your child.
24. Remove safety bar covers
Push in the buttons and slide the covers off. Keep the
covers in a safe place for future use.
25. Attach safety bar
While pressing the two buttons on the outside of the
safety bar, push it down onto the seat frame, until it clicks.
Check if the safety bar is properly attached by attempting
to pull it out again.
26. Remove safety bar
Press the buttons on the outside of the safety bar, and
pull it up.
27. Adjust safety bar angle
While pressing the two buttons on the inner side of the
safety bar, rotate it to the desired angle.
CANOPY
• The canopy can be fixed to both the seat as well as the
carrycot.
• When the canopy becomes wet, keep it open and let it
dry before closing it.
28. Attach canopy to seat or carrycot
Push the canopy clips onto the seat frame until they click
in place.
Fix the velcro flap to the seat.
29. Open/close canopy
Pull the canopy flaps to open.
Push down the canopy flaps to close.
30. Remove canopy
Release the velcro flap at the top of the canopy
Pull the canopy clips outwards and pull them up to
remove them from the seat frame.
9
31
32
33
APRON
31. Attach apron to carrycot
First zip the apron flap onto the apron body.
Place the apron over the carrycot frame.
Click the snap buttons on both sides of the apron onto the
studs of the carrycot frame.
32. Adjust apron
The upper apron flap can be placed into two different
positions, which are magnetized.
RAIN COVER
• The rain cover can be fixed to both the seat as well as
the carrycot.
• Make sure you attach the canopy first.
33. Attach rain cover to seat or carrycot
Fully open the canopy.
Position the rain cover over the canopy so the rotation
lever goes through the hole in the raincover.
Stretch the rain cover over the seat or carrycot and fix the
velcro straps around the seat brackets.
OTHER ACCESSORIES
We frequently develop new accessories for xari. For more
details please visit www.mimakids.com or contact your
retailer.
The following accessories are already available and can be
purchased separately:
• Footmuff
• Mosquitonet
• Adapter kit (BeSafe iZi Go, BeSafe iZi Sleep, Cybex
Aton, Maxi Cosi Cabrio, Maxi cosi Pebble, Bebe Confort
Pebble)
• Parasol
• Changing bag
• Cup holder
• Baby headrest
10
CARE AND MAINTENANCE
EN
• To keep xari in perfect condition please go through the
following steps regularly.
• Fabrics and plastics conform to the highest grade of
colourfastness. But excessive exposure to the sun can
cause premature fading of plastics and fabrics.
CHASSIS CLEANING
Wash off sand and salt after visiting the beach.
Brush off excessive dirt. Then wipe clean with a moist
cloth and a mild cleaning agent
LUBRICATING MOVING PARTS
Periodicly lubricate the wheels, hinges and other sliding
parts using a light oil or silicon spray. Do not use heavy
oil as this will attract dust and grit which tend to clog and
damage moving parts.
SEAT CLEANING
The rigid seat can be wiped clean with a moist cloth and a
mild cleaning agent. More resistent marks can be rubbed
away using a pencil eraser.
The seat cushion and shoulder pads can be removed (see
fig. 17) and must be washed by hand.
Please note the following:
- maximum temperature 30°C / 85°F
- do not bleach
- do not tumble dry
- do not iron
- do not dry clean.
CHECK OTHER PARTS
From time to time check xari for loose screws, worn parts,
torn material and loose stitching.
Contact your retailer if parts need to be replaced or repair
the parts as needed.
11
EN
WARRANTY
REGISTER YOUR PRODUCT ONLINE AT WWW.MIMAKIDS.COM
This will activate your warranty and help us keep you informed about any possible product updates.
Your product complies with the current safety requirements and is guaranteed to be free from any manufacturing or
material defects at the time of purchase.
If this product has any manufacturing and/or material defects after it has been bought and during the warranty period (with
normal use as described in the user manual), please contact your supplier.
WARRANTY CONDITIONS
• The warranty is valid for 24 months starting on the date of purchase. This warranty period cannot be extended, even if
the product has to be repaired.
• For the warranty to be valid you need to:
1. Have registered your product online at www.mimakids.com
2. Provide your supplier with the original receipt.
3. Provide your supplier with a description of the defect.
• The warranty only covers the original owner of the product and cannot be transferred to any subsequent owner.
• The warranty entitles the owner to have the product repaired but not exchanged or get a refund for such.
The warranty is not valid in the following circumstances:
• The product has been modified or repaired by third parties.
• Corrosion or rust on the wheels and chassis due to extreme environmental conditions, including high humidity, salt spray,
ice or snow or due to insufficient maintenance.
• The defect was caused by improper usage or maintenance or due to anything else deemed to be the fault of the user; in
particular, failure to comply with the instructions for use as described in the user manual.
• The defect was caused as the result of an accident or airline/ transport damage.
• Normal wear and tear that can be expected with daily use of this product.
• Discoloration or damage to the fabric due to washing, rainwater, or excessive exposure to sunlight.
• The defect is the result of overloading (exceeding the maximum weight allowance for the child and any items being
carried).
12
NOTES
79
A02EU-IV02
www.mimakids.com
All rights reserved © Mima International Ltd. 2013
80