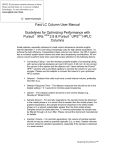
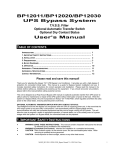
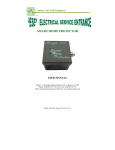
1
BP20812060-2ATS-DCC
UPS Redundancy
And
Bypass System
UPS Redundancy Switching
TVSS Filter
Automatic Transfer Switch
Dry Contact Status
Operators Manual
Version 1.0
THIS PAGE IS INTENTIONALLY BLANK
ii
Note
The instructions contained in this manual are not intended to cover all of the details or variations
in equipment, or to provide for every possible contingency to be met in connection with
installation, operation, or maintenance. Should further information be desired or should
particular problems arise which are not covered sufficiently for the purchaser’s purposes, please
refer the matter directly to Always “On” UPS Systems Inc.
Any electrical or mechanical modifications to this equipment, without prior written consent of
Always “On” UPS Systems Inc, will void all warranties and may void UL/cUL/CSA listing.
Unauthorized modifications can also result in personal injury, death, or destruction of the
equipment.
Redundant Bypass System
Please complete the below information and return it to Always “On” UPS Systems Inc. This
will activate the warranty.
If additional information or technical assistance is required call:
Always “On” UPS Systems Inc Sales and Technical Support Line
Toll free at 1-877-259-2976 Ext. 451 or (250) 491-9777 Ext. 451 or Fax (250) 491-9775
Or E-mail at [email protected] or visit our web site at www.alwaysonups.com
Or write to
Always “On” UPS Systems Inc.
#100 – 150 Campion Road,
Kelowna, BC,
V1X 7S8,
Canada
Please complete the following information for your records.
Model Number:
______________________________________________________________
Serial Number:
______________________________________________________________
Date of Installation: ____________________________________________________________
Inspected By:
______________________________________________________________
iii
THIS PAGE IS INTENTIONALLY BLANK
iv
Table of Contents
1.
INTRODUCTION.............................................................................................................................................. 1
2.
BLOCK DIAGRAM .......................................................................................................................................... 3
3.
LAYOUT ............................................................................................................................................................ 5
4.
SITE PREPARATION ...................................................................................................................................... 7
4.1.
DELIVERY ................................................................................................................................................... 7
4.2.
INSPECTION ................................................................................................................................................. 7
4.3.
STORAGE ..................................................................................................................................................... 7
4.4.
LOCATION ................................................................................................................................................... 8
5.
INSTALLATION ............................................................................................................................................... 9
5.1.
BYPASS ....................................................................................................................................................... 9
5.2.
OPTIONAL BATTERY BANKS ....................................................................................................................... 9
5.3.
PRIMARY UPS (UPS #1) ............................................................................................................................. 9
5.4.
STANDBY UPS (UPS #2) ........................................................................................................................... 10
6.
OPERATION ................................................................................................................................................... 11
6.1.
SYSTEM START UP .................................................................................................................................... 11
6.2.
SYSTEM SHUTDOWN ................................................................................................................................. 11
6.3.
ATS1 – REDUNDANCY TRANSFER SWITCH ............................................................................................... 12
6.4.
ATS2 – BYPASS TRANSFER SWITCH ......................................................................................................... 13
7.
TROUBLESHOOTING .................................................................................................................................. 15
8.
SPECIFICATIONS.......................................................................................................................................... 15
9.
CONTACT INFORMATION ......................................................................................................................... 17
9.1.
ADDITIONAL PURCHASES OR UPGRADES................................................................................................... 17
9.2.
QA / WARRANTY QUESTIONS ................................................................................................................... 17
9.3.
SOFTWARE QUESTIONS ............................................................................................................................. 17
v
THIS PAGE IS INTENTIONALLY BLANK
vi
1. Introduction
Thank-you for choosing the Always “On” UPS Redundancy and UPS Bypass Line Conditioner. It is
designed to provide a high degree of protection for the critical loads connected. This manual is a guide to
installing and using the Bypass System. It includes important safety instructions for operation and correct
installation. Please read this manual in its entirety before setting up, installing and powering up the
equipment.
This system is designed to allow for redundant switching between two UPS systems and an alternate AC
source. This system will automatically or manually transfer from one UPS to the other and also provide
allowances to transfer from UPS power to the alternate AC source.
The UPS redundant switching provides automatic (or manually initiated) transfer from the Primary UPS
(UPS #1) to the Standby UPS (UPS #2) in the event UPS #1 is shutdown or a critical failure has occurred.
This switching ensures redundant protection, while maintaining noise-free and back-up AC power to all
the critical loads connected.
The Bypass switching allows for maintenance or repair of the UPS systems without interruption of power
to the critical loads. This switching is also designed with an automatic feature so in the unlikely event of
a shutdown of both UPS systems the Bypass will automatically transfer the supply to the alternate source.
When the system is in Bypass Mode the unit incorporates an Always “On” TVSS filter, which will
continue to filter the utility power to the critical loads ensuring clean power at all times.
The intelligence built into the Bypass recognizes which UPS is supplying power and in the event the UPS
output power is lost, and utility is still present, it will automatically switch to bypass mode. The Dry
Contact communications will notify the connected equipment that they are no longer running off the UPS
power. This will allow the user to program a switch in equipment operation, or to provide remote status.
So in the unlikely event of a power outage, while the system is in bypass mode the connected loads can be
prepared.
1
THIS PAGE IS INTENTIONALLY BLANK
2
2. Block Diagram
#
#
3
THIS PAGE IS INTENTIONALLY BLANK
4
3.
Layout
Figure 3.1
Front of the Bypass
Figure 3.2
Back of the Bypass
5
THIS PAGE IS INTENTIONALLY BLANK
6
4. Site Preparation
4.1.
Delivery
Upon receiving the Bypass system, inspect the packaging integrity and the
physical condition of the cabinet carefully.
In the event that physical damage is visible, the carrier must be informed
immediately and a claim filed with them. Inform Always “On” as soon as the
claim has been filed. A copy of the claim should be faxed to Always “On” at
(250) 491-9775.
A detailed report of the damage is necessary for carrier insurance claim.
4.2.
Inspection
Unpack the system carefully. Be sure to notice the packing method, and retain the
box and packing material. If you must return the system at any time, you must
repack it the way it was originally shipped. Visually inspect the system for
damage that may have occurred during shipment. If there is damage, or anything
is missing, contact the dealer from whom you purchased the unit, and save the
packaging for future shipment. When the system has passed the initial inspection,
record the installation date on the back panel of the unit and in the space provided
towards the front of this manual.
Included with Bypass System:
User manual
4.3.
Storage
If the system is to be stored prior to installation, it should be placed in a dry area
where it will not be exposed to dirt, moisture or other contaminants.
Extreme storage temperatures are: -30ºC to +60ºC
7
4.4.
Location
The UPS is intended for installation in a temperature-controlled indoor area, free
of conductive contaminants. Qualified individuals should conduct installation.
Below is an example of one installation.
Note: We recommend placing ID stickers on the systems to ensure proper user
connections and operation.
8
5. Installation
WARNING!
The Bypass system should be installed by a qualified technician or personnel and wired in
accordance with local and national electrical codes. Be sure the polarities and voltage match the
rating of the unit. Check that the loads being protected are within the capacity of the system.
Ensure no power has been applied to the systems and nothing has been turned on before
proceeding.
5.1.
Bypass
Note: All connections are available at the rear of the Bypass, See Figure 3.2.
1. Connect the critical loads to the Output terminal strip on the Bypass.
2. If required, connect the user provided interface to the dry contact
terminal strip on the Bypass.
3. Connect input cabling from the alternate utility source to the Bypass
input terminal block.
WARNING! Do NOT apply utility at this time.
4. Connect the output of the Primary UPS (UPS #1) to the UPS #1 input
on the Bypass Input terminal strip using appropriate cabling.
5. Connect the output of the Standby UPS (UPS #2) to the UPS #2 input
on the Bypass Input terminal strip using appropriate cabling.
WARNING! Do NOT turn UPS’s on at this time.
5.2.
Optional Battery Banks
1. Refer to Battery Bank Operators Manual for installation instructions.
Quick reference guide
- Connect Battery Banks in a daisy chain fashion for each UPS system.
- Connect charger input cord to a utility receptacle (if applicable).
5.3.
Primary UPS (UPS #1)
1. If an optional Battery Bank has been purchased, connect the Battery
Bank to the UPS. Refer to the Battery Bank Operators Manual for
instructions.
2. Connect input cabling to the UPS as instructed in the included 6K12KVA TN Series Operators Manual.
WARNING! Do NOT apply utility at this time.
WARNING! Do NOT turn UPS on at this time.
9
5.4.
Standby UPS (UPS #2)
1. If an optional Battery Bank has been purchased, connect the Battery
Bank to the UPS. Refer to the Battery Bank Operators Manual for
instructions.
2. Connect input cabling to the UPS as instructed in the included 6K12KVA TN Series Operators Manual.
WARNING! Do NOT apply utility at this time.
WARNING! Do NOT turn UPS on at this time.
10
6. Operation
6.1.
System Start Up
1. Ensure all connections are secure and correct as per Installation
instructions.
2. Turn both switches on the Bypass to the Auto position.
3. Switch alternate utility source on.
Note: Bypass will startup in Bypass mode (Bypass Power, Bypass, and
Output LED’s will be illuminated).
4. Turn on UPS #2 (Refer to 6K-12KVA TN series Operators Manual for
instructions).
Note: Bypass will switch to UPS2 mode (UPS2, Bypass Power, and
Output LED’s will be illuminated, Bypass LED will go out).
5. Turn on UPS #1 (Refer to 6K-12KVA TN series Operators Manual for
instructions).
Note: Bypass will switch to UPS1 mode (UPS1, Bypass Power, and
Output LED’s will be illuminated, UPS2 LED will go out).
6. Turn on loads sequentially as required.
6.2.
System Shutdown
1.
2.
3.
4.
5.
6.
7.
8.
9.
Turn off loads sequentially as required.
Turn off UPS #1 (Refer to 6K-12KVA TN Series Operators Manual
for instructions).
Note: Bypass will switch to UPS2 mode (UPS2, Bypass Power, and
Output LED’s will be illuminated, UPS1 LED will go out).
Turn off UPS #2 (Refer to 6K-12KVA TN Series Operators Manual
for instructions).
Note: Bypass will switch to Bypass mode (Bypass Power, Bypass, and
Output LED’s will be illuminated, UPS2 LED will go out).
Disconnect the Bypass from the alternate utility source.
Disconnect the UPS #1 from utility.
Disconnect the UPS #2 from utility.
Disconnect the Battery Banks from utility (if required).
Disconnect the Battery Banks from the UPS systems (if required).
System is now shutdown.
11
6.3.
ATS1 – Redundancy Transfer Switch
Mode Switch in “Auto” Position
This position provides an automatic transfer switch (ATS) between the Primary
UPS (UPS #1) and the Standby UPS (UPS #2). Priority for output power selection
is given to UPS #1.
If UPS #1 power is removed (UPS turned off, UPS output off, etc), the ATS will
transfer to UPS #2 mode automatically and maintain power to the critical loads.
The UPS2 indicator will illuminate and the UPS1 indicator will go out. When
UPS #1 power is re-established the ATS will automatically switch back to normal
mode and supply UPS #1 power to the loads. The UPS1 indicator will illuminate
and the UPS2 indicator will go out.
Mode Switch in “Disable” Position
With the switch in this position, the automatic transfer is disabled and the switch
is locked in the UPS1 position. The UPS #1 output is fed to the critical loads via
ATS2. The loads can lose power if UPS #1 power is removed and Bypass Power
is not present.
Mode Switch in the “UPS2” Position
This causes a manual transfer to UPS2 mode. This swaps the Primary UPS and
Standby UPS around, which means UPS #2 is now supplying the load and UPS
#1 is the Standby UPS. The UPS2 indicator will illuminate indicating this mode
has been selected.
This transfer can only occur if UPS #2 is operating and supplying power to the
Bypass. If the switch is in UPS2 position and the UPS2 LED is not illuminated,
then the transfer has not occurred. Therefore UPS #2 is not supplying power to
the Bypass.
Indicators
UPS1 LED – Illuminated when ATS1 is in UPS1 position.
UPS2 LED – Illuminated when ATS1 is in UPS2 positi
UPS1 Indicator
Illuminated when UPS1
is providing power
UPS2 Indicator
Illuminated when UPS2
is providing power
12
6.4.
ATS2 – Bypass Transfer Switch
Mode Switch in “Auto” Position
This position provides an automatic transfer switch (ATS) between the UPS
supplied power (ATS1) and the Bypass (or alternate) power. Priority for output
power selection is given to the UPS supplied power (ATS1).
If the UPS power is removed (both UPS’s turned off, UPS’s outputs off, etc) the
ATS will switch to Bypass mode automatically and maintain power to the loads.
The Bypass LED will illuminate.
When UPS power is re-established, the ATS will switch to UPS mode
automatically and maintain power to the loads. The Bypass LED will go out.
Mode Switch in “Disable” Position
With the switch in this position, the automatic transfer is disabled and the switch
is locked to only supply UPS power to the loads. The loads will lose power if both
of the UPS’s outputs lose power.
Mode Switch in “Bypass” Position
This causes a manual transfer to Bypass mode. UPS power is removed from the
load and is conditioned by the Always “On” TVSS filter. Bypass power is applied
to the loads. The “Bypass” indicator will be illuminated when ATS2 is operating
in this mode.
Bypass mode relies on bypass power to be available, and the switching action to
bypass mode is inhibited if the bypass power is not present at the transfer switch.
If the “Bypass” indicator is not illuminated when the Mode switch is in this
position, then the transfer to Bypass mode has not occurred. Therefore there is no
Bypass power available to the Bypass.
Indicators
Output LED
Illuminated when output power is available to the load
receptacles in either Normal or Bypass modes.
Bypass LED
Illuminated when the transfer switch is in the Bypass
position and bypass power is feeding the load.
Bypass Power LED Illuminated when Bypass power is available.
Bypass Power Indicator
Illuminated when bypass
power is available
Bypass Indicator
Illuminated when transfer
switch is providing bypass
power to the load
Output Power Indicator
Illuminated when output
power is available
3 Position Mode
Select Switch
13
THIS PAGE IS INTENTIONALLY BLANK
14
7. Troubleshooting
Problem
Cannot be switched to
Bypass Mode
Possible Cause
Utility not available at
input of bypass system
Action to Take
• Confirm Utility supply and
connection.
Cannot be switched to
UPS Mode
UPS power not available
• Confirm UPS supply and
connection
• Turn UPS on
8. Specifications
Protection
Voltage
Frequency
Voltage
Frequency
Voltage
Capacity
Frequency
Typical
Maximum
Transient Suppression
Options
Automatic Transfer Switch
Bypass Input
UPS 1&2 Input
Output
Transfer Time
Dry Contact Interface
15
208VAC
60Hz
240/120VAC
60Hz
240/120VAC
62.5A
60 Hz
8ms (1/2 cycle)
16ms (full cycle)
275V Clamping Voltage
5700
20,000 Amps
<1 ns response
1 Redundancy ATS
1 Bypass ATS
Form C, ATS1 and ATS2
THIS PAGE IS INTENTIONALLY BLANK
16
9. CONTACT INFORMATION
9.1.
Additional Purchases or Upgrades
Always “On” UPS Systems Inc.
Bldg 1 – 150 Campion Road,
Kelowna, BC, Canada, V1X 7S8
Phone: (250) 491-9777 Ext 451
Fax: (250) 491-9775
Email: [email protected]
Website: www.alwaysonups.com
9.2.
QA / Warranty Questions
Always “On” UPS Systems Inc.
Bldg 1 – 150 Campion Road,
Kelowna, BC, Canada, V1X 7S8
Phone: (250) 491-9777 Ext 209
Fax: (250) 491-9775
Email: [email protected]
Website: www.alwaysonups.com
9.3.
Software Questions
Always “On” UPS Systems Inc.
Bldg 1 – 150 Campion Road,
Kelowna, BC, Canada, V1X 7S8
Phone: (250) 491-9777 Ext 204
Fax: (250) 491-9775
Email: [email protected]
Website: www.alwaysonups.com
17