1
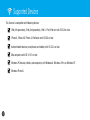
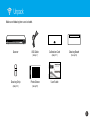
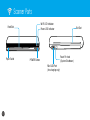
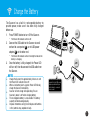
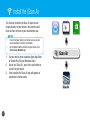
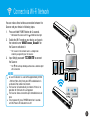
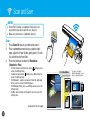
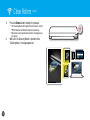
Works with
iScan Air
Scanner App
Wireless Scanner
For smartphones, tablets, and computers
All trademarks are the property of their respective owners and all rights are
acknowledged.
Wi-Fi®
Images and screenshots used in this User Guide may vary according to the
devices used and its operating system. Images and screenshots shown inside
are example only.
User Guide
802.11g/n
supported
A4
A4
A6
A6
A8
A8
POWER
POWER
Compatible with Apple iOS, Mac OS X,
Android OS, and Windows PC/Phone
V3.2
••
••
••
••
••
••
••
••
••
••
••
••
••
••
••
Safety and Precautions
Never store the unit in hot, or very cold, or humid or dusty places.
For an extended storage period, we recommend storing the unit in a cool and dry place.
To help keep the scanning area clean, store the unit in a proper case when not in use.
If the unit is left in extreme cold or hot conditions, allow to adjust to normal room temperatures before use.
Only use accessories included with the unit.
When left unused for a long period of time, the unit should be disconnected from the power supply.
Always handle the unit with care. Avoid dropping and strong impact.
Keep the lens and roller clean and free from scratches.
Do not scan sharp objects or hard abrasive surfaces to avoid damage to the lens and other parts.
Do not scan documents with glue, grease, correction fluid, or wet ink on it which can cause malfunctions.
Do not scan adhesive-backed paper or labels as these may become detached during scanning and cause damage.
Operate the unit on a level, well-grounded work surface, and free of excessive vibration.
Don’t open the unit. Risk of electric shock.
Use only a soft damp cloth to clean the exterior areas of the unit.
Do not leave the unit within the reach of children.
Discarded electrical and electronic appliances are recyclable and should separate from the household waste. Please actively support in
conserving resources and protecting the environment by returning this appliance to the collection centers (if available).
2
Contents
Safety and Precautions........................................................................................ 2
Contents.......................................................................................................... 3
Supported Devices.............................................................................................. 4
Unpack............................................................................................................ 5
Scanner Parts.................................................................................................... 6
Charge the Battery.............................................................................................. 7
Install the iScan Air............................................................................................. 8
Connect via Wi-Fi Network.................................................................................... 9
Scan and Save.................................................................................................. 10
Scan.......................................................................................................................................................................10
Save........................................................................................................................................................................11
Use the Photo Sleeve.......................................................................................... 12
Clean Rollers.................................................................................................... 13
Clean Lens ...................................................................................................... 15
Calibrate......................................................................................................... 16
Helpful Hints.................................................................................................... 18
Specifications................................................................................................... 19
3
Supported Devices
The Scanner is compatible with following devices:
iPad (4th generation), iPad (3rd generation), iPad 2, iPad, iPad mini with iOS 5.0 or later.
iPhone 5, iPhone 4S, iPhone 4, iPod touch with iOS 5.0 or later.
Android mobile devices (smartphones and tablets) with OS 2.3.3 or later.
Mac computers with OS X 10.7 or later.
Windows PC devices (tablets, and computers) with Windows 8, Windows 8 Pro, or Windows RT.
Windows Phone 8.
4
Unpack
Make sure following items are included.
A4
A4
A6
A6
A8
A8
POWER
POWER
Scanner
USB Cable
Calibration Card
Cleaning Strip
Photo Sleeve
User Guide
(See p.15)
(See p.7)
(See p.12)
(See p.17)
Cleaning Board
(See p.13)
5
Scanner Parts
Wi-Fi LED Indicator
Feed Slot
A4
A4
Paper Guide
Exit Slot
Power LED Indicator
A6
A6
A8
A8
POWER
RESET
POWER
Reset Pin-hole
(System Shutdown)
POWER Button
Mini USB Port
(for charging only)
6
Charge the Battery
The Scanner has a built-in rechargeable battery to
provide power, make sure it has been fully charged
before use.
A
1. Press POWER button to turn Off the Scanner.
OFF
* The Power LED indicator will turn off.
2. Connect the USB cable to the Scanner at small
end and to a computer( A ), or to USB power
adapter( B ) at the other end.
* The Power LED indicator will emit red light to indicate the
battery is charging.
3. Once the battery is fully charged, the Power LED
will turn off, then disconnect the USB cable from
the Scanner.
••
••
••
••
••
B
OFF
NOTES
Charge the Scanner for approximately 4 hours or until
the Power LED indicator turns off.
When a low battery alerts (a green Power LED blinks),
charge the Scanner immediately.
Scanner will not charge while operating. Ensure
Scanner’s power is off when charging battery.
The rechargeable battery is consumable. The battery
capacity will decreased gradually.
Dispose of batteries safely (Do not dispose of batteries
in fire, batteries may explode or leak).
The USB power adapter not
included. Use the USB power
adapter provided with your
mobile device to connect a
power socket.
7
Install the iScan Air
The Scanner includes free iScan Air apps to scan
images directly to your devices. You need to install
iScan Air from Internet to your device before use.
•
•
NOTES
Ensure that your device has Internet access via your
service provider or wireless connection.
Do not perform other activities on your device while
downloading iScan Air app.
1. On your device, go to respective Apple App Store
or Google Play Store or Windows Store.
2. Search for "iScan Air", press the install button to
install it to your device.
3. Once installed, the iScan Air app will appear on
your device's home screen.
iScan Air
iScan Air
8
Connect via Wi-Fi Network
You can make a direct wireless connection between the
Scanner and your device in following steps.
1. Press and hold POWER button for 3 seconds.
* Wait about 20 seconds until the
ON
LED blinks blue light.
2. Enable the Wi-Fi mode on your device, and search
the network name “DIRECT-xxxxxx_iScanAir” for
the Scanner and select it.
* The "xxxxxx" in the network name is a 6-digit code
randomly assigned for your the Scanner.
3. Input 8-digit password “12345678” to connect
the Scanner.
*The
LED will stop blinking and become a solid blue light
after connected.
NOTES
•• Be sure the Scanner is used within approximately 60 feet
~100 feet (18m~30m) from your WiFi enabled device in
an obstacle free indoor environment.
•• The Scanner will automatically shut down if there is no
operation for 5 minutes for saving power.
•• The Scanner allows connection up to 8 mobile devices at
once.
•• To turn power off, press POWER button for 4 seconds
until the Power LED indicator turns off.
Wi-Fi On
Connected
9
Scan and Save
NOTES
•• Ensure Wi-Fi function is enabled on the Scanner and
connected to your device prior to use. (See p.9)
•• Make sure your device is supported. (See p.4)
Scan
1. Press iScan Air app on your device to open it.
2. Place a photo/document facing up against right
edge, adjust the Paper Guide, gently push it in until
it is pulled into the Feed Slot.
3. Press the Settings to select the Resolution
(Standard or Fine).
* For iPad, iPhone, and iPod touch, press
Settings icon to
access the Setting menu.
* For Android, press either Settings icon or Menu button to
access the Setting menu.
* For Windows 8, swipe in or mouse in from the right edge
of the screen to access the Setting menu.
* For Windows Phone, press
Settings icon to access the
Setting menu.
* For Mac, press Settings at the top left corner to access the
Setting menu.
(continued on the next page)
10
Select Resolution.
* The app looks slightly
different depending on your
device's operating system
Scan and Save (cont'd)
4. Press the Scan button to start scanning.
*The
LED indicator will blink pink light during scanning,
the iScan Air app will show real-time preview.
Save
Press Save to save the image to your device’s photo
folder.
* For Mac and Windows 8, save the image with a chosen file name,
directory, and file format (JPG or PDF).
*For Mac, press Export to iPhoto to export the image to iPhoto.
* Press Cancel to exit without save or to re-scan.
Press Scan.
Press Save.
11
Use the Photo Sleeve
Use the Photo Sleeve when photos are fragile or small
to avoid damage or jams, and get the best result.
1.
2.
Remove the plastic foil on the Sleeve, place the
photo inside of it, and insert the tab into the slot at
the open end.
Insert the sealed end of the Sleeve facing up into
the Feed Slot, adjust the Paper Guide, then follow
the 'Scan and Save' section to start scanning to a
device.
A4
The sealed end
goes in first.
12
A6
A8
POWER
Clean Rollers
Dirt and residues can build up on the Scanner’s rollers
and affect image quality. Clean the rollers periodically to
get the best result using the included Cleaning Board.
NOTES
•• Make sure the Cleaning Board is clean and free of dust
before use.
•• If necessary, perform cleaning few times until the image
quality is improved.
•• Use a soft cloth dampened with alcohol to clean the
Cleaning Board when it is dirty.
1.
2.
3.
Select Clean from the Settings menu.
Press Clean.
Press iScan Air app on your device to open it.
Press the Settings to select the Clean.
* For iPad, iPhone, and iPod touch, press
Settings icon to
access the Setting menu.
* For Android, press either Settings icon or Menu button to
access the Setting menu.
* For Windows 8, swipe in or mouse in from the right edge
of the screen to access the Setting menu.
* For Windows Phone, press
Settings icon to access the
Setting menu.
* For Mac, press Settings at the top left corner to access the
Setting menu.
A4
A6
A8
POWER
Hold the foam strip of Cleaning Board facing
down, and gently insert it into the Feed Slot.
(continued on the next page)
13
4.
5.
14
Clean Rollers (cont'd)
Press the Clean button to begin the process.
* The Cleaning Board will be pulled into the Scanner and the
LED indicator will blink pink light during cleaning.
* Mechanical sounds produced during the cleaning process
are normal.
Wait until the Cleaning Board is ejected with a
'Cleaning done.' message appeared.
A6
A8
POWER
Clean Lens
Dirt and residues can build up on the Scanner’s lens and
affect image quality. Clean the lens periodically to get
the best result using the included Cleaning Strip.
••
••
1.
2.
3.
4.
NOTES
Make sure the Cleaning Strip is clean and free of dust
before use.
Using small drops of alcohol on the cotton side of the
Cleaning Strip can help to remove dirt and the residues
easily.
Turn off the Scanner.
Hold the foam grip handle of Cleaning Strip facing
down.
Insert the thinner end with cotton side facing up
into the Exit Slot from the rear of the Scanner.
Gently move the Strip from side to side as many
times as necessary, then remove it.
15
Calibrate
NOTES
•• Always clean Scanner’s rollers and lens first before
calibration. If cleaning rollers and lens did not improve
image quality, then please perform calibration procedures.
•• If necessary, perform calibration few times until image
quality is improved.
•• Make sure the Calibration Card is clean and free of dust
before use.
1.
2.
Press iScan Air app on your device to open it.
Press the Settings to select the Calibrate.
* For iPad, iPhone, and iPod touch, press
Settings icon to
access the Setting menu.
* For Android, press either Settings icon or Menu button to
access the Setting menu.
* For Windows 8, swipe in or mouse in from the right edge
of the screen to access the Setting menu.
* For Windows Phone, press
Settings icon to access the
Setting menu.
* For Mac, press Settings at the top left corner to access the
Setting menu.
3.
Remove the plastic foil on the Calibration Card,
insert it in the Feed Slot with the arrow mark
facing up and pointing to the Scanner.
(continued on the next page)
16
Select Calibrate from the Settings menu.
Press Calibrate.
A4
A6
A8
POWER
Calibrate (cont'd)
4.
5.
Press the Calibrate button to begin the process.
*The Calibration Card will be pulled into the Scanner and the
LED indicator will blink pink light during calibrating.
* Mechanical sounds produced during the calibrating
process are normal.
A6
A8
POWER
Wait until the Calibration Card is ejected with a
'Calibration done.' message appeared.
17
Helpful Hints
Scanner does not turn on.
•• Check if the POWER button is pressed on.
•• Check if Scanner’s battery has drained and no power is available.
Scanner cannot connect to your device.
•• Try moving Scanner closer to your device. The effective wireless transmission range is 60~100 feet (18~30m) unobstructed.
LED indicator of the Scanner is flashing blue.
•• Make sure the
•• Check that the network name on your device is matched to the Scanner. (See p.9)
•• Check if the Scanner is being used by another user, please wait and try again later.
•• Disable the Internet sharing on your device when it is already on, then connect to the scanner again.
No output from Scanner.
•• Check if connection and/or communication errors occurred while scanning. Restart your Scanner and try again.
Scanner behaves abnormally.
•• Please shutdown the Scanner by placing a pin into the RESET pin-hole located on the back of the Scanner, and gently push until the
Scanner performs a system shutdown.
Cannot save scan results to your device.
•• Check if the storage memory of your device is full.
•• Check if the Scanner and the mobile device have a low power. Charge them to a full power capacity.
On the Apple device, a message ‘iScan Air Would Like to Access Your Photos’ appears after pressing SAVE button.
•• This is a privacy settings requested by your device. Press ‘OK’ button in order to save images to your device. If you select ‘Don’t Allow’, no
image will be saved, and you will get an error message for the next scan. Follow on-screen instructions to solve the problem: select Settings >
Privacy > Photos > iScan Air > "ON".
Scan result is poor.
•• Please clean the Scanner’s rollers and lens. If image quality is not improved, then please perform calibration procedures.
•• Do not use the Photo Sleeve when the photo is laminated.
Cannot feed the paper.
•• Remove the photo/document from the feed slot and insert it again.
•• Check if the paper thickness is exceeded the limit. Acceptable scan thickness is 0.08~0.6mm(with supplied Photo Sleeve).
•• Do not scan more than one page at a time; otherwise the extra pages may not feed properly.
18
Specifications
Scanner Type
Image Sensor
Light Source
Scan Size
Scan Thickness
Scan Resolution
Scan Speed
Interface
File Format
Power
Power Consumption
Battery
Scans per Charge
Auto Shutdown
Charge Time
Wi-Fi Capability
Dimensions
Weight
Operating Conditions
A4 color sheetfed scanner
Color CIS (Contact Image Sensor)
LED (R, G, B)
Min. 55mm x 90mm (2.2" x 3.5") ; Max. 216mm x 356 mm (8.5" x 14") (W x L)
0.08mm ~ 0.6mm (with supplied Photo Sleeve)
Standard (300 dpi), Fine (600dpi)
12 seconds per page (A4 color) at 300 dpi
36 seconds per page (A4 color) at 600 dpi
USB mini-B port (charge only); Reset pin-hole (system shutdown)
JPG; PDF (for MAC and Windows PC only)
5Vdc
4.2W (Max.)
Lithium polymer battery 1500mAh (built-in)
Approx. 400 sheets (A4 size at 300dpi) of continuous use after fully charged.
Approx. 150 sheets (A4 size at 600dpi) of continuous use after fully charged.
Auto power off after 5 minutes when not in use.
Approx. 4 hours.
Radio Frequency
2.4GHz~2.472GHz compliant 802.11g/n protocol
Configuration
Soft AP (access point) supported
Security
WPA2
273 x 70 x 50 mm (10.6" x 2.8" x 2") (W x D x H)
580g (1.28lbs)
5°C ~ 35°C (41°F ~ 95°F), humidity range 35% ~ 80% RH; Non-condensing
19