1
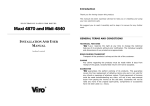
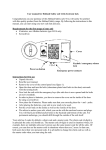
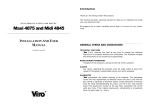
Introduction
Thank you for having chosen this product.
This manual has been expressly devised to help you in installing and using
your new electronic safe.
ELECTRONIC SAFES FOR HOTEL
Maxi 4870 and Midi 4840
We suggest you to read it carefully and to keep it in secure for any further
need.
GENERAL TERMS AND CONDITIONS
INSTALLATION AND USER
MANUAL
TECHNICAL FEATURES
S.p.A. reserves the right at any time to change the technical
features of its products without prior notification. The individual weights
and dimensions of our products are approximate.
RISKS DURING TRANSPORT
Transport of the products is always at the risk of the customer.
CLAIMS
Any claims regarding the products must be made within 8 days from
receipt of the goods. Unauthorised returns will not be accepted.
GUARANTEE
guarantees the perfect working of its products. This guarantee
covers the free replacement of defective items only and is not valid for
any refund or expenses of whatever nature. Timely payement of invoices
must be made notwithstanding any claim, will not in any case exempt
buyer from paying the invoice at the due date. Guarantee will not be
valid any more if the original spare-parts, components or accessories
have not been used (i.e.: keys).
SUMMARY
1 TECHNICAL FEATURES
1
TECHNICAL FEATURES............................................................2
2
INSTALLATION ............................................................................4
Midi 4840
Maxi 4870
External dimensions (H x W x D) mm:
170 x 390 x 285
200 x 410 x 400
FIRST USE OF THE SAFE .........................................................6
Internal dimensions (h x w x d) mm:
163 x 386 x 235
193 x 406 x 350
3.1
3.2
Door opening (h1 x l1) mm:
120 x 316
150 x 333
14.8
27.4
11
15
2.1
3
4
5
Insert / Replace batteries............................................... 6
Keypad and colored LEDs ............................................... 8
Internal volume (lt):
4.1
4.2
4.3
4.4
4.5
Unit weight (kg):
The Master Codes ......................................................... 9
How to insert the PRINCIPAL Master Code .......................... 9
SECONDARY Master Codes .............................................10
How to insert a SECONDARY Master Code..........................10
Opening with a Master Code ..........................................11
FUNCTIONS FOR THE GUEST ..............................................12
Instruction for the Guest...............................................12
How to insert the Guest Code ........................................12
How to open the safe ...................................................13
How to close the safe ...................................................13
Electronic anti-theft block ............................................13
EMERGENCY MECHANICAL KEY ........................................14
6.1
6.2
7
Installation inside a piece of furniture (suggested) ............... 5
FUNCTIONS FOR THE HOTEL-OWNER ................................9
5.1
5.2
5.3
5.4
5.5
6
Dimensions
How to open with the emergency mechanical key ..............14
Emergency key duplication............................................15
OPTIONALS ................................................................................15
7.1
7.2
7.3
Renting mode .............................................................15
Power supply from the electrical mains............................16
Internal plug for laptops and mobile phones recharge..........16
Fig. 1
Materials and thicknesses
Maxi 4870 and Midi 4840
Installation and User Manual
Page 1 of 16
Steel body, thickness mm 2.
Steel made frame and door, thickness mm 6.
Nickel plated steel deadbolts, diameter mm 15.
Hinge pins, diameter mm 8.
All steel door back cover and internal mechanism.
No internal plastic parts.
Maxi 4870 and Midi 4840
Installation and User Manual
Page 2 of 16
Mechanics
2 INSTALLATION
Motorized lock with two cylindrical horizontal fix deadbolts.
Controlled opening.
Emergency mechanical opening with special profile disc safety cylinder
allowing to open the safe in any case of anomalous block.
Easy accessible battery holder.
Replaceable door and door back cover.
Electronics
12 Key keypad with Braille reference and sound confirmation (the nonsighted are able to recognize the exact layout of the keys) and with 4
colored LEDs: 2 green (OK and NEW CODE) and 2 red (ERROR and
BATTERY).
Guest Code of 3 up to 8 digits (up to 100 millions of possible
combinations).
3 Master Codes of 3 up to 8 digits.
Needs Guest Code for closing.
Resident codes in NON-VOLATILE memory: codes remain in memory
even if batteries are failed.
Electronic anti-theft block of 15 minutes after 6 consecutive wrong
attempts.
Low consumption electronic board protected from any break-in attempts
performed with electrical shocks.
Audio-visual warning of low batteries.
Power supply
4 x 1,5V AA LR6 alkaline batteries (already included). Thanks to the
electronic board high engineering level it is possible to make more than
10,000 operations with 1 set of 4 alkaline batteries. Special long life
batteries can be used, thus increasing even more the autonomy of the safe.
Optional power supply from the electrical mains.
The safe must be installed by qualified personnel only. In order to
make your safe work properly, please follow carefully the following
instructions.
Maxi 4870 and Midi 4840 safes could be wall-mounted using dowels or could
be installed on a plane surface (for instance inside a piece of furniture –
suggested installation) using fixing bracket and bolts (see Fig. 2 next page)
or using screws for wood (if the thickness of the piece of furniture is depth
enough). Fixing elements (dowels, bracket, bolts) are not included.
For the installation of the safe, choose an adequate place with the following
characteristics.
Installation surface
It should be a regular and plane surface. Do not install the safe on a
slanting or unstable position like tripods, shelves or tables.
Temperature
Above 0°C and below 45°C. Do not install the safe near heat sources such
as radiators, stoves, etc.
Humidity
Relative humidity without dew below 90%RH. Do not install the safe near
basins, wash-basins, etc. Absolutely avoid pouring liquids on the safe.
If the relative humidity of the room where the safe is installed was too
high (for instance after the starting up of the heating system, when the
room was previously cold), moisture condensation should appear inside
the safe and the safe might not work properly. In such cases, do not use
the safe for some hours, then try again.
Environmental conditions
Working temperature ......................... 0 / +45 °C
Relative humidity (with no dew) .......... 0 / 90 %RH
Optional
Activating kit for renting option.
220 Volts converter for power supply option.
Recharging kit for laptops and mobile phones.
Maxi 4870 and Midi 4840
Installation and User Manual
Page 3 of 16
Maxi 4870 and Midi 4840
Installation and User Manual
Page 4 of 16
2.1 Installation inside a piece of furniture (suggested)
3 FIRST USE OF THE SAFE
Maxi 4870 and Midi 4840 safes are equipped with 4 fixing holes: 2 holes on
the base and 2 holes on the back.
For the installation it is necessary:
•
•
on the wall of the piece of furniture where the safe will be mounted,
make 2 holes of 10 mm diameter corresponding to the holes on the
base or on the back of the safe;
fix the safe using M8 screws (suggested) of adequate length to the
thickness of the piece of furniture and of the fixing bracket
cod. 4565.0469.
Note. We suggest to insert 3 – 4 mm thickness washers between the
safe and the fixing surface in order to reduce the deformation of the
safe.
After having fixed the safe, make sure the levelness tolerance is ±5°
maximum in order to avoid malfunctioning of the safe. It also necessary to
verify that the door controlled opening and the closing work properly.
3.1 Insert / Replace batteries
1. Open the door and unscrew with a star head screwdriver the battery
case locking screw situated on the bottom left hand corner of the door
back cover (see 1 on Fig. 3).
2. With the screwdriver bit, unthread battery case situated into the door
back cover bottom left hand hole. During this operation, be careful not
to damage the battery case (see 2 on Fig. 3).
3. Remove batteries (in case of replacement).
4. Insert new batteries paying attention to the polarity indicated on
the battery case.
5. To check whether the safe works, press any key: the green LED OK
(see Fig. 4 page 8) should blink slightly.
6. Insert battery case into the door back cover bottom left hand hole
and screw its locking screw.
Fig. 3
Fig. 2
Maxi 4870 and Midi 4840
Installation and User Manual
Page 5 of 16
Maxi 4870 and Midi 4840
Installation and User Manual
Page 6 of 16
3.2 Keypad and colored LEDs
WARNING !!
DO NOT SCATTER FLAT BATTERIES IN THE ENVIRONMENT !
DEPOSIT THEM IN CONTAINERS PROVIDED FOR THE PURPOSE.
Use only AA LR6 1.5V alkaline batteries. The 4 batteries of the safe should
be replaced at once. We also suggest to check battery charge level before
each seasonal closing (that is to say for longer periods than three months).
When the batteries are almost flat, after any press of the key ENTER
the red LED BATTERY will blink (see Fig. 4 page 8): replace then
batteries.
After the first flat battery signal, it would still be possible to make more than
200 operations before the electronics stops working. Exceeded such limit,
and for a certain period only, the safe will permit a unique last opening after
which the door will remain open. When battery charge level becomes too
low to activate the internal mechanism, the safe could be opened with the
mechanical emergency key only.
Note. Electronic board memory is non-volatile, that is to say that
stored codes are not erased if batteries are removed/replaced.
On the keypad appear standard digits (from 0 to 9) and 2 special keys:
COMB and ENTER.
The COMB key is used to cancel the last inserted digit or to change the
codes of the safe while the ENTER key is used to confirm the just inserted
combination.
The colored LEDs are four: two green (OK and NEW CODE) and two red
(ERROR and BATTERY).
The OK LED lights up:
after pressing a key to confirm the inserted digit;
when a new code is inserted to confirm the code itself.
The NEW CODE LED lights up:
when a new code is being inserted.
The BATTERY LED lights up:
when the batteries are almost flat and it is necessary to replace them.
The ERROR LED lights up:
in case of a generic error; for instance, when a wrong code is inserted to
open the door or in case a new inserted Guest Code is not valid
(because, for example, the code is less than 3 digits).
Fig. 4
Maxi 4870 and Midi 4840
Installation and User Manual
Page 7 of 16
Maxi 4870 and Midi 4840
Installation and User Manual
Page 8 of 16
4 FUNCTIONS FOR THE HOTEL-OWNER
4.3 SECONDARY Master Codes
4.1 The Master Codes
Each time a new PRINCIPAL Master Code is stored, the two SECONDARY
Master Codes change this way:
Maxi 4870 and Midi 4840 electronic safes have 3 Master Codes (also known
as directional codes or passe-partout codes): one is the PRINCIPAL and
the remaining two are the SECONDARY. The Master Codes allow to open
the safe and can be used in some particular events, for instance when a
guest forgets its Guest Code or when the guest leaves the safe closed at the
end of his stay.
Note. The hotel-owner has to insert his PRINCIPAL Master Code
when installing the safe or anyhow before the guest uses the safe.
- the 1st SECONDARY Master Code is composed of PRINCIPAL Master Code
digits with the addition of the digit ‘2’ at the end (thus the default code is
0022);
- the 2nd SECONDARY Master Code is composed PRINCIPAL Master Code
digits with the addition of the digit ‘3’ at the end (thus the default code is
0023).
Example: the PRINCIPAL Master Code is set to 045, then the 1st
SECONDARY Master Code becomes 0452 and the 2nd one becomes 0453.
The SECONDARY Master Codes can be changed one by one, therefore
getting a different value from the one generated by the a.m. rule (example:
if the PRINCIPAL Master Code is 045, the 1st SECONDARY Master Code could
be changed to 12389).
4.2 How to insert the PRINCIPAL Master Code
(min. 3 – max. 8 digits)
1. When the door is open press the key ENTER.
However it is useful to remember that changing the PRINCIPAL Master Code
will modify the SECONDARY Master Codes as explained above.
2. Digit the old PRINCIPAL Master Code (default: 002).
3. Press again the key ENTER: the green OK and NEW CODE LEDs will
light up at the same time.
4. Press the key COMB: only the green NEW CODE LED remains lit.
4.4 How to insert a SECONDARY Master Code
5. Digit a personal code composed of min. 3 – max. 8 digits within 10
seconds (note: if no code has been inserted within 10 seconds, restart
from point 1). In case of error, it is possible to cancel the last inserted
digit by pressing the key COMB.
1. When the door is open press the key ENTER.
6. Press the key ENTER. A sound confirmation will confirm that the code
has been stored. Pay attention not to forget the new code: its
restoration requires Viro after-sales service. Viro is not
responsible for any inconvenience caused by an erroneous
code setting or if the code is forgotten.
3. Press again the key ENTER: the green OK and NEW CODE LEDs will
light up at the same time.
How to insert the PRINCIPAL Master Code
ENTER
Old Master Code
ENTER
COMB
New Master Code
ENTER
Maxi 4870 and Midi 4840
Installation and User Manual
Page 9 of 16
(min. 3 – max. 8 digits)
2. Digit the old SECONDARY Master Code (default: 0022 for the 1st and
0023 for the 2nd SECONDARY Master Code).
4. Press the key COMB: only the green NEW CODE LED remains lit.
5. Digit a personal code composed of min. 3 – max. 8 digits within 10
seconds (note: if no code has been inserted within 10 seconds, restart
from point 1). In case of error, it is possible to cancel the last inserted
digit by pressing the key COMB.
6. Press the key ENTER. A sound confirmation will confirm that the code
has been stored.
Maxi 4870 and Midi 4840
Installation and User Manual
Page 10 of 16
5 FUNCTIONS FOR THE GUEST
How to insert the SECONDARY Master Code
ENTER
COMB
Old Master Code
Master CodeVecchio
New Master Code
Codice Master
ENTER
5.1 Instruction for the Guest
ENTER
The instructions for the guest are printed on the oval sticker on the
door (in italian and english) and on plastified instruction sheet
inside the safe (in different languages). We suggest to leave the
instruction sheet near the safe.
4.5 Opening with a Master Code
(PRINCIPAL or SECONDARY)
5.2 How to insert the Guest Code
1. Press the key ENTER.
(min. 3 – max. 8 digits)
2. Digit the PRINCIPAL or SECONDARY Master Code.
In order to open or close the safe, it is necessary to insert a code of
min. 3 – max. 8 digits: this code is called Guest Code.
3. Press the key ENTER twice and wait for the door opening.
Insert a Guest Code by following these steps:
Opening with a Master Code
ENTER
Master Code
ENTER
ENTER
Note. After the opening with a Master Code, the Guest Code is
automatically restored to the 007 default value and the green OK
LED lights up each time a key is pressed. This way the safe opening
without the use of the Guest Code is underlined.
1. When the door is open keep pressing the key COMB until the green
NEW CODE LED will light up.
2. Digit a personal code composed of min. 3 – max. 8 digits within 10
seconds.
In case of error, it is possible to cancel the last inserted digit by
pressing the key COMB.
If no code is inserted within 10 seconds, restart from point 1.
3. Press the key ENTER. A sound confirmation will confirm that the code
has been stored.
How to insert a Guest Code
COMB
Maxi 4870 and Midi 4840
Installation and User Manual
Page 11 of 16
Maxi 4870 and Midi 4840
New Guest Code
Installation and User Manual
ENTER
Page 12 of 16
5.3
How to open the safe
6 EMERGENCY MECHANICAL KEY
1. Digit the Guest Code.
2. Press the key ENTER and wait for the door opening.
Maxi 4870 and Midi 4840 safes are supplied with an emergency mechanical
key with a special profile disc safety cylinder.
Opening
With the emergency mechanical key it is always possible to open the safe,
even if the electronic board is damaged, in case of missing power supply
(flat batteries) or when the stored code has been forgotten.
Guest Code
ENTER
However, we suggest you to limit the use of the emergency
mechanical key and to allow its use to security staff only.
5.4 How to close the safe
1. Close the door manually.
2. While keeping the door closed, digit the Guest Code, press the key
ENTER and wait until the green OK LED lights off (this indicates the
closing of the door).
Closing
Guest Code
ENTER
Fig. 5
Keep the door close until
the OK LED lights off.
6.1 How to open with the emergency mechanical key
In order to open the safe with the emergency mechanical key it is
necessary:
5.5 Electronic anti-theft block
Maxi 4870 and Midi 4840 safes are equipped with an electronic anti-theft
block of 15 minutes after 6 consecutive wrong codes are entered: during the
block the green OK LED will blink and it will be possible to open the door
with the mechanical emergency key only.
1. Remove the plastic top situated on the door in order to access to the
hole for the key insertion (see Fig. 5).
2. Insert the key and turn it clockwise until the full retraction of the dead
bolts. Open the door pulling the key: the red ERROR LED will light up
confirming the emergency opening.
3. When the door is open, turn the key counter-clockwise and take it out.
4. Insert the plastic top on the hole for the key insertion.
Maxi 4870 and Midi 4840
Installation and User Manual
Page 13 of 16
Maxi 4870 and Midi 4840
Installation and User Manual
Page 14 of 16
7.2 Power supply from the electrical mains
The lighting off of the ERROR LED will indicate the end of the emergency
opening.
Note. After the opening with the mechanical emergency key, the
Guest Code is automatically changed to the 007 default value and,
moreover, the green OK LED will lights up each time a key is
pressed. This way the safe opening without the use of the Guest
Code is underlined.
(cod. 4295.0850)
This set allows the use of the external power supply from electrical mains
instead of the standard one supplied by batteries.
6.2 Emergency key duplication (only for Hotel versions with
KA key)
Fig. 7
Special profile keys duplication can be done at Viro S.p.A. factory upon
special request proving the right title to receive the copy of the key.
7.3 Internal plug for laptops and mobile phones recharge
7 OPTIONALS
(only for special execution order)
7.1 Renting mode
It is possible to require, as a special execution, the insertion of one electrical
plug inside Maxi 4870 or Midi 4840 safes in order to recharge laptops or
mobile phones.
(only for special execution order)
It is possible to require, as a special execution, Maxi 4870 or Midi 4840 safes
to be arranged for the
renting mode.
In this mode the safe
functions are blocked and
could be enabled only by
the insertion of a specific
jack onto the relevant plug
placed on the door back
cover.
Fig. 8
Fig. 6
Maxi 4870 and Midi 4840
Installation and User Manual
Page 15 of 16
Maxi 4870 and Midi 4840
Installation and User Manual
Page 16 of 16
ELECTRONIC SAFES
FOR HOTEL
Maxi 4870 and Midi 4840
Installation and User Manual
cod. 2.0.4840.493.00.410
rev. D - 11/12/2008
Viro S.p.A.
via Garibaldi n.4 - 40069 Zola Predosa (Bologna) – ITALY
Tel. +39 051 6176511 (ask for after-sales service)
Fax +39 051 755079 – Fax after-sales support +39 051 6176627
www.viro.it – e-mail: [email protected]
Maxi 4870 and Midi 4840
Installation and User Manual
Page 17 of 16
Maxi 4870 and Midi 4840
Installation and User Manual
Page 18 of 16