1
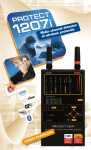
PROTECT
1206 i
USER’S MANUAL
Detector of bugs and digital
transmissions
The Protect 1206i is a new class of counter surveillance device. Unlike all typical
searching devices it can detect modern 'hidden' bugs which use such protocols as
Bluetooth and Wi-Fi at a long distance. Such bugs, especially Bluetooth types, are
practically undetectable by common RF detectors due to their very low transmitted
power and special type of modulation. The Protect 1206i uses a separate channel
with a high, (2.4/5 GНz) frequency pre-selector to detect and locate Bluetooth and
Wi-Fi with a much higher sensitivity. The unit also then processes the demodulated
signal in order to identify which protocol has been detected. In addition the unit
can detect all 'classical' bugs and inspect them for the presence of correlation by
sending sound impulses as well as other digital transmissions at a standard distance
(GSM, 3G, DECT, etc.)
The unit which you have selected is not a slightly improved version of the old device,
but a completely new, revolutionarily changed sweeping tool.
New features:
New wide-band antenna (for ANT1 socket)
Wider coverage, particularly at lower frequencies, has made it possible to increase
the detection distance of a conventional VHF/UHF bug by 2-3 times, while saving
perfect sensitivity at the higher bands (GSM, Wi-Fi, Bluetooth, etc.)
New Micro-Pointer microwave antenna (for ANT1/ANT2 socket)
This is the first time when an affordable RF detector gets the microwave logperiodic directed antenna supplied in the standard set. 2-4 times longer distance
to all sources above 2GHz (Wi-Fi 2.4GHz, Wi-Fi 5GHz, Bluetooth, Wi-Max, LTE
High, etc.). The directionality provides easy pinpointing of a wireless source. Now
you not only know that there is a Wi-Fi source, but can quickly pinpoint it.
Increased dynamic range
The bargraph now rises quickly to weak signals and increases slowly to strong
signals, thus giving the opportunity to locate the source
New Attenuator
The new algorithm widens the dynamic range even more, making the location
procedure easier. Turn on the attenuator near a strong source, the bargraph which
lights fully will drop and then increase further, therefore making it possible to
locate more precisely.
Other features:
2
Extra high sensitivity to Bluetooth, Wi-Fi 2.4 GHz, Wi-Fi 5GHz and wireless video
cameras
Frequency range:
Main antenna ANT1: 50-6000 MНz
Auxiliary antenna ANT2: 2.4 - 2.48 GНz, 4.9 - 5.875 GНz
The perfect tool for searching for digital and analogue transmitters of all types
16-segment bargraph indicator
3 modes: sound, vibration and mixed
Correlation function discovers FM-transmitters by the presence of correlation
(probing sound is used)
2 levels of sensitivity (attenuator)
Long battery life
Durable metallic body
Microprocessor controlled
Specification
Antenna 1: 50-6000 MHz;
Antenna 2: 2.4 - 2.48 GНz; 4.9 - 5.875 GНz
Frequency range
Power
Dimensions
Current consumption
Two AAA batteries (2xLR 03)
With out antennas: 120x70x16 mm
With antennas: 210x70x16 mm
Up to 30 mA
Up to 20 hours
Active antenna, Low battery, Mode, Identification,
Attenuator, Secondary demodulation
Operation duration
Indications
Micro-Pointer Antenna
Frequency range
Type
2-12 GHz
Log-periodic array
Model name
LPDA-12
Dimensions
53 x 84 x 9 mm
Connector
SMA Male
Sensitivity graph of the Protect 1206i
Supplied set
The new Protect 1206i comes with the following accessories:
1 x MicroPointer
antenna
1 x Rod
antenna
2 x LR03 (AAA)
batteries
1 x User's Manual
3
Description of controls
Use the POWER switch (7) to turn the device on and off.
The 'IDENTIFICATION' LED (5) of the Protect 1206i
changes color depending on the detected protocol:
BLUE — BLUETOOTH
GREEN — Wi-Fi
RED — GSM900/1800
ORANGE — DECT
4
The Protect 1206i has two separate RF channels which work with the two corresponding antennas. The ANT1 channel (1) is used for the detection of the wide
frequency range 50-6000MHz in order to perform searches for all types of transmitters, including room, car, body-worn, telephone or other types with different
methods of modulation, both analogue and digital, including the following bands:
VHF, UHF, GSM 900/1800/1900 MHz, 3G, Wi-Fi, Wi-Max, 4G (LTE), etc. The second
channel ANT2, marked as '2.44GHz 5.39 GHz' (2) , is used for the detection of
Bluetooth and Wi-Fi only (or other signals with coinciding frequencies) but with
a higher sensitivity .
The usual method of searching suggests using the ANT1 antenna (1), i.e.
50-6000 Mhz, first in order to cover a wide range of frequencies. Then the
procedure of scanning the area should be repeated with the ANT2 (2) selected.
Use the buttons (8) and (9) to toggle between ANT1 and ANT2.
For assistance during the search the Protect 1206i has an active correlation mode.
This function allows the operator to study the suspicious signals in certain cases.
When the 'CORR' button (10) is pressed in close proximity to the suspicious area
the unit produces probing 'beep' signals. The sound is picked up by a bug and then
transmitted into the air. The unit will receive and demodulate transmitted waves
and the operator can see signs of the probing signals on the DEMODULATION
display (3). Fluctuations appearing simultaneously with the beeps will warn of an
FM transmitter or other type of transmission which correlates with the sound.
The Protect 1206i has a 16-segment ‘SIGNAL STRENGTH' bargraph indicator (6)
providing precise information to the operator. The signals can be measured in
the range of -30dB to +8dB. The closer the unit is to the source of transmission
the higher the bargraph's level will be.
In addition to this the new version of the detector has an increased dynamic range,
meaning that the bargraph rises quickly to weak signals and increases slowly to
strong signals, some powerful sources may cause full illumination of the display
(or when the unit is in close proximity to the transmitter). In such cases use
the attenuator buttons ATT+ and ATT- (8) to alter the sensitivity. Turn on the attenuator near a strong source when the bargraph lights fully. It will drop and then
increase further, therefore making it possible to locate more precisely.
Note that the vibration function will be turned on when the SIGNAL STRENGTH (6)
approaches the 6th segment.
The MODE (4), control of the Protect 1206i is used for selecting the desired
indication method. There are four modes available:
Sound mode, when the unit's speaker produces demodulated sound
Vibration mode, when the unit's vibrator turns on when a high level of the RF
field is reached (i.e. 6th segment of the bar graph)
Mixed mode, when both types of indication are used
Silent, when there is no sound or vibration
5
The sound mode is convenient for a fast search as an experienced operator may be
able to distinguish between different types of signals.
An FM-modulated transmitter (bug) can produce a 'loopback effect' when the unit
is close to it, or cause the effect of the disappearance of background noises, which
are usually present further away from the transmitter. In this case the 'hum' which
can be heard in other parts of the room can disappear when the Protect 1206i
approaches the transmitter and there will be silence from the unit's speaker.
When this happens it is recommended to use the 'CORR' function (10) while
watching the 'DEMODULATION' display (3). Simultaneous fluctuations will warn of
danger. Please note that the sound mode is not suitable for covert searches, as
the transmitter will 'hear' sounds in the room.
The vibration and mixed modes are convenient when probing difficult to reach
objects and places. The operator can work without the necessity of watching the
bargraph, a high RF level will be indicated by vibration of the unit.
The Protect 1206i is powered by two AAA (LR03) batteries. It is recommended to
use alkaline batteries in order to reach the optimal working duration. The 'LOW
BATT' indicator (11) will turn on when the batteries are nearing exhaustion.
Usage
Sweeping the room
Before starting sweeping, some preparation tasks should be carried out. Firstly, it is
necessary to consider the time and individual circumstances of the sweep. Due to
there being lots of devices which are remotely controlled it is recommended to carry
out a sweep during working hours in real situations when the eavesdropper most
wants to listen. It may be necessary to arrange a fictitious meeting. Nobody has to
know about the pending search.
Close all drapes in the room. Turn on all the lights and activate any other devices to
imitate normal conditions. It is also advisable to turn on a source of sound such as a
stereo system or radio. This sound source has two very important functions:
Voice activated transmitters will be activated
Your actions will be masked
Step 1. Selecting working mode.
Connect the rod antenna to ANT1 and the Micro-Pointer microwave antenna to ANT2.
Turn on the Protect 1206i (7). Make sure the ANT1 is selected (button (9)).
Choose the operation mode with the help of the MODE button (4):
6
1) For covert procedures use the vibration or silent mode
2) The sound mode is more convenient for locating and inspecting the RF
source.
3) The vibrating or mixed mode allows the operator to avoid constantly
watching the bargraph when inspecting areas that are difficult to access
The sound mode allows the operator to listen to the signal so that he or she can
understand more about the source. The FM-modulated transmitter (bug) can
produce a 'loopback effect' when the unit is close to it or cause the effect of
the disappearance of background noises, which are usually present further away
from the transmitter. In this case the 'hum' which can be heard in other parts of
the room can disappear when the Protect 1206i approaches the transmitter and
there is a silence on the speaker. In this case it is recommended to use the 'CORR'
function (10) while watching the DEMODULATION' display (3). Simultaneous
fluctuations will warn of the danger.
Step 2. Scanning the area
Enter the room holding the Protect 1206i while watching its bargraph or paying
attention to the vibrator. Turn the lights and other equipment in the room on and
off. Walk around the room, continuously watching the indicator or feeling for the
Protect's vibration. The bargraph level will increase or decrease when the detector
is closer to, or farther away from a transmitting device. Probe all objects which may
contain a hidden surveillance device. When you get close to an RF bugging device
the bargraph of your Protect 1206i will rise (or the vibration will appear). Pay
special attention to the places where an AC exists as a bug can be powered from it
(AC outlets, AC lines, electrical appliances, etc).
The distance of detection may vary depending on the situation. Usually the
Protect 1206i is able to detect an average radio microphone at a distance of
30-100 cm, although it is recommended to probe objects at a proximity of 10 cm.
The bargraph can display 16 different levels.
In the case of detecting an increased level, try to find where it is the strongest.
Move the detector in different directions and/or rotate it. Turn on the attenuator
near a strong source when the bargraph lights fully. It will drop and then increase
further, therefore making it possible to locate more precisely. Do not forget to
restore the normal sensitivity of the device before continuing the search by turning
the attenuator off.
Step 3. Checking a suspicious place
The bargraph may often show an increased level near wires or metal objects such as
building constructions. This may not be a bug, but rather the metal acting as an
antenna extension. A similar situation may appear in the apertures of windows due
to radio waves coming from the outside. This interference does not usually have a
concentrated area and exists within a large expanse, whereas a bugging device will
have an area of a strong and concentrated field in a more local area.
After you have found the exact location of a high field, perform the following
actions:
1) If secrecy is not critical turn on the sound mode and listen to the sound. Check
for the presence of a loopback effect or the effect of the disappearance in background noise near the suspicious place. It is also possible to recognize some typical
communication protocols by the sound they produce:
7
Bluetooth gives a 'crackle' sound
Wi-Fi will produce a 'scratching' sound
GSM gives a 'buzzing' (hum)
DECT is heard as a 50Hz AC transformer hum
The IDENTIFICATION LED (5) will change its color correspondingly. Please note
that some DECT signals may be not recognized.
2) Press the CORR button while watching the DEMODULATION display to find the
synchronous fluctuations. They will show the presence of correlation, i.e. a radio
microphone.
3) Switch the Protect 1206i to ANT2 (2) temporarily to detect whether it is a
Wi-Fi/Bluetooth signal or not.
Step 4. Physical search
Not depending on the results, start a physical search. Visually inspect and probe
each object in the highlighted area. Disassemble, if necessary, lamps, desktop
items, telephones, AC outlets, phone outlets. Inspect all power and phone lines
carefully. Open books, wardrobes, etc. Remember, that a physical search is a
fundamental operation during the sweep. Illegal transmitters often have a number
of these typical characteristics:
Compact
Hidden
Handmade or produced with low quantity
With microphones or video cameras
Implanted inside another piece of electronic equipment
Connected to a telephone line
Connected to AC wires or with its own source of power
With antenna
With a SIM card inserted
If you find a bugging device, do not stop! You should continue the search more
carefully as eavesdroppers often install more than one device. They may install a so
called 'foolish bug' which may be easily detected and some other well hidden
devices that may have remote control and non-standard modulation.
Step 5. Checking Bluetooth/Wi-Fi
Bluetooth and Wi-Fi can be easily used for bugging and therefore needs special
attention. Conventional Bluetooth headsets, smartphones or cameras can be
installed (or intentionally left) in premises, in personal possessions or on a body in
order to transmit audio or video. In addition, a well-hidden dedicated bugging
device can be created with the use of accessible Bluetooth and Wi-Fi electronic
components.
Therefore we strongly recommend repeating a scanning of the area with the ANT2
selected and the Micro-Pointer antenna in ANT2. In this mode the Protect 1206i will
detect Bluetooth and Wi-Fi devices only at a longer distance so that location of all
wireless sources will be much easier.
8
The new Micro-Pointer antenna provides great amplification, a good detection
distance and directivity for quick pinpointing. Repeat the procedure of scanning
mentioned in Step 2, but keep in mind t hat the directed antenna Micro-Pointer
sees signals in its direction area only (opposite the detector). Therefore, scan
slower, while rotating the detector in different directions (left, right, up, down) at
a number of points in the room. Note: before starting the actual sweeping you may
want to have a short training using your own Wi-Fi router.
If you have found a direction with a high level, approach the source while pinpointing it by rotating the detector slightly. As such you will locate the source.
Inspect it very carefully. Consult IT employees to become acquainted with the
scheme of wireless access points and the location of wireless telephones used in the
office to make sure it is a 'own' and 'legal' access point.
Step 6. Checking the microwave range
The ANT1 channel of the detector covers frequencies in the range of 50-6000MHz.
It is difficult to cover such a wide band simultaneously, but the rod antenna used in
the new version of the Protect 1206i manages this task very well. The antenna
gives good results at detecting signals on frequencies starting from 50 MHz and
higher, up to 3000MHz including all the following bands – VHF 140MHz,
UHF 450MHz, 900MHz, 1200MHz and 2400MHz.
Although the rod antenna can be used for detecting signals above 3000MHz,
the microwave antenna Micro-Pointer can give better results on these bands.
Additionally the microwave antenna gives directionality for easy pinpointing.
Therefore, it is possible to use the Micro-Pointer antenna in the left ANT1 socket for
an additional search, instead of the ANT2 where it is as standard.
Connect the Micro-Pointer antenna to the ANT1 temporarily instead of the rod
antenna and select ANT1 (9) to get a better detection distance on the higher
frequencies; above 2000MHz. Signals on lower frequencies will be omitted. You will
detect: Wi-Fi 2.4MHz, some bands of LTE (4G), Bluetooth, Wi-Max 2.3 GHz,
2.5 GHz, 3.5 GHz and 5.8 GHz, Wi-Fi 5 GHz and all other signals including audio
and video bugs sending radio signals above 2GHz. Scan the room again taking into
consideration the direction of the antenna. Try scanning objects and surfaces as
closely as possible because the higher the frequency is, the shorter the detection
distance will be. Some 5 GHz signals might be detected at a distance 20-50 cm.
There is a difference between the use of the Micro-Pointer antenna on the ANT1
and ANT2. The ANT2 channel was created for the detection of Wi-Fi and Bluetooth
only. It is more sensitive to the above mentioned signals and is not capable of
detecting any other signals. The Micro-Pointer antenna in the ANT2 will increase
the sensitivity but the device will still be able to detect Wi-Fi and Bluetooth only.
The ANT1 has a continuous coverage of 50-6000MHz and with the Micro-Pointer
antenna plugged into it there will be an increase in sensitivity to all high frequency
signals, not only to Wi-Fi and Bluetooth.
Do not forget to return the antennas to their initial state after completing the work:
rod antenna to ANT1, Micro-Pointer – to ANT2.
9
Checking telephone lines
Telephone bugs may be installed anywhere a phone line lays. It may be within the
phone set, the phone outlet, connecting box or cable. Most telephone bugs activate
only when the receiver is off-the-hook. Therefore the sweeping of phone lines
should be carried out only when the receiver is in this state.
You should apply the rod antenna on ANT1, although the procedure can be repeated
with the Micro-Pointer on ANT1.
Start checking from the phone set. Place the Protect 1206i near the set and lift the
receiver. Watch for an increase of the RF level (or starting of the vibration). Please
note: It is pointless to test wireless (radio) telephones, for they act exactly like a
bugging device themselves due to the use of radio waves. Only a physical
inspection of these items is sufficient to know if they are bugged.
Move the detector along the phone line while keeping it off-the-hook. Check
all the outlets and communication boxes. If possible ask a second person to lift the
receiver and then hang it up repeatedly. If you see that the RF level changes when
the line is activated and deactivated, this is a sign of a bug's presence. Try to locate
the place where the RF level is highest and then perform a physical search.
Testing people
There are many types of body-carried transmitters. They may broadcast conversations and (or) video signals. While carrying the Protect 1206i with ANT1 selected
and the rod antenna in it, approach the person. If the bargraph level grows, it
means that the person is carrying a transmitting device. If you change location you
will need to select the necessary attenuator mode in accordance with the background noise.
Another way of testing people is to place the Protect 1206i on the desktop. In this
case, it is necessary to watch the bargraph carefully when the person approaches
the table and sits down.
Other applications
If you cannot inspect a whole room, for example, in a restaurant or someone else's
office, the Protect 1206i can be used for checking the closest objects to you. In a
restaurant it may be necessary to check the items on the table, or the table itself,
since they can contain a bugging device.
Detection distance
The detection range of the Protect 1206i depends on two major factors:
The output power of the transmitter and its frequency
The surrounding RF environment, such as radio / TV and communication devices
which can cause the device to show an increased level
10
Typical detection distances:
Type of signal
Rod antenna
in ANT1
VHF bug
(140 MHz, 5 mW)
30-60 cm
UHF bug
(450 MHz, 5 mW)
Micro-Pointer
in ANT2
Micro-Pointer
in ANT1
_
_
50-100 cm
_
_
GSM, LTE,
CDMA 800-900MHz
30-200 cm
_
_
GSM 1900,
3G 2100 Mhz
30-100 cm
_
60-200 cm
2.4 GHz Wi-Fi
accesspoint
30-80 cm
1-4 meters
0,5-2 meters
2.4 GHz Wi-Fi client
20-60 cm
60-120 cm
40-100 cm
Bluetooth
10-20 cm
20-80 cm
10-30 cm
LTE Higher ranges /
Wi-Max
10-30 cm
5 GHz Wi-Fi, 5 GHz
video cameras, etc.
5-50 cm
_
30-100 cm
30-100 cm
20-60 cm


![Stealth Protect Series catalogue 2011_We[...]](http://vs1.manualzilla.com/store/data/005809212_1-caf297493bfcf938dba2b64bb0d79842-150x150.png)