1
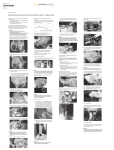
User Manual Palletank® For Shipping 85037-551-72 Table of Contents 1.Introduction 1. Introduction 2 2.Palletank® For Shipping – Unfolding and folding instructions3 2.1.Unfolding 3 4 2.2.Folding 2.3.Storage of Palletank® panels and Shipping Kit components within the Palletank® base 4 3.Preparation prior to shipping kit installation 4. Shipping Kit installation 7 Whenever long distance transport is planned using a Flexsafe® | Flexel® 3D bag, it is imperative that the Palletank® for Shipping with its dedicated Shipping Kit is used. 5. Shipping Kit removal 9 Product codes 6 6.Cleaning and maintenance instructions9 7. 2 The Flexsafe® | Flexel® 3D System for Shipping are composed of a single-use sterile bag (the Flexsafe® 3D bag or Flexel® 3D bag) and the Palletank® for Shipping rigid container. The stainless steel constructed Palletank® for Shipping supports the fluid contained within the Flexsafe® | Flexel® 3D bag and must be used together to comprise a robust shipping system. Precautions of use 9 8.Disclaimers 10 9.Warranty 10 10. 10 Trademarks and Patents Volume 100 L 200 L 500 L Palletank® FXC FXC FXC 106362103133106609 for Shipping Palletank® FXCFXCFXC 102475102477102256 Shipping Kit Purpose The instructions for use describe the operations required to fold and unfold the Palletank® for Shipping and to assemble the Palletank® Shipping Kit. 2. Palletank® For Shipping – Unfolding and folding instructions 2.1. Unfolding a) Starting from the folded Palletank® (See Fig. 1), remove all the components from inside the Palletank® base (See Fig. 2) and from the bottom compartments: – the lid by turning its handle – the two large panels – to remove the second panel, first unlock the two locking systems (See Fig. 3). – the two blocking bars – the two small panels – the foam pads Fig. 1 Fig. 2 Fig. 3 b) Starting from the empty Palletank® base, position first the front and back panels (See Fig. 4 & Fig. 5) with locking systems downwards. Do not secure these yet. Fig. 4 Fig. 5 3 c) Position the side panels by sliding these in-between the front and back panels (See Fig. 6) and secure the four locking system (See Fig. 7). d) Verify the correct positioning and locking of the panels by trying to removing these. e) Insert the Flexsafe® | Flexel® 3D bag in the Palletank® and fill it according to the “Instructions for Use” provided with each box of Flexsafe® | Flexel® 3D bags. Fig. 6 Fig. 7 2.2. Folding Caution Verify that the “Palletank® for Shipping User Manual” have been communicated to the receiver prior to the shipment arrival. a) Starting from the unfolded Palletank® (See Fig. 8), remove the lid by turning its handle. b) Remove the four locking systems of the front and back panels (See Fig. 7). c) Remove first the side panels by sliding these upwards (See Fig. 6). d) Remove the front and back panels (See Fig. 4 & 5). Fig. 8 2.3. Storage of Palletank® panels and Shipping Kit components within the Palletank® base a) Starting from the empty Palletank® base, insert the Shipping kit foam pad (See Fig. 9) and steel plate (See Fig. 9 and 10). b) The dunnage foams should be packed in a polybag prior to being stored in the Palletank® bottom compartment. Fig. 9 4 Fig. 10 c) Insert the two side (smaller) Palletank® panels (See Fig. 11) and position the Shipping Kit two blocking bars by inserting these in the dedicated notches (See Fig. 12) Fig. 11 Fig. 12 d) Insert the front and back (larger) Palletank® panels: – Hold the first panel with the locking systems visible and position it in the Palletank® (See Fig. 13). The two holes on the side of the panel will fit into the two slots on the sides of the Palletank® base. Engage the two locking systems. Fig. 13 – Hold the second panel with the locking system underneath on the back and position it on the first panel (See Fig. 14). e) Unlock the lid by turning the handle (if necessary) f) Finally, position the lid on the folded Palletank® and lock it. Fig. 14 5 3. Preparation prior to shipping kit installation a) Check that the Flexsafe® | Flexel® 3D bag is positioned in the Palletank® for Shipping and filled in accordance with the “Instructions for Use” supplied in each box of F lexsafe® | Flexel® 3D bag. b) Most importantly, make sure that: – The Flexsafe® | Flexel® 3D is filled to its nominal volume – The filled Flexsafe® | Flexel® 3D bag is correctly positioned in the Palletank® for Shipping (the bag corners must be aligned with the container angles) – There are no folds on the bag – All clamps and caps on the bag tubing are closed c) Before installing the Shipping Kit, check that all component parts are present, as listed below: – Shipping Kit steel plate with its mobile 4-port gripping plate (See Fig. 15) Fig. 15 – Shipping Kit foam plate (See Fig. 16) Fig. 16 – Two Shipping Kit blocking bars (each with 2 clamping screws (See Fig. 17) Fig. 17 – 4 dunnage foams (See Fig. 18) Fig. 18 – 4 locking levers (See Fig. 19): Only for use with Flexsafe® 3D bag Fig. 19 6 4. Shipping Kit installation a) Position the 4 dunnage foams on top of the filled Flexsafe® | Flexel® 3D bag by inserting them between the bag and the Palletank® (See Fig. 20 and 21). Fig. 20 Fig. 21 b) Position the foam plate on top of the filled bag while inserting the bag tubes through the foam plate opening (See Fig. 22). c) Slightly unscrew the two nuts of the gripping plate and slid it open. Fig. 22 d) Hold the steel plate with the two handles and position it over the foam plate while inserting the bag tubes through the opening near the Palletank® front panel (See Fig. 23). Fig. 23 e) Slide the movable gripping plate close to grasp the bag 4-port system and secure it by screwing the two nuts of the movable gripping plate (See Fig. 24). Make sure that the tubes are not pinched and kept free. f) Unscrew the four clamping screw without removing them for the blocking bars. Fig. 24 > If you are using a Flexel® 3D bag: g) Insert the blocking bars ends in the Palletank® front and back panel holes. Start by inserting the bar extremities in the container front panel then in the rear panel (See Fig. 25). Check that all 4 ends are properly inserted in the corresponding container panel holes. Fig. 25 7 h) Manually screw the clamping screws by turning them clockwise (See Fig. 26). Make sure the tightening is alternately and progressively performed (in diagonal). The clamping screw rod ends will locate and position in the mating holes of the steel plate. End the operation by making sure that the steel plate is horizontally positioned over the bag. If this is not the case, unscrew and start the clamping operation again. > If you are using a Flexsafe® 3D bag: Fig. 26 i) Unscrew the 4 clamping screws from the 2 blocking bars and assemble the 4 locking levers onto the 4 clamping screws until they reach the spring washer. Make sure you assemble them in the right way as shown on Fig. 27. Right assembly Fig. 27 Wrong assembly Caution If you are using a Palletank® Shipping Kit 500L (FXC102256), remove the nuts of the 4 clamping screws prior to assembling the locking levers. j) Insert the blocking bars ends in the Palletank® front and back panel holes. Start by inserting the bar extremities in the container front panel then in the rear panel (See Fig. 28). Check that all 4 ends are properly inserted in the corresponding container panel holes. Fig. 28 k) Manually screw the clamping screws by turning them clockwise (See Fig. 29). Make sure the tightening is alternately and progressively performed (in diagonal). The clamping screw rod ends will locate and position in the mating holes of the steel plate. Make sure that the that the steel plate is horizontally positioned over the bag. If this is not the case, unscrew and start the clamping operation again. End the operation by manually tightening the 4 locking levers by turning them clockwise (See Fig. 30). l) Protect the bag tubes by wrapping them with plastic bubble wrap or equivalent. Coil them in the headspace provided between the Palletank® Shipping Kit and the Palletank® lid. m) Close and secure the Palletank® lid (See Fig. 8). Fig. 29 Fig. 30 8 5. Shipping Kit removal 6. Cleaning and maintenance instructions a) In order to remove the Palletank® Shipping Kit at the shipping destination, perform the Shipping Kit Installation operations as described above in reverse sequence. Make sure that the “Palletank® for Shipping Instructions for Use” have been communicated to the receiver prior to shipment arrival. b) In preparation for container return, inventory all Palletank® Shipping Kit component parts. Store them in the locations provided in the empty Palletank®. Please refer to section 2.3. Caution Danger of corrosion and damage to stainless steel Palletank®. Avoid strongly caustic or alkaline and | or chloride-containing detergents. Only use the cleaning agents specified in these operating instructions. Precautions Before Use Before using the Palletank®, observe the following points: –E nsure that the cleaning work is carried out according to the information in these instructions. –B efore installing the Flexsafe® | Flexel® 3D bag in the Palletank®, check that the internal surfaces of the Palletank® are dry, smooth and free of any particles that might damage the bag surface. Cleaning Instructions Complete the following cleaning activities on all metal surfaces of the Palletank®: 1. Clean the surfaces first with a moist, lint-free cloth to remove coarse c ontamination. 2. Clean the surfaces with a conventional stainless steel cleaner. 3. Metallic parts can be cleaned, if needed, with the help of mild detergents or alcohol. Care should be taken at all times to avoid scratching. Precautions to Avoid Corrosion – For cleaning operations you must use only smooth cloths. – The Palletank® must be dried after each cleaning operation and more generally after any contact with liquid. – In general, all the cleaning products for stainless steel equipment available on the market can be used for Palletank® maintenance. 7. Precautions of use a) The Flexsafe® | Flexel® 3D System for Shipping is designed for the transport of Flexsafe® | Flexel® 3D bag filled at nominal capacity. Failure to follow this instruction may result in product loss. b) Any sterile fluid shipping with the F lexsafe® | Flexel® 3D System implies imperatively the use of the corresponding Palletank® For Shipping and its Shipping Kit. In case of any doubt on the correspondence of product codes that constitute the system, please contact your Sartorius Stedim Biotech representative. c) The Shipping Kit is fully operational only if all its component parts are installed as described in sections 3 and 4. d) Manually tighten the compression screws and the locking levers (when applicable) of the Shipping Kit as it is designed to perfectly maintain the bag filled to its nominal capacity in the Palletank® For Shipping during long distance transport. Do not use any tooling for this operation. e) The Shipping Kit Foam Plate and the dunnage foams must be stored either in the Palletank® when not in use in a polybag to protect from wood splinters or other objects getting stuck in the foam with the risk of puncturing the bag or causing small cuts in the bag during shipping. f) Do not use the Shipping Kit for static storage. Only place the Shipping Kit a few hours prior to shipping at a maximum. Frequency The Palletank® should not come into contact with the process fluid. However, periodic cleaning | disinfection cycles are recommended at a frequency dependent upon the nature of use (type of application and environment) into which the Palletank® is taken. Recommended cleaning intervals vary depending upon Palletank® usage level and contamination level (from improper use, etc.) 9 8. Disclaimers 9. Warranty 10. Trademarks and Patents a) Sartorius Stedim Biotech will not accept responsibility of any kind for use of the Palletank® with any other bag than the Flexsafe® | Flexel® 3D bag. For the use of Flexsafe® | Flexel® 3D bag, the respective instructions for use and precautions of use, shall apply. Sartorius Stedim Biotech warrants that the Flexsafe® | Flexel® 3D bag and Palletank® are produced according to Sartorius Stedim Biotech specifications. Unless otherwise specified, the general Sartorius Stedim Biotech specifications will apply. Flexsafe® | Flexel® and Palletank® are registered trademarks of Sartorius Stedim Biotech. b) Sartorius Stedim Biotech will not be held responsible if the “Palletank® For Shipping User Manual” as described in this document are not strictly followed and the above mentioned Precautions of Use applied. Upon request, Sartorius Stedim Biotech Application Specialists can perform training of employees. c) Sartorius Stedim Biotech is not responsible for any special, incidental or consequential damages resulting from any legal theory, including lost profits, downtime, goodwill, damage to or replacement of equipment or property. 10 Sartorius Stedim Biotech GmbH August-Spindler-Strasse 11 37079 Goettingen Phone +49.551.308.0 Fax +49.551.308.3289 www.sartorius-stedim.com Copyright by Sartorius Stedim Biotech GmbH, Goettingen, Germany. All rights reserved. No part of this publication may be reprinted or translated in any form or by any means without the prior written permission of Sartorius Stedim Biotech GmbH. The status of the information, specifications and illustrations in this manual is indicated by the date given below. Sartorius Stedim Biotech GmbH reserves the right to make changes to the technology, features, specifications, and design of the equipment without notice. Status: September 2015, Sartorius Stedim Biotech GmbH, Goettingen, Germany Printed in the EU on paper bleached without chlorine. | W Publication No.: SPT6016-e150901 Ver. 09 | 2015