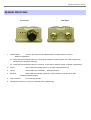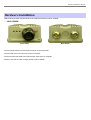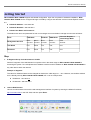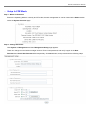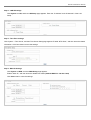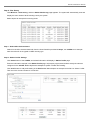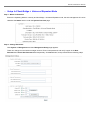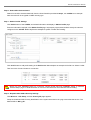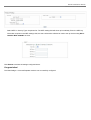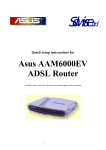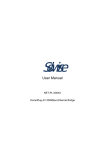
1
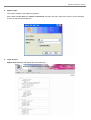
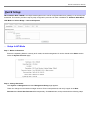
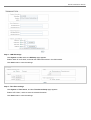
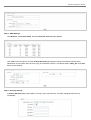
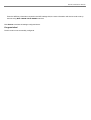
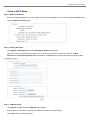
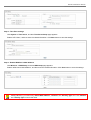
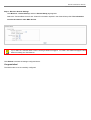
802.11a/n High Power
Wireless Outdoor
Bridge / AP
WLO-15814N / WLO-15802N
Quick Installation Guide
Ver 1.08
Solwise Ltd, www.solwise.co.uk, [email protected]
Quick Installation Guide
WLO-15814N / WLO-15802N
Preface PheeNet IEEE802.11a/n 5GHz 300Mbps MIMO Wireless Outdoor Bridge is a powerful solution. The Wireless Network
Service Provider can use it to build up Wireless Backhaul Point to Point or Point to Multi-point connection, or deploying
last mile services to business or residential broadband subscribers. Network administrators can create multiple subscriber
service tier using per-subscriber rate limiting features, and manage centrally. PheeNet High Power Wireless Outdoor
Bridge/AP utilizes a 200mW output Tx Power connect to the Wireless Mesh Network or WDS infrastructure and provides
the subscriber with an Ethernet connection for a local access.
PheeNet High Power Wireless Outdoor Bridge/AP can be used for different purposes in different modes. In the AP mode,
it can be deployed either as traditional fixed wireless Access Point (AP), or combination of AP and WDS (AP+WDS). In
the WDS mode, it’s only used to expand or bridge Ethernet networks and deployed as a main base, relay based or
remote base station. In the CPE mode, it connects to Wireless Internet Service Provider’s (WISP) outdoor network via
wireless WAN gateway to access to Internet. In the Client Bridge + Universal Repeater mode, it connects to Wireless
Internet Service Provider’s (WISP) outdoor network via wireless or wired bridge to access to Internet
Package Contents z
WLO-15814N / WLO-15802N
x1
z
CD-ROM (with User Manual and QIG)
x1
z PSE with AC Cable
z
Mounting Kit
x1
x1
It is highly recommended to use all the supplies in the package instead of substituting any components by other
suppliers to guarantee best performance.
Quick Installation Guide
WLO-15814N / WLO-15802N
System Overview Front Panel
1.
Reboot Button :
Rear Panel
Unscrew the screw and click Reset button to restart system or reset to
default configurations.
Î
Press and hold the Reset button for 2 seconds and release to restart system. The LED except Power
indicator will be off before restarting.
Î
Press and hold the Reset button for more than 10 seconds to reset the system to default configurations.
2.
Power :
Green LED ON indicates power on, and OFF indicates power off.
3.
WLAN :
Green LED FLASH indicates
4.
Ethernet :
Green LED ON indicates connection, OFF indicates no connection, FLASH
Wireless Transmit.
indicates Packets transmit
5.
PoE Connector :
For connecting to PSE
6.
Dual Ntype connector: to connect to antenna (WLO-15802N only)
Quick Installation Guide
WLO-15814N / WLO-15802N
Hardware Installation Please follow the steps mentioned below to install the hardware of WLO-15802N :
¾
WLO-15802N
Front Panel
Connect N-type antenna to the N-type connector on the rear panel.
Connect PSE to the PoE connector on the front panel.
Connect an Ethernet cable to the PSE and the other end to a computer.
Power on the PSE in order to supply power to WLO-15802N
Rear Panel
Quick Installation Guide
WLO-15814N / WLO-15802N
Getting Started WLO-15814N / WLO-15802N supports web-based configuration. Upon the completion of hardware installation, WLO15814N / WLO-15802N can be configured through a PC/NB by using its web browser such as Internet Explorer version
6.0.
z
Default IP Address : 192.168.2.254
z
Default IP Netmask : 255.255.255.0
z
Default User Name and Password :
The default user name and password for both root manager account and admin manager account are as follows :
Mode
CPE Mode
AP Mode
WDS Mode
Universal Repeater +
Client Bridge Mode
Management Account
Root
Account
Admin
Account
Root
Account
Root
Account
Root
Account
User Name
root
admin
root
root
root
Password
root
admin
root
root
root
Step
1.
IP Segment Set-up for Administrator's PC/NB
Set the IP segment of the administrator's computer to be in the same range as WLO-15814N / WLO-15802N for
accessing the system. Do not duplicate the IP Address used here with IP Address of WLO-15814N / WLO-15802N or
any other device within the network
Example of Segment :
The value for underlined area can be changed as desired; the valid range is 1 ~ 254. However, 254 shall be avoided
as it is already used by WLO-15814N / WLO-15802N; use 10 as an example here.
2.
z
IP Address : 192.168.2.10
z
IP Netmask : 255.255.255.0
Launch Web Browser
Launch as web browser to access the web management interface of system by entering the default IP Address,
http://192.168.2.254, in the URL field, and then press Enter.
Quick Installation Guide
WLO-15814N / WLO-15802N
3.
System Login
The system manager Login Page then appears.
Enter “root” as User name and “default” as Password, and then click OK to login to the system; the root manager
account is used as an example here.
4.
Login Success
System Overview page will appear after successful login.
Quick Installation Guide
WLO-15814N / WLO-15802N
Quick Setup WLO-15814N / WLO-15802N is a multiple mode system which can be configured either as a gateway or an access point
as desired. This section provides a step-by-step configuration procedure for basic installation for AP Mode, WDS Mode,
CPE Mode and Client Bridge + Universal Repeater.
¾
Setup In AP Mode
Step 1 : Mode Confirmation
Ensure the Operating Mode is currently at AP mode; the web management UI can be viewed at the Status section
under the System Overview page.
Step 2 : Change Password
Click System -> Management and then Management Setup page appears.
There can change root and admin manager account. Enter a new password, and verify it again in the New
Password and Check New Password field respectively. Click Save button, and proceed with the following steps.
Quick Installation Guide
WLO-15814N / WLO-15802N
Step 3 : LAN IP Settings
Click System -> LAN, and then LAN Setup page appears.
Enable “Static IP” and “DNS”, and enter the related information in the field marked.
Click Save button to save the settings.
Step 4 : Time Zone settings
Click System -> Time Server, and then Time Server Setup page appears.
Enable “NTP Client”, and then enter the related information.
Click Save button to save the settings.
Quick Installation Guide
WLO-15814N / WLO-15802N
Step 5 : SSID Settings
Click Wireless -> Virtual AP Setup, and then Virtual AP Overview page appears.
Click “Edit” on the Primary AP and then Primary AP Setup page appears. Setup the broadcast SSID for easy
identification of the system when device is trying to associate the service. The default SSID is “Main_AP” Click Save
button to save settings
Step 6 : Security Settings
In Primary AP Setup page, select WEP in “Security Type“ drop-down list. The WEP setting field will show up
immediately.
Quick Installation Guide
WLO-15814N / WLO-15802N
Enter the WEP key information required in the WEP settings field, the same information will also be used to set up
devices using WLO-15814N / WLO-15802N's services.
Click Reboot to activate all settings configured above.
Congratulation!
The AP mode is now successfully configured.
Quick Installation Guide
WLO-15814N / WLO-15802N
¾
Setup In WDS Mode
Step 1 : Mode Confirmation
Ensure the Operating Mode is currently at WDS mode; the web management UI can be viewed at the Status section
under the System Overview page.
Step 2 : Change Password
Click System -> Management and then Management Setup page appears.
There can change root and admin manager account. Enter a new password, and verify it again in the New
Password and Check New Password field respectively. Click Save button, and proceed with the following steps.
Step 3 : LAN IP Settings
Click System -> LAN, and then LAN Setup page appears.
Enable “Static IP” and “DNS”, and enter the related information in the field marked.
Click Save button to save the settings.
Quick Installation Guide
WLO-15814N / WLO-15802N
Step 4 : Time Zone settings
Click System -> Time Server, and then Time Server Setup page appears.
Enable “NTP Client”, and then enter the related information. Click Save button to save the settings.
Step 5 : Enable WDS Peer's MAC Address
Click Wireless -> WDS Setup, and then WDS Setup page appears.
Enable “WDS Peer's MAC Address”, and then enter the related information. Click Save button to save the settings.
Setting WDS link, you need verify “Peer's MAC Address”, “Channel” and “Security Type” first. The “Channel”
and “Security Type” must be the same
Quick Installation Guide
WLO-15814N / WLO-15802N
Step 6 : Wireless General Settings
Click Wireless -> General Setup, and then General Setup page appears.
Select the “Transmit Rate Control” and “Channel” information required in the General Setup field. The information
must be the same as other WDS devices.
Try to select fix “Transmit Rate Control” will be get better throughput. “Tx Power” also effect throughput. More
advanced setting see User Manual
Click Reboot to activate all settings configured above.
Congratulation!
The WDS mode is now successfully configured.
Quick Installation Guide
WLO-15814N / WLO-15802N
¾
Setup In CPE Mode
Step 1 : Mode Confirmation
Ensure the Operating Mode is currently at CPE mode; the web management UI can be viewed at the Status section
under the System Overview page.
Step 2 : Change Password
Click System -> Management and then Management Setup page appears.
There can change root and admin manager account. Enter a new password, and verify it again in the New
Password and Check New Password field respectively. Click Save button, and proceed with the following steps.
Quick Installation Guide
WLO-15814N / WLO-15802N
Step 3 : LAN IP Settings
Click System -> LAN, and then LAN Setup page appears. Enter the “IP Address” and “IP Netmask” of the LAN
Setup.
Step 4 : Time Zone settings
Click System -> Time Server, and then Time Server Setup page appears. Enable “NTP Client”, and then enter the related
information. Click Save button to save the settings.
Step 5 : WAN IP Settings
Click System -> WAN, and then WAN Setup page appears.
Enable “Static IP”, and then enter the related information (Default WAN IP is 192.168.1.254)
Click Save button to save the settings.
Quick Installation Guide
WLO-15814N / WLO-15802N
Step 6 : Site Survey
Click Wireless -> Site Survey, and then Station Site Survey page appears. The system will automatically scan and
display the scan results of all AP existing near by the system.
Below depicts an example for scanning result.
Step 7 : Select AP to be Associated
Search for the AP to be associated with from the Scan Result list provided in Step 3; use 211AP0 as an example
here where the AP is encrypted via WEP security type.
Step 8 : Station Profile Settings
Click Select button of the 211AP0, and related information will display in Station Profile page.
Enter the information required in the Station Profile page. Information to be entered shall be exactly the same as
configured in the 211AP0. Below depicts an example for profile “Profile-Test” setting.
Click “Add” button to add profile setting in the Profile List. Below depicts an example for Profile List. Select “ProfileTest” and click “Connect” button for connection
Quick Installation Guide
WLO-15814N / WLO-15802N
Click Reboot button to activate all settings configured above.
Congratulation!
The CPE mode is now successfully configured.
Quick Installation Guide
WLO-15814N / WLO-15802N
¾
Setup In Client Bridge + Universal Repeater Mode
Step 1 : Mode Confirmation
Ensure the Operating Mode is currently at Client Bridge + Universal Repeater mode; the web management UI can be
viewed at the Status section under the System Overview page.
Step 2 : Change Password
Click System -> Management and then Management Setup page appears.
There can change root and admin manager account. Enter a new password, and verify it again in the New
Password and Check New Password field respectively. Click Save button, and proceed with the following steps.
Quick Installation Guide
WLO-15814N / WLO-15802N
Step 3 : LAN IP Settings
Click System -> LAN, and then LAN Setup page appears. Enter the “IP Address” and “IP Netmask” of the LAN
Setup.
Step 4 : Time Zone settings
Click System -> Time Server, and then Time Server Setup page appears. Enable “NTP Client”, and then enter the
related information. Click Save button to save the settings.
Step 5 : Site Survey
Click Wireless -> Site Survey, and then Station Site Survey page appears. The system will automatically scan and
display the scan results of all AP existing near by the system.
Below depicts an example for scanning result.
Quick Installation Guide
WLO-15814N / WLO-15802N
Step 6 : Select AP to be Associated
Search for the AP to be associated with from the Scan Result list provided in Step 3; use 211AP0 as an example
here where the AP is encrypted via WEP security type.
Step 7 : Station Profile Settings
Click Select button of the 211AP0, and related information will display in Station Profile page.
Enter the information required in the Station Profile page. Information to be entered shall be exactly the same as
configured in the 211AP0. Below depicts an example for profile “Profile-Test” setting.
Click “Add” button to add profile setting in the Profile List. Below depicts an example for Profile List. Select “ProfileTest” and click “Connect” button for connection
Before you click “Connect” button for connection, Please double check the “Channel” setting of “Wireless
General Setup” page on WCB1200H2PX as it must be the same with associated AP channel setting
Step 8 : Repeater AP's SSID & Security Settings
Click Wireless -> AP Setup, and then Primary AP page appears.
Setup the broadcast SSID for easy identification of the system when device is trying to associate the service. The
default SSID is “Main_AP”.
Quick Installation Guide
WLO-15814N / WLO-15802N
Select WEP in “Security Type“ drop-down list. The WEP setting field will show up immediately. Enter the WEP key
information required in the WEP settings field, the same information will also be used to set up devices using WLO15814N / WLO-15802N's services.
Click Reboot to activate all settings configured above.
Congratulation!
The Client Bridge + Universal Repeater mode is now successfully configured.