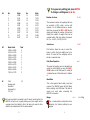
1
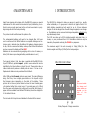
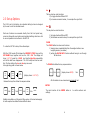
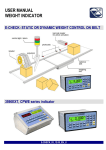
6 CHARGING.
USER MANUAL
ALL WEIGHERS ARE CHARGED USING THE
SOCKET ON THE SIDE OF THE UNIT.
PRINTERS
OLDER PRINTERS WILL HAVE A SOCKET ON
THE BACK NEXT TO THE PRINTER CABLE
Charger socket
Weltech BW-1050
Manual Live Bird
Weigher
NEWER UNITS WILL HAVE A FLYING LEAD
COMING FROM THE CONNECTOR WHICH HAS
AN IN-LINE SOCKET.
Printer
1
0
SIDE or
FRONT
Logo here
Mains charger
20
Version 8-1d
4 MAINTENANCE
Apart from cleaning with a damp cloth, the BW1050 requires no special
maintenance.The unit cannot be immersed in liquid; disinfecting is confined to using a moist wipe towel or the unit can be enclosed in a polybag during use with the hook protruding.
The printer should be office based for optimum life.
The rechargeable batteries will need to be charged after 6-8 hours
use.In common with all NiCad batteries a complete discharge and recharge cycle is advised when the battery life between charges reduces
to say 4 Hrs to overcome the battery memory effect. When the batteries
are low on power the display will flash BAT.
Batteries can be removed during weighing with no loss of memory or
data. (N.B. Have a spare charged battery available when in use! )
Two types of printers that have been supplied with the BW1050 kits.
Up until 1998 only portable impact printers were used which can be
identified by the three buttons on top of the unit. These printers have a
ribbon inside which produces a faded print out when it is low on ink.
Replacement ribbons can be purchased from Weltech.
1 INTRODUCTION
The BW-1050 is designed to allow one person to weigh live poultry
either individually or in groups and is ideal for all types of birds. It is
totally battery operated and will weigh for up to 8 hours between
charges. It can be charged from the wall charger supplied, a car charger
or the batteries can be removed and charged separately without losing
any data already stored.
The 1050 can store up to 2000 individual weights and place them in
houses, or pens, numbered from 1-20. Information stored can only be
cleared by the operator entering the CLEAR key sequence.
The maximum weight the unit can weigh is 10kgs (22lbs) for
chicken weigher and 50kgs (110lbs)for the turkey weigher.
BW-1050 Control Panel
After 1998 portable thermal printers were issued. The main difference
being that they have a single green button on the top with a light
that changes colour depending on the state of the battery. These
printers do not have a printer ribbon but need to have thermal paper
rolls inserted rather than normal ones. If a normal paper roll is fitted
then the paper will advance but nothing will be printed. Both types of
paper rolls are available from Weltech.The battery should be charged for
16 hrs before first use.
Note:
On current models
the charger and
printer sockets are
mounted on the
side
of
the
enclosure
The led codes for this printer are tabulated in the back of the manual.
Printer/Computer Charger connection
18
the
2
KGS / LBS
CALIBRATION KEY SEQUENCE
This key has two main functions.
1) to toggle from pounds and ounces to kilos and grammes.
2) to enter the SET-UP or CALIBRATION in conjunction
with the HOLD key.
The display shows a colon after the right hand two digits
when in lbs mode.
ON
OFF
THEN
KGS
LBS
HOLD
(display shows .C.A.L.)
Release the keys then follow the sequence
HOLD
This key has two main functions.
1) to freeze the display as a weight is applied or as it is removed.
2) to enter the SET-UP or CALIBRATION in conjunction with the
lbs/kg key.
The display shows flashing decimal points when in the freeze
mode.
HOLD
THEN
KGS
LBS
THEN
HOLD
THEN
KGS
LBS
THEN
HOLD
After this key sequence, t *.*** should be displayed. At this point
any auxiliary device to used in the weighing process but not to be recorded as part of the total weight can be fixed to the hook ( ie hanging shackle). Now press the TARE key.
TARE
This button only has one function: to zero the display if a hanging shackle
or other implement is used for weighing. It can be used at any time but
care must be taken to ensure the weight of the shackle is not accepted
into the memory. This can happen if the TARE button is not pressed
quick enough once the unit is turned on.
If it is accepted then end statistics will be affected.
TARE
The display will now show F 0.000 indicating that the shackle etc. has
been tared out. Next place a known weight on the hook (approx. 90%
of the unit capacity ie 9kg/45kg depending on model). Use the INC
and DEC keys to make the display reading equal to the weight being
used and then press ENTER.
ENTER
ENTER
The main function is to confirm actions and settings.
15
The display will now show DONE and then go back to normal
operation. The units memory should now be cleared using the key sequence:
CLEAR ENTER CLEAR
4
EA
No
1
2
3
4
5
6
7
8
9
10
Wgts
0.998
2.001
2.997
2.998
3.991
3.995
3.270
3.997
5.277
5.227
No
11
12
13
14
15
16
17
18
19
20
Wgts
6.284
7.275
7.278
7.279
4.275
3.277
3.273
3.280
0.999
2.003
To by-pass any setting just press ENTER
To change a setting use inc or dec
Number of stores
10=200
The maximum number of weighings that can
be recorded is 2000, which, can be split
between 1 to 20 different stores or houses.
Each time you press the INC or DEC key the
display will change the number of stores and
display the number of weights that can be
recorded within that store before it becomes
full. (I.e. 1=2000, 10=200) 20=100
Select House
HY
St
Band Limits
0.980 to 0.999
2.000 to 2.019
2.980 to 2.999
3.260 to 3.279
3.280 to 3.299
3.980 to 3.999
4.260 to 4.279
5.260 to 5.279
6.280 to 6.299
7.260 to 7.279
Total
2
2
2
3
1
3
1
2
1
3
Total
Average wgt:
Deviation:
Evenness(%):
C.V (%):
20
Did you know that if connected to an 80 column serial printer, the
BW1050 will print out a graph plotting every bird weight and an
evenness trend line. Added to this it will also print areas for farm
details to be entered and all of the options above!
13
SH Off
This function allows the user to select the
house in which the bird weights are to be
stored. If turned off the weighings will be
stored in numerical order.
Fast/Slow Operation
butt 1
The speed of weighing can be changed from
normal to a fast setting by using the FAST/
SLOW button on the front panel. A setting of
1 enables the use of this button and 0 disables
it.
Baud Rate
bAud 96
This is the speed at which data is sent and
received. The BW1050 works at 9600 Baud,
factory setting, and 1200 Baud. The latter is
usualy only used when connecting the
BW1050 to a modem.
Range
rnG 4
This is a scaling factor and should not be
altered as it is a factory setting for your
weigher.
6
rnG2 (50Kg)
SET BANDS
Set Filter
This button is multifunctional and is mainly used when grading lights
have been fitted.Each function is described below.
To move to the next item, press ENTER.
GL
OFF/ON/SEP
This is a shortcut to enabling and disabling the grading lights function.
There are several types of grading machines and some need an external
power source to drive the lights fitted. To select the options use the inc
and dec keys.
r
0.000
Once the lights have been set to ON or SEP you will need to have a
reject limit. This is the limit below which the red light fitted will
illuminate. To adjust this setting use the inc and dec keys.
G
0.000 (GL ON ONLY)
Now that you have a reject limit you will need a banding value. This
value is used to determine the group into which the weights will go. For
example, if you have a reject limit of 1.000kg and a group of
0.100kg, then the bands would show as below.
REJECT LIMIT
0 TO 0.999KG
GROUP ONE
1.001KG TO 1.099KG
GROUP TWO
1.101KG TO 1.199KG and so on..
To adjust this setting use the inc and dec keys.
SEPARATE
When GL is set to SEP, four individual limits will need to be entered.
Each band is shown by the number on the left of the display and the
band limit set by using the inc and dec keys. When the
hystogram is printed all four groups and the reject limit will be shown
with the total number of birds that have been accepted into each band
next to them.
t
0.000
Along with the evenness of the average weight the BW1050 can work
out the evenness of the birds weighed against a target weight. This is
represented here by the t figure.To adjust this setting use the inc and
dec keys. Note if a target is not set, then nothing will be printed.
11
FIL 2
This setting filters out all movement on the 1050 to
create a stable reading. The higher the value the
greater the filter and the more accurate the unit
becomes. However this does slow down the
acceptance speed.
Set filter jump out
J 0.045
This should not be altered as it is a setting for
your weigher.
Set Acceptance freeze
AF ON
This should not be altered as it is a setting for
your weigher.
Set Printer type
Prnt 1
The 1050 can be set to print on a number of different
printers. Your 1050 is set to print on the portable
printer as supplied.( More detail in printing from the
BW1050 can be found later in the manual.)
Set evenness (uniformity)
E 10
This is the limit used to calculate the evenness
percentage (uniformity) of the birds. This setting can
be set from 5-25%. However, 10 is a standard used
throughout most countries except USA which uses 15.
50Kg
High Limit
H10.100
The loadcell fitted will either be 10kg or 50kg max
load.The maximum load weight should include any
shackles or other implements used during weighing.
Low Limit
50Kg
L 0.050
This is the minimum weight the 1050 will accept in
kgs. When the Auto zero is switched on, any value that
is lower than the limit set will automatically be tared
out. ( See Automatic Zero )
8
H50.10
L0.10
CONTENTS
1.
INTRODUCTION
2.
GETTING STARTED
2.1
2.2
2.3
Safety Considerations
Calibrating your BW-1050
Set-up Options
3.
OPERATING INSTRUCTIONS
3.1
3.2
Using the keypad
Normal Operating Procedure
4.
MAINTENANCE
5.
TECHNICAL INFORMATION
6
CHARGING
5 TECHNICAL INFORMATION
POWER SUPPLY :
POWER CONSUMPTION :
WEIGHT :
DIMENSIONS :
(INC HOOK AND HANDLE)
DATA OUPUT/INPUT VIA :
PP3 9V BATTERY (RECHARGEABLE)
20mA (STANDARD BW1050)
1400 GRAMMES (approx’)
178mmx313mm
9-WAY D CONNECTOR FEMALE
The BW1050 will work with a number of peripheral devices. These
include a bar-code reader, any p.c. with a serial port, serial printers
and modems.
When used in bAud 12 the BW1050 will send the auto answer
command to a modem if connected direct. It will then be able to send
data via the modem when the correct ASCII commands are used.
The BW1050 does not implement any handshaking. When used with
any comm’s programs. The port settings should be set as follows:
EMULATION :
TERMINAL :
CHARACTERS TYPED LOCALLY :
BITS PER SECOND :
DATA BITS :
PARITY :
STOP BITS :
FLOW CONTROL :
AUTO DETECT
ANSI
ECHO
9600 (OR 1200)
8
NONE
1
NONE
Some examples of the ASCII codes that can be sent are as follows:
7
PRINTER LED CODES
ALL?
WGT?
STAT?
Sends number of weights in each store and all
weights
Sends a list of body weights
Sends a list of body weight statistics
All commands must be in upper case.
1
19
2. GETTING STARTED
2.1 Safety Considerations
3.2 Normal Operating Procedure
The BW-1050 is a rugged unit designed for outdoor use but should be
handled with care. The unit should be cleaned with a damp cloth but
under no circumstances be immersed in water.
When the BW-1050 has been set to suit the users individual
requirement it is ready to start weighing.
The BW-1050 is fitted with rechargeable batteries that can be
replaced with standard batteries. Under no circumstances should the
1050 be connected to the charger while non rechargeable batteries
are installed as damage will result to the 1050 charging circuit.
2.2 Calibrating the BW-1050
The 1050 is calibrated by Weltech before it leaves the
factory, but should it need recalibrating at any time
the procedure is as follows:
The 1050 should be hanging from a secure support and turned off with
nothing hanging from the hook.
Turn the 1050 on while holding down the Kgs/Lbs and HOLD keys
together. The display will show .C.A.L.
Release the Kgs/Lbs and HOLD keys. Now by pushing the HOLD key the
first dot on the display will go out. By pressing the Kgs/Lbs key the
second dot will go out. Follow the same sequence until the display shows
t.****.
By pressing the TARE button the display will go to F.0000. Put a known
weight onto the hook which should be 90% of the maximum weighing
capacity of the 1050.(9kg/45kg)
Next, by pressing the inc or dec keys on the key pad the reading can be
adjusted to display the weight on the hook. When the two match press
ENTER.
3
Hang the 1050 up and turn ON. As data may already be stored in the
memory it will need clearing. Press CLEAR then ENTER. The display
will read SURE then press CLEAR again and the display will read DONE.
When weighing, the 1050 must be securely supported. If a holder or
length of string is being used to hold the bird it can now be placed on
the hook.Turn the 1050 ON and the display will show the weight on the
hook. This can be tared out by pressing the TARE button. Sometimes if
the weight is above the low limit setting the 1050 will accept it. This can
be cleared by following the clear procedure as described above. If the
same holder is always used it can be permanently tared by following the
calibration procedure as described in Section 2.2.
With the 1050 reading 0.000 and the memory clear, birds can be
weighed. When a bird is placed in the holder the display will show it's
weight. When the 1050 is happy that the weight is stable it will bleep
and A will be appear to say the weight has been accepted. This may
take a second or two depending on the amount of movement of the
bird. When accepted the bird can be removed and the next weighed and
so on.
When weighing is complete the data can then be stored by pressing
MEMORY STORE. The display will show Str 1, press ENTER. The
display will now show SURE, press MEMORY STORE again to confirm.
All the data will be stored in the first store section. You can now move
to the next house or pen and follow the same procedure.The 1050 must
be turned off when moved to avoid spurious readings.
If SELECT HOUSE has been set to ON in the set up (see sections 2.3
and 3.1) the data can be stored in the house or pen selected. When
16
inc
2.3 Set up Options
This key has two main functions.
1) to toggle functions ON and OFF
2) to increase numerical values; for example the reject limit.
The 1050 is set in the factory to a standard setting but can be changed
by the user to suit his individual needs.
dec
This key has two main functions.
Most user functions are accessed directly from the front panel keys;
some less frequently used options and protected settings which are vital
to correct operation can be found in the SET UP.
1) to toggle functions ON and OFF
2) to decrease numerical values; for example the reject limit.
CLEAR
To enter the SET UP routine, follow these steps:
With the 1050 turned off hold down the MEMORY STORE key and the
SET BAND keys together and turn the 1050 ON. The display will
show .S.E.T.U P press the HOLD key then the Kgs/Lbs sequentially
until all the dots have disappeared . The 1050 setup can then be modified. To alter settings the inc and dec keys are used.
A step by step guide is shown below.
ON
OFF
SET
BANDS
MEMORY
STORE
The CLEAR button has two main functions.
1) clearing down unwanted data from the weigher before a new
weighing session (see below)
2) exiting the SHOW DATA function without having to run through
all the stores.
To CLEAR data follow the key sequence below.
CLEAR THEN
ENTER
(display shows SURE)
THEN
CLEAR
(display shows .S.E.T.U P)
All information is now cleared and permanently lost
Release the keys then follow the sequence below
ENTER
HOLD
THEN
KGS
LBS
HOLD
THEN
THEN
KGS
LBS
THEN
HOLD
The main function of the ENTER button is
settings.
Weltech manufacture a 10kg and a 50kg version. All values below apply
to both except where stated and are default values.
5
14
to confirm actions and
Decimal Point
dCPt2
dCPt3 (50Kg)
This should not be altered as it is a factory
setting for your weigher.
Set Weight Display
IU 0
This setting determines whether the1050 starts
up in kgs or lbs.
IU 0= kgs, IU 1=lbs
Set lbs display
FAST/ SLOW
SU 1
This setting only applies when the 1050 is set
to operate in lbs.
SU 1=ounces, SU 0=10ths of a lb (USA)
Grading Lights Option
GL Off
When grading lights are fitted, this option needs
to be switched On or SEP in order for the lights
to illuminate in the correct order.
(Note that when On or SEP are selected, the
hystogram print-out changes.)
Last digit display
This is the increments in which the 1050 will
operate Ld 1=Single grams, Ld 5= Five grams.
StL 04
7
When pressed twice the display will show; Hy ON or OFF.
When Hy is selected ON the bird weights are put into a numerical
histogram of 20 gram bands.
Each one can be turned ON or OFF independently by pressing the inc
key. The following are examples of printouts from the weighing of 20
birds.
StC 3
This setting defines the number of counts
the 1050 makes within the limit setting
before accepting the weight. This is a
factory setting and should not be altered.
The user can select the type of information to be printed by the
PRINT DATA key.
When pressed once the display will show; EA ON or OFF.
When EA is turned ON the weight of each bird will be printed as it was
weighed.
When pressed a third time the display will show; St On or OFF
When St is selected ON all the statistics are printed
This is a setting which calculates when the
1050 will accept the weight. The lower the
setting the faster the acceptance but the
lower the accuracy. This is a factory setting
and should not be altered.
Stability Count
When the unit is being used for grading purposes it maybe necessary
to work at speed and this is possible by reducing the accuracy from
+/- 2grms to +/- 5grms which significantly reduces the time to reach
a stable reading.
Each time the button is pressed the status of the weigher will be
displayed before returning to the normal display which willshow an extra decimal point to the left I f the unit is in fast mode.
PRINT EACH
Ld 1
Stability Limit
n
00000000
It is possible to set an eight digit farm identification number into the
unit which will head the print-outs. To adjust each of the digits use
the inc and dec keys and then press ENTER to move to the next
digit. Note if an id number is not set, then nothing will be printed.
As of version 7-5 a new function was added called LOG Pr This
was created so data could be downloaded and saved onto a
DATAPOD or into the DATAPOD FILE MANAGER software.
12
Hide Display
hd OFF
When the 1050 is in use and HD is set to OFF,
the display will read 0.000. When set to ON it
will display READY.
3 OPERATING INSTRUCTIONS
3.1 USING THE KEYPAD
MEMORY STORE
Automatic Zero
AU ON
When set to ON any weight on the 1050 which is
below the low limit setting will automatically zero
the display.
Set Power down
Pd 15
This option enables the user to set a time for the
1050 to automatically turn itself off to save
power when not in use . It is set to 15 minutes.
NOTE NO INFORMATION IS LOST WHEN THE
1050 IS TURNED OFF
Divisions
div 1
The BW1050 has the ability to work out an
average weight for a given multiple in a single
weighing. I.e. if the DIV was set to 10, 10 chicks
could be placed into a bucket and weighed at the
same time. The BW1050 would then work out
the average weight and store this as 10 birds at
that weight. However, because of the nature of
this type of weighing, some of the statistics will
not be printed as they would be false. (The
maximum number for the setting is 10.)
This key is used to store weights in individual pens or houses. It can be
used in two ways depending on how the SH is set in the main SET-UP.
With SH off, the houses run in numerical order and advance each time.
The key sequence for this is: MEMORY STORE, ENTER, MEMORY
STORE.
With SH on, the user chooses which store number to put the weights into.
The key sequence for this is: MEMORY STORE then the inc and dec
keys to move to the desired store number and then press MEMORY
STORE again. From this point all weights accepted will be placed into
that store.
SHOW DATA
This key is used to display the statistics of the data in each memory
store. Once pressed the display will show the data for the current store
being used. It will then go back to store number one and start to toggle
through the statistics automatically. If GL=ON then the display shows
each band , indicated by a single bar in the first digit, followed by the
number of readings (birds) in that band and returns to the current store
display.
This can be speeded up by using the ENTER key.
It is also possible to jump from store to store if required. To do this
wait for the display to show a store number and then press either the inc
or dec keys. The display will then skip through the stores. Once the
desired store number is displayed press ENTER.
A shortcut to exit the function without waiting for the unit to run
through all the stores is to simply press CLEAR when a store number
is shown.
PRINT DATA
This key sends the data from the machine. The type of data sent is
determined by the PRINT EACH key.
9
10
7 PRINTER LED INDICATOR CODES
MEMORY STORE is pressed the display will show Str 1. To change this
press the inc or dec buttons until the house you want is displayed then
press ENTER.
To view the weighings at any time press SHOW DATA. Information will
scroll across the display automaticaly or can be advanced using the
ENTER key.
When the weighing is complete turn the 1050 OFF. It can now be
connected to a printer or computer and turned on to download the stored
data.
17
PATTERN
BATTERY
PAPER
GREEN
CHARGING
OK
GREEN/
ORANGE/
GREEN/
ORANGE
CHARGING
LOW
ORANGE
CHARGING
LOW
GREEN/
OFF/
GREEN/
OFF
RUNNING
OK
GREEN/
OFF/
ORANGE/
OFF
RUNNING
LOW
ORANGE/
OFF/
ORANGE/
OFF
RUNNING
LOW
RED/OFF/
RED/OFF
LOW
OK
RED/OFF/
ORANGE/
OFF
LOW
LOW
NO LIGHT
FLAT,OR IN SLEEP
MODE
21