1
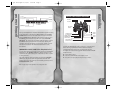
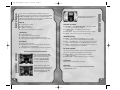
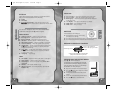
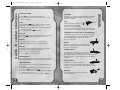
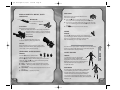
Electronic Template: Manual Cover, Version 4.0
(DOC-000563 Rev 0)
File name: TP_PS2ManualCover.eps
For illustration purpose only. Use electronic template for specifications.
Do not alter, change or move items in template unless specifically noted to do so.
NOTE: Turn off “Notes” and “Measurements” layers when printing.
1/8" BLEED ZONE
Rev 9/03
1/16" SAFETY ZONE
7.1875"
™
Return to
the tombs in
Lara Croft’s
most amazing
adventure yet!
In Stores
Now!
This title is available for the
PlayStation®2 computer
entertainment system and
PSP™ (PlayStation®Portable) system.
Lara Croft Tomb Raider: Legend © 2006 Core Design Ltd. Developed by Crystal
Dynamics, Inc. Published by Eidos, Inc. 2006. Lara Croft Tomb Raider: Legend, Lara
Croft, Tomb Raider, the Tomb Raider logo, Eidos and the Eidos logo, Crystal Dynamics
and the Crystal Dynamics logo are all trademarks of SCi Entertainment Group. "PSP"
is a trademark and "PlayStation" and the "PS" Family logo are registered trademarks
of Sony Computer Entertainment Inc. Memory Stick Duo(TM) may be required (sold
separately). The ratings icon is a registered trademark of the Entertainment Software
Association. All other trademarks are the property of their respective owners. All
rights reserved. The rating icon is a registered trademark of the Entertainment
Software Association.
PROGUSUS03
4.5"
4.5"
9.0"
rt ps2 final.qxd
4/13/06
5:08 PM
Page ii
PLAYSTATION®2
A very small percentage of individuals may experience epileptic seizures
when exposed to certain light patterns or flashing lights. Exposure to
certain patterns or backgrounds on a television screen or while playing
video games, including games played on the PlayStation 2 console, may
induce an epileptic seizure in these individuals. Certain conditions may
induce previously undetected epileptic symptoms even in persons who
have no history of prior seizures or epilepsy. If you, or anyone in your
family, has an epileptic condition, consult your physician prior to
playing. If you experience any of the following symptoms while playing
a video game — dizziness, altered vision, eye or muscle twitches, loss
of awareness, disorientation, any involuntary movement, or convulsions
— IMMEDIATELY discontinue use and consult your physician before
resuming play.
WARNING TO OWNERS OF PROJECTION TELEVISIONS:
Do not connect your PlayStation 2 console to a projection TV without
first consulting the user manual for your projection TV, unless it is of
the LCD type. Otherwise, it may permanently damage your TV screen.
USE OF UNAUTHORIZED PRODUCT:
The use of software or peripherals not authorized by Sony Computer
Entertainment America may damage your console and/or invalidate
your warranty. Only official or licensed peripherals should be used in
the controller ports or memory card slots.
HANDLING YOUR
PLAYSTATION 2 FORMAT DISC:
GETTING STARTED . . . . . . . . . . . . . . . . . . . . . . . . . . 2
CONTROLLER . . . . . . . . . . . . . . . . . . . . . . . . . . . . . . 3
DEFAULT CONTROLS . . . . . . . . . . . . . . . . . . . . . . . . 4
LEGEND OF THE ROGUE TROOPER . . . . . . . . . . . . 5
BIO-CHIPS . . . . . . . . . . . . . . . . . . . . . . . . . . . . . . . . . 6
PROFILE SETUP . . . . . . . . . . . . . . . . . . . . . . . . . . . . 6
MAIN MENU . . . . . . . . . . . . . . . . . . . . . . . . . . . . . . . 7
OPTIONS . . . . . . . . . . . . . . . . . . . . . . . . . . . . . . . . . . 8
HUD . . . . . . . . . . . . . . . . . . . . . . . . . . . . . . . . . . . . . . 9
STEALTH & COMBAT STRATEGIES . . . . . . . . . . . . 12
WEAPONS . . . . . . . . . . . . . . . . . . . . . . . . . . . . . . . . 13
THE NORTS . . . . . . . . . . . . . . . . . . . . . . . . . . . . . . . 15
SAVING . . . . . . . . . . . . . . . . . . . . . . . . . . . . . . . . . . 16
ONLINE PLAY . . . . . . . . . . . . . . . . . . . . . . . . . . . . . . 17
MULTIPLAYER MODE . . . . . . . . . . . . . . . . . . . . . . . 18
LAN . . . . . . . . . . . . . . . . . . . . . . . . . . . . . . . . . . . . . 19
CREDITS . . . . . . . . . . . . . . . . . . . . . . . . . . . . . . . . . . 20
TROUBLESHOOTING . . . . . . . . . . . . . . . . . . . . . . . 24
contents
WARNING: READ BEFORE USING YOUR
COMPUTER ENTERTAINMENT SYSTEM.
• This disc is intended for use only with PlayStation 2 consoles
with the NTSC U/C designation.
• Do not bend it, crush it or submerge it in liquids.
• Do not leave it in direct sunlight or near a radiator or other source
of heat.
• Be sure to take an occasional rest break
during extended play.
• Keep this disc clean. Always hold the disc by the edges and keep it
in its protective case when not in use. Clean the disc with a lint-free,
soft, dry cloth, wiping in straight lines from center to outer edge.
Never use solvents or abrasive cleaners.
1
4/13/06
5:08 PM
Page 2
®
DUALSHOCK 2 ANALOG CONTROLLER CONFIGURATIONS
open button
disc cover
memory card slot 2
memory card slot 1
on/standby/
reset button
R2 button
L1 button
R1 button
IR receiver
USB connectors
controller port 1
controller port 2
Set up your PlayStation®2 computer entertainment system according
to the instructions in its Instruction Manual. Make sure the MAIN
POWER switch (located on the back of the console) is turned ON.
Press the RESET button. When the power indicator lights up, press
the OPEN button and the disc tray will open. Place the ROGUE
TROOPER™ disc on the disc tray with the label side facing up. Press
the OPEN button again and the disc tray will close. Attach game
controllers and other peripherals, as appropriate. Follow on-screen
instructions and refer to this manual for information on using
the software.
MEMORY CARD (8MB)(for PlayStation®2)
To save game settings and progress, insert a memory card (8MB)(for
PlayStation®2) into MEMORY CARD slot 1 before powering on the
system. At least 170KB of free space on the memory card is required
to save game data.
This game supports saving and loading of game data in MEMORY
CARD slot 1 only. You can load saved game data from the same
memory card or from any memory card containing previously saved
ROGUE TROOPER™ games.
E
2
L2 button
directional
buttons
controller
getting started
rt ps2 final.qxd
button
left analog stick
(L3 button when pushed down)
SELECT button
ANALOG mode button
START button
right analog stick
(R3 button when pushed down)
button
button
button
Connect the DUALSHOCK®2 analog controller to controller port 1
before starting play. When the vibration function is On, the
controller will vibrate in response to game events. You can
reconfigure the controls and toggle the vibration function On/Off
in Options mode.
Options Mode, page 8.
All controls in this manual are the default controls.
E This game can only be played using an analog controller.
E
E
See page 16 for more information on saving game data.
3
4/13/06
5:08 PM
Page 4
CHARACTER MOVEMENT
Run/Walk
left analog stick
Look
right analog stick
Crouch
. button (default; see page 8)
Action
x button
Dive/Climb/Vault
l button
Cover Mode
, button (default; see page 8)
COMBAT
Fire
r button
Toggle Primary/Secondary Fire
d button (Multiplayer only)
Sniper Scope
f button
Throw Grenade
s button
Micro-mine
Drop:
c button
Project: Hold c button
Detonate: Press c button again
and release
INVENTORY
Map/Salvage/Upgrade screen
q button
Select Underslung
1/2 directional buttons
Select Grenade
4 directional button
Medi-pak
3 directional button
Bio-chip menu
t button
MENU CONTROLS
4
Cycle through options
1/2 directional buttons
Change option setting
4/3 directional buttons
Confirm/Next menu
x button
Cancel/Previous menu
t button
Pause/In-game options
w button
Nu Earth is a hellish, nightmare planet ravaged by war.
The planet’s atmosphere is deadly to inhale, devoid of life,
and poisoned by repeated chemical attacks.
But the planet is close to a vital wormhole in space, a fact
that has dragged its two rival factions — the Norts and
the Southers — into a never-ending war. Now Nu Earth is
a toxic, hell-blasted rock where millions of soldiers
in bio-suits wage bloody battles and die by the millions.
Nu Earth is too important to lose. Not an inch of ground
can be lost!
Here is where the legend of ROGUE TROOPER was born.
Created by Souther forces, ROGUE TROOPER is the sole
surviving example of the Genetic Infantrymen: a regiment
of soldiers grown in vats and bio-engineered to be the
perfect killing machines.
Complete with protective blue skin and the ability
to breathe the venomous atmosphere, the Genetic
Infantrymen (GI) became renowned figures on both sides
of the conflict.
Moreover, the mind and soul of the GI could be
downloaded onto a silicone chip in case of a mortal wound
on the battlefield. Once downloaded, the bio-chip could
then be slotted into special equipment and preserved
until the soldier could grace a newly grown body.
Betrayed by a general in their own high command, almost
the entire regiment of GIs were wiped out in the Quartz
Zone Massacre. The sole survivor managed to save just
three bio-chips from his former comrades and slot them
into his gun, helmet and back pack.
legend of the rogue trooper
default controls
rt ps2 final.qxd
Now he is a loner with just the disembodied personalities
of his comrades for company...
...roaming the chemical wasteland in search of revenge...
...the ROGUE TROOPER!
5
4/13/06
5:08 PM
Page 6
Rogue Trooper is assisted by three computer bio-chips, each
containing the unique personality of one of his dead friends: Helm,
Gunnar, and Bagman. Each bio-chip personality offers Rogue
tactical guidance and physical options, creating a dominating team
with the ability to fight its way across Nu Earth.
HELM
Use the controls to navigate around
the Main Menu and its options.
E
SINGLE PLAYER
E
E
Stored in Rogue’s helmet.
Offers tactical advice.
E Updates on-screen radar.
E Can be used to create distractions for the Norts.
GUNNAR
Stored in Rogue’s gun.
Offers assistance with shooting accuracy.
E Underslung unit can be fitted with different ammo types.
E Can be deployed in the field as an Automated Sentry Gun (ASG).
E
E
BAGMAN
Stored in Rogue’s backpack.
Manufactures any type of ammo and health paks collected from
salvage points around the battlefields.
E Turns blueprints into upgrades for the entire range of equipment.
E
E
New Game — Begin ROGUE TROOPER™. This option is default
if no previously saved game is available.
E Continue Game — Proceed from your last save point
on your profile.
E Select Level — Allows you to replay any level already completed.
E Cheats — Unlocked as you progress through the game.
main menu
bio-chips
rt ps2 final.qxd
MULTIPLAYER
Offline — Select Offline to play Multiplayer mode on a single
console. From 1 to 2 players can play Multiplayer mode offline.
E LAN — Select LAN if players’ consoles are connected to a Local Area
Network. From 2 to 4 players can play Multiplayer mode via a LAN.
E Online — Play other players on the Internet. From 2 to 4 players can
participate. (See page 17 for more information.)
E
PLAYER SETUP
profile setup
Choose the character you want to play as, and the Underslung you
want to use. (See page 18 for descriptions of character types.)
6
After starting ROGUE TROOPER,
you’ll proceed to the Profile screen.
If this is your first time playing
the game, create a new profile
by selecting Create New Profile
(using the controls on page 4).
Select a profile slot, then enter a
profile name via the virtual keyboard
(using the controls to select letters).
When you’re finished, select End
to return to the Main Menu.
Player 1 Skin — Use the controls to adjust the attributes
of Player 1’s character.
E Player 2 Skin — Adjust the attributes of Player 2’s character.
E
OPTIONS
Adjust a range of game settings. (See page 8.)
PROFILE
Edit your Profile info using the Change Profile, Rename Profile
and Delete Profile options.
7
rt ps2 final.qxd
4/13/06
5:08 PM
Page 8
EXTRAS
SCREEN SETUP
Collect the required amount of salvage to unlock new content
that you can view in the Extras menu, including:
E
E
E
E
Credits
Cinematics
Nu Earth Encyclopaedia – Select an option, then use the
l/r buttons to switch screens to browse info about Nu Earth.
E
E
on the game screen.
E
E
E
16:9 Display — Turn off to set the game for 4:3 display.
Enable Hints — Turn in-game hints on/off.
Enable Gore — Turn gore on/off.
You can access the Options menu from either the Main Menu
or the Pause menu (press the w button in-game).
RETICLE
ADJUST CONTROLS
Use the reticle to aim a weapon.
E
E
E
E
E
E
E
Configure Controls — Select a control configuration.
Invert Up/Down — Select the look up/down controls.
Invert Left/Right — Select the look left/right controls.
Vibration — Turn the controller’s vibration function on/off.
Horizontal Sensitivity — Adjust the left/right look sensitivity.
Vertical Sensitivity — Adjust the up/down look sensitivity.
Crouch Mode — Set the Crouch control either to holding down
the . button to remain crouched, or to pressing the button
to toggle crouch/stand up.
E Cover Mode — Set the Cover control either to holding down
the , button to remain in cover, or to pressing the button
to toggle cover/no cover.
E Lookspring — Toggle on/off.
The reticle turns red when over a hostile;
green when over a friendly.
E The shape of the reticle changes according to the weapon selected.
E The reticle visually indicates a headshot and an air tank shot.
E
HUD
options
Screen X Offset — Adjust the horizontal position of the screen.
Screen Y Offset — Adjust the vertical position of the screen.
HUD Opacity — Adjust the brightness of the HUD info displayed
PRIMARY WEAPONS DISPLAY
Grenade type/count
Ammo in the Underslung
Ammo in the clip of your active
weapon
Current actual health and potential health
if Rogue were allowed to regenerate
SOUND
E
E
E
SFX Volume — Adjust the volume of the game’s sound effects.
Music Volume — Select the game’s music volume.
Sound Output — Choose your speaker setup: Stereo, Mono
or Surround.
E Subtitles — Turn in-game subtitles on/off.
E Chip Speech Level — Choose the frequency of bio-chip talk:
Essential or All.
SECONDARY WEAPONS MENU
Press 1/2 directional buttons
to display the Secondary Weapons Select tab
above the Primary Weapons Display. Continue
using the directional buttons to cycle through
the available secondary weapons.
Help text to the left ID’s the selected weapon.
Press the x button when a weapon is selected
to activate it instantly.
E A newly selected item becomes the focused
weapon.
E You can also select the Pistol from this menu.
E Press the t button to cancel the menu.
E
E
8
9
rt ps2 final.qxd
4/13/06
5:08 PM
Page 10
GRENADE MENU
DIGIPAD MENU
Functions similar to the Secondary
Weapons Menu. Press the 4/3
directional buttons to display
the Grenade tab next to
the Primary Weapons Display.
Press the q button to activate the Digipad menu. Use
the l/r buttons to cycle through the Digimap,
Salvage/Manufacture and Upgrade screens.
Help text centered above the tab ID’s the selected grenade.
E Press the x button when a grenade is selected to activate
it instantly.
E Press the t button to cancel the menu.
Displays Rogue’s objectives next to a map of the level.
E
RADAR/COMPASS
The radar shows all units in the radar radius. More
accurate information becomes available
as you progress through the Single Player
Campaign. Enemies above Rogue Trooper appear
as triangles. The radar also indicates when
an enemy is alert and what direction the enemy is
looking in.
BIO-CHIPS
Bio-chips offer invaluable advice. When one
of the bio-chips talks to Rogue, that personality’s
portrait appears in the bottom right of the HUD.
INFORMATION
Important info appears in the center of the screen.
After absorbing the info, press the x button to continue play.
E Hints appear at the top left of the screen.
E When an objective is completed or a checkpoint reached,
a notification appears above the radar.
E
10
DIGIMAP
SALVAGE/MANUFACTURE
Collect salvage from defeated Norts. Bagman can transform it
into ammo and items on the Manufacture screen.
Use the 1/2 directional buttons to highlight an item and press
the x button to manufacture it.
E Press the c button to manufacture the maximum amount allowed
of the item.
E If an item is classified, it is not yet available for manufacture.
E
UPGRADE
Throughout the game, opportunities will arise to upgrade items in
the inventory. Check the Summary screen for information on new
upgrade availability. You must collect the right amount of salvage
to upgrade an item.
E
Use the 1/2 directional buttons to highlight an item and press
the x button to upgrade it.
BIO-CHIPS PETAL MENU
Press the t button to activate the Bio-chips
petal menu. The game pauses while you’re
using the menu.
Each item on the menu is both labeled
and shown as an icon.
E Using the directional buttons to select items
activates them immediately. You can also press
the x button to activate the item immediately.
E When you use the left analog stick to select items,
you must keep the item highlighted briefly to activate it.
E Press the t button to cancel the menu.
E
11
4/13/06
5:08 PM
Page 12
CROUCH/STEALTH MODE
GI RIFLE
Press the . button to enter Crouch/Stealth mode.
Specialized troops require specialized equipment, and Genetic
Infantrymen are equipped with the most versatile weapon on
Nu Earth — the GI rifle.
E
In this mode, Rogue makes less noise and his chance of being
detected is lessened.
COVER
SCOPE
Press and hold the , button to take cover behind an object.
(Most objects on Nu Earth can be used for cover.)
Turning the GI rifle into a precision
sniper rifle is as simple as putting
the scope to your eye. Automatic
sensors detect and load the high-caliber armor-piercing rounds.
To ensure the shot is held steady, a gyro-stabilizer is available.
While taking cover, use the left analog stick to move Rogue along
the edge of the object.
E To leave cover, press the , button again.
E
PEEK & FIRE
When taking cover, Rogue can peek-and-fire around or over edges.
E Press the r button to jump out, fire and return to cover.
BLIND FIRE
From a cover position, Rogue can fire blindly by pressing
the x button, forcing the enemy into a defensive position.
SILENT KILL
If an enemy is unaware of Rogue’s presence, you can approach
your potential victim from behind for a silent kill.
Use Crouch to sneak up behind an enemy
E Press the x button to execute the kill.
E
SILENCED WEAPONS
Using Gunnar’s silencer, Rogue can shoot and take out the enemy
quietly and efficiently without alerting other Norts to the gunfire.
GUNNAR DEPLOYMENT
Rogue can place Gunnar on the ground to apply suppressing fire
to the enemy.
Select Sentry Gun from the Bio-chips menu, choose the location,
and press the x button to place Gunnar.
E To activate Gunnar, either press the d button or select Activate
Gunnar from the Bio-chips menu.
E To collect Gunnar, return to his location and press the x button.
E
12
weapons
stealth & combat strategies
rt ps2 final.qxd
UNIVERSAL ADAPTOR ATTACHMENTS
Under the main barrel of the GI rifle lies the Universal Adaptor,
the key to its supremacy in battle. The UA allows a multitude
of secondary weapons to be attached and activated
at the press of a button.
SHOTGUN
Designed for close encounters with multiple enemies,
the shotgun attachment sprays high-velocity pellets
out in a cone-shaped array.
FRAGMENT MORTAR
A medium-range cluster weapon. The mortar fires
out in a spreading array towards its target, bursting
into fragments at the top of its flight arc. Each fragment then rains
down and detonates on impact, creating a widespread blanket
of damage.
SAMMY LAUNCHER
A medium-to-long range missile weapon,
the Sammy works by first acquiring a lock on the target’s heat
signature, then using that to home in. Once locked-on, a Sammy
cannot be shaken.
BEAM RIFLE
A close-range electrical weapon, daisy-chaining
to any nearby target.
13
rt ps2 final.qxd
4/13/06
5:08 PM
Page 14
EMPLACEMENT & HEAVY DUTY
WEAPONS
MACHINE GUN
Good rate of fire but prone
to overheating.
FLAK CANNON
Designed for taking down aerial
threats, the flak cannon fires a fast-moving projectile that
detonates either on impact or at a preset altitude,
creating a cloud of debris that damages anything
flying nearby.
HELL CANNON
Large fireball plasma bolt used
for distant attacks against large battalions.
MICRO-MINES
Micro-mines can be detonated when the micromine icon is displayed.
Press the c button to drop a micro-mine. You can
also project a mine forward by holding down the c button.
E The mine has a proximity trigger that detonates when an enemy
gets close. Alternately, press and hold the c button to detonate
the mine.
E Use l button to fire mines into the distance.
E
ITEMS
MEDI-PAK
Press the 3 directional button to use a medi-pak to
regenerate Rogue’s health. A health boost from Bagman
restores 50% of Rogue’s health: 20% immediately
with an additional 30% (up to full) over time.
LAZOOKA
GRENADES & EXPLOSIVES
GRENADES
Press the s button to quickly throw a
grenade. For a more accurate throw, press and
hold the s button and use the left analog stick to move the
aiming arc. Press the s button again to throw the grenade,
or press the t button to cancel.
E
E
FRAG — Standard issue explosive fragmentation grenade.
STICKY — Magnetic grenade attaches to any moving object
before exploding.
SCRAMBLER — Disrupts electrical equipment such as sensors
and radios.
E INCENDIARY — Plasma fire grenade.
E
14
From the vicious rogue nations of Nordland comes the Nort Army,
made up of small, highly skilled teams, each with a sergeant
and a small number of deadly infantry.
NORT TROOPS
SERGEANT
Co-ordinating each team, the Sergeant
hangs back in a battle, initiating full
engagement only if his team is compromised.
With better armor and a more powerful weapon
than the Infantryman, the Sergeant poses
a significant threat.
the norts
A large-targeted mortar, the lazooka round slowly
climbs to its desired altitude, then quickly homes in
on its target, causing massive damage.
INFANTRYMAN
He is the grunt of the Nordland Army, outfitted with
a basic breathing apparatus commonly known to
explode when pierced. Because the Infantryman is
saddled with a visor that barely allows visibility
and a weapon that often jams when fired, it’s possible
to believe that the Nordland Generals almost want their
infantry to die.
15
rt ps2 final.qxd
4/13/06
5:09 PM
Page 16
HOPPA
Since Nu Earth is a large planet,
it takes advanced technology to
efficiently move troops around it.
Flying vehicles known as Hoppas are
used to get extra troops quickly to the front
line. Artillery-based flying vehicles are also rumored to exist.
DRILL PROBE
saving
Treating its troops kindly is
not something the Nordland
Army does well. The best
example of this is the Drill
Probe. Essentially a small
metallic chamber with a large
drill on the front, these
“vehicles” are used to deploy
troops behind enemy lines.
The drill erupts from the
ground, then protects emerging troops with machine gun
blisters. Once the troops are deployed, the driver drills
the probe back underground to collect another team.
16
ROGUE TROOPER uses a profile system that allows multiple
gamers to play the game at their own pace on a single memory
card. Insert a memory card with at least 170 KB of free space
into MEMORY CARD slot 1 if you want to save your progress.
After completing a mission you’ll have the opportunity to save
your game progress. If you choose to do so, the data is written
to the currently active profile on the memory card.
E Progress within each mission is monitored by an automatic
checkpoint system. If you decide to exit the current game, you can
choose to save your game data up to your last checkpoint. When
you return to the Single Player Mode, you can select Continue
Game to resume at the last checkpoint you reached in that level.
E
The online portion of this game is subject to the terms and
conditions under the User Agreement found within the game.
For a full copy of the User Agreement go to:
www.us.playstation.com/support/useragreements
NETWORK CONFIGURATION
In order to play ROGUE TROOPER™ online, you need to have a
valid network configuration saved on a memory card. You can use
the network adaptor start-up disc included with your network
adaptor (Ethernet/modem)(for PlayStation®2) to set up your
network connection. Refer to the instructions that came
with your network adaptor start-up disc.
online play
NORT VEHICLES
ONLINE SYSTEM REQUIREMENTS
Up to 4 players can battle online or over a Local Area Network
(LAN). In order to play ROGUE TROOPER™ online, you need:
Memory card (8MB)(for PlayStation®2).
Network adaptor (for PlayStation®2).
E Broadband Internet connection or Local Area Network (LAN).
E Network Configuration set up using the network adaptor
start-up disc.
E
E
USING THE USB HEADSET
The USB Headset (for PlayStation®2) allows you to talk to other
players during play. This is an optional feature and is not required
to enjoy the game. Connect the USB Headset into either USB
connector, located on the front of the console (page 2), before
turning the power on.
CREATING AN ACCOUNT
Enter the data under your profile and save it. After you do this,
you only need to select the profile to log-in automatically.
17
multiplayer mode
rt ps2 final.qxd
4/13/06
5:09 PM
Page 18
Multiplayer mode lets you experience the Quartz Zone Massacre
from a different perspective: that of the GIs who didn’t make it.
The basic game is the same whether it’s played on online or over
a Local Area Network. Five arenas are available, which fall into
either the Stronghold or the Progressive category.
GETTING INTO A GAME
From the Main Menu, select Multiplayer and then Online.
Press the x button to connect; press again after the DNAS
Authentication and License screen. At the list of Lobbies, select
one to enter. In the Lobby, use the l and r buttons to cycle
through the menus. Press the x button to join a server or press
the c button to host a game.
The Lobby menu offers these options:
E
E
E
E
RESPAWNING
A continual timer counts down the time to the next wave; when
“killed,” players automatically join the “benched” group. When
the timer hits zero, expired players respawn via a drop pod.
Progressive maps show several landing zones. Respawning players
land at the nearest secure zone.
PICK-UPS
In Multiplayer mode the emphasis is on constant action, so instead
of the salvage system, items are granted via pick-ups placed
throughout the levels. Pick-ups respawn over time. To collect
a pick-up, move over it and press the x button.
E
MEDI-PAK — Grants 1 medi-pak.
AMMO — Grants 1 clip of specified ammo.
GRENADE — Grants 1 of specified grenade type.
Servers — Highlight a game and press the x button to join.
Players — Scroll through the names of players currently on-line.
Chat — Talk to other players.
Options — The console acting as server can set several options:
E
• Map that will be played on first (of 5 available).
• Time Limit per round for completing the map objective.
• Total Lives available in the respawn pool.
• Friendly Fire damages/does not damage other players.
• Max Players in the session.
Each map has a preset overall objective: it could be defending
ground for a set amount of time on Stronghold maps, or gaining a
certain position on Progressive maps. In addition, mini-objectives
(such as taking out all the Hoppas) provide short-term goals.
CHARACTER SELECTION
Each of Rogue’s companions has unique abilities and weapon
levels. Having a range of character-type selections gives you
the luxury of tailoring the gameplay to your own personal style.
E
OBJECTIVES
SCORING
All actions gain points. The highest scores per map are stored
in the currently active profile. In split-screen mode, the scores
of both player 1 and player 2 are saved in the same profile.
CHARACTER ATTRIBUTES
E
E
E
E
18
ALL — Outfitted with radar, scope, choice of 1 Underslung, and
level 4 inventory, three quarters full (6/8 clips of standard ammo).
ROGUE — Starts with full inventory.
HELM — Holodecoy.
GUNNAR — Has unlimited standard ammo.
BAGMAN — Has infinite medi-paks.
This is the same gameplay as the online Multiplayer mode games,
but you’re connected via a Local Area Network to up to 3 different
PlayStation 2 systems, each running a ROGUE TROOPER™ disc.
Local Area Network gameplay has the following requirements:
Each PlayStation 2 system must be connected to a network adaptor
(for PlayStation®2) and its own television. The network adaptor
(for PlayStation®2) must be connected to a LAN via Ethernet.
Each PlayStation 2 system supports one player.
E One player must host the LAN game.
E
LAN
E
19
credits
rt ps2 final.qxd
4/13/06
5:09 PM
Page 20
MANAGEMENT
Creative Director
Jason Kingsley
Technical Director
Chris Kingsley
Rebellion’s Head of Programming
Kevin Floyer Lea
Head of Communication
Kristien Wendt
Design Team
Wayne Adams
Andrew Crystall
Andrew Haith
John McCann
Kevin Nolan
Mike Rosser
Story and Script
Gordon Rennie
Audio
Tom Bible
Jordan Pedder
English Vocal talents
Russell Bentley
Rupert Degas
Nigel Greaves
Nick Haverson
Emma Tate
ROGUE TROOPER
From an original game design by
Michael Burnham
and Tim Jones
Senior Producer
Michael Burnham
Assistant Producer
Scott Mackintosh
Code Lead
Morgan Parry
Code Team
Nick Davis
Richard Fine
Steven Humphreys
Richard May
Andrew McDonald
Asura and Support Programming
Art Lead
Ben Flynn
Art Team
Alex Birtles
Sam Grice
David Kidd
Dan Meeuws
Ben Murch
Ivan Pedersen
Richard Whitelock
Wiggz
Additional Art
Andy Brady
Joe Gelder
Alex Moore
Dave Walsh
Lead Animator
John Nightingale
Animation Team
Mark Bradshaw
Chris Bull
Tim Doubleday
Adam Murphy
Diarmaid O’Connor,
Design Lead
20
Kevin Floyer-Lea
Mike Healey
Kim Randell
Richard Rice
Andy Weinkove
SUPPORT
QA
Pawel Goleniewski
Julian Hall
Andy Pattinson
Ian Tuttle
IT
Ed Duerr
Dan Thomas
Finance
Neil Blackler
John O’Brien
THANKS
Our thanks go to Gerry Finley-Day and Dave Gibbons who created the original Rogue
Trooper comic and also to all the writers and artists that worked on Rogue Trooper
over the years. Also our special thanks go to Emerson Best, John Cleasby, Risa
Cohen, Aeron Guy, Tim Jones, Dominic Preston, Kathryn Symes, Jamie Sims, Ken
Turner and all Rebellionites past and present.
2000 AD: Jonathan Oliver, Matt Smith, and the 2000 AD team.
AUDIO MOTION: Mick Morris, and the team.
SARASSIN LLP: Vincent Scheurer
NASA: NASA and the “Visible Earth” team and web page, who allowed use of their
imagery as the basis of geological texture work. Use of this imagery does not imply
endorsement.
OUTSOURCE MEDIA: Mark Estdale and team
MAIN FONT: Justin Callaghan
Alex Moore
21
rt ps2 final.qxd
4/13/06
5:09 PM
Page 22
EIDOS US
EIDOS UK
CEO
Jane Cavanagh
CEO & President, Eidos North America
Commercial Director
Bill Ennis
Executive Vice President of Sales & Marketing
Robert Lindsey
Financial Director
Rob Murphy
Vice President of Legal & Business Affairs
James O’Riordan
Company Secretary
Anthony Price
Vice President of Finance
Malcolm Dunne
Head of European Publishing
Scott Dodkins
Vice President of Human Resources
Edie Dykstra
Product Acquisition Director
Ian Livingstone
National Sales Manager
Joe Morici
Worldwide CTO
Julien Merceron
Associate Marketing Manager
Mike Schmitt
Development Director
Darren Barnett
Director of Public Relations
Michelle Seebach Curran
External Development Manager
Lee Singleton
Public Relations Manager
Tali Fischer
Producer
Patrick Cowan
Senior PR Manager
Oonagh Morgan
Designer
Anna Marsh
Online Community Specialist
Matt Dalghren
Brand Manager
Adrian Arnese
Channel Marketing Manager
Janty Sumimoto
QA Manager
Marc Titheridge
Senior Channel Marketing Specialist
Ilana Budanitsky
QA Supervisors
Ian Rowsell
Channel Marketing Project Manager
Diane Eng
Lead QA
Germaine Mendes
Richard Acherki
Damian Bennett
Channel Marketing Coordinator
Rafal Dudziec
Director of Marketing Communications
Stephanie Lipetzky
QA Engineers
James Hinchliffe
James Tripp
Tim Dunn
Femi Sani
David Sangan
Neil Delderfield
David Klein
Joseph Pirocco
Jason Claridge
Naomi Westlake
Mattew Poon
Group Localisation Manager
Caroline Simon
Localisation Manager
Monica Dalla Valle
QA Localisation Supervisor
Arnaud Messager
Lead QA Localisation Tester
Pablo Trenado
QA Localisation Testers
Augusto D’A puzzo
Alessandro Marchesini
Edwige Bechet
Laetitia Wajnapel
Tobias Horch
Francisca Barcel
Technical Author
Tom Waine
Creative Manager
Quinton Luck
Creative Designers
Philippa Pratley
Jodie Brock
Gus Aliyu
Bill Gardner
Web Producer
Roderick van Gelder
Web Designer
John Lerma
Creative Services Project Manager
Eileen Buenviaje
Media Specialist
Micheal Tran
Graphic Designer
James Song
Event Specialist
Annie Meltzer
Music Licensing
Kevin Gill
Operations Manager
Gregory Wu
Senior External Producer
Nick Goldsworthy
Associate Project Manager
Clayton Palma
Associate Manager of Product Operations
Colby McCracken
Quality Assurance/Customer Service Manager
Mark Cartwright
Product Test Coordinator
Richard Hartzell
Assistant Product Test Coordinators
John Hayes, Clint Waasted
Quality Assurance Technicians
Nicholas Cooprider,
Mackenzie Hume, Jeff Lowe,
Dan Franklin, Erik Kennedy,
Kip Ernst, Ergin Dervisoglu,
Aaron Keillor,
Richard Campbell,
Stephen Cavoretto,
Elizabeth Rutlin,
Jason Johnson, Will Dimas
Special Thanks
Matt Gorman
Hanshaw Ink & Image
Jason Bergquist
Susan Kwon
Julie Spund
Danny Jiang
22
x
23
troubleshooting
rt ps2 final.qxd
4/13/06
5:09 PM
FIREWALLS
In order to join or host a ROGUE TROOPER™
game from behind a router with NAT (Network
Address Translation), or firewall, you may need
to enable Port Forwarding. You will need to
route, or forward, all data on port UDP 3658
to the IP address assigned to your
PlayStation 2 system.
Note: Users using DHCP must ensure that their
PlayStation 2 system is always assigned
the IP address specified in the Port Forwarding
setup; under these circumstances you may
need to change your network configuration
from Auto Detect (DHCP) to a Static IP address
using the network adaptor start-up disc to
ensure that forwarded data always gets
to your PlayStation 2 system.
If you are still having trouble connecting
to other players, try bypassing the router
or firewall by connecting your PlayStation 2
system directly to your DSL modem, cable
modem, or other broadband device.
STATUS
You can check the status of the game servers
and read news about ROGUE TROOPER™ by
visiting www.eidos.com.
USB HEADSET
During gameplay, if your USB headset is
plugged into your PlayStation 2 system but
you are not able to chat with your opponent,
your opponent may not have a USB headset
connected to the PlayStation 2 system, or you
and your opponent may have a low quality
connection to each other.
CUSTOMER SUPPORT
For further questions, please visit
www.eidos.com or contact Eidos Inc.
DNAS SYSTEM
24
This Software uses “DNAS” (Dynamic Network
Authentication System), a proprietary
authentication system created by Sony
Computer Entertainment Inc. (“SCEI”).
“DNAS” retrieves information about a user’s
hardware and software for authentication,
copy protection, account blocking, system,
rules, or game management and other
purposes. The information collected does not
identify the user personally and will not be
shared with any non-SCE company.
A PUBLISHER CAN COMBINE THIS
INFORMATION WITH PERSONALLY
IDENTIFYING INFORMATION FROM THE
PUBLISHER’S RECORDS IF THE USER
PROVIDES THE PERSONALLY IDENTIFYING
INFORMATION. BEFORE PROVIDING ANY
PERSONAL INFORMATION TO A PUBLISHER,
PLEASE BE SURE TO REVIEW THE
PUBLISHER’S PRIVACY POLICY AND TERMS
AND CONDITIONS OF USE. DO NOT PROVIDE
PERSONALLY IDENTIFYING INFORMATION TO
Page 24
Customer Support at (415) 615-6220, Monday
through Friday, 9:00 a.m. to 12:00 noon and
1:00 p.m. to 5:00 p.m. Pacific Time.
ONLINE TECHNICAL REQUIREMENTS
Broadband access and the network adaptor
(Ethernet/modem) (for PlayStation®2) are
required for Network Capabilities. Players are
responsible for all applicable Internet fees.
Network Capabilities may be subject to
change, withdrawal and charge for use. Go to
www.playstation.com for Network Capabilities
access terms and availability.
ONLINE FEATURES
THE ONLINE FEATURES OF THIS GAME ARE
SUBJECT TO ACCEPTANCE OF ONLINE TERMS
OF SERVICE. EIDOS RESERVES THE RIGHT
TO CHANGE OR TERMINATE THE ONLINE
FEATURES OF THIS GAME. EIDOS MAKES
NO GUARANTEE AS TO THE AVAILABILITY OF
THE ONLINE FEATURES FOR THIS GAME OR
THAT THE EIDOS ONLINE SERVICE WILL BE
UNINTERRUPTED OR ERROR-FREE. Please read
the Eidos Online Terms of Service for full terms
and conditions, a copy of which is available
at www.eidos.com and in-game. Certain online
features may be subject to payment
of an additional fee.
RATINGS
The Game’s content has been rated T for TEEN
content. However, the content of the Game
may change due to interactive exchanges
between players in Online mode. Neither Eidos
nor Sony Computer Entertainment accepts any
responsibility for content which is external to
the game itself. Please refer to the Terms of
Service for further conditions of use relating
to online play.
A PUBLISHER UNLESS YOU ACCEPT THE
CONDITIONS OF USE AND TERMS OF THEIR
PRIVACY POLICY. SCEI, Sony Computer
Entertainment America (“SCEA”) and their
affiliates cannot guarantee the continuous
operation of the “DNAS” servers. SCEA shall
not be liable for any delay or failure of the
“DNAS” servers to perform. If you receive a
message during login identifying a “DNAS”
authentication error, please contact SCEA
Consumer Services at 1-866-466-5333. For
additional information concerning “DNAS,”
visit www.us.playstation.com/DNAS. In the
event of a systems incompatibility or
inoperability with DNAS, the sole liability of
SCEI, SCEA and their affiliates shall be limited
to the repair or replacement of the user’s
affected game software, console or
peripherals at the option of SCEA. SCEA, its
parents, affiliates, or licensed Publishers shall
not be liable for any delays, system failures,
authentication failures, or system outages,
which may, from time to time, affect online
game play or access thereto.
EIDOS, INC., LICENSE & LIMITED WARRANTY
Eidos, Inc., warrants to you, the original purchaser of this disc, that for a
period of ninety (90) days from the date of your purchase, this disc shall be
free from defects in materials and workmanship. If, at any time during the
applicable ninety (90) day warranty period you determine that this limited
warranty has been breached, Eidos, Inc., agrees, in its sole option, to repair or
replace, free of charge, any such disc, provided the disc is returned postage-paid
to the Eidos, Inc., Factory Service Center and a proof of date of purchase is included.
This limited warranty is not applicable to normal wear and tear and shall be void with
respect to any defects that arise from disc abuse, unreasonable use, mistreatment or
neglect. This disc is sold “as is” without any warranties of any kind, express or implied,
including implied warranties of merchantability or fitness for a particular purpose,
other than the limited warranty expressly stated above.
No other claims arising out of your purchase and use of this disc shall be binding on
or obligate Eidos, Inc., in any manner. Eidos, Inc., will not be liable to you for any losses
or damages incurred for any reason as a result of your use of this disc, including, but
not limited to, any special, incidental, or consequential damages resulting from your
possession, use or malfunction of this disc. This limited warranty states the entire
obligation of Eidos, Inc., with respect to the purchase of your disc. If any part of this
limited warranty is determined to be void or illegal, the remainder shall remain in full
force and effect. For warranty support please contact our Customer Support department
at (415) 615-6220. Our staff is available Monday through Friday, 9:00 a.m. to 12:00
noon and 1:00 p.m. to 5:00 p.m. Pacific Time. You are responsible for all toll charges.
Customer Support Representatives will not provide game hints, strategies or codes.
PRODUCT RETURN PROCEDURE
In the event our support agents determine that your game disc is defective, you will
need to forward material directly to us. Please include a brief letter explaining what is
enclosed and why you are sending it to us. The agent you speak with will give you
an authorization number that must be included and you will need to include a daytime
phone number so that we can contact you if necessary. Any materials not containing
this authorization number will be returned to you unprocessed and unopened.
Send your postage-paid package to the following address:
Eidos, Inc. Customer Services
RMA# (state your authorization number here)
651 Brannan Street, Suite 400
San Francisco, CA 94107
You are responsible for postage of your game to our service center.
Register online at
www.eidosregistration.com
RSA BSAFE® SSL-C and Crypto-C software from RSA Security Inc. have been installed. RSA is a registered trademark
of RSA Security Inc. BSAFE is a registered trademark of RSA Security Inc. in the United States and other countries.
RSA Security Inc. All rights reserved.
This software uses “DNAS” (Dynamic Network Authentication System), a proprietary authentication system created by
Sony Computer Entertainment Inc. to provide security and to help protect copyrighted content. The unauthorized transfer,
exhibition, export, import or transmission of programs and devices circumventing its authentication scheme may be
prohibited by law. For additional information, see www.us.playstation.com/DNAS.
Uses Bink Video Technology. Copyright © 1997-2005 by RAD Game Tools, Inc.
Published in North America by Eidos, Inc., and published in the rest of the world by Eidos
Interactive Ltd.


![ManualCover-3Panel10_03 [Converted]](http://vs1.manualzilla.com/store/data/005711777_1-408df82eece155ec198a9b3b174c8b0a-150x150.png)