1
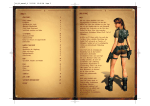
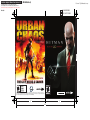
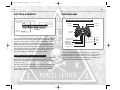
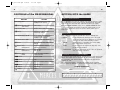
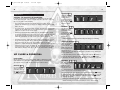
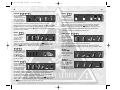
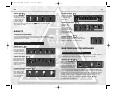
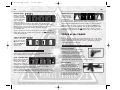
Electronic Template: Manual Cover, Version 4.0
(DOC-000563 Rev 0)
File name: TP_PS2ManualCover.eps
For illustration purpose only. Use electronic template for specifications.
Do not alter, change or move items in template unless specifically noted to do so.
NOTE: Turn off “Notes” and “Measurements” layers when printing.
1/8" BLEED ZONE
Rev 9/03
7.1875"
1/16" SAFETY ZONE
IN STORES NOW!
www.UrbanChaosGame.com
©2006 SCi Games Ltd. “Eidos” and the Eidos Logo are trademarks of the Eidos group of companies. “Urban Chaos”
and “Urban Chaos: Riot Response” are trademarks of Eidos Interactive Ltd. The rating icon is a registered
trademark of
PHTBMSUS03
the Entertainment Software Association. All rights reserved. PHTBMSUS03
4.5"
4.5"
9.0"
hbm ps2 final.qxd
4/25/06
1:13 PM
WARNING: READ BEFORE USING YOUR
COMPUTER ENTERTAINMENT SYSTEM.
Page ii
PLAYSTATION®2
A very small percentage of individuals may experience epileptic seizures
when exposed to certain light patterns or flashing lights. Exposure to certain
patterns or backgrounds on a television screen or while playing video
games, including games played on the PlayStation 2 console, may induce
an epileptic seizure in these individuals. Certain conditions may induce
previously undetected epileptic symptoms even in persons who have no
history of prior seizures or epilepsy. If you, or anyone in your family, has
an epileptic condition, consult your physician prior to playing. If you
experience any of the following symptoms while playing a video game —
dizziness, altered vision, eye or muscle twitches, loss of awareness,
disorientation, any involuntary movement, or convulsions — IMMEDIATELY
discontinue use and consult your physician before resuming play.
WARNING TO OWNERS OF PROJECTION TELEVISIONS:
Do not connect your PlayStation 2 console to a projection TV without first
consulting the user manual for your projection TV, unless it is of the LCD
type. Otherwise, it may permanently damage your TV screen.
USE OF UNAUTHORIZED PRODUCT:
The use of software or peripherals not authorized by Sony Computer
Entertainment America may damage your console and/or invalidate your
warranty. Only official or licensed peripherals should be used in the
controller ports or memory card slots.
HANDLING YOUR
PLAYSTATION 2 FORMAT DISC:
• This disc is intended for use only with PlayStation 2 consoles
with the NTSC U/C designation.
• Do not bend it, crush it or submerge it in liquids.
• Do not leave it in direct sunlight or near a radiator or other source of heat.
• Be sure to take an occasional rest break during extended play.
• Keep this disc clean. Always hold the disc by the edges and keep it in its
protective case when not in use. Clean the disc with a lint-free, soft, dry
cloth, wiping in straight lines from center to outer edge. Never use
solvents or abrasive cleaners.
CONTENTS
GETTING STARTED . . . . . . . . . . . . . . . . . . . 2
CONTROLLER . . . . . . . . . . . . . . . . . . . . . . . 3
CONTROLS of the PROFESSIONAL . . . . . . . . 4
GETTING INTO the GAME . . . . . .
Profile Management . . . . . . .
Difficulty . . . . . . . . . . . . . . .
A Manual for the Professional
Notoriety . . . . . . . . . . . . . . .
.
.
.
.
.
.
.
.
.
.
.
.
.
.
.
.
.
.
.
.
.
.
.
.
.
.
.
.
.
.
.
.
.
.
.
.
.
.
.
.
.
.
.
.
.
5
5
5
5
6
UP CLOSE & PERSONAL . . . . . . . . . . . . . . . 6
AGILITY . . . . . . . . . . . . . . . . . . . . . . . . . . 10
Climbing & Scaling . . . . . . . . . . . . . . . . . 10
SUBTERFUGE TECHNIQUES . . . . . . . . . . . . . 11
Disguises & Concealment . . . . . . . . . . . . 11
INGRESSION . . . . . . . . . . . . . . . . . . . . . . . 12
Doors, Locks & Security . . . . . . . . . . . . . 12
Distraction . . . . . . . . . . . . . . . . . . . . . . 14
TOOLS of the TRADE . . . . . . . . . . . . . . . . 15
Firearms, Situational & Equipment . . . . . 15
COMPENSATION . . . . . . . . . . . .
Weapons & Tools . . . . . . . . .
Cleaning . . . . . . . . . . . . . . . .
Recovering Surveillance Tapes
POST MISSION
.
.
.
.
.
.
.
.
.
.
.
.
.
.
.
.
.
.
.
.
.
.
.
.
.
.
.
.
.
.
.
.
18
19
19
20
. . . . . . . . . . . . . . . . . . . . 20
GAME CREDITS . . . . . . . . . . . . . . . . . . . . . 21
MUSIC CREDITS . . . . . . . . . . . . . . . . . . . . 23
URBAN CHAOS ™: RIOT RESPONSE DEMO ™ . . 24
hbm ps2 final.qxd
4/25/06
1:13 PM
Page 2
2
3
GETTING STARTED
CONTROLLER
®
DUALSHOCK 2 ANALOG CONTROLLER CONFIGURATIONS
open button
disc cover
memory card slot 2
memory card slot 1
on/standby/
reset button
L2 button
R2 button
L1 button
R1 button
IR receiver
USB connectors
controller port 1
controller port 2
Set up your PlayStation®2 computer entertainment system according to
the instructions in its Instruction Manual. Make sure the MAIN POWER
switch (located on the back of the console) is turned ON. Press the
RESET button. When the power indicator lights up, press the OPEN
button and the disc tray will open. Place the HITMAN BLOOD MONEY™
disc on the disc tray with the label side facing up. Press the OPEN
directional
buttons
button
left analog stick
(L3 button when pushed down)
SELECT button
ANALOG mode button
START button
right analog stick
(R3 button when pushed down)
button
button
button
button again and the disc tray will close. Attach game controllers and
other peripherals, as appropriate. Follow on-screen instructions and
refer to this manual for information on using the software.
Connect the DUALSHOCK®2 analog controller to controller port 1
before starting play. When the vibration function is On, the controller
MEMORY CARD (8MB)(for PlayStation®2)
To save game settings and progress, insert a memory card (8MB)(for
PlayStation®2) into MEMORY CARD slot 1 before powering on the
system. At least 2200KB of free space on the memory card is required
to save game data.
This game supports saving and loading of game data in MEMORY CARD
slot 1 only. You can load saved game data from the same memory
card or from any memory card containing previously saved HITMAN
BLOOD MONEY™ games.
will vibrate in response to game events. You can reconfigure the
controls and toggle the vibration function ON/OFF in Options mode.
Note: All controls used in this manual are the default controls.
hbm ps2 final.qxd
4/25/06
1:13 PM
Page 4
4
5
CONTROLS of the PROFESSIONAL
BUTTON
ACTION
left analog stick
Move character; Zoom map;
Highlight menu options
.
Throw item
button (push in, hold
and release)
right analog stick
Rotate camera; Pan across map
f
Open/Close sniper scope;
View Mode switch
button
GETTING INTO the GAME
PROFILE MANAGEMENT
Before embarking on a career as a Hitman, you must first prepare a profile.
The profile keeps a record of your progress and preferences, along with
weaponry choices, funds and other equipment and items you acquire.
From the PROFILE MANAGER screen, choose CREATE PROFILE and enter
a name for the profile. If you have a previously created profile, you can
select this to resume the career. You can also delete profiles you no
longer want.
DIFFICULTY
directional buttons */@
Zoom sniper scope/binoculars;
Scroll through actions/items;
Highlight menu options
Once you’ve created a profile, you will then choose a difficulty level:
• ROOKIE
For the inexperienced, and those new to the world
of the assassin. There are no limitations on how many
saves you can make while attempting a mission.
directional buttons $/^
Scroll through maps/inventory
t
button
Drop item; Exit map; Exit legend;
Cancel
• NORMAL
Suitable for those comfortable with contract killing.
Each mission allows seven saves.
s
button
(tap)
(hold/release)
Holster/Unholster weapon
Open/Close inventory
• EXPERT
For the practiced and experienced. Only three saves
per mission are permitted.
c
button
(tap)
(hold/release)
Pick up item
Pick up list
• PROFESSIONAL
For the true professional only. No saves are permitted
once a mission is in progress.
x
button
(tap)
(hold)
Carry out action; Confirm
View action list
l
button
Crouch; Sneak
,
button
Map
r
button
Fire; Use weapon; Close combat
d
button
Reload weapon
q
button
Objectives
w
button
Pause
A MANUAL for the PROFESSIONAL
This manual provides insight into the mind and practices of the professional
Hitman. This manual refers to the Hitman as “the professional.” It explores
the complexities, skills and the intricacies with which “the professional”
conducts his craft.
The professional techniques outlined in this manual vary in complexity,
and are graded by difficulty to execute using the following ranking system:
HITMAN TECHNIQUES
BASIC
1
2
ADVANCED
3
4
5
hbm ps2 final.qxd
4/25/06
1:14 PM
Page 6
6
NOTORIETY
ANONYMITY, THE DISGUISE OF THE PROFESSIONAL
Longevity in the profession is dependent on transparency in the world.
The professional seeks solace in a world where the only way to carry out
this sort of work is with anonymity.
• The professional avoids the blood bath wherever possible, as this
attracts the unwanted eyes of the law or multiple witnesses and an audit
trail to his door.
• If a witness lives, the professional’s notoriety increases. The professional
negates this by making sure he is not discovered on a job, and that no
witnesses or clues are left on the scene.
• When the professional takes civilian lives, the invariable result is taped
TV footage and witnesses at the scene of the crime. When this happens,
the professional gains notoriety. As notoriety increases, the ease with
which the professional can carry out his next contract decreases.
• For further insurance against discovery in areas covered by TV cameras,
the professional can make sure to destroy all video-surveillance tapes.
• The professional can assess his successfulness and his notoriety
following a contract through the media. If there have been witnesses, the
newspaper is his best way of finding out. The professional should look
out for newspapers while on location. These may detail previous targets
and missions, and may even give a clue to the professional’s identity.
UP CLOSE & PERSONAL
CLOSE COMBAT
The professional uses close hand combat skills to eliminate the mark
with minimum noise and when dealing with unforeseen circumstances.
The majority of these skills are ideal in firearm-restricted areas.
HEAD USE
Use the left analog
stick to position
yourself in front of
the victim, then press
the r button to
head butt your target.
7
THE PUNCH
While the victim is
dazed, use the left
analog stick to
position yourself in
front of your target,
then press the r
button to punch.
DISARMING
Use the left analog
stick to position
yourself in front
of the armed victim,
then press the r
button to disarm
the person.
Note: During the struggle, it’s possible that the firearm will go off accidentally.
CONCEALING WEAPONS
Whenever possible,
the professional
carries out his work
using tools that can
be concealed on his
person. He has a
number of tools at his disposal that, when concealed, can go undetected
in most public areas.
Use the left analog stick to walk toward the mark, hold the s button to
access the inventory and then select a firearm. Press the r button
to discharge the firearm, then tap the s button to holster and conceal it.
FIBER WIRE
The fiber wire is the
most difficult of your
weapons to use
but the easiest to
conceal. It is also
the quietest and most
efficient tool to use to avoid raising an alarm.
Select the fiber wire from inventory, then press and hold the r button
to tighten the fiber wire and automatically enter sneak mode. Use the left
analog stick to maneuver behind the mark, then release the r button
to strangle the victim.
Note: If you are spotted or you fail to execute this move in one fluid movement, your
intended victim may become alerted, and attempt to raise an alarm or attack!
hbm ps2 final.qxd
4/25/06
1:15 PM
Page 8
8
9
ELEVATOR
POISON
The professional
often looks for
secluded areas away
from TV cameras
and civilian witnesses
to eliminate a guard
or mark. Elevators provide an excellent space in which to do this.
The professional
often studies
behavioral patterns,
and then uses poison
to eliminate the mark
with clinical precision from a safe distance.
While in an elevator, access the roof hatch by pressing the x button. Equip
the fiber wire from inventory, and then look toward the open hatch. While
a victim is visible below, press the x button to strangle and pull the mark
up and out of the elevator.
KNIVES
Knives are another
silent, easy to
conceal, efficient
means for the
professional to
eliminate the mark.
Select the knife from inventory. Press and hold the l button to enter
sneak mode, and sneak toward the mark. When you’re behind the victim,
press the r button to silently slit the mark’s throat.
To throw a knife, use
the right analog stick
to aim at the victim,
press and hold
the . button, then
release the . button
to kill your mark.
SYRINGES
The professional
uses two types of
syringes. The sedative
syringe (non lethal) is
an effective means
of sedating guards
and civilians obstructing your path. This reduces your notoriety by limiting
the amount of civilian casualties. Use the poison syringe (lethal) either
to eliminate a mark directly or to administer poison to food and drink,
allowing you to terminate the mark from a safe distance.
Select a syringe type from inventory, and then use the l button and left
analog stick to sneak up behind the victim. Once behind the mark, press
the r button to inject poison into the victim’s neck.
Stand in front of the food or beverage, open the inventory and select
the required syringe. Use the right analog stick to aim the crosshair
at the food or beverage, and press the r button to poison the item.
Note: The professional will use any means at his disposal to gain the strategic
advantage required to successfully execute his contract.
HUMAN SHIELD
When backed
into a corner, the
professional must
take every advantage
to safeguard his exit
from the scene; this
may mean using a human life as a protective shield.
Equip a firearm from inventory, then approach the victim from behind
and press the x button to grab the mark and use him as a human shield.
Press the d
button to reload the
firearm while holding
a human shield.
When out of danger,
press the x button
again to knock the
human shield
unconscious, or press
the t button to push
the human shield to the floor once his usefulness is over.
hbm ps2 final.qxd
4/25/06
1:16 PM
Page 10
10
11
JUMPER
WALKING A LEDGE
The professional
can use the veil of
suicide when offered
a huge height and
a target. Walk up
behind the mark.
When you’re close enough, press the
over a ledge or railing.
Approach the ledge,
then push toward it
to automatically
climb onto it.
r button to push the mark
AGILITY
CLIMBING DRAIN PIPES
Approach the
drainpipe, then
push toward it to
automatically climb
onto it. Push the left
analog stick */@
to ascend/descend.
TRAVERSING THE ENVIRONMENT
The professional looks for the most anonymous path through the
environment and will exhaust all possible avenues of access to the mark
in preparation for a contract.
CLIMBING LADDERS
Approach the ladder, then push toward it
to automatically climb onto it. Push the left
analog stick */@ to ascend/descend.
CLIMBING & SCALING
JUMPING WALLS
Using the left analog
stick, first approach
the wall, then push
forward toward it to
automatically jump it.
JUMPING BALCONIES
Using the left analog
stick, approach the
balcony, then push
forward toward the
edge to automatically
jump across it.
CLIMBING THROUGH WINDOWS
Using the left analog
stick, approach the
open window, then
push forward toward
it to automatically
climb through.
SUBTERFUGE TECHNIQUES
DISGUISES & CONCEALMENT
The professional will often apply subterfuge techniques to evade detection
and introduce the element of surprise to an unsuspecting mark.
DISGUISES
The professional seeks
anonymity on a contract,
acquiring disguises from
rooms and changing areas,
and opportunistically from
the people wearing them.
Disguises allow the professional to infiltrate and move undetected through
areas of high security. Similarly, when dressed as a worker, the professional
carries the tools of that profession and can use them as weapons without
raising suspicion. For example, as a workman the professional will carry
hammers and nail guns; as a gardener he will carry shears; and so on.
Stand near a dead or unconscious body, then press the
to change into the disguise.
c button
hbm ps2 final.qxd
4/25/06
1:16 PM
Page 12
12
13
CONCEALING BODIES
SURVEILLANCE
The professional
carries out his work
exercising discretion.
When unplanned
terminations are
made during a
contract, the professional quickly seeks out a hiding place to conceal
the body or bodies.
The professional
will often scope out
a room before
entering it, negating
any unnecessary
surprises and
ensuring that nothing is left to chance.
Stand near a dead or unconscious body and press the x button to begin
dragging it. Press the t button to drop the body.
Using the left analog stick, approach the door. Press and hold the l
button to crouch in front of it, then press the x button to look through
the keyhole. Press the x button again to exit keyhole view.
DISPOSING OF BODIES
COMMUNICATION
On more complicated
contracts, unplanned
casualties may occur.
These terminations
can jeopardize cover,
alert security and
arouse suspicion in the mark. The professional avoids this at all costs,
quickly adapting to the environment, disposing of bodies in freezers,
wardrobes, showers and badly lit areas.
The professional often applies subtle
communication techniques on staff
members to gain layout and location
information.
Stand near a dead or unconscious body and press the x button to drag it.
Press the x button to open the lid of a container, then press the x
button again to dump the body inside.
The lock pick is a default
tool used by the
professional on every
job; it is easily concealed
and is not detectable by
hand-held or walk-through
detection devices. The professional can also purchase more enhanced lock
picks for slicker, speedier access.
INGRESSION
Walk up to the person and press
the x button to initiate conversation.
LOCK PICKS
Approach a locked door and press the x button to begin picking the lock.
DOORS, LOCKS & SECURITY
The professional is an expert locksmith with a number of specialist tools
and distraction techniques at his disposal to gain access to the highest
secured areas.
SURVEILLANCE & COMMUNICATION TECHNIQUES
Knowledge is integral to the professional’s survival. Every detail is
meticulously researched so that all possible scenarios, exits and escape
routes are thoroughly explored.
KEY CARDS & READ/WRITE DEVICES
In areas of high
security, the
professional requires
access key cards to
gain access to the
mark. You can steal
key cards from rooms or security when on a contract.
Approach the locked door and press the
the key card and open the door.
x button to equip
hbm ps2 final.qxd
4/25/06
1:17 PM
Page 14
14
15
BREAKING LOCKS
MANIPULATING LIGHT
Things occasionally
go wrong on a job
and the professional
needs to gain quick
entry to an area
without time to use
a lock pick. When faced with no other option, you can gain access
by shooting the door lock. (This only works on conventional door locks
and not on key card areas.) This is the riskiest solution as the noise
of shooting the lock may alert security or result in discovery
of a damaged door.
The professional
can use a firearm
to shoot out lights
and shut down
power junction boxes
to plunge an area into darkness, forcing security to investigate. The
professional will manipulate light wherever possible to remain anonymous.
Select a firearm from inventory, walk up to the door, and use the right
analog stick to aim the crosshair at the lock. Press the r button to fire
and break open the lock.
HIDING IN THE CLOSET
Stand in front of the
closet and press the
x button to enter it.
Press the x button
when inside the
closet to exit.
Stand in front of the switch or junction box and press the x button to
plunge the room or area into darkness. You can also destroy lights. Equip
a firearm from inventory, use the right analog stick to aim the crosshair
at the light source and press the r button to fire a shot and destroy it.
TOOLS of the TRADE
Tools are the only things in the professional’s life that can be truly relied
on. The professional studies and masters each of his tools so that he can
use the correct application on every contract — guaranteeing anonymity
and minimum exposure in the field.
FIREARMS, SITUATIONAL & EQUIPMENT
PISTOLS & HANDGUNS
DISTRACTION
Using a range of distraction techniques, the professional gains extra time
on a contract and access to high security areas.
COINS & THROWN ITEMS
The professional will often
throw an item such as
a coin into a guarded
area to force security to
investigate the created distraction. The professional often uses these
techniques to lessen civilian and security casualties, or to enable
an undetected passage into high security areas.
Select a coin from inventory (or equip another small item to throw) then
push in and hold the . button to prepare to throw. Use the right analog
stick to aim the crosshair, then release the . button to throw the item.
The professional opts for the pistol and
handgun for their power and size. Pistols
and handguns are easily concealed,
and once silenced become a highly
effective means of eliminating the mark.
The professional uses these weapons only
in close proximity to the mark, since they
offer limited clip capacity and accuracy over long distances.
ASSAULT RIFLES
The professional opts for assault
rifles as an option only when
cornered or in clutch situations.
The size and noise of the assault
rifle makes it very difficult to conceal.
In its favor, the assault rifle offers
a range of 300m but must be used
with single shot and burst fire
to afford any kind of accuracy.
hbm ps2 final.qxd
4/25/06
1:17 PM
Page 16
16
17
SUB-MACHINE GUNS
RIGGING BOMBS
The sub-machine gun offers
the professional a high rate of fire and
lightweight maneuverability when in close
proximity to the mark. The sub-machine
gun is the least subtle choice when on
a job and doesn’t offer the accuracy
or anonymity of a silenced weapon.
An explosive device
placed on the fixing
point of a chandelier
not only eliminates
the mark successfully,
but is also initially perceived as an accident, ensuring your smooth exit
from the scene. There are other ways a professional can choreograph
a hit to be perceived as “accidental.” See ENVIRONMENTALIST below
for an example.
SHOTGUNS
The shotgun is devastating in close
quarters but makes a lot of noise!
The professional will only resort to
using this type of weapon when backed
into a corner or as a last resort.
THE FALL
The professional looks for opportunistic suspended items that could
demolish a mark. These can be brought crashing down with clever use
of explosives, or by shooting glass or fixture points using a high-powered
weapon such as a sniper rifle.
SNIPER RIFLES
ENVIRONMENTALIST
The professional’s choice, the sniper
rifle is the most powerful and accurate
means of eliminating the mark. This
weapon can be silenced and used long
distance from a safe vantage point, then
broken down into a concealed briefcase.
The professional has an eye for ingenious ways of dressing a hit as an
accident. For example, when in a kitchen, the professional notices the gas
burner and its explosive potential. He weighs every opportunity and makes
the hit look like a freak accident whenever possible.
The sniper rifle is
the favorite weapon
of the professional
and when mastered
is the deadliest ally.
The professional’s best tool for surveillance work. Binoculars provide
an excellent tool for surveying and spying on the mark’s behavioral patterns
from safe distances.
REMOTE BOMBS
The remote bomb is another useful tool which
the professional can plant in a mark’s room
and then detonate from a safe distance.
The professional uses explosives intelligently
and strategically to eliminate the mark.
BINOCULARS
MISSION BRIEFING
The professional carries the mission briefing
throughout the contract so that he can refer
to objectives and mark information at will
and leave nothing to chance.
MAPS
Detailed maps and intelligence are paramount
to the success of a contract. The professional
uses maps as his main navigational means.
The map’s attention to detail ensures that he
never gets lost and that detailed intelligence
on guards, security and the mark’s location
are always at his fingertips.
The professional can buy additional info and
intel on more complicated jobs to ensure that
everything goes smoothly. This additional data
is always included on the map.
hbm ps2 final.qxd
4/25/06
1:17 PM
Page 18
18
COMPENSATION
PAYMENT
The professional takes payment in unmarked bills, which he can easily
transfer to an offshore bank account, avoiding detection. The professional
is paid according to risk and the social or political prominence of the mark.
The higher the profile and complexity, the higher the price. The professional
often receives bonuses for executing a contract quickly, smoothly and
without trace. The professional can earn additional cash by retrieving
suitcases and money from safes on the scene.
19
WEAPONS & TOOLS
The professional often elects to purchase
upgrades in the form of specialized weapons.
These weapons are always untraceable, so
they have to be ordered through a trusted
fence before purchase. The professional
chooses the highest-quality tools and weapons
on the market:
• ADVANCED LOCK PICKS:
Key card
reader/re-router.
Allows access to
key-carded doors without the relevant key
card; requires additional time.
SPENDING
• ADVANCED BINOCULARS:
The professional leads a frugal existence, preferring not to draw attention
to himself with extravagant spending. The professional can choose to spend
money on new tools, information and — when required — cleaning services
on contracts that went badly with high civilian casualties.
Incremental zoom, with better overall vision
capabilities and digital distance counter.
• ADRENALINE:
Restores partial health.
• KEVLAR VEST:
Allows the
professional to
absorb some
projectile hits.
• PAINKILLERS:
Provide a small
health boost.
Note: Replaying a mission can earn you more money; however, you will only receive
the difference between the initial and new earnings.
INTELLIGENCE
Before beginning a contract, the professional
can choose to purchase information aiding
completion of mission objectives and
concerning the mission as a whole. He can
also purchase target location information
(room location, behavior, next expected
location) and access information (disguise
requirements, location of off-limit areas,
key-carded doors, frisk and search
points, possible smuggle opportunities).
The professional often tries to purchase structural information
for the location in question.
PURCHASING AGENCY PICKUPS
The professional can purchase additional items to aid completion
of the contract. These are placed and marked on the map as Agency
pickups. The Agency may sometimes employ a contact to deliver
valuable information.
CLEANING
The professional, performs all his own cleaning where possible,
but occasionally is forced to hire external help if he has had to make
an emergency exit when a contract has gone badly. He can take care
of non-disposed-of bodies and use bribes to reduce notoriety.
Note: Replaying a mission and finishing with a lower notoriety value than originally
awarded in turn lowers your current notoriety level.
hbm ps2 final.qxd
4/25/06
1:17 PM
Page 20
20
21
The professional
meticulously plans
the contract ahead
using information
provided in the
Agency’s mission
briefing. From the briefing the professional knows where TV cameras
are located, but sometimes under pressure he is forced to perform
an unplanned action that may be caught on camera. The professional
always (circumstances allowing) carries out his own cleaning on an untidy
contract. The professional locates the TV control room and removes
all evidence.
Stand in front of the recording unit and press the
the tape.
x button to remove
POST MISSION
Once the professional has successfully
completed a mission, he will often need to
address several expenses. These cover
a number of different circumstances,
for example the retrieval and replacement
of items left at the scene, such as suits
and custom weaponry.
It may also happen that potential witnesses
have been left at the scene. These can both
jeopardize your anonymity and make future
contracts that much harder to complete efficiently.
Additionally, the unlawful killing of innocents and law enforcement officials
will raise the profile of completed missions. This is also an expense
to the professional; the Agency charges him for the killing of innocent
civilians and officers in duty. Unnecessary publicity is bad for business
and this contributes to the final Damage Control penalty, displayed
post mission.
The professional can handle all expenses (both mandatory and optional)
upon successful completion of the mission.
GAME CREDITS
IO-INTERACTIVE
RECOVERING SURVEILLANCE TAPES
Game Director
Rasmus Højengaard
Technical Producer
Martin Amor
Art Director
Tore Blystad
Gameplay Director
Peter Fleckenstein
Producer
Helle Marijnissen
Programmers
Jens Bo Albretsen
Brian Meidell Andersen
Marcell Baranyai
Carsten Brügmann
Zoltán Buzáth
Bo Cordes
Neil Coxhead
Theo Engell-Nielsen
Chris Gilbert
Martin Harring
Morten Heiberg
Michael Holm
Morten Suldrup Larsen
Pèter Màlnai
Peter Wraae Marino
Sandor Nyako
Stein Nygård
Lars Piester
Mads Østerby Olesen
Rasmus Sigsgaard
Jens Skinnerup
Hakon Steinø
Jeroen Wagenaar
Artists
Jacob Andersen
Tobias Biehl
Marek Bogdan
Svend Christensen
Timothy Evison
Peter Fleckenstein
Thor Frølich
David Giraud
Allan Hansen
Bo Heidelberg
Tom Isaksen
Søren B. Jensen
Sascha Jungnickel
Jesper Vorsholt Jørgensen
Rasmus Kjær
Sebastian “Vlad” Lindoff
Oskar Lundqvist
Stephan Nilsson
Mads H. Peitersen
Anders Pedersen
Jesper Kieler Petersen
Alexander Pshenichniy
Birgitte Bay Overgaard
Thomas Storm
Gyorgyi Szakmar
Animators
Barbara Bernád
Frederik Budolph-Larsen
Jens Peter Kurup
Søren Lumholtz
Frederic Poirier
Martin Poulsen
Thomas P Theede
Gameplay Scripters
Jesper Donnis
Jonas Lind
Thomas Løfgren
Jacob Mikkelsen
Sound Designers
Ivan Brandt
Thomas “Tomzen” Dietl
Simon Holm
Michael Ziegler
Engine Programmers
Rune Brinckmeyer
Micky Kelager Christensen
Kasper Engelstoft
Károly Faragó
David Guldbrandsen
Karsten Hvidberg
Michael Bach Jensen
Asger Mangaard
Mircea Marghidanu
Allan Merrild
Morten Mikkelsen
Kasper Høy Nielsen
Martin Pollas
Jon Rocatis
Henning Semler
Gyula “Luppy” Szentirmay
Torsten Kjær Sørensen
Andreas Thomsen
Script Writer
Greg Nagan
Additional Programmers
Peter Andreasen
Jesper Christiansen
Henrik Edwards
Martin Gram
Martin Lütken
Michael Juel Nielsen
Additional Artists
Michael Bing
Alan Cameron Boyle
Morten Bramsen
Miklos Büte
Johan Flod
Henrik Hansen
Mads Prahm
Morten “Mazy” Hedegren
Michael Heilemann
Balàzs von Kiss
Peter von Linstow
Roberto Marchesi
Peter Eide Paulsen
Rasmus Poulsen
Additional Animators
Anders Haldin
Gabor Horvath
Craig Kristensen
Martin Madsen
Doron Meir
Simon Sonnichsen
Kim Zoll
Additional Sound Designer
Peter Wendelboe Hansen
Additional Engine
Programmers
Thomas Jakobsen
Ulf Johansen
Steffen Toksvig
Additional Script Writer
Morten Iversen
Music
Composed and Produced
by Jesper Kyd (Score)
Performed by the Budapest
Symphony Orchestra (Score)
QA
Petronela Cimpoesu
Hugh Grimley
Klavs Kofod
Janus Rau
Oliver Winding
Additional QA
Natasza Ashkanani
Christian Egense
Mikkel Havmand
Frederikke Hoff
Uffe Holm
Tatiana Højengaard
Marja Konttinen
Jakob Mygind
Thomas Møller
Kristian Rise
Jakob Rød
Management
Janos Flösser
Morten Borum
Support
Mette Agerbæk
Else Andersen
Michael Andersen
Ulla Andersen
Anni Greve Andersen
Fredrik Ax
Jakob Bondesen
Charlotte Delran
Chris Edgar
Peter Fischer
Cæcilie Heising
Thomas Howalt
Tantiana Højengaard
Niels Jørgensen
Søren Reinhold Jensen
Christoffer Kay
hbm ps2 final.qxd
4/25/06
1:17 PM
Page 22
23
Support (continued)
Jørgen Larsen
Tamir Lomholt
Karsten Lund
Ulf Maagaard
Foad Mojib
Jonas Nielsen
Rune Petersen
Mads Prahm
Genevieve Ripeau
Niels Ole Sørensen
Martin Schröder
Christine CT Thårup
Kjartan Vidarsson
Voice Casting & Direction (US)
KBA Voice Production
Featuring the Voice Talents of
David Andriole
David Bateson
Barbara Bernád
Brian Beacock
Joan M. Bentsen
Michael Benyer
Nicole Black
Scott Bullock
Billy Cross
Christopher Curry
Vinny Curto
Mark Deakins
Christine Dunford
Wayne Duvall
Alfred Fair
Crispin Freeman
Jorge Garcia
Grant George
Jessica Gee
Bob Glouberman
Francois Eric Grodin
Nemi Fadlahllah
Jean Claude Flamant
Thor Frølich
Heather Halley
Danielle Hartnett
Stew Herrera
Tish Hicks
Stephani Hodge
Tray Hooper
Roger L. Jackson
Peter Jessop
Bill Jurney
Barry Gordon Mc. Kenna
Mark Klastorin
Celestino Lancia
Noah Lazarus
Micheal Lindsay
Deborah Marlowe
Jennifer Martin
Don Mathews
Vivienne McKee
Jim Meskinen
Ennis Morris
Bob Neches
Byrne Offutt
Jeremy C. Petreman
Carlos Reig Plaza
Billy Pope
Earth Miller Bernard Reeves
Sam Riegel
Daniel Riordan
Paul Rugg
Sam Sako
Pete Scherer
Karen Strassman
Mathew Stravitz
Miles Stroth
Jim Thornton
Trey Turner
Sal Viscuso
Wade Williams
Laura J.K. Wrang
Voice Recording Studio (US)
Studiopolis
Mocap Actors
Christopher (Jack) Corcoran,
Tina Robinson,
Bo Thomas, Jamie Treacher
Cellist
Helle Sørensen
Additional Artwork
Supplied by Mine Loader
Software Co., Ltd.
EIDOS U.S.
I O - I N (Tc oEn tR
ACTIVE
inued)
22
CEO & President,
Eidos North America
Senior Channel
Marketing Specialist
Bill Gardner
Executive Vice President
of Marketing & Sales
Ilana Budanitsky
Channel Marketing
Project Manager
Robert Lindsey
Vice President,
Legal & Business Affairs
Diane Eng
Vice President, Finance
Malcolm Dunne
Vice President, Human
Resources
Edie Dykstra
Rafal Dudziec
Director of Marketing
Communications
Stephanie Lipetzky
Creative Services
Project Manager
Eileen Buenviaje
Marketing Manager
Jefferson Dong
Media Specialist
Micheal Tran
Public Relations Director
Michelle Seebach Curran
Graphic Designer
James Song
Public Relations Manager
Tali Fischer
Online Public
Relations Specialist
Web Producer
Roderick Van Gelder
Web Designer
Matt Dahlgren
National Sales Manager
John Lerma
Operations Manager
Joe Morici
Channel Marketing Manager
Gregory Wu
Senior External Producer
EIDOS U.K.
Janty Sumimoto
CEO
Jane Cavanagh
Commercial Director
Bill Ennis
Financial Director
Rob Murphy
Company Secretary
Anthony Price
Head of European Publishing
Scott Dodkins
Product Acquisition Director
Ian Livingstone
Worldwide CTO
Julien Merceron
Development Drirector
Darren Barnett
Executive Producer
Neil Donnell
Assistant Producer
Adam Lay
Creative Development Director
Patrick O’Luanaigh
Head of Global Brand
Larry Sparks
Brand Manager
Kathryn Clements
Head of Support Services
Flavia Timiani
Senior Localisation Manager
Monica Dalla Valle
Localisation Manager
Alex Bush
Creative Manager
Quinton Luck
Senior Designer
Jodie Brock
QA Manager
Marc Titheridge
QA Supervisor – Functionality
John Ree
QA Lead Technicians
David Haddon
Germaine Mendes
Shams Wahid
Clayton Palma
QA/CS Manager
Mark Cartwright
Senior QA Technician
Stephen Cavoretto
Channel Marketing
Coordinator
James O’Riordan
Associate Project Manager
Nick Goldsworthy
Assistant Lead QA Technician
Richard Hartzell
Quality Assurance
Katie Bieringer,
Richard Campbell,
Nicholas Cooprider,
Ergin Dervisoglu,
Wil Dimas, Kip Ernst,
Stephanie Greer, John Hayes,
Mackenzie Hume,
Nick Jacobson,
Jason Johnson,
Aaron Keillor, Erik Kennedy,
Chester Lee, Jeff Lowe,
Joshua Pfeiffer
Special Thanks
Jordan Romaidis,
Patrick Goodspeed,
Annie Meltzer, Sean Mylett,
Petrol Advertising,
Shane Francis Co.,
Danny Jiang, Susan Kwon
Julie Spund, Jason Bergquist,
Hanshaw Ink & Image
MUSIC CREDITS
Music sourced by
QA Technicians
Richard Acherki
Steve Addis
Linus Dominique
Allen Elliott
Steve Inman
Carl Perrin
William Wan
Special Thanks
A big thanks to all our
European Marketing,
Sales and Web teams
as well as our Finance
department who have done
a wonderful job to make
this game happen. Your
tremendous work is much
appreciated. A big thanks
also to Tom Waine for
writing this manual.
“Double Trouble” Performed by John Mayall’s
Bluesbreakers Courtesy of The Decca Record
Company Ltd
www.airbiscuit.net —
www.zenithcafe.co.uk
[email protected]
Licensed by kind permission from the Film
& TV licensing division. Part of the Universal
Music Group.
“Tomorrow Never Dies” (Karaoke version) Music:
Rosendahl/Christensen. Lyrics: Rosendahl/
Rosendahl. Performed by Swan Lee. Karaoke
version sung by Barbara Bernád.
“Double Trouble” composed by Otis Rush.
Published by Conrad Music, A Division
of Arc Music Corp.
“White Noise” performed by The Vacation.
Written by Ben Tegal & Steve Tegal. Produced
by Tony Hoffer. Published by Chrysalis
Music Limited.
Appears by kind permission of Chrysalis Music
and The Echo Label (P) & (C) The Echo Label
Limited 2004
Taken from the album Band From World War Zero
Published by Zenith Publishing Ltd. © 2003 Zenith
Publishing Ltd. Written by P Watts/S Gillett/
J Reeve. Performed by “Airbiscuit” from the album
Caldo-Freddo. Recording Copyright 2003 Zenith
Café Ltd
“Tomorrow Never Dies” (Original version) Music:
Rosendahl/Christensen. Lyrics: Rosendahl/
Rosendahl. Performed by Swan Lee. Original
version sung by Pernille Rosendahl
Franz Schubert (1797): “AveMaria.” The work is
in the Public Domain.
Artists: Daniel Perrett, Soprano. Praxedis Rütti,
Soprano. From the album Tudor4 7029
Ave maria. Zürcher Sängerknaben. Conductor:
Alphons von Aarburg. © 1995 Tudor Recording AG,
Zürich/Switzerland
“Slasher” Music and lyrics: Bo Heidelberg
& Kim G. Hansen Performed by Institute
for the Criminally Insane
hbm ps2 final.qxd
4/25/06
1:17 PM
Page 24
24
25
URBAN CHAOS™: RIOT RESPONSE™
DEMO
IN-GAME CONTROLS
BUTTON
ACTION
left analog stick
Move character
.
Crouch
button (push in and hold)
right analog stick
Look
f
Zoom aim
button (push in)
directional buttons *
Action order
directional buttons @
Open orders (when teamed up)
directional buttons $
“Follow me” order/Heal
directional buttons ^
“Take cover” order/Don’t heal
t
Cycle available thrown weapons
(hold for quick throw)
button
THE GAMESCREEN
s
button
Cycle available firearms
c
button
Cycle melee weapons
(hold for quick use)
x
button
Reload/Action/Skip cutscene
l
button (hold)
Use Riot Shield
,
button
Equip/Unequip Thermal Breather
(when available)
r
button
Fire selected weapons
d
button
Use Secondary Fire mode
(or Flashlight when using
one-handed firearms)
q
button
View objectives
w
button
Start/Pause game
Nick’s Health
Teammate’s
Health
Thrown weapons
Firearms
Melee Weapons
Total available
Number of rounds/items
available
SCREEN DISPLAYS
Currently selected weapon
Flashlight On/Off
HEALTH
This gives you an idea of how Nick’s doing. If the bar’s almost empty, you’d better
find a paramedic.
AIMING/DIRECTION CURSOR
An aiming cursor is always present in the center of the screen.
Its appearance depends on what weapon is currently selected.
If the cursor is green, the target is friendly — so hold your fire.
Tip: If the cursor is red, you’re hitting an enemy target.
Use the right analog stick to change the direction Nick is aiming
or looking in.
hbm ps2 final.qxd
4/25/06
1:17 PM
Page 26
26
27
WEAPON AND AMMO
This overlay shows the weapon you’ve selected and how
many rounds of ammunition are in its clip.
Note the on-screen buttons. Press the indicated button
to equip that weapon type. Press the button again
to toggle through other weapons of that type.
THE x BUTTON
Whenever you approach something Nick can interact with, such as a
door, an on-screen prompt appears. Press the Action button to carry out
the command.
OBJECTIVES MENU
The Objectives Menu lets you take a break from the action and check
on your progress.
• Press the q button to open the Objectives Menu.
• Press the directional buttons */@ to scroll through the list of objectives.
• Press the t button to return to the game.
Objectives are orders that must be completed in order to finish the mission.
The Primary Objective is the key to completing the mission. Complete Special
Objectives to win medals. Medals bring rewards as well as street cred.
Tip: Weaponry and other upgrades are available to the best of the best.
Emergency Missions are awarded for non-lethal capture of gang leaders.
Note: The x button returns to its normal function when you move away
from a door or other interactive item.
DISPLAY ORDERS ICON
When you move the cursor over certain colleagues or items, a Display Orders icon
appears.
• Press the directional button @ to open the Order Panel.
• Use the directional buttons to select the order you want to issue.
PAUSE SCREEN
The Pause Screen provides access to game options.
• Press the w button to view the Pause Screen.
• Use the directional buttons to highlight the following options and press
the x button to select:
RETURN TO GAME — Get back into the fray.
CONTINUE — Restart from the last checkpoint in the current mission.
RESTART MISSION — Return to the beginning of the mission.
OPTIONS — Open the Option Menu.
OBJECTIVES — View the Objectives screen.
QUIT — Return to the Main Menu without saving your progress.
©2006 SCi Games Ltd. “Eidos” and the Eidos Logo are trademarks of the Eidos group of companies. “Urban Chaos” and
“Urban Chaos: Riot Response” are trademarks of Eidos Interactive Ltd. The ratings icon is a registered trademark of the
Entertainment Software Association. All rights reserved.
hbm ps2 final.qxd
4/25/06
1:25 PM
Page 28
Register online at
www.eidosregistration.com
EIDOS, INC., LICENSE & LIMITED WARRANTY
DOWNLOAD NOW
www.eidosmobile.com
Visit www.esrb.org
for updated rating
information.
Hitman: Blood Money Vegas and Hitman: Blood Money L.A. © 2006 IO Interactive A/S. Developed by Morpheme Wireless Ltd. Published by Eidos Inc. Hitman, Hitman: Blood Money,
Eidos, Eidos Mobile, the Eidos logo, and the Eidos Mobile logo are trademarks of the SCi Entertainment Group. © 2006 InfoSpace, Inc. All rights reserved. Other trademarks
represented are owned by their respective companies. The rating icon is a registered trademark of the Entertainment Software Association. All rights reserved.
Eidos, Inc., warrants to you, the original purchaser of this disc, that for a period of
ninety (90) days from the date of your purchase, this disc shall be free from defects
in materials and workmanship. If, at any time during the applicable ninety (90) day
warranty period you determine that this limited warranty has been breached, Eidos,
Inc., agrees, in its sole option, to repair or replace, free of charge, any such disc,
provided the disc is returned postage-paid to the Eidos, Inc., Factory Service Center
and a proof of date of purchase is included. This limited warranty is not applicable
to normal wear and tear and shall be void with respect to any defects that arise
from disc abuse, unreasonable use, mistreatment or neglect. This disc is sold “as is”
without any warranties of any kind, express or implied, including implied warranties
of merchantability or fitness for a particular purpose, other than the limited warranty
expressly stated above.
No other claims arising out of your purchase and use of this disc shall be binding
on or obligate Eidos, Inc., in any manner. Eidos, Inc., will not be liable to you
for any losses or damages incurred for any reason as a result of your use of this disc,
including, but not limited to, any special, incidental, or consequential damages
resulting from your possession, use or malfunction of this disc.
This limited warranty states the entire obligation of Eidos, Inc., with respect
to the purchase of your disc. If any part of this limited warranty is determined
to be void or illegal, the remainder shall remain in full force and effect.
For warranty support please contact our Customer Support department
at (415) 615-6220. Our staff is available Monday through Friday, 9:00 a.m.
to 12:00 noon and 1:00 p.m. to 5:00 p.m. Pacific Time. You are responsible
for all toll charges.
Customer Support Representatives will not provide game hints, strategies
or codes.
PRODUCT RETURN PROCEDURE
In the event our support agents determine that your game disc is defective, you will
need to forward material directly to us. Please include a brief letter explaining what
is enclosed and why you are sending it to us. The agent you speak with will give
you an authorization number that must be included and you will need to include
a daytime phone number so that we can contact you if necessary. Any materials
not containing this authorization number will be returned to you unprocessed
and unopened.
Send your postage-paid package to the following address:
Eidos, Inc. Customer Services
RMA# (state your authorization number here)
651 Brannan Street, Suite 400
San Francisco, CA 94107
You are responsible for postage of your game to our service center.
© 2006 IO Interactive A/S. Developed by IO Interactive. Published by Eidos, Inc. Hitman, Hitman Blood Money, Eidos
and the Eidos logo are trademarks of SCi Entertainment Group. IO and the IO logo are trademarks of IO Interactive A/S.
The ratings icon is a registered trademark of the Entertainment Software Association. All rights reserved.


![ManualCover-3Panel10_03 [Converted]](http://vs1.manualzilla.com/store/data/005711777_1-408df82eece155ec198a9b3b174c8b0a-150x150.png)