1
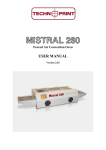
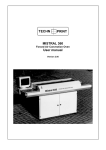
MISTRAL 460 DRY
Forced Air Convection Oven
USER MANUAL
Version 3.01
Mistral 460 Dry User manual
TABLE OF CONTENTS
1. Preface......................................................................................................................
2
2. Setting up..................................................................................................................
3
3. Working with the TFT touch screen.........................................................................
5
3.1 Starting the program .........................................................................................
3.2 Creating a program ...........................................................................................
3.3 Temperature progress for each zone .................................................................
3.4 Setting date and time..........................................................................................
3.5 Selecting a recipe...............................................................................................
3.6 Creating and changing the recipe name.............................................................
3.7 Using the Profiler menu.....................................................................................
3.7.1 Start profile test............................................................................................
3.7.2 Print report...................................................................................................
3.7.3 Store on USB................................................................................................
3.7.4 Macro information.......................................................................................
3.7.5 Show dealer information...............................................................................
3.8 The service menu................................................................................................
5
6
7
8
10
11
13
15
17
18
19
19
20
4. Specifications .............................................................................................................
20
5. List of spare parts .......................................................................................................
21
6. Appendix .....................................................................................................................
22
7. CE Declaration of Conformity...................................................................................... 23
Technoprint 2013
Version 3.01
Pagina 1
Mistral 460 Dry User manual
1. Preface
Congratulations! You have purchased a machine of high quality made with dedication to meet
the highest standards possible. To ensure proper operation we strongly advise you to read this
manual first.
This manual is designed to help you get the most out of the Forced Air Convection Oven
program in the shortest possible time. It is written for both the new and experienced user in
mind.
How this manual is organized:
The first section of the manual explains the unpacking and installation of the oven. Included is
a description of the principles and specifications of the oven.
The main section of the manual is built around questions a user might have concerning the
touch screen display. The software is designed to achieve the most user friendly control of the
oven simply by using your fingertip.
The figures:
The figures in this manual were captured with the intention of providing the clearest possible
tutorial for the program. Default screen positions and sizes were used in most cases.
Because the oven program can be configured in many different ways, do not be concerned if
you detect minor differences between the figures in this manual and what you see on your
own display.
Technoprint 2013
Version 3.01
Pagina 2
Mistral 460 Dry User manual
2. Setting up
Unpacking the oven:
Carefully unpack the oven and save the original package in case you need to ship the unit.
Ensure that1 thermocouple wire is enclosed.
Before starting the oven:
Operate the oven in a well ventilated room only.
Keep people, who do not operate the unit, away from the oven.
Power source:
380 VAC, 6-phase +N, 16A 50/60Hz.
Make sure that the oven is connected to a well earthed outlet.
CAUTION! Always disconnect the main plug of the unit from the outlet before servicing
the machine.
WARNINGS:
Notices on installation
-
-
Installing the oven, in a location free from rain and snow, and near the fire
extinguisher.
Installation and/or servicing should only be done by a qualified electrical engineer.
A wet oven can be a source of electrical shock and the oven can be damaged.
Be sure to install complying with industry standards. Incomplete installation can cause
stumbling accidents or electrical shock.
Be sure to install the oven on a flat and solid surface.
Be sure to provide with clearance of at least 4 inches (10 cm) between the unit and
walls.
Be sure to connect the power cord complying with industry standards.
Check the power supply to se if it can satisfy the specifications of the oven. The
working voltage ranch can not out of 10 % when the oven is working. Violating this
standard can cause electrical shock or fire. If you cannot identify the specifications of
the power supply used, consult the supplier.
Be sure to connect a ground wire to the oven. Operating the oven without grounding it
can cause electrical shock or fire by a short circuit.
Do not bundle the power cord, otherwise a fire can be caused.
Do not step on, squeeze, or forcedly twist the power cord; otherwise the power cord
can be damaged, causing electrical shock or fire. If your power cord has been
damaged, consult the supplier for replacement.
Technoprint 2013
Version 3.01
Pagina 3
Mistral 460 Dry User manual
Notices on operation
- Do not operate any switch with a wet hand, otherwise you can get a electrical shock.
- Do not use combustibles (e.g. thinner), combustible gases, or volatile matter near the
oven; otherwise explosion or fire can be caused.
- Co not put anything on the oven while using the oven. The heat could cause
deformation, cracking, etc.
- Consult only your dealer for repairs. Incomplete repairs can cause electrical shock, fire
or stumbling.
- When removing dirt on the oven, do not use chemicals, such as thinner or benzene;
otherwise accidents can be caused.
Purpose of using the oven
The oven was designed only to be used for drying. Do not use for other purposes.
Exhaust:
To connect the exhaust: move the exhaust pipe over the stud at the rear end of the oven. From
there you can exhaust directly to the outside as long as the distance is less the 3 meter.
When the distance is more then 3 meter, an additional exhaust ventilation unit is required.
Note that when using an added ventilation unit air flow regulation may be required since
excessive air exhaust can cause temperature drop in the oven.
Timer function:
Timer function is included to be used as a timed starter of the machine. The machine is
switched on by the timer, and switched off by switching to O on the O/1 switch.
Important: when timer is set to “START” at for instance 7.00 h., always activate STOP
at 7.02 h. (2 minutes later). The machine is communicating with START impulse at the
timer, not the STOP impulse.
If STOP is not activated the machine will restart when switched off.
For further information: check user manual of the timer.
Technoprint 2013
Version 3.01
Pagina 4
Mistral 460 Dry User manual
3. Working with the TFT touch screen
3.1
Starting the program
Connect powersupply and keep it active
because of the powersupply of the timer.
After the machine is started up with the
main switch and 0/1 switch, the display
will start automatically and
you will see screens that similar are to the
one shown on the left.
The display will start in operational
modus.When oven heats up there is a
YELLOW light blinking (in screen NOT
READY). When all zones have reached
their temperature and are stabelized, light
is solid GREEN and on screen you see a
sigh READY.
Here you can find all information about
the temperatures for each zone and
conveyor belt speed.
In this menu screen you are allowed to set
any temperature between 0 and 200°C for
each zone with increments of 0.1°C and
any conveyor speed between 7 and 55
cm/min with increments of 1cm.
In the upper part of the screen you will
see the actual temperature for each zone
PV (°C) and the set temperature for each
zone SV (°C). The default value is 0.0 °C
for each zone.
In the middle of the screen you will see the Product temp. This is the actual temperature
measured by the probe of the thermocouple when it is connected to the outlet. If no
thermocouple is connected a message Not connected is shown.
Following that the current recipe is shown. Up to 8 named recipes can be stored in the
program. The default value is 1 <empty>.
Below the Cur. recipe you will find the Belt speed showing the actual speed of the conveyor.
The default value of the speed is 15 cm/min.
After powering down the machine the control will always save all last settings entered.
Technoprint 2013
Version 3.01
Pagina 5
Mistral 460 Dry User manual
3.2
Creating a program
Creating a program can be done in the
operating menu. Tap on “unlock”.
Request for password will appear.
Password is known by the head of
administration. After giving this password
you can tap within the square with the
temperature setting for the zone you want
to change. A soft keypad as shown on the
left will appear on the screen. Enter the
desired value within the range indicated
on the top left of the soft keypad.
All settings entered with the soft keypad
will be remembered after powering down
the machine.
Setting the conveyor speed can be done as
follows:
Tap within the square with the conveyor
speed setting. A soft keypad as shown on
the left will
appear on the screen. Entering a value for
the conveyor speed is done in the same
way as entering a value for the
temperature. Settings entered both ways
will always be
saved after powering down the machine.
After all settings are entered the screen will show the desired settings as shown for example in
the screen on the left. To activate the program tap on the
show “RUN” next to the button. To stop the program tap on the
the status will show “STOP” next to the button.
button once; the status will
button once again;
To lock system again, tap on main menu and go to operate again.
Everytime you want to change temperature settings or beltspeeds you have to “unlock” and
follow this process again.
Technoprint 2013
Version 3.01
Pagina 6
Mistral 460 Dry User manual
3.3
Temperature progress for each zone
Tap on the
button in the
operating menu or tap on the
button in the main menu
(figure 1 on page 11) to see a temperature
curve for each zone and thermo coupler
(if connected) on a time base.
A screen like this will appear with graphs
steadily changing for each temperature
zone. When a thermocouple is connected
a dotted line will appear indicating the
probe’s temperature.
Tap anywhere in the screen to go back to
the operating menu.
Temperature alarm
When one or more oven zones exceed the temperature deviation an acoustic signal will be
activated together with a red signal lamp. Also a screen will appear with this report.
Technoprint 2013
Version 3.01
Pagina 7
Mistral 460 Dry User manual
3.4
Setting date and time
To alter date and/or time go to the
operator menu shown to the left.
The operator menu can be called up by
tapping on the
or
button if shown in your current screen.
Tap on the
button and
the main menu screen as shown to the left
will appear.
Tap on the
button to
jump to the setting screen to alter or set
date and/or time. Tap on each set of
numbers (default is 00) below the date or
time indication.
Technoprint 2013
Version 3.01
Pagina 8
Mistral 460 Dry User manual
With the soft keypad appearing in the
screen any number between
1 and 99 can be entered. Note that any
number exceeding the maximum
allowed value for the specific field
entered will not be stored.
Technoprint 2013
Version 3.01
Pagina 9
Mistral 460 Dry User manual
3.5
Selecting a recipe
Up to 8 recipes can be stored for your
convenience.
Each recipe can hold a program, as
created for example in chapter 3.2.
After creating your program the screen
will look similar the one on the left (with
possible other entered values).
The first recipe you create is stored under
recipe number 1 (default). By calling up
another recipe number you can create a
new program which will automatically be
stored under that number.
To change to another recipe number:
button, a screen
Tap on the
looking like the one on the left will
appear. You are now in the recipe menu.
To select the recipe number you want to
activate tap within the square next to
“SELECT YOUR RECIPE:”
A soft keypad as shown in the screen on
the right will appear. Here you can enter
the desired recipe number within the
range indicated on the
top left of the soft keypad.
All settings entered with the soft keypad
will be remembered after powering down
the machine. To go back to the operating
menu after you have called up a new
button.
recipe number tap on the
From the operating menu you can create a
new program under the set recipe as explained in chapter 3.2
Technoprint 2013
Version 3.01
Pagina 10
Mistral 460 Dry User manual
3.6
Creating and changing the recipe name
To create a new recipe name or to change
an existing recipe name tap
on the
menu.
button in the operating
You should see a screen as shown on the
left.
Tap on the
button to access the
input fields for all 8 recipes.
A screen as shown on the left will appear.
Tap in the desired recipe field box that
you wish to name or rename.
Technoprint 2013
Version 3.01
Pagina 11
Mistral 460 Dry User manual
A soft keypad will appear so that a 16
character name can be entered.
All settings entered with the soft keypad
will be saved after powering down a
machine.
Tap on the
menu.
Technoprint 2013
Version 3.01
button to enter main
Pagina 12
Mistral 460 Dry User manual
3.7
Using the Profiler menu
The profiling menu can be used to store,
print or view important data registered by
the thermo coupler(s).
Before this can be done some variable
must be entered in the profiling menu.
First go to the operator menu shown to
the left.
If you connect the thermo couple to the
thermocouple input, on the left of the
oven, the next screen will appear.
From here there profiler menu can be
called up by tapping on the
button.
From this menu several sub menus can be
accessed. ( For that purpose this screen
will be indicated as “profiling test screen”
for further use in this manual, when
referred to this screen. )
Technoprint 2013
Version 3.01
Pagina 13
Mistral 460 Dry User manual
When you tap “meltpoint temperature” a
soft keypad will appear and a value for
meltpoint temperature can be entered ore
altered.
On the profiling test screen there will appear a red line. This screen shows the parameters for:
- Peak temperature
- Critical temperature
And it also shows the time ( that the PCB is on ore above meltpoint temperature which is
important for maximum time and temperature, the most critical component of the PCB
require.)
Each time you tap on
Technoprint 2013
you can see all entered parameters in one screen.
Version 3.01
Pagina 14
Mistral 460 Dry User manual
3.7.1 Start profile test
Make sure the machine is running. Tap on
in the operating menu. Place
PCB and thermocouples in starting
in operating
position and tap on
menu. You enter the profile test screen as
shown on the left. Than tap on start.
Than tap on
and wait for about 15
seconds for the curve to appear.
This warning screen will appear every
time you do a new profiling test.
If you don’t want to have this warning
again, you can disable it by tapping on
Don’t show this message again.
If you want to re-enable the warning
message tap on
menu.
Technoprint 2013
Version 3.01
in profile test
Pagina 15
Mistral 460 Dry User manual
After the curve has been made tap on
Now all data have been registered.
Tap on
to see all of the
information you will need.
Touch the screen anywhere to return to
“profiling test” screen.
Technoprint 2013
Version 3.01
Pagina 16
Mistral 460 Dry User manual
3.7.2
Print report
All data captured from the profile test can
be printed by a printer connected to USB
connector located on the left side of the
oven. (see page 22 )
Tap on
Tap on
to start printing.
Tap on
again.
to enter profiling test
Use a printer that is compatible to HP laserjet
Technoprint 2013
Version 3.01
Pagina 17
Mistral 460 Dry User manual
3.7.3
Store on USB
Collected data from the profiler menu can
be “dumped” to a external storage device
connected to the USB connector on the
left side of the oven. ( see page 22 )
Tap on
The next screen will indicate if USB
storage is connected ore not. Before data
is dumped, a number can be assigned to
the file by tapping on the “0” behind the
file ID number.
A softkey pad will appear and the ID
number can be entered. Than tap on
to start downloading the data.
You can use all kinds of USB sticks
except the ones with password
protection.
Technoprint 2013
Version 3.01
Pagina 18
Mistral 460 Dry User manual
3.7.4 Macro information
Data stored on USB stick can be visualised in a graphic drawing. To simplify the process
there is a macro tool installed on the USB stick. (Delivered with the computer)
Step 1
Place USB stick in USB entry of the computer
2
Open the USB stick
3
Open macro file
4
Click on “Open CSV”
5
Look up USB stick (my computer)
6
Open SAM... with ID number
7
Open SA... (With stored data)
8
Curve appears
3.7.5 Show the Dealer information
Dealer information is factory set and can
only be changed by an authorized dealer.
Dealer information can be accessed from
the main menu. Starting from
the operator menu tap on the
button to go to the main menu.
The dealer information screen will show
all necessary information to contact the
dealer where this machine was purchased
from. Tap anywhere in the screen to go
back to the main menu.
Technoprint 2013
Version 3.01
Pagina 19
Mistral 460 Dry User manual
3.8 The service menu
The Service menu should only be used by a certified technician and is therefore protected
with a password.
4. Specifications
The reflow oven MISTRAL-460 Dry is developed for drying products or curing adhesives.
Transport system
The boards are transported through the oven on a conveyor belt made from high grade
stainless steel spring wires with variable speed between 7 and 55 cm/min (3 to 23 inch/min).
When for some reason the motor is damaged or conveyor is not running because of some
obstruction, the red alarm lamp will light up together with an acoustic alarm. On the screen
will appear a notification “transportbelt is not running”
Heating system
Heating is achieved by forced air convection. This reduces the shadow effects and results in
no colour sensitivity, no hot spots. If for some reason the temperatures get “off line” more
than the installed marge (for instance ± 5 °C) the oven will give an alarm sign with red light
and acoustic signal.
To increase of decrease this marge go from Main menu.... to Deviation Bond..... to max.
Temperature deviation and change the setting.
Cooling system
Top and bottom cooling fans at the offload section ensure cooling of your circuits before
leaving the transport belt. If for some reason one of the cooling ventilators brake, the yellow
light will start to appear. (machine stays active, this is only a repair warning)
Control
All functions are controlled by a TFT touch screen display which is easy to program with a
user friendly interface. Furthermore this control is equipped with a USB
compatible data interface for data output to a printer or storage device.
2.0
Exhaust
The integrated exhaust system transports fumes to an outdoor ventilation or filtration unit.
Thermocouple wire
The included thermocouple wire can be used to monitor the temperature progress when
attached to a PCB or any other object running through the oven on the conveyor belt.
Technoprint 2013
Version 3.01
Pagina 20
Mistral 460 Dry User manual
5. List of spare parts
Article number:
Description:
100319
Bearing for roller, round 32 x 15 x T9
100320
Cooling front/rear blower 120x120x38
100333
Control module for touch screen
100397
Digital Timer EF700ET
100396
Dio controle module
100321
Emergency stop switch
100317
Forced air heater ventilator
100325
Glass oven, hardened
100322
Heater element 1200W
100323
Heater element 1800W
100324
Main relay
100330
Main switch
100388
Powersupply 24V with PSU
100329
Solid state relay 25A
100398
Step motor
100399
Stepmotorpowercard
100331
Thermocouple sensor for measuring inside
chamber
100074
Thermocouple wire with plug, set of 2
100318
Touchscreen 5,8”full colour
Technoprint 2013
Version 3.01
Pagina 21
Mistral 460 Dry User manual
Technoprint 2013
Version 3.01
Pagina 22
Mistral 460 Dry User manual
CE Declaration of Conformity
Technoprint
Veldzichtweg 10B
3851 SH Ermelo
Tel. : 0341 563026
Fax.: 0341 563027
E-mail: [email protected]
www.technoprint-smt.nl
Technoprint as stated above, herewith declares that:
FORCED AIR CONVECTION OVEN
MISTRAL 460
-
are in compliance with the machinery directive
(89/392/EEC, as amended, 91/368/EEC,93/44/EEC, 93/68/EEC);
-
are in conformity with the provisions of the following other EEC directives;
73/23/EEG, 89/336/EEG
-
the following harmonized standards have been applied: EN 60204-1
Serial number:
Year of manufacturing:
The Netherlands, Ermelo, 01-01-2013
Technoprint 2013
Version 3.01
R.van de Beek , Director
Pagina 23