1
iQBio™
iQBio™ Guardian XL30 / XL99
User’s manual
The iQBio™ Guardian XL™ Series Fingerprint Lock is a technically
sophisticated yet simple electronic lock specially designed for use in
homes and small offices.
The Guardian XL™ uses a high-performance algorithm to capture and
identify each user and doesn’t actually store your fingerprint, but only a
small subset of the representative features of your fingerprint called
minutiae in a fingerprint template. This template cannot be removed
from the lock to create a replica of your fingerprint by any method.
The Guardian XL™ has a capacity of 30 (XL30) or 99 (XL99) unique
fingerprint templates and can identify a specific person (1:N) in less
than 1 second which is more than 3 times faster than competing fingerprint locks currently on the market.
Through the use of a sensor installed directly below the fingerprint
scanner that detects the contact of the user's finger, fingerprints will
then be “read”, encoded and transmitted to the lock’s memory.
The action of placing your finger on the fingerprint scanner automatically triggers the locks identification system. If the fingerprint template
presented matches a fingerprint template enrolled in the system, the
door unlocks and is then ready to open. No wake-up button or keystroke is required. This mechanism controls the power consumption
thus saving energy and substantially prolonging the life of the batteries.
The iQBioLock™ system in the Guardian XL Series Fingerprint Lock
can also be operated with the use of PIN’s (6-14 digits) or an emergency non-duplicable mechanical key. The lock can be set to normally
closed (Secure Mode) or normally open (Pass Mode) as needed.
2
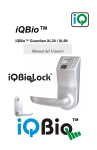
Enrollment of Fingerprint
iQBio™ Guardian XL
Enrollment Notes
Gently place your finger on the window panel when enrolling your
fingerprint. Do not “point” at the sensor, but place your finger firmly on the
entire sensor panel to read properly.
Remember to hold your finger still for the 4-5 second enrollment period. This will ensure a good quality print and will make identification much
easier when you try to open the lock with your fingerprint.
Infrequently, some fingerprints may not enroll even after multiple attempts. If one of your fingers happens to fall in this category, please try
enrolling another finger. This often times resolves this rare issue.
3
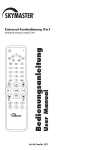
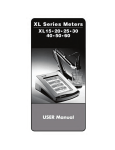
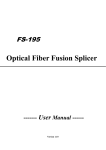
iQBio™ Guardian XL™
Front Panel Diagram
c: iQBioLock™ Fingerprint Scanner
d: LED Indicator
e: Keypad
f: Display Screen
g: Front Panel
h: Cylinder Cover
i : Outside Lever Handle
j: Hex Screw for Installing Door Handle Lever
4
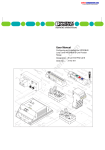
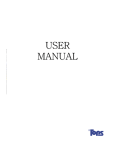
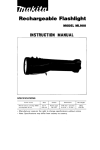
iQBio™ Guardian XL™
Back Panel Diagram
c: Latch - “Mechanical Deadbolt” Feature
d: 4 AA Battery Compartment
e: S1---Auto/ Manual Switch
f: S2---Function Switch
g: Battery Cover Latch
h: Inside Lever Handle
5
Contents
1. Quick start Guide—Enrolling Administrators......7
2. Enrolling “User” fingerprint templates .............10
3. Unlocking Door by fingerprint templates .........12
4. Setting PIN by fingerprint templates ..............13
5. Using the PIN to unlock ................................15
6. Changing PIN for the same ID No ……...........16
7. Deleting all fingerprint templates and PINs ….18
8. Deleting selected users …………....................19
9. S1 switch: Pass Mode or Secure Mode …..... 20
10.Display information of enrolled users …........22
11.Using mechanical key to unlock .................... 23
12.Battery low indicator …….............................. 24
13. Use of the Mechanical Deadbolt Feature … 25
14. iQBio™ Warranty Statement ……………….. 26
15. Enrollment Table …………………………….. 28
16. Record of Purchase Information …………… 33
17. Features and Specifications ……………….. 34
6
iQBio™ Guardian XL™
Quick start - Administrator
1.1
Switch Function Switch S2 to the
middle position
1.2
Install the batteries, the Display Screen
will show 10 which means this model can
accommodate up to 10 fingerprint templates (30 for XL30 ,99 for XL99), and then
vX which is the version of lock and then
shows 00 which means that no fingerprint template
has been enrolled.
This is the factory default setting for all iQBioLock™ Guardian XL™ Door Locks.
Press any key to wake up the lock.
1.3
Input the default password 123456 as below:
1.4
1
2
3
4
5
6
You are now ready to
Enroll the First Administrator
Proceed to the next page...
7
1.5
LED indicator blue light blinks.
1.6
Press the 1 key until the display screen
shows Fn.
1.7
Place the First Administrator’s finger on the fingerprint scanner and hold until a beep sounds twice
and the LED Indicator flashes solid blue.
1.8
Remove the finger and display screen will
show the fingerprint ID 01, if successful.
1.9
If display screen shows E0 means the
enrollment was not successful. In this
case, repeat steps 1.3 to 1.8 listed above.
1.10 If display screen shows E1 it means that
this fingerprint is already enrolled in the
Guardian XL.
Place the enrolled finger on the fingerprint scan-
1.11 ner and hold firmly for identification.
1.12
The LED Indicator will light up (red).
8
1.13 If identification is successful, 2 beeps will sound and
the LED indicator will flash solid blue and the Guardian XL will unlock.
1.14
Remove finger and turn the handle to open.
The default PIN will be deleted automatically
for security purposes after the first Administrator‘s fingerprint is enrolled and used to
open the door. You must choose a new PIN
at this point to secure your lock from misuse.
You may select a PIN from 6 to 14 digits in
length, but remember to record your PIN number for
future use. It is also advisable to make a record of
the individuals enrolled in your lock in the enrollment
table provided at the end of this manual.
If the Manual Deadbolt Feature is engaged,
the Guardian XL will not open even if an authorized Users fingerprint or PIN is identified.
This is a safety feature to allow for secure
locking from within the premises.
9
iQBio™ Guardian XL™
Enrolling Additional Users
2.1
Change Function Switch S2 to the
center position,
2.2
Unlock the Guardian XL by presenting either Administrator’s Fingerprint on the Fingerprint Scanner or entering the Administrator's PIN Code on the
Keypad.
Administrator IDs must always be set as 01
or 02. Either the Primary Administrator (01)
or the Secondary Administrator (02) may enroll or delete users at will with either their
fingerprint or PIN code using the method
above.
2.3
2.4
2.5
The LED Indicator will light up, showing a blinking
blue light - this means that you have entered the
Enrollment Mode and are ready to enroll additional
Users or a Secondary Administrator.
Press the 1 Key on the Keypad, until the
Display Screen shows the fingerprint enrollment function Fn.
Place the finger on the Fingerprint Scanner. A
beep sounds twice and the blue light will appear
notifying you of a successful enrollment.
10
2.6
A number will appear in the Display Window indicating the enrolled users ID Number. The second person enrolled in the Guardian XL is automatically assigned the ID 02 and is the Secondary Administrator.
Each additional user is enrolled using the same
method and is assigned an incremental ID Number
from 3 to 30 (XL 30) or 3 to 99 (XL 99).
Please make sure to note of the name of the user
and their corresponding ID Number and record this
information on the Enrollment Table located in the
rear of this manual.
Using the Function Switch in the center position will
allow either Administrator to Authenticate to enroll
additional users into the Guardian XL one at a time.
If you are enrolling multiple users at one time into the
Guardian XL, it is more convenient to change the
Function Switch to the + Position as shown below.
The center position is the normal operating setting for
Function Switch S2.
.
11
iQBio™ Guardian XL™
Unlocking by Fingerprint
3.1
3.2
3.3
3.4
3.5
Return Function Switch S2 to center position .
The center position is the normal
operating setting for Function
Switch S2 .
Place any enrolled finger on the reader window and
hold for Identification.
The LED Indicator will light-up red.
If the Identification of an enrolled Administrator or
User is successful, the Guardian XL will beep twice
notifying you that the door is unlocked and the LED
Indicator will turn blue.
Remove your finger from the Fingerprint Scanner
and simply turn the handle to open. The ID Number
of the enrolled fingerprint will flash on the Display
Screen.
12
iQBio™ Guardian XL™
Setting PIN Using Fingerprint
4.1
Switch Function Switch S2 to the
center position .
4.2
Unlock the lock by the enrolled Administrator’s
fingerprint or PIN code.
4.3
Press the 3 button on the Keypad and
hold Until the Display Screen shows “Pn”
4.4
Place the enrolled finger of the Administrator or User that wishes to change their PIN code.
4.5
If the Identification of the Administrator or User is
successful, the Display Screen. will display the ID
Number and then P1.
4.6
Input the new PIN code (6-12 digits).
4.7
Press the 9 button on the Keypad and hold
until the Display Screen shows P2.
4.8
Repeat the PIN code.
See Page 14 for Remaining Steps ...
13
4.9
Press the 9 button on the Keypad and hold
until the display screen shows the ID Number of enrolled Administrator or User.
4.10 The PIN code is now set successfully for this enrolled
Administrator or User.
The default PIN code of 1 2 3 4 5 6 may not be selected by any enrolled Administrator or User and is
reserved for the Factory Default Setting only.
14
iQBio™ Guardian XL™
Using the PIN code to unlock
5.1
5.2
5.3
Press any key to wake up the lock.
Simply press any enrolled PIN and the
Display Screen will show the ID Number of enrolled Administrator or User
Now the lock can be unlocked by turning the lever
handle.
The Function Switch S2 may be in any position
for this procedure to work.
15
iQBio™ Guardian XL™
Changing a Users’ PIN code
6.1
Unlock the lock by using the enrolled Fingerprint
Template or PIN of any enrolled User..
6.2
The Display Screen will show the ID Number of
enrolled User
6.3
Press and hold the 3 button on the Keypad..
6.4
The display screen will show P1.
6.5
6.6
6.7
6.8
6.9
6.10
Input the new PIN.
Press and hold the 9 button on the Keypad,
The display screen will now show P2 .
Repeat the new PIN.
Press and hold the 9 button on the Keypad,
The Display Screen will show the ID Number of the
enrolled User and their corresponding PIN code is
now changed.
16
If the 9 button on the Keypad is depressed and held directly after the Display Screen shows P1 or P2, the enrolled Users PIN will be deleted from the
Guardian XL.
If any Administrator
wishes to change their PIN
code, please refer to section 4.
There are four numeric buttons on the Keypad.
Each key represents ANY of the numbers on the
key. For instance if the desired PIN is 8761593
then you would press the keys in the following
sequence:
8
7
6
1
5
9
Each of the buttons on the Keypad have
a corresponding function once the door
is opened. These functions are listed
below the numbers on the buttons.
17
3
iQBio™ Guardian XL™
Factory Default Reset
7.1
Switch Function Switch S2 to the position.
7.2
Place any Administrators enrolled finger on the
Fingerprint Scanner to wake up the lock.
7.3
The Display Screen will display dA
7.4
Press and hold the 9 button on the Keypad – until 2 beep sounds are heard and
the display screen will show the ID Numbers of the
enrolled Administrator and Users being deleted
from the lock one by one.
7.5
Wait, until the Display Screen displays dA
again.
7.6
The deletion of all enrolled Administrators and Users is now complete.
The Guardian XL is now re-set to Factory Default
Setting and the default PIN is reset to 123456. The
first person to enroll in the Guardian will receive the
ID Number 01 and be the Primary Master on the
lock.
18
iQBio™ Guardian XL™
Deleting Individual Users
Switch Function Switch S2 to the
8.1 center position.
8.2
8.3
8.4
Unlock the lock by placing any Administrators enrolled finger on the Fingerprint Scanner or entering
any Administrators Enrolled PIN code.
Press and hold the 6 button on the Keypad
until 2 beep sounds are heard and the
Display Screen will show dE and then dis
play the next Enrolled ID Numbers
03 through 30 (XL30) or 99 (XL99).
Using the 3 button and 6 button to move up
or down the Enrolled ID Numbers select
the Administrator or User ID Number to be
deleted.
8.5 Once the proper Administrators or User ID
Number to be deleted is shown on the
Display Panel, Press and hold the 9 button
until the Guardian XL beeps twice and the
Display Panel shows dE signifying that the
Administrators or User has been deleted from the
lock. The Administrators or User being deleted
does not need to be present to be removed from the
system.
19
iQBio™ Guardian XL™
Pass Mode and Secure Mode
9.1
The position of the Function Switch
S1 determines the current operating
mode of the iQBio™ Guardian XL™.
The switch will either be on A for Auto
Lock or M for Manual Lock Mode.
9.2
Initially in the Factory Default Setting the Function
Switch S1 is set to A.
9.3
To use Pass Mode - make sure the Function
Switch S1 is set to A.
9.4
Unlock the lock by using the enrolled Fingerprint
Template or PIN of any enrolled User.
9.5
The Display Screen will show the ID Number of
enrolled Administrator or User
9.6
Press and hold the 9 button on the Keypad until the Display Panel shows oP,
denoting that the lock is in Pass Mode
and the door will open each time someone turns the handle.
9.7
To disengage Pass Mode, simply put any enrolled
finger on the Fingerprint Scanner and when the
LED Indicator flashes blue, pull the handle.
20
9.8
9.9
9.9
When the Function Switch S1 is set to M or Manual
Locking Mode, if an authorized Administrator or
User unlocks the Guardian XL™ and does not open
the door when the LED Indicator is flashing blue, the
lock is automatically set to Pass Mode. Any further
pulling of the outside handle will open the lock.
To disengage Pass Mode, simply put any enrolled
finger on the Fingerprint Scanner and when the LED
Indicator flashes blue, pull the handle.
When the Function Switch S1 is set to M or Manual
Locking Mode, if an authorized Administrator or
User unlocks the Guardian XL™ and opens the door
when the LED Indicator is flashing blue, the lock is
automatically set to Secure Mode. Any further pulling
of the outside handle will NOT open the lock.
To use Pass Mode with Function Switch S1 in the A
setting you must use the procedure 9.4 through 9.6 or
each time a Administrator or User is Identified and
the lock unlocks, the door must be opened when the
LED Indicator is flashing blue or the door is reset to
Secure Mode (Locked).
21
iQBio™ Guardian XL™
Display info of lock
10.1 Press any key to wake up the lock.
10.2 Press the 1 button on the Keypad and then
press and hold the 9 button on the Keypad
until the Guardian XL™ beeps twice and the
display screen will show the capacity of the
lock (30 or 99), and the version of your
iQBio™ Guardian XL™. This procedure is
only used to identify the model of iQBio™ Guardian
XL™, version number and the fingerprint capacity.
22
iQBio™ Guardian XL™
Use mechanical key to unlock
11.1
Insert the cylinder-cover-removal pin to remove the
cover.
Insert the emergency key into the slot and turn
11.2 counter-clockwise 90° to unlock the iQBio™ Guardian XL™.
11.3 Turn the lever handle to unlock the door.
11.4
After unlocking, turn key back to the original position
to remove the key.
11.5
Replace the cylinder-cover to restore your iQBio™
Guardian XL™ to its original condition.
23
iQBio™ Guardian XL™
Battery low indication
If the battery is low, when unlocking, the display
screen will show and follow by beep warning
sound, please replace the battery as soon as possible.
You should be able to achieve a minimum of 100 openings
of the iQBio™ Guardian XL™ with a low battery indicator,
however we recommend changing the batteries as soon as
the indicator is noticed on the Display Panel.
24
iQBio™ Guardian XL™
Use of the Mechanical Deadbolt
Your iQBio™ Guardian XL™ is configured with an additional safety feature – a Mechanical Deadbolt that can only
be secured or opened from inside the room.
As an added security feature, this Mechanical Deadbolt will
lock the door such that even if a person is authorized in the
lock, they will not gain entry to the premises.
To use the Mechanical Deadbolt, turn the knob at the top of
the back of the iQBio™ Guardian XL™ in a clock-wise motion until the deadbolt is engaged inside the latch plate.
To disengage the Mechanical Deadbolt, turn the knob at
the top of the back of the iQBio™ Guardian XL™ counterclockwise until the deadbolt is returned inside the lock body.
25
iQBio™ Guardian XL™
Warranty Statement
Intelligent Biometric Solutions, LTD (IBSL) (HK) and Artemis Solutions
Groups (ASG) warranty obligations are limited to the terms set forth
below. Please read carefully:
[IBSL (HK) and/or ASG (USA)] (herein referred to as iQBio, We, Us, or Our(s)), warrant
this iQBio branded product against defects in materials and workmanship under normal
use for a period of ONE (1) YEAR from the date of retail purchase by the original enduser purchaser ("Warranty Period"). If a hardware defect arises and a valid claim is
received within the Warranty Period, at its option, We will either (1) repair the hardware
defect at no charge, using new or refurbished replacement parts, or (2) exchange the
product with a product that is new or which has been manufactured from new or serviceable used parts and is at least functionally equivalent to the original product, or (3)
refund the purchase price of the product. We may request that you replace defective
parts with new or refurbished user-installable parts that we provide in fulfillment of its
warranty obligation. A replacement product or part, including a user-installable part that
has been installed in accordance with instructions provided by us, assumes the remaining warranty of the original product or ninety (90) days from the date of replacement or
repair, whichever provides longer coverage for you. When a product or part is exchanged, any replacement item becomes your property and the replaced item becomes
our property. Parts provided by us in fulfillment of our warranty obligation must be used
in products for which warranty service is claimed. When a refund is given, the product
for which the refund is provided must be returned to us and becomes our property.
EXCLUSIONS AND LIMITATIONS
This Limited Warranty applies only to hardware products manufactured by or for Us that
can be identified by the "iQBio" trademark, trade name, or logo affixed to them. The
Limited Warranty does not apply to any products not manufactured by iQBio. Manufacturers, suppliers, or publishers, other than iQBio, may provide their own warranties to
the end user purchaser, but iQBio, in so far as permitted by law, provides their products
"as is". iQBio do not warrant that the operation of the product will be uninterrupted or
error-free. iQBio is not responsible for damage arising from failure to follow instructions
relating to the product's use.
This warranty does not apply: (a) to damage caused by use with non-iQBio products;
(b) to damage caused by accident, abuse, misuse, flood, fire, earthquake or other
external causes; (c) to damage caused by operating the product outside the permitted
or intended uses described by IQBio; (d) to damage caused by service (including upgrades and expansions) performed by anyone who is not a representative of iQBio or
an iQBio Authorized Service Provider; (e) to a product or part that has been modified to
significantly alter functionality or capability without the written permission of iQBio; (f) to
consumable parts, such as batteries, unless damage has occurred due to a defect in
materials or workmanship; or (g) if any iQBio serial number has been removed or defaced.
TO THE EXTENT PERMITTED BY LAW, THIS WARRANTY AND.REMEDIES SET
26
FORTH ABOVE ARE EXCLUSIVE AND IN LIEU OF ALL OTHER WARRANTIES,
REMEDIES AND CONDITIONS, WHETHER ORAL OR WRITTEN, STATUTORY,
EXPRESS OR IMPLIED. AS PERMITTED BY APPLICABLE LAW, IQBIO SPECIFICALLY DISCLAIMS ANY AND ALL STATUTORY OR IMPLIED WARRANTIES, INCLUDING, WITHOUT LIMITATION, WARRANTIES OF MERCHANTABILITY, FITNESS FOR A PARTICULAR PURPOSE AND WARRANTIES AGAINST HIDDEN OR
LATENT DEFECTS. IF IQBIO CANNOT LAWFULLY DISCLAIM STATUTORY OR
IMPLIED WARRANTIES THEN TO THE EXTENT PERMITTED BY LAW, ALL SUCH
WARRANTIES SHALL BE LIMITED IN DURATION TO THE DURATION OF THIS
EXPRESS WARRANTY AND TO REPAIR OR REPLACEMENT SERVICE AS DETERMINED BY IQBIO IN ITS SOLE DISCRETION.
No IQBio reseller, agent, or employee is authorized to make any modification,
extension, or addition to this warranty.
EXCEPT AS PROVIDED IN THIS WARRANTY AND TO THE EXTENT PERMITTED
BY LAW, IQBIO IS NOT RESPONSIBLE FOR DIRECT, SPECIAL, INCIDENTAL OR
CONSEQUENTIAL DAMAGES RESULTING FROM ANY BREACH OF WARRANTY
OR CONDITION, OR UNDER ANY OTHER LEGAL THEORY, INCLUDING BUT NOT
LIMITED TO LOSS OF USE; LOSS OF REVENUE; LOSS OF ACTUAL OR ANTICIPATED PROFITS (INCLUDING LOSS OF PROFITS ON CONTRACTS); LOSS OF
THE USE OF MONEY; LOSS OF ANTICIPATED SAVINGS; LOSS OF BUSINESS;
LOSS OF OPPORTUNITY; LOSS OF GOODWILL; LOSS OF REPUTATION; OR ANY
INDIRECT OR CONSEQUENTIAL LOSS OR DAMAGE HOWSOEVER CAUSED
INCLUDING THE REPLACEMENT OF EQUIPMENT AND PROPERTY, ANY COSTS
OF RECOVERING, PROGRAMMING, OR REPRODUCING ANY PROGRAM OR
DATA STORED OR USED WITH IQBIO PRODUCTS AND ANY FAILURE TO MAINTAIN THE CONFIDENTIALITY OF DATA STORED ON THE PRODUCT. THE FOREGOING LIMITATION SHALL NOT APPLY TO DEATH OR PERSONAL INJURY
CLAIMS. IQBIO DISCLAIMS ANY REPRESENTATION THAT IT WILL BE ABLE TO
REPAIR ANY PRODUCT UNDER THIS WARRANTY OR MAKE A PRODUCT EXCHANGE WITHOUT RISK TO OR LOSS OF PERSONAL PROPERTY BEING SECURED BY THIS DEVICE.
CONSUMER PROTECTION LAWS
FOR CONSUMERS WHO ARE COVERED BY CONSUMER PROTECTION LAWS OR
REGULATIONS IN THEIR COUNTRY OF PURCHASE OR, IF DIFFERENT, THEIR
COUNTRY OF RESIDENCE, THE BENEFITS CONFERRED BY THIS WARRANTY
ARE IN ADDITION TO ALL RIGHTS AND REMEDIES CONVEYED BY SUCH CONSUMER PROTECTION LAWS AND REGULATIONS. Some countries, states and
provinces do not allow the exclusion or limitation of incidental or consequential damages or exclusions or limitations on the duration of implied warranties or conditions, so
the above limitations or exclusions may not apply to you. This warranty gives you specific legal rights, and you may also have other rights that vary by country, state or province.
This Limited Warranty is governed by and construed under the laws of the United
States of America, State of Washington, County of Island. All Service and Support
questions should be directed in writing to: Intelligent Biometric Solutions Limited, ASG,
PO Box 403, Freeland, WA 98249 USA or by email to [email protected].
27
iQBio™ Guardian XL™
Enrollment Table
ID #
Role
01
Admin
02
Admin
03
User
04
User
05
User
06
User
07
User
08
User
09
User
10
User
11
User
12
User
13
User
14
User
15
User
16
User
17
User
18
User
19
User
20
User
Name
28
iQBio™ Guardian XL™
Enrollment Table - Continued
ID #
Role
21
User
22
User
23
User
24
User
25
User
26
User
27
User
28
User
29
User
30
User
31
User
32
User
33
User
34
User
35
User
36
User
37
User
38
User
39
User
40
User
Name
29
iQBio™ Guardian XL™
Enrollment Table
ID #
Role
41
User
42
User
43
User
44
User
45
User
46
User
47
User
48
User
49
User
50
User
51
User
52
User
53
User
54
User
55
User
56
User
57
User
58
User
59
User
60
User
Name
30
iQBio™ Guardian XL™
Enrollment Table
ID #
Role
61
User
62
User
63
User
64
User
65
User
66
User
67
User
68
User
69
User
70
User
71
User
72
User
73
User
74
User
75
User
76
User
77
User
78
User
79
User
80
User
Name
31
iQBio™ Guardian XL™
Enrollment Table
ID #
Role
81
User
82
User
83
User
84
User
85
User
86
User
87
User
88
User
89
User
90
User
91
User
92
User
93
User
94
User
95
User
96
User
97
User
98
User
99
User
100
User
Name
32
iQBio™ Guardian XL™
Purchase Information
Model Number: ______________________________
Serial Number: ______________________________
Date Purchased:______________________________
Where Purchased:_____________________________
Sales Rep:
______________________________
Phone Number: ______________________________
Email:
______________________________
Address:
______________________________
______________________________
City / State / Zip ______________________________
Country
______________________________
33
iQBio™ Guardian XL™
Features and Specifications
Specifications
Fingerprint Sensor - 500 DPI Optical Sensor
PVD Hardened Sensor – Scratch Resistant
Active Sensor to Awaken Lock
Verification Time <1 Second
False Rejection Rate (FRR) - <0.1%
False Acceptance Rate (FAR) - <0.0001%
PIN Length - 6 to 12 Digits
Power Supply - 4 AA Batteries (Alkaline)
Battery Life Span - 1 Year (4000 Transactions)
Emergency Key Override Feature
Mechanical Deadbolt Feature
Dimensions - 7.560”(h) x 2.835”(w) (192mmx72mm)
Features
No Wake-Up Code Needed
Administrative Function - 2 Administrators
Users - 28 (XL30) or 97 (XL99)
Attractive, Durable Design
Handle can be field installed either right or left
Easy installation with minimal modifications to door
Includes both 2 3/8” and 2 3/4” Cylindrical Locksets
Ability to delete individual users
iQBioLock Guardian XL’s can be set to normally
open (meeting) or normally closed status.
Manual Secure Deadbolt
34
iQBio™ Guardian XL™
Installation Notes
35
Artemis Solutions Group
iQBio™ - Intelligent Biometric Solutions
PO Box 403
1635 East Main Street
Suite A-8
Freeland, WA 98249
Phone 360-331-1071
Fax 360-331-4828
Email [email protected]
iQBio™ and iQBioLock™ are trademarks
of Artemis Solutions Group (ASG).
© 2005 Artemis Solutions Group.
All Rights Reserved.
No duplication or reproduction of this manual is permitted in whole or in part without express written consent of ASG.
36